Speakers
What are Speakers?
In Lineup Ninja, we use the term ‘speaker’ to mean anyone delivering a session. This can includes presenters, chairs, panelists, moderators, keynote speakers, emcees etc.
For an overview of Speakers in Lineup Ninja, we recommend watching the short video below.
Where do my Speakers’ details come from?
Depending on how you configured your content collection, your speakers’ details can come from one of several places
- Invited speaker details via a Speaker Task.
- Call for papers / call for speakers via a Submission Flow.
- Invited speaker details via a Submission Flow.
- The ‘My Profile’ section of the Speaker Portal.
- Added manually by an event manager.
How do I add Speakers to my agenda from Submission Flows?
For any speaker data collected via Submission Flows, you will need to update speaker/session from the Submission Flow portion of LN.
Individually:
- Navigate into the relevant and into list
- Click into the submission you wish to create/update
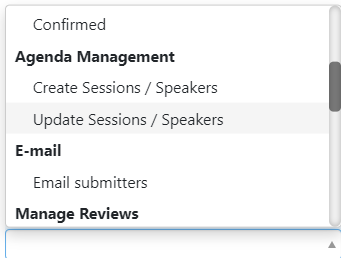
- You will see a blue button labeled ‘Create Session / Speakers’ if the speaker/session has not already been created or ‘Update Session / Speakers’ if it has already been created


In bulk:
- Navigate into the relevant and into list
- Select the submissions you wish to create/update using the tick-box on the left hand side
- Scroll to the ‘Actions’ drop down menu
- Select either ‘Create Session / Speakers’ if the speaker/session has not already been created or ‘Update Session / Speakers’ if it has already been created
Tip
Creating/ updating Speakers/Sessions can be automated within the Submission Flow. This is useful if you do not need to review the submitted details (for example, additional speaker details). For more information, follow this link.
How do I add Speakers to my agenda from the Speaker Portal?
For more information on inviting Speakers via Speaker Portal, please follow this link.
How do I manually add Speakers?
- Navigate into >
- To create a new Speaker, click on the bottom right-hand side of the screen/list
- Enter the Speaker’s first & last name. You can optionally add their email address and company
- If you have configured the Sessions, you can optionally associate the speaker with them
Note
We recommend that you add speakers’ email addresses as you may need to send them automated confirmation emails later.
How do I change a Speaker’s availability?
- Navigate into >
- Click into the Speaker you wish to edit
- Scroll to ‘Speaker’s Timeline’ where you will see a blue stripe that represents the availability of the Speaker
- You can adjust the availability of the Speaker by using to drag the ends of the blue stripe up and down
- If you have asked an availability question on a Submission Flow, the blue stripe will vary depending on the answer
Here you can also see all sessions that the Speaker is taking part in
How do I ensure that a Speaker doesn’t get scheduled in two places at once?
Lineup Ninja takes care of this for you!
Can I change what details I see in the list view for Speakers?
Yes! Click in the top right-hand corner of the list view.
How do I keep notes for internal use about a Speaker?
- Navigate into >
- Click on the Speaker’s name
- In the Speaker Details view there is a ‘Notes’ field
How do I copy Speakers?
For more information about copying Speakers, follow this link.
How can I print or save a PDF of an individual Speaker’s timetable/schedule?
For more information about saving a PDF/ printing a Speaker’s individual timetable/schedule, please follow this link.
Next - Speaker Roles
Still can’t find what you’re looking for? Email support@lineupninja.com and one of the team will get back to you as soon as possible.