Speaker Confirmation
Info
Speaker Confirmation can not currently be used in the same event as Sub Sessions.
If you require to use both features in the same event please contact support.
You can use Speaker Confirmation to tell your speakers where and when their sessions will happen, and ask them to confirm that they’ve seen this notification.
What is Speaker Confirmation?
Speaker Confirmation is Lineup Ninja’s tool that ensures your speakers know where and when their session is scheduled, and lets you know that they know!
At a high level the process is straightforward:
- Once a speaker’s session has been scheduled, you can send them an email with:
- Their session title, time and location.
- A link to a simple form
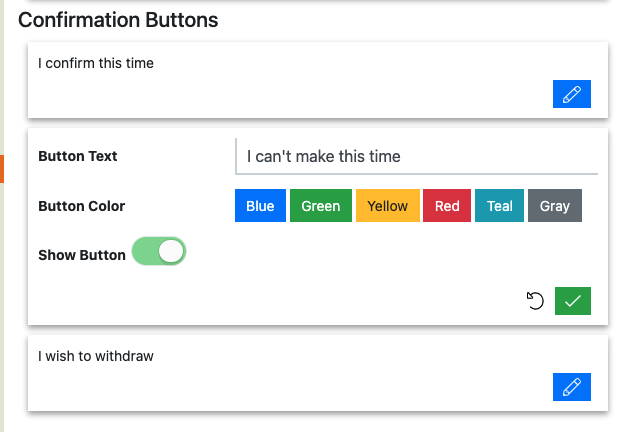
- By default, the form has three buttons for speakers to choose from:
- Accept / acknowledge the session time.
- Request a different time
- Withdraw from the event
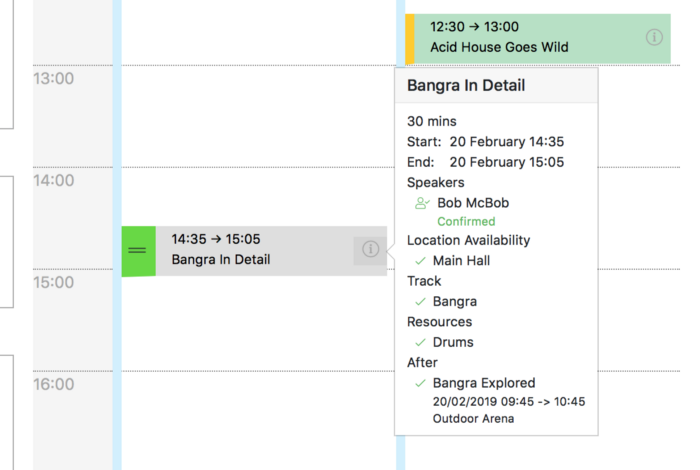
- The status of speakers’ confirmations are shown on the Agenda Planning Board:
- Each session starts off amber, before you request confirmation from speakers
- While you’re waiting for speakers to confirm, the session will stay amber
- Once all the speakers for a given session have confirmed, the session will turn green.
Tip
You can manually change speakers’ confirmation status yourself.
For example, if you discuss the time with the speaker verbally, you can set that speaker’s confirmation status to ‘Confirmed’ without needing to send them an email etc.
How do I get started with Speaker Confirmation?
Speaker Confirmation is an optional feature. To enable it:
- Navigate to > >
- Click the blue ‘Add Speaker Confirmation’ button

Tip
You can experiment with the feature and if you decide it’s not for your event you can disable it again.
Once you have added Speaker Confirmation, you’ll see a preview of a web page with three buttons on it. This is the page that speakers see when they click the link in the ‘Confirmation Requested’ email:

The speaker is presented with 3 options. They can confirm the current time, ask for a new time or withdraw entirely. You can disable these buttons if you wish (eg. you might not want to allow your speakers the option of requesting a new time!)
Finally, configure the Email Templates that will be sent to the Speaker when you ask them to confirm. You will be able to amend these when actually sending the confirmation email if you need to add anything specific to a session.
Tip
When the speaker confirms their time, they will be sent a Calendar Appointment for their diary. You can configure the text in the appointment to suit your event.
How do I ask Speakers to confirm?
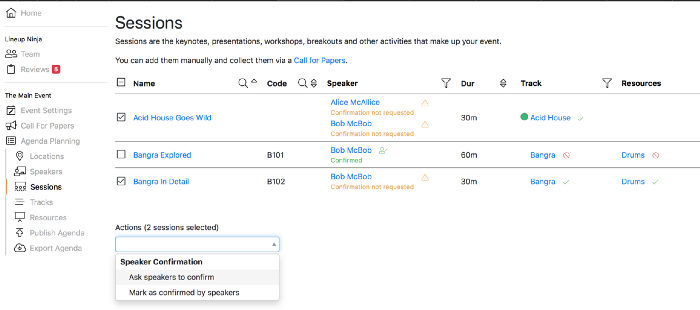
You can Request Confirmation from the Sessions List or the Speakers List:
- Select the sessions or speakers that you wish to Request Confirmation for
- Scroll down to the bottom of the Session or Speaker list table.
- Open the Actions drop-down menu.
- Choose ‘Request Confirmation’
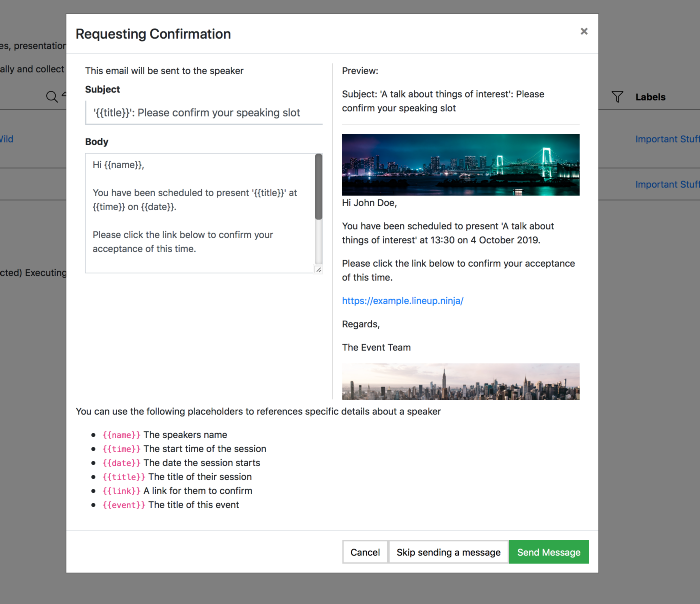
- This will pull up the ‘Request Confirmation’ email template, which you can edit before sending if you wish.
Info
Requesting confirmation from the Sessions list will ask all Speakers associated with the selected Session(s) to confirm.
Requesting confirmation from the Speakers list will ask the selected Speakers to confirm all of the Sessions that they are associated with.
How do I ask all the Speakers in a given Session to confirm?
- Navigate to >
- Select the Speakers/Sessions you wish to confirm using the tick box on the left-hand side
- Scroll to the ‘Actions’ drop down and select ‘Request Confirmation’
- You will then see a pop-up giving you the opportunity to tweak the wording of the email before you send it
Info
If any speakers associated with the session don’t have email addresses (so can’t be sent a confirmation request), the system will warn you and ask you to add email addresses for them.
How do I ask a given Speaker(s) to confirm all of their sessions?
- Navigate to >
- Select the Speakers you wish to confirm using the tick box on the left-hand side
- Scroll to the ‘Actions’ drop down and select ‘Request Confirmation’
- You will then see a pop-up giving you the opportunity to tweak the wording of the email before you send it
Info
If you Request Confirmation from the Speaker List, and a speaker has more than one session, they will receive a separate Confirmation Request email for each of their sessions.
How do I track the status of the confirmations?
When you enable Speaker Confirmation a new ‘amber’ status will appear on the Agenda Planner Calendar. This means that the Speaker Confirmation has either not been sent, or it is awaiting the speaker to respond. For example, when you first enable the feature you will see this:
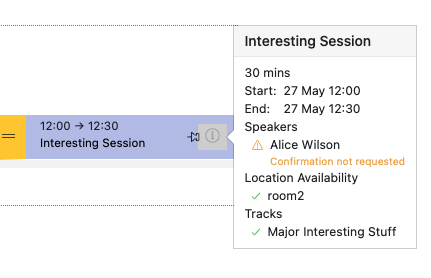
As speakers respond to your email you will see the Agenda update. The status will then update to either green or red as Speakers confirm. For example:
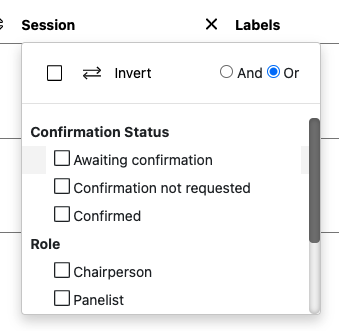
You can also filter the list of Sessions and Speakers by clicking on . Use the ‘speakers’ filter on the list of sessions, and the ‘sessions’ filter when looking at the list of speakers. For example:
How do I nudge my speakers to confirm?
Inevitably, some speakers will not action your request to confirm their session times immediately, and you will want to nudge them to remind them to do it.
To do this, set up one or more scheduled reminder emails that will be sent to all speakers who are still in the “Confirmation Requested” stage for one or more of their sessions.
Note
This is the same approach as creating deadline reminders for Submission Flows and Speaker and Session Tasks.
Here’s how:
-
Navigate to the Speaker Confirmation configuration page:
Agenda Planning / Speakers / Confirmation -
Choose the Confirmation Requested tab near the top of the page.
-
Scroll to the bottom of this page to the Emails section:

-
Click the blue ‘Add Email’ button. This will bring up a window where you can choose the type of email to create. Choose ‘Scheduled’

-
You will now see the Email Template Editor. This allows you to compose and save your email template.

-
Schedule the time to send your reminder email.

Tip
If you want to send your reminder email immediately, you can choose a time in the past.
Tip
You might want to add several of these reminder emails, and schedule them with increasing frequency, and increasingly urgent messages as your event approaches.
Because the emails are associated with the Confirmation Requested stage, they will only be sent to speakers who have not yet confirmed all of their sessions. i.e. they won’t be sent to speakers whose sessions are in the Confirmed stage.
How do I choose which roles require confirmation?
By default all Speaker Roles require confirmation. If you have roles that will not be presenting, for example ‘Co-Authors’ or ‘Mentor’ you can configure the role to not require confirmation. See the Roles Documentation for more info.
Still can’t find what you’re looking for? Email support@lineupninja.com and one of the team will get back to you as soon as possible.