Submission Stages
Submission Stages were added to Lineup Ninja in October 2021.
If you see in the menu for your Submission Flow then you can use this feature.
What are Submission Stages?
Submissions stages you give you the tools to modify the flow your submission will take as it progresses through your event.
For example a submission may start life as a Draft, then be Submitted. At which point you might choose to Accept it, or request it to be Reworked, or Waitlist it for the future. Each of these bolded words is a Stage.
We provide some default flows that we know our customers find useful. Starting from there you can, if you wish, make changes from small language tweaks, to creating an entirely custom workflow.
If this sounds intimidating, then don’t worry, you can also just ignore it! Our default workflows are suitable for most events, but we know a lot of events like to do something a little different and this is where Submission Stages are useful.
If you would like assistance with using Submission Stages then please reach out to support and we will work with you to understand your process and work with you to find the best configuration for your event.
How do I get started with Submission Stages?
When you create a new Submission Flow you will see this dialog. You are presented with 3 choices for your initial workflow.
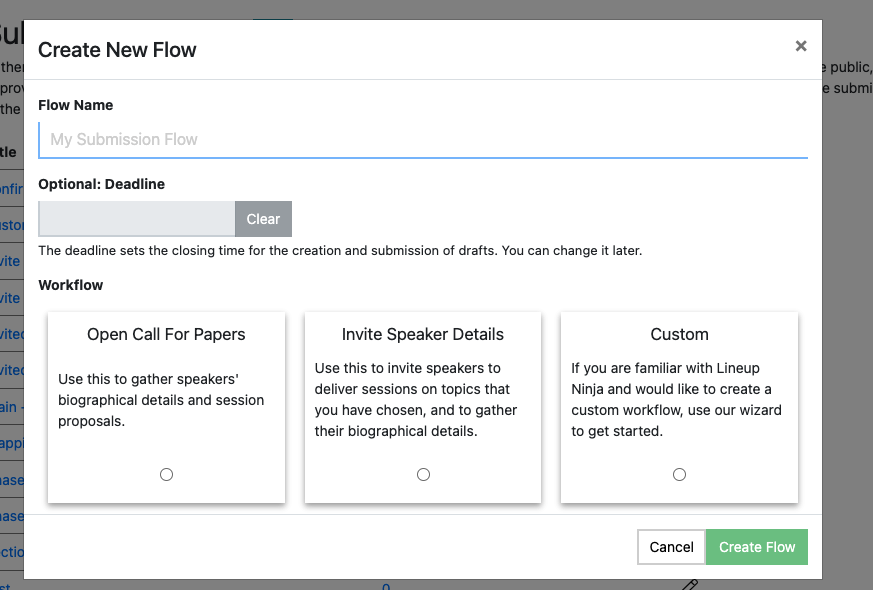
Open Call For Papers
Select this if you are running an open Call For Papers, also known as Call For Speakers, or Abstract Submission.
It will generate the following Stages:
- Draft - New submissions will be created here until the submitter submits them.
- Rework Requested - You can use this stage to request a submitter improves their submission.
- Submitted - Once a submitter completes their submission it will move to this stage.
- Waitlisted - Use this stage to Waitlist submissions.
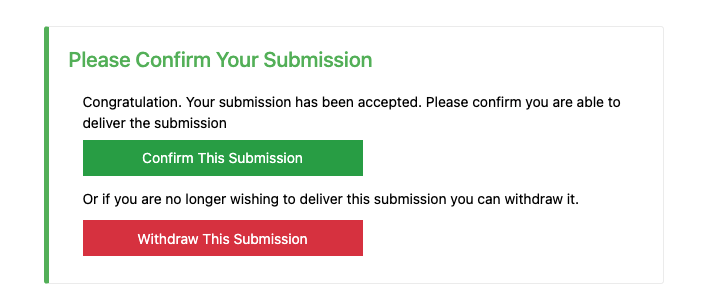
- Accepted - If you accept a submission it will move to this stage. The submitter will then be asked to confirm they will deliver the session.
- Declined - If you turn down a submission it will move to this stage.
- Withdrawn - If a submitter withdraws a submission it will move here.
- Confirmed - When a submitter confirms their accepted submission it will move here.
Invite Speaker Details
Select this if you are inviting speakers to your event and need them to provide their biographical details. This is a simpler flow than the ‘Open Call For Papers’ options and, by default, will only allow speakers you have invited to provide their details.
It will generate the following Stages:
- Invited - When you send an invite the submission will appear here.
- Rework Requested - You can use this stage to request a speaker improves their submission.
- Submitted - Once a speaker completes their submission it will move to this stage.
- Accepted - If you accept the speakers details it will move to this stage.
- Declined - If you turn down a speaker it will move to this stage.
- Withdrawn - If a speaker withdraws themselves the submission will move here.
Custom
If you choose ‘Custom’ you will be presented with a wizard which will ask you a series of questions to help understand your workflow. It will then create Stages based on your answers.
The wizard changes based on our customer needs so the individual options are not documented here, just give it a go, each question should be clear, it not just ask!
Can I rename a Stage?
Of course! Browse to the then the tab for the stage you want to edit.
To change the name of the stage edit the ‘Name’ field. By default the name will be shown to the submitter but if you would like to show a different name to the submitter then you can also set the ‘Name Shown To Submitter’ field in the ‘Submitter Experience’ on the same page.
This can be useful if you have an stage called “Only if desperate” but would rather show “Waitlisted” to the submitter :-)
How do I reorder Stages and does the ordering matter?
To reorder a stage, click on then the tab for the stage you want to move. You will see two arrows appear:
Just click the arrows to move the stage left and right.
The ordering does not affect anything, it is purely visual, feel free to adjust them to whatever makes sense for your event.
How do I set deadlines for Stages?
Each stage can have its own deadline. You can set this when looking at the configuration for a stage, or on the page. See How To Set Deadlines for instructions.
How do I add a new Stage?
To add a new Stage browse to the and click the blue plus button next to ‘Stages’.
You will be asked to give the name and an optional deadline for the new Stage.
You have the option to copy an existing Stage or start from scratch. We recommend you copy a stage that serves a similar purpose to the one you are creating. This will give you more of a starting point for configuring the new stage.
What does the submitter see?
There are two parts to the submitters experience.
- What the submitter sees when they look at the list of submissions they have sent in for event.
- What the submitter sees when they look at an individual submission.
You can customize both of these to suit your needs. To do so browse to the and select the tab for the Stage you want to edit.
What does the submitter see when looking at the list of submissions?
The overall branding and design for the list of submissions is configured in , how each submission appears in that list changes depending on the Stage the submission is in. This is configured by browsing to and selecting the tab for the Stage you want to edit.
You can choose what the submitter will see for the name of the Stage. By default this is the name of the stage, but you can override it by setting ‘Name shown to submitter’
As you will have seen on the page, the submissions list is split into 3 sections. The first shows the submissions that the submitter needs to interact with, perhaps to complete a draft or rework a submission. These are sorted first to draw the submitters attention to them. The next section shows submissions that are currently with the event team and do not require input from the Submitter.
To choose which section the submission appears in set the ‘Does submitter need to take action?’ field to either ‘Yes’ or ‘No’ as appropriate.
You can also set the text and color of the button the submitter will see. For example you might want it to say ‘Continue Submission’, or ‘Complete Rework’, or ‘Upload Slides’ or whatever is suitable for your event.
What does the submitter see when looking at an individual submission?
A key component of Submission Stages is the ability to change what a submitter sees depending on the current Stage for their submission. You can show a mixture of text and buttons. For example you might want to show different buttons for a submitter to offer a Workshop, or a Talk, and then do something different depending on which button they press.
To configure their view scroll down to the ‘View of a Submission’ section and you will see a fake browser that shows a preview of what they will see.
They grey bit in the middle represents the form you have designed on the Form Designer
To add things to the page you start by clicking ‘Add Group’. This will add a simple group with a single button to the page. Move your mouse over the group and you will see some buttons appear like this:

You can
- Move the group up and down the page with the up and down arrows.
- Delete the group by clicking the trash can, you will then see a red ‘confirm’ trash can, click that to confirm the deletion of the group.
- Add new items to the group by clicking the blue plus. You can then choose if you want to add some text or another button to the group.
- Edit how the group is displayed by clicking the blue pencil.
When you edit a group you can choose between a ‘Plain’ or ‘Featured’ group, and if you want the group content to be arranged on a row or in a column.
If you choose a ‘Featured’ group you can set a color to highlight the group. For example here is a ‘Featured’ group set to ‘Column’ layout containing both text and button items.
To edit buttons and text hover over them and you will see similar options.

- Move the text or button up and down or left and right the page with the arrows.
- Delete the text or button by clicking the trash can, you will then see a red ‘confirm’ trash can, click that to confirm the deletion.
- Edit the text or button by clicking the blue pencil.
Editing the text is straightforward. You can either use a formatted editor, or if you prefer you can use Markdown formatting.
Editing a button lets you configure both what the button looks like, and what it will do when pressed. You can add these actions to be performed when a button is pressed.
- Add Labels to the Submission - This can be useful if you want to automatically label submissions based on a submitters choice. For example you might want to add a ‘Workshop’ label or ‘Needs Attention’ or anything you need to help you sort your submissions.
- Remove Labels from the Submission - Does the opposite of ‘Add Labels to the Submission’!
- Move Submission To State - This saves the form and moves the submission to a new state. This triggers any emails and any automation you have configured (see below for more on that).
- Save and Exit - Saves the form and returns the submitter to their list of submissions
- Exit without Saving - Returns the submitter to their list of submissions without saving the form
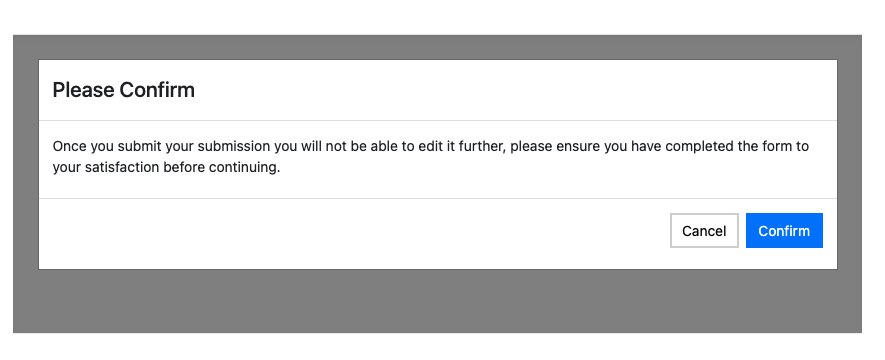
- Show Popup - Shows a Popup, this can be useful to ask the user to confirm before submitting or withdrawing their submission.
What is a Popup?
A Popup is a dialog box that displays over the submission. You can use this to ask the user to confirm their action before performing it. To create a Popup click ‘Add Popup’. They are configured in the same way as the Groups on the page, move your mouse over the Popup to see the buttons to add content. The main difference with the content on a Popup is the buttons appear at the bottom, and the text in the middle.
For example here’s a confirmation Popup:
How do I configure emails for a stage?
You can configure emails to be sent when a submission moves into a stage, or scheduled to be sent at a specific time.
Emails that are sent when a submission moves into a stage are called ‘Triggered Emails’. Emails that are scheduled to be sent are called ‘Scheduled Emails’.
For each email you configure you can send it to
- The submitter
- All members of your team - More configuration on here soon!
- Specific email addresses
You can add multiple emails, sending different ones to different people. For example the default ‘Submitted’ stage send an acknowledgement to the submitter, and a notification to the event team:

You can add a scheduled email to automatically nudge Draft submissions to complete their submission. You can add multiple scheduled emails to say, notify submitters with one week to go, and then again when there is one day remaining.
What is Automation?
In the Automation section you can configure actions to happen automatically when a submission moves into or leaves a stage.
The actions occur regardless of who initiates the move, either the submitter or the event manager.
This is used for two things:
How do I manage the content on the form?
When a submission enters or leaves a stage you can:
- Add and hide Form sections from the users view.
- Lock and unlock answers the user has given.
You can use this to progressively add more content to the form as the submitter progresses through your process.
The default ‘Call For Papers’ flow adds all questions in the Draft Stage. It then locks all answers when the submission moves into the Submitted Stage. If you move the submission to Rework Requested the Stage has Automation to unlock all answers. They are then locked again when the submission moves back into the Submitted Stage.
How do I add labels automatically?
You can also add and remove labels from a submission when it moves into and out of Stages.
For example you might want to add a ‘Needs Rework Review’ label to a submission when it moves out of the ‘Rework Requested’ Stage. You can then filter your Submitted submissions to see which have been reworked.
If you do want to separate out Submitted from Reworked submissions more clearly you can create a new ‘Reworked’ Stage by copying the ‘Submitted’ Stage and changing the ‘Confirm’ button on the ‘Rework Requested’ stage to move the submission to the new ‘Reworked’ Stage.
How do I add content to the agenda automatically?
As a submission moves between your stages there may be a stage were you would like to create or update the content on the agenda automatically.
To do this add a ‘Create / Update Agenda Items’ automation. You can then choose whether to update Speakers and Sessions, just Speakers, or just Sessions.
If you are creating content in multiple events you can also choose which event the content should be added to. If you need to add content to multiple events then create multiple ‘Create / Update Agenda Items’ actions.
Note that it can take around 15 seconds for the updated content to appear.
How do I know about problems with submissions on the agenda?
As you manage your submissions you create Sessions. Sometimes a submitter may withdraw their session proposal. Obviously you need to know about this!
For each Stage you can flag the status on the agenda. For example for submissions in ‘Withdrawn’ stage you can have the agenda show a red highlight indicating an error.
You can also choose whether the speakers a submitter has added should appear on the agenda or not. Similarly for a ‘Withdrawn’ submission you want the speaker to be removed but for an ‘Accepted’ submission you want the speakers to be added.
How do I delete a Stage?
To delete a stage scroll to the bottom of the page. There are a few pre-requisites to deleting a stage, these will be shown to you. Once you have addresses the issues click the ‘Delete Stage’ button to delete the stage.