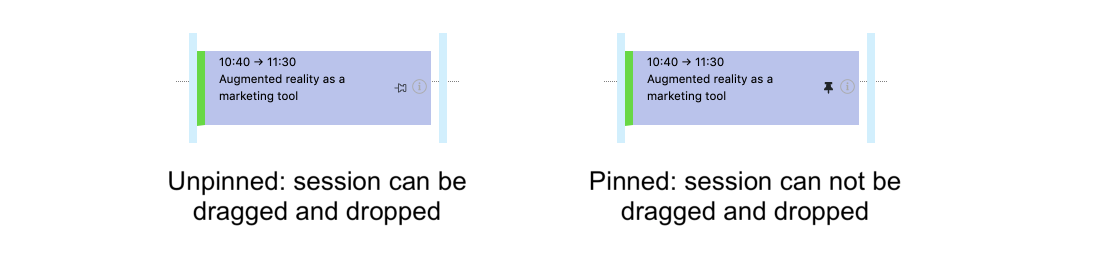
If you’re new to Lineup Ninja, we recommend watching this 2-minute Orientation and Core Concepts video.
If you’re more experienced using Lineup Ninja, please use either the menu or search bar on the left to get started.
Key Terms
Submission Flows - Submission Flows are used to collect content from your speakers and submitters. These can be used to run an open Call for Papers with reviews, gather Speaker Details, run awards entry and judging process and to gather in files. Submission Flows are also known as Call for Papers, Call for Speakers, Abstract Submission, Abstract Management, Artist Submissions, Entry Submission, Nomination Management, and many other names!
Submissions - Submissions are the individual applications you receive from your Submission Flow process. These are also known as presentations, proposals, abstracts, entries.
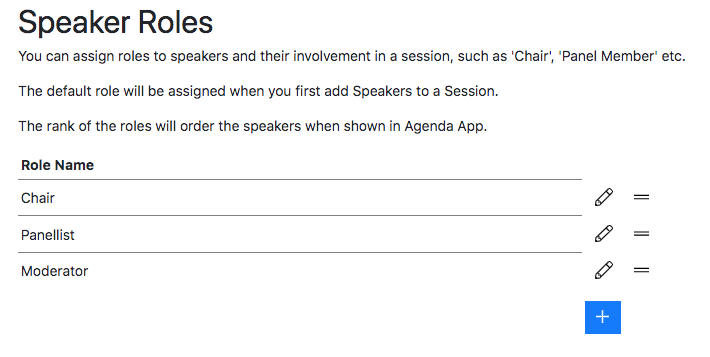
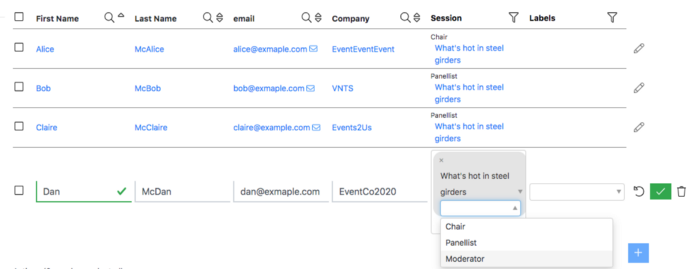
Speakers - In Lineup Ninja, the person(s) presenting the session is called a Speaker. A Speaker can be know as a presenter, lecturer, moderator, panellist, author, co-author, presenter and host.
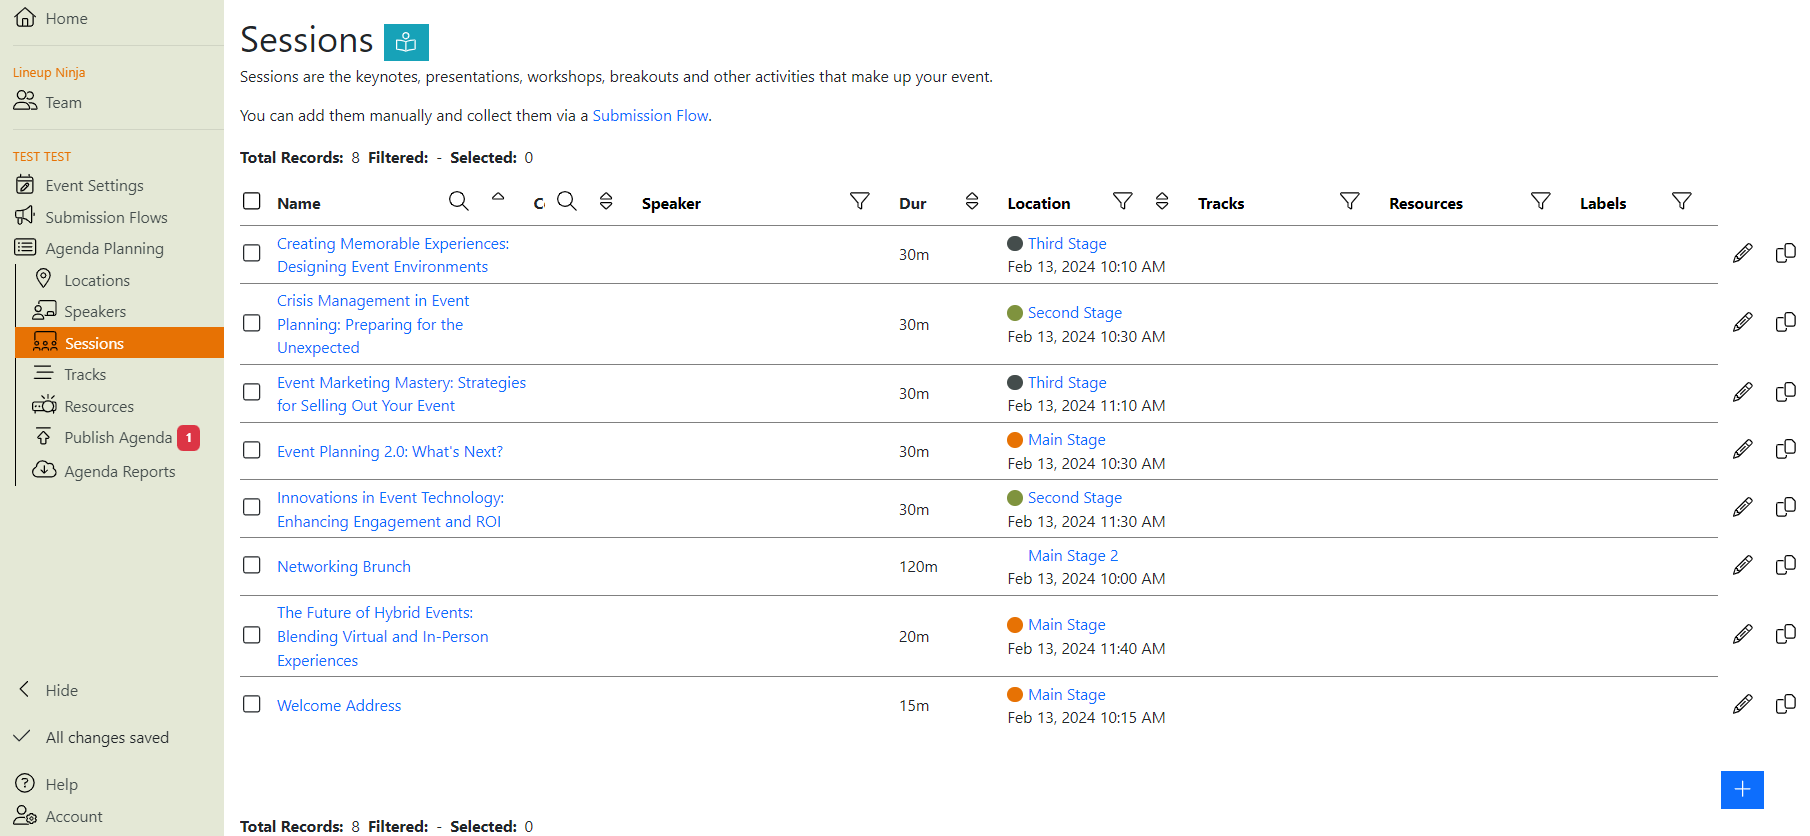
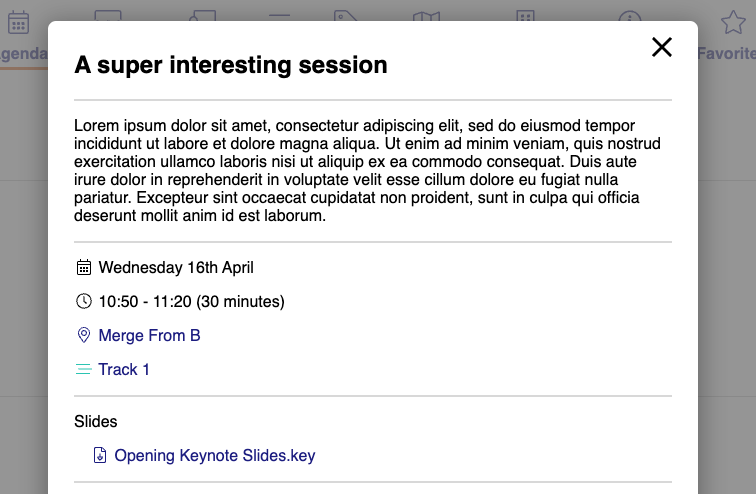
Sessions - Sessions are the individual talks that happen in your Conference. In your event, you may have a container session that host multiple presentations. Sessions may also be more information gatherings such as a Welcome Brunch or Networking Lunch. Sessions are also known as talks, presentations, lecture, meetings, or forums.
Review - In Lineup Ninja, a Review is a way of gathering feedback on submissions and is conducted by Reviewers. Your Reviewers may be committee members, subject matter experts, or other members of your team.
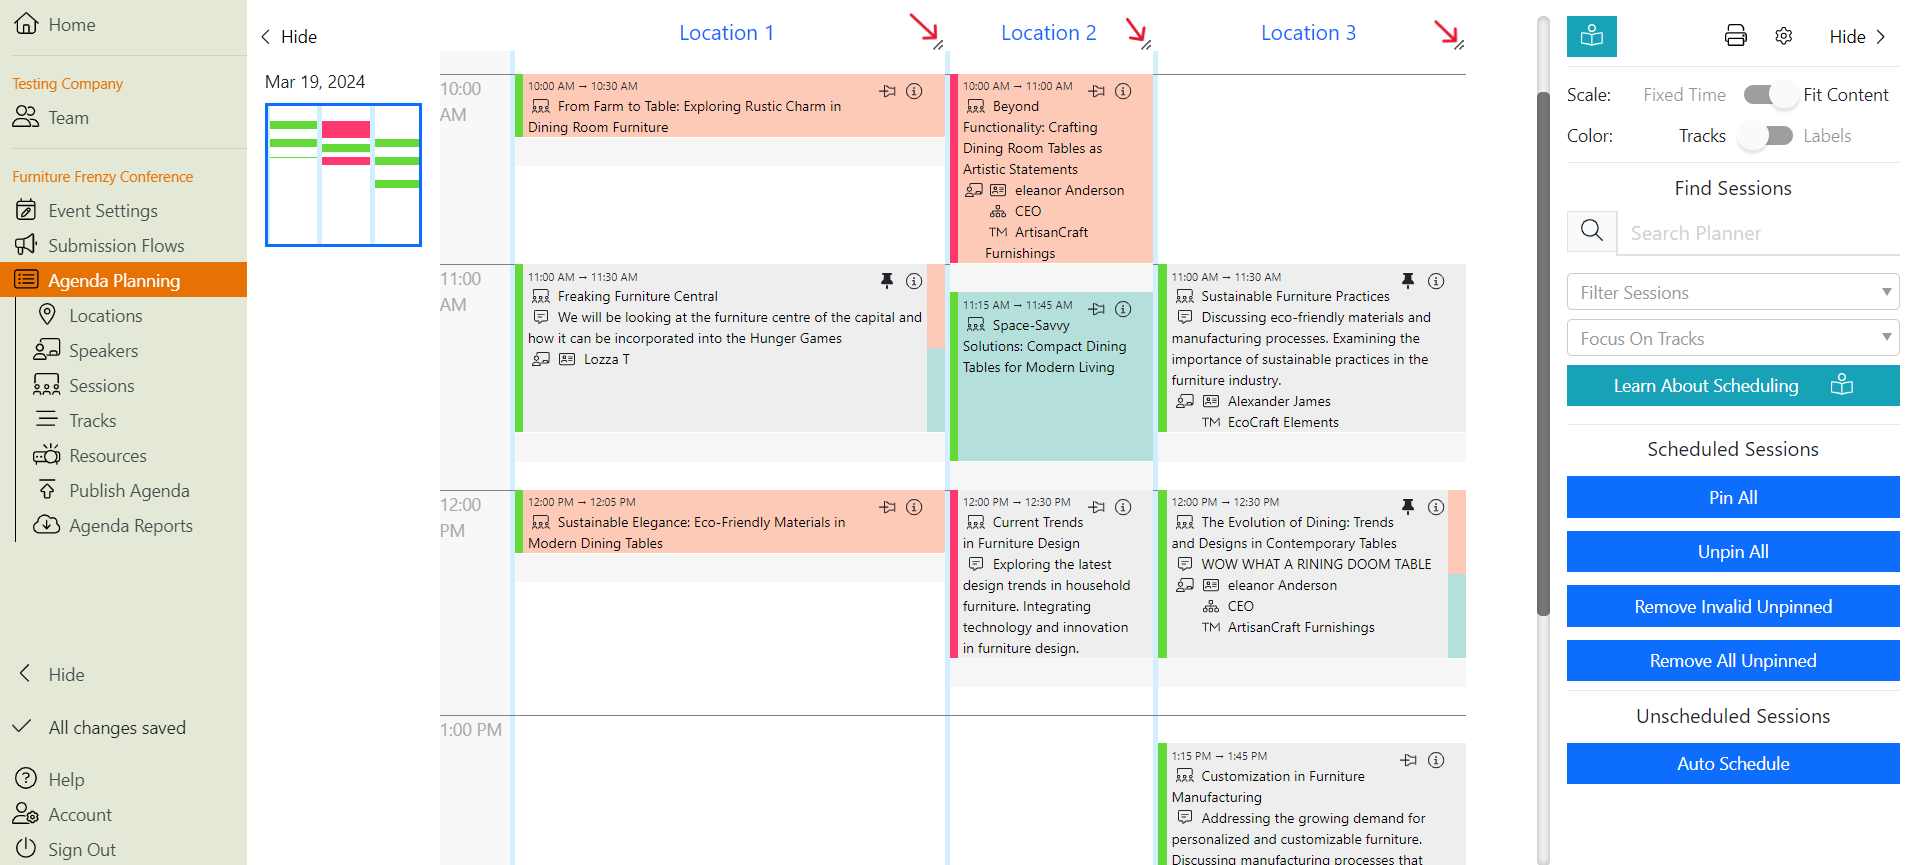
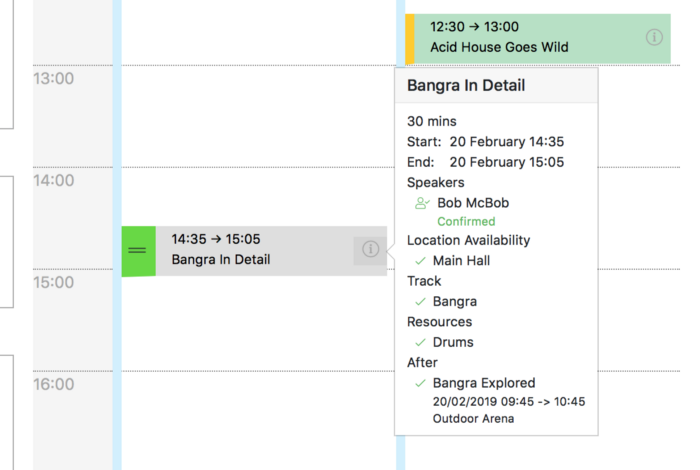
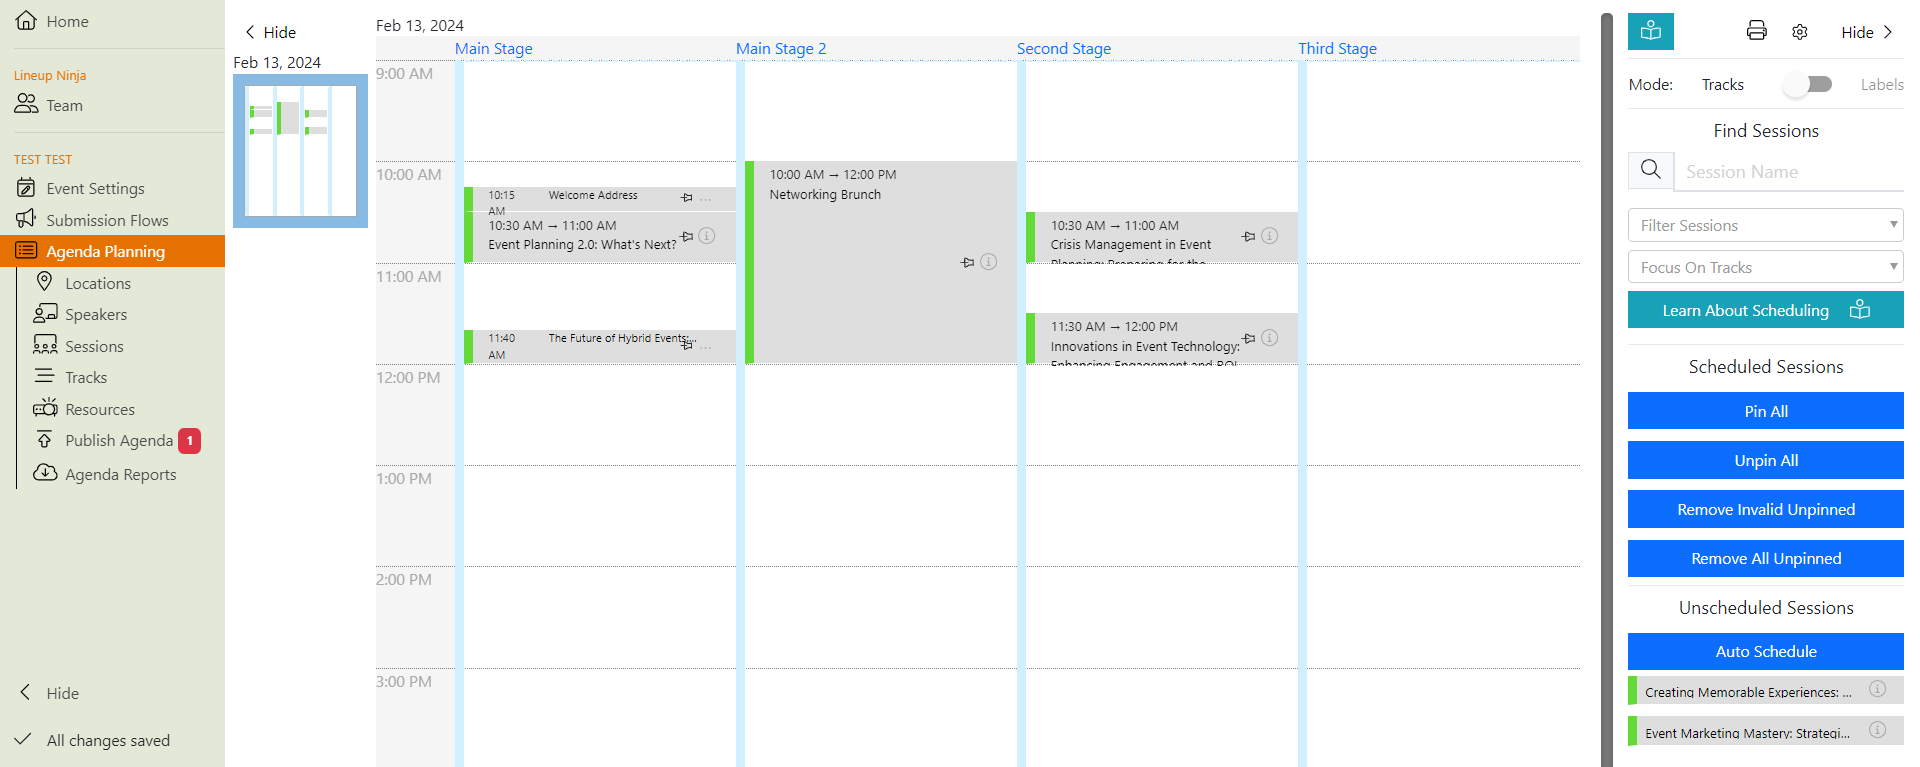
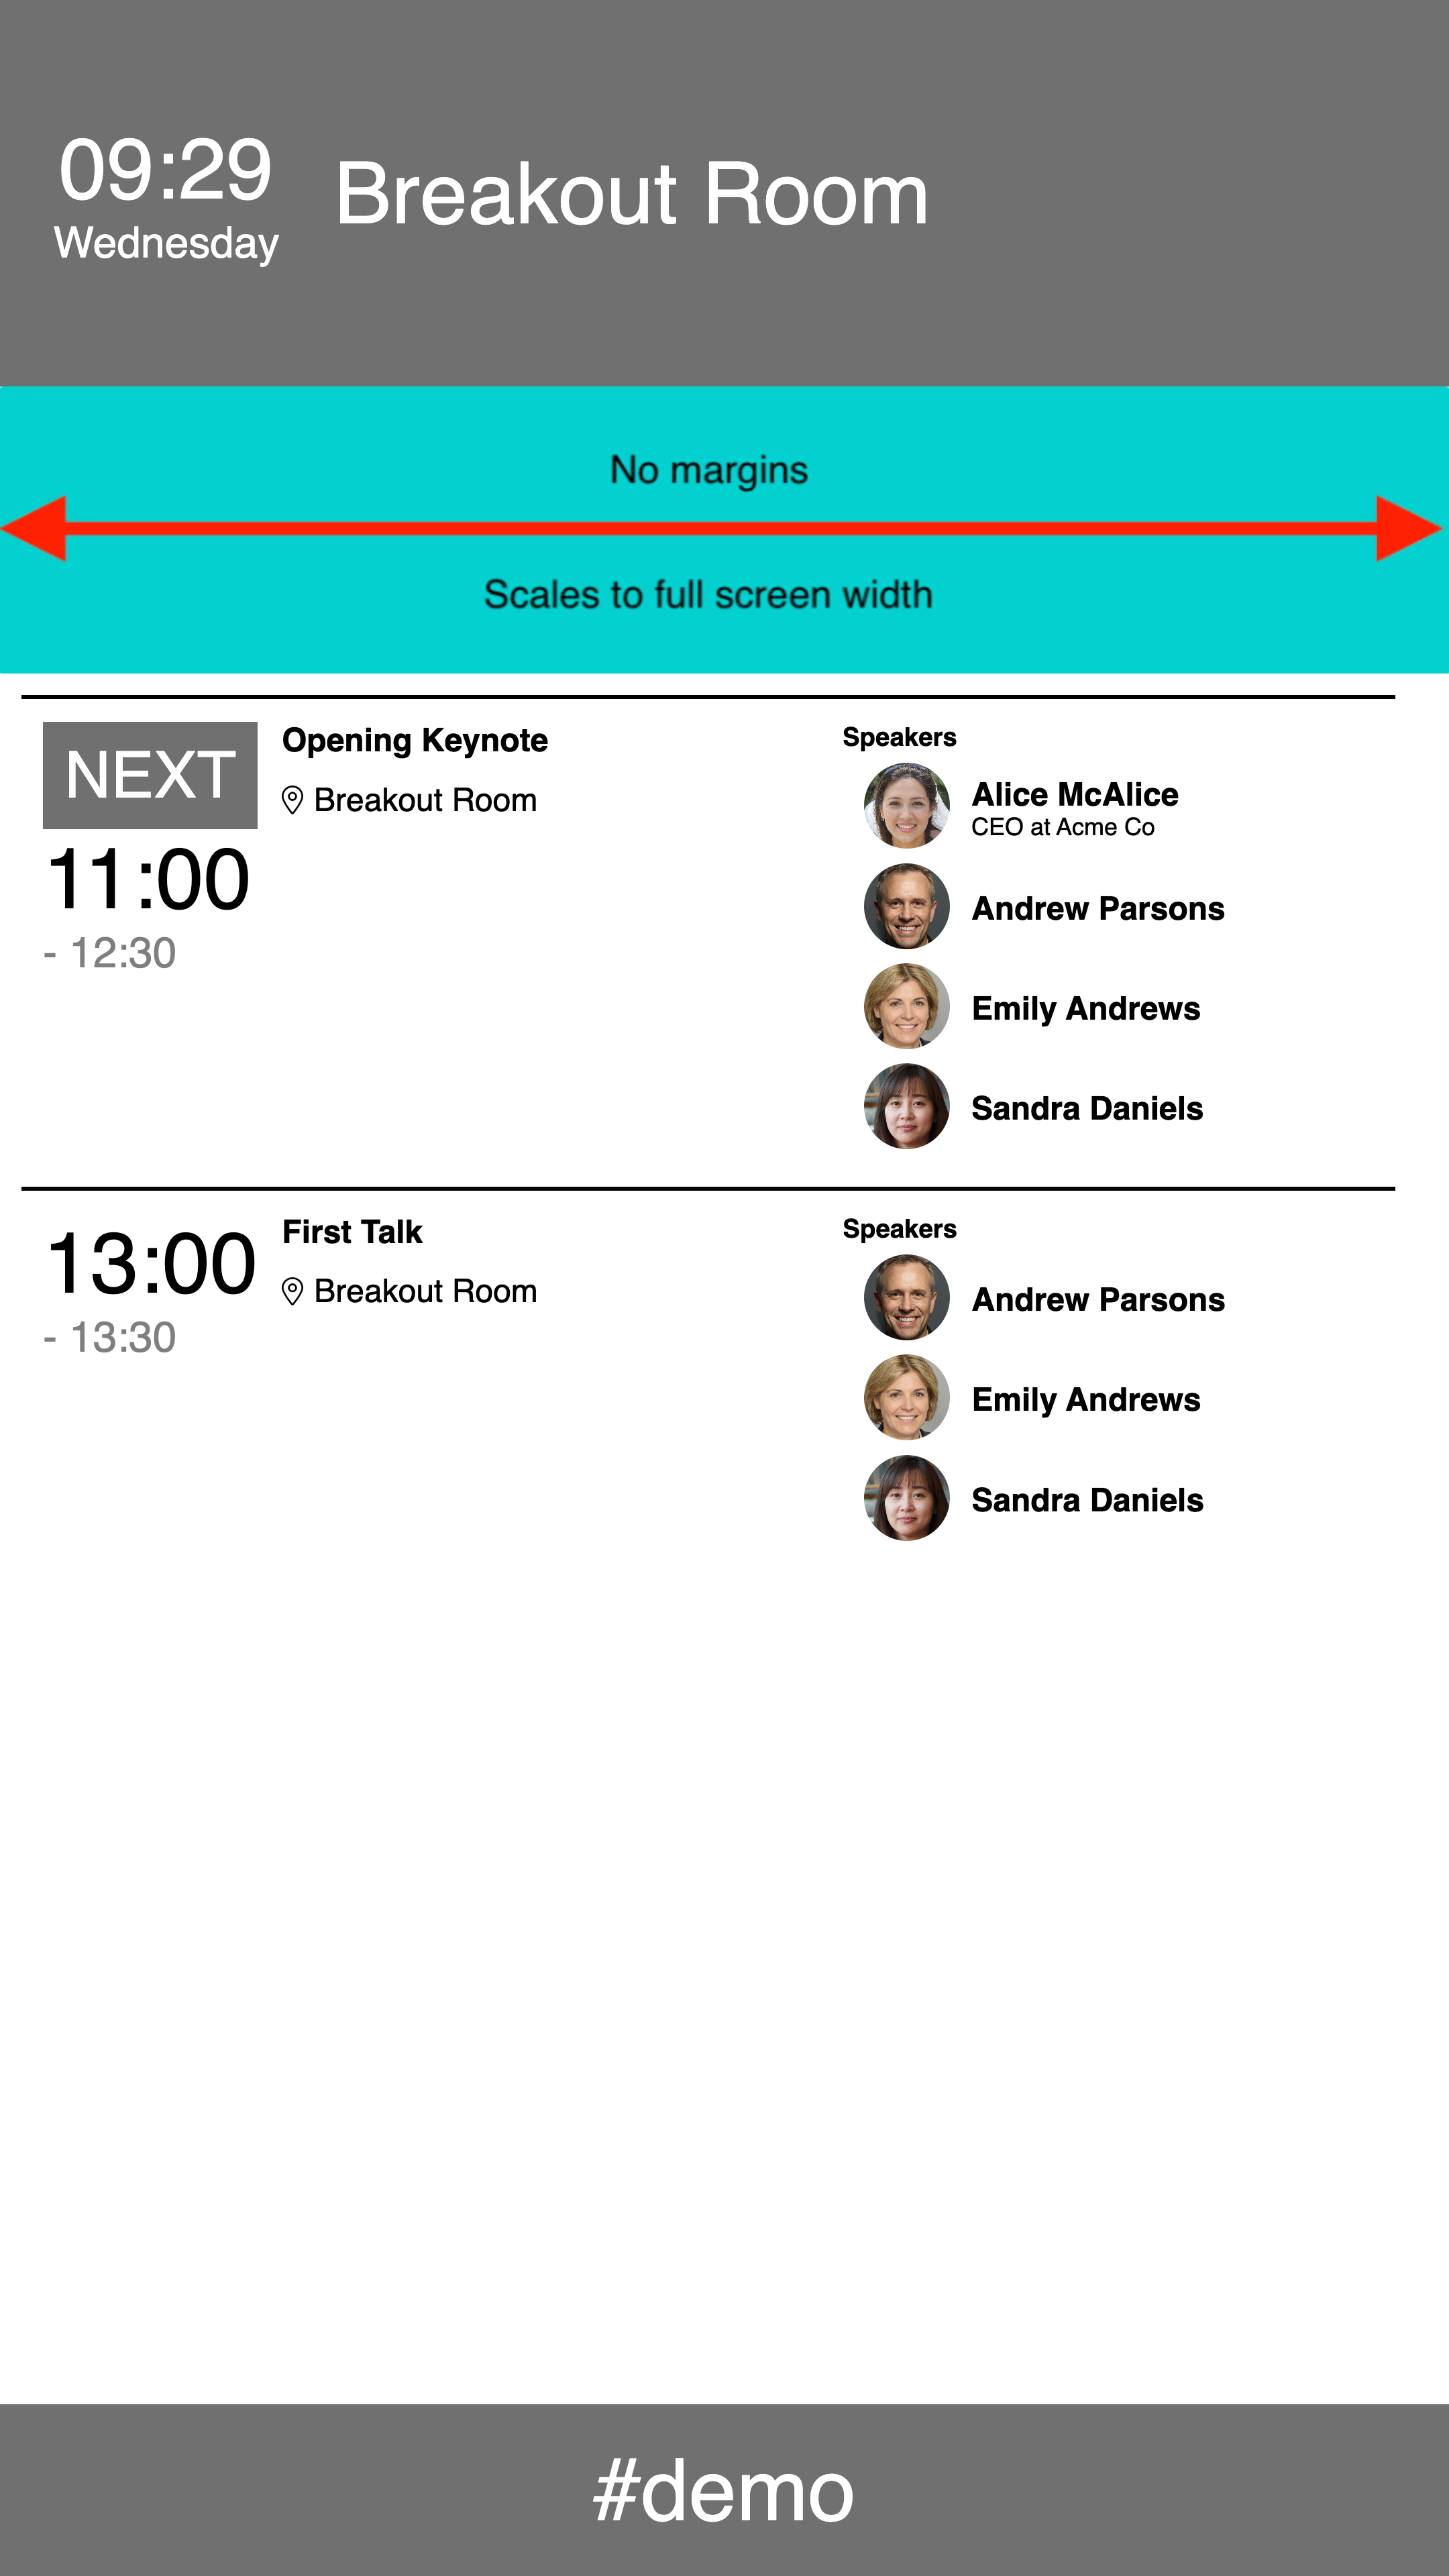
Agenda Planning - Your Agenda Planner is where you will schedule your sessions in a calendar-style board for each day. Within Agenda Planning, you will also set your locations, tracks, breaks and gaps between sessions. Think of this like a user-friendly, visually pleasing Excel Spreadsheet, that can be moved around and adjusted with ease!
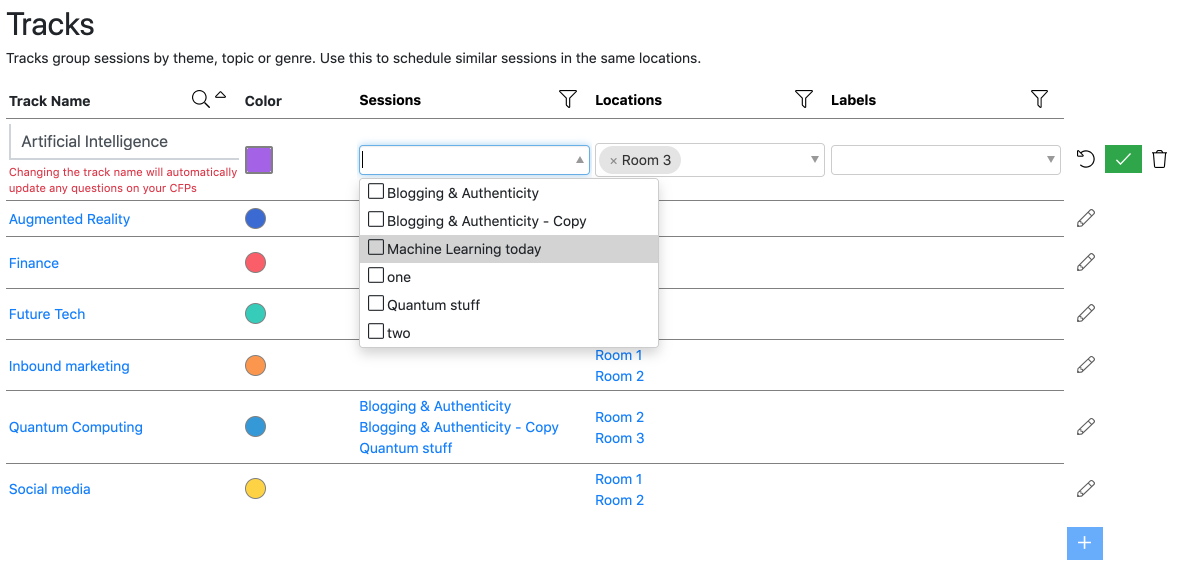
Tracks - In Lineup Ninja, Tracks are a way of grouping sessions together. This may be grouped into themes, subject or topic, depending on how you organise your event.
Locations - Locations are commonly referred to as theatres, rooms, conference halls, forums, area or lecture hall.
Lineup Ninja Icon Key
Still can’t find what you’re looking for? Submit your question here or contact us and one of the team will get back to you as soon as possible.
Subsections of Lineup Ninja Documentation
Account
Your Account is your key to accessing Lineup Ninja. Here you can learn how to create and manage your account.
Info
Your user account can be a member of multiple teams.
Still can’t find what you’re looking for? Email support@lineupninja.com and one of the team will get back to you as soon as possible.
Manage Account
How do I manage my account?
To manage your account, log in as normal and click the ‘Account’ button in the bottom left-hand menu.
Here, you can edit your name, change your password and manage several other account features.
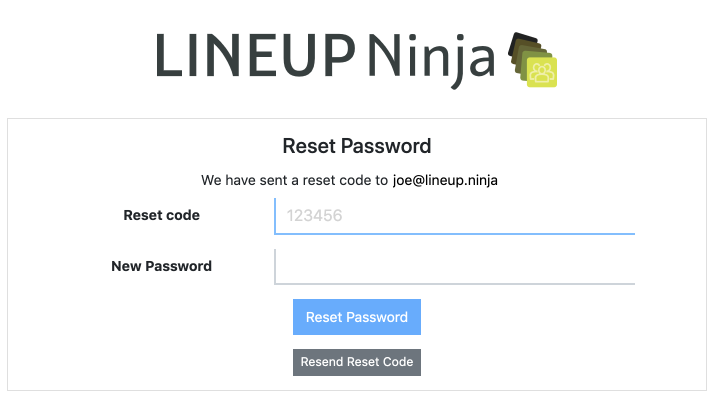
How do I reset my password?
You can reset your password at the login screen. Enter your email address and at the password prompt, click on ‘Forgot Password’
You will be sent an email with a temporary passcode that is valid for an hour. The screen will change to ask for your temporary passcode and to enter a new password.
Tip
Didn’t receive your email reset password? Check your junk email folder.
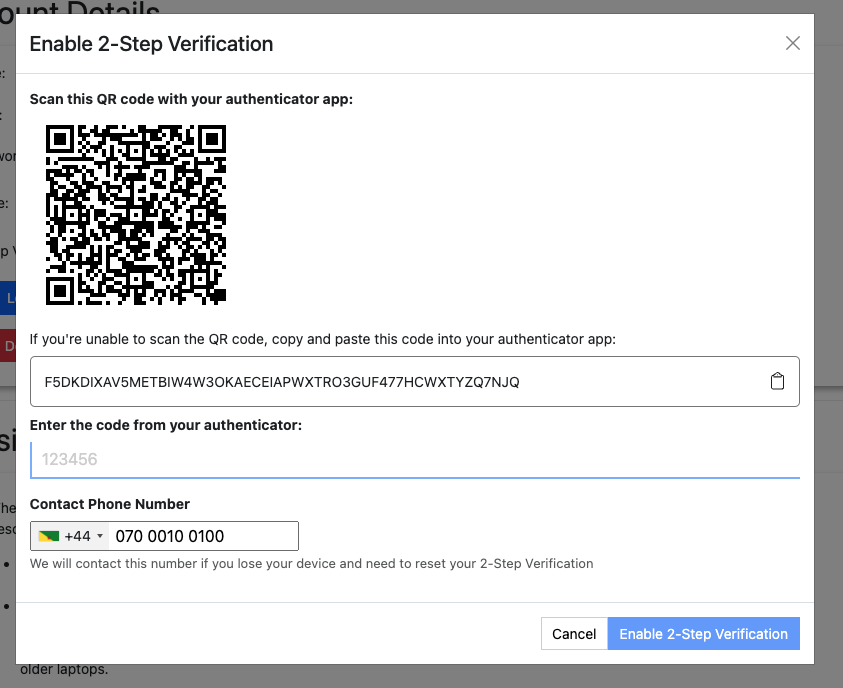
How do I enable 2-Step Verification for my account?
To improve the security of your account you can enable 2-Step Verification. When enabled you will be required to provide a code from an authenticator device when logging in. You can use Google Authenticator or any similar app as your authentication device.
To enable 2-Step Verification log in as normal and click the ‘Account’ button in the bottom left-hand menu.
Then click the ‘Enable 2-Step Verification’ button, you will then see a screen like this:
Scan the QR code with your authentication device and then input the code shown. Your phone number is also required so that we can contact you to verify your identity should you lose your authentication device. We will not use your phone number for any other purpose.
How do I disable 2-Step Verification for my account?
If you need to remove 2-Step Verification from your account, for example to change authentication device, you can do this by navigating to the ‘Account’ page and clicking ‘Disable 2-Step Verification’.
Please note that if you are a member of a team that requires 2-Step Verification you will lose access to that team until your re-enable 2-Step Verification. You will be warned if this is the case.
I’ve lost my authenticator device, how do I access my account?
If you have lost your authenticator you can request for 2-Step Verification to be removed from your account. To do this perform the following steps
Go to the login page as normal
Enter your email address and submit
Entry your password and submit
On the ‘2-Step Verification’ click ‘Lost your authenticator?’
Then we will either
Call you automatically with a code that you can input into the next screen.
Raise a ticket with our support desk and someone will call you to confirm your identity before proceeding.
The call will be made to the phone number you gave when creating your account, you must be able to receive a phone call to that number for your 2-Step Verification reset to be processed.
Still can’t find what you’re looking for? Email support@lineupninja.com and one of the team will get back to you as soon as possible.
Teams
What is a team?
In Lineup Ninja, a team consists of a group of people who work on events together: it may correspond to a single business that runs events, or it could be business divisions. Teams can have many events and a number of roles associated with them. Every team must have at least one team Admin.
How do I add team members?
To add new team members, navigate to your team where you will see the Team Members table.
Click
to add a new team member. You will need to select a role from these options
Info
There is no limit to the number of team members you can add to one team.
How do I manage my team members’ permissions?
To manage existing team member permissions, navigate to your team where you will see the Team Members table.
Click
next to the team member you wish to edit.
Here, you can review their role and permissions across all events within the team.
How do I require my team members to use 2-Step Verification?
You can improve your team’s security by requiring that all team members have 2-Step Verification configured on their accounts before they can access your team’s data.
To do this first ensure you have 2-Step Verification enabled for your own account.
Navigate to your team’s home page and you will see this toggle below the list of team members:
When you click the toggle we will check whether your current team members have 2-Step Verification enabled already or not. If they do not we will warn you that they will lose their access until they enable 2-Step Verification. To enable 2-Step Verification just press ‘Confirm’.
Users who do not have 2-Step Verification enabled when your turn on the team requirement will be notified in the application and guided to configure 2-Step Verification for their account.
Can I turn off 2-Step Verification for my team?
If you need to remove the requirement for 2-Step Verification for your team you can request this by clicking the toggle underneath the list of team members. This will raise a ticket with our support team who will call you to confirm your request before proceeding. We will call you to ensure you intended for the request to be made and to ensure any contractual requirements are met.
How many teams can I be in?
There is no limit to the number of teams you can be a member of.
How many teams can I manage?
There is no limit to the number of teams you can manage, however one license covers one team only.
How do I change my team name?
Navigate to your team homepage
Click
next to the team name to edit it
How many events can one team have?
There is no limit to the number of events a team can have.
Still can’t find what you’re looking for? Email support@lineupninja.com and one of the team will get back to you as soon as possible.
Team Roles
What are team roles?
Team roles are available to assign the access level that your team members have to your event data.
Below is a description of each role.
Admin
Admin users have the highest level of control. They can add other users and edit their permissions. Every team must have at least one admin user, who is able to act as a legal representative for the client organisation. As the top level user, they can also do everything that the other user types can.
Event Manager
Event Managers are able to create and edit events, Submission Flows, publications and integrations. Event Managers can add Reviewer users. Event Managers can design and publish Submission Flows, set deadlines, communicate with submitters and reviewers. They can see all the Reviewers’ responses and scores. This role is typically used for the content manager, or chair of the review committee. Event managers can also be Reviewers, in which case their reviews will be visible from within their team home page.
Warning
Event Managers have the power to delete Events and Submission Flows - this could be a LOT of data, and Lineup Ninja cannot guarantee that it can be restored. So we recommend that you make Event Managers aware of what they can do!
Event Viewer
Event Viewers are read-only users. They have access to see all the data that the Event Manager can see - Submission Flows, submissions, internal notes, the draft agenda, speakers’ and reviewers’ data. However, Event Viewers cannot edit or delete any data. This role is typically used for users such as AV technicians who need access to download slides, but who do not need to update anything.
Note
Event Viewers have access to other users’ Personally Identifiable Information (PII)
Custom
The custom role allows you to define a different access level for each event in your team. When using the custom role you can assign one of these access levels to a team member:
Manager - This gives them the same access as the ‘Event Manager’ role above for an individual event.
Viewer - This gives them the same access as the ‘Event Viewer’ role above for an individual event.
No Access - This prevents the user from accessing the event. They can still be added as a reviewer for the event.
When a user has a custom role you can, optionally, allow them to create their own events. For events they create, they will automatically receive the Event Manager access level.
You can also decide what access a custom user should have after events have been created. By default they will have No Access.
Reviewer
Reviewers can have submissions assigned to them, along with any review questions that have been defined by the Event Manager. They can see a list of assigned (i.e. pending) reviews as well as reviews that have previously completed.
Disabled
These users cannot log in to Lineup Ninja. Typically used for ex-team members whose access you wish to revoke.
Still can’t find what you’re looking for? Email support@lineupninja.com and one of the team will get back to you as soon as possible.
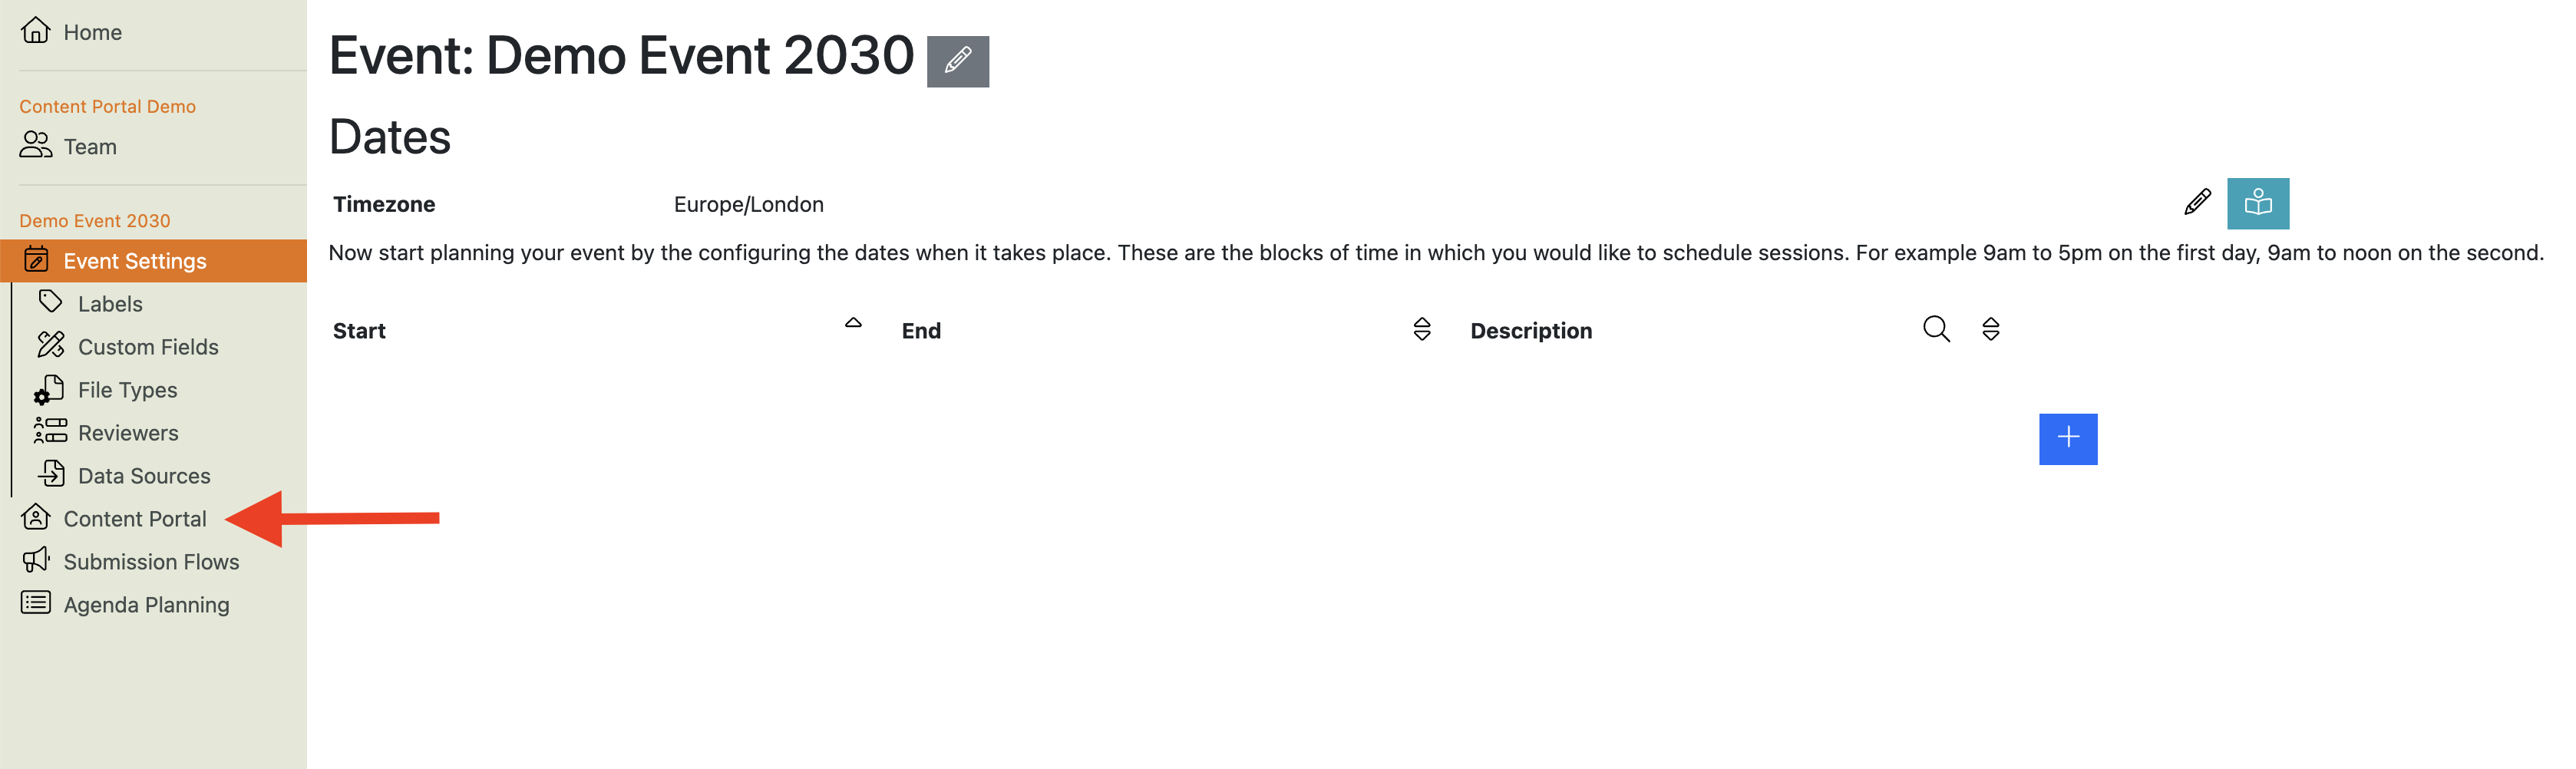
Event Settings
This section covers basic event settings like timezones and dates, as well as settings that apply to both submission flows and agenda planning, such labels, custom fields and file types.
Still can’t find what you’re looking for? Email support@lineupninja.com and one of the team will get back to you as soon as possible.
Subsections of Event Setup
Create Event
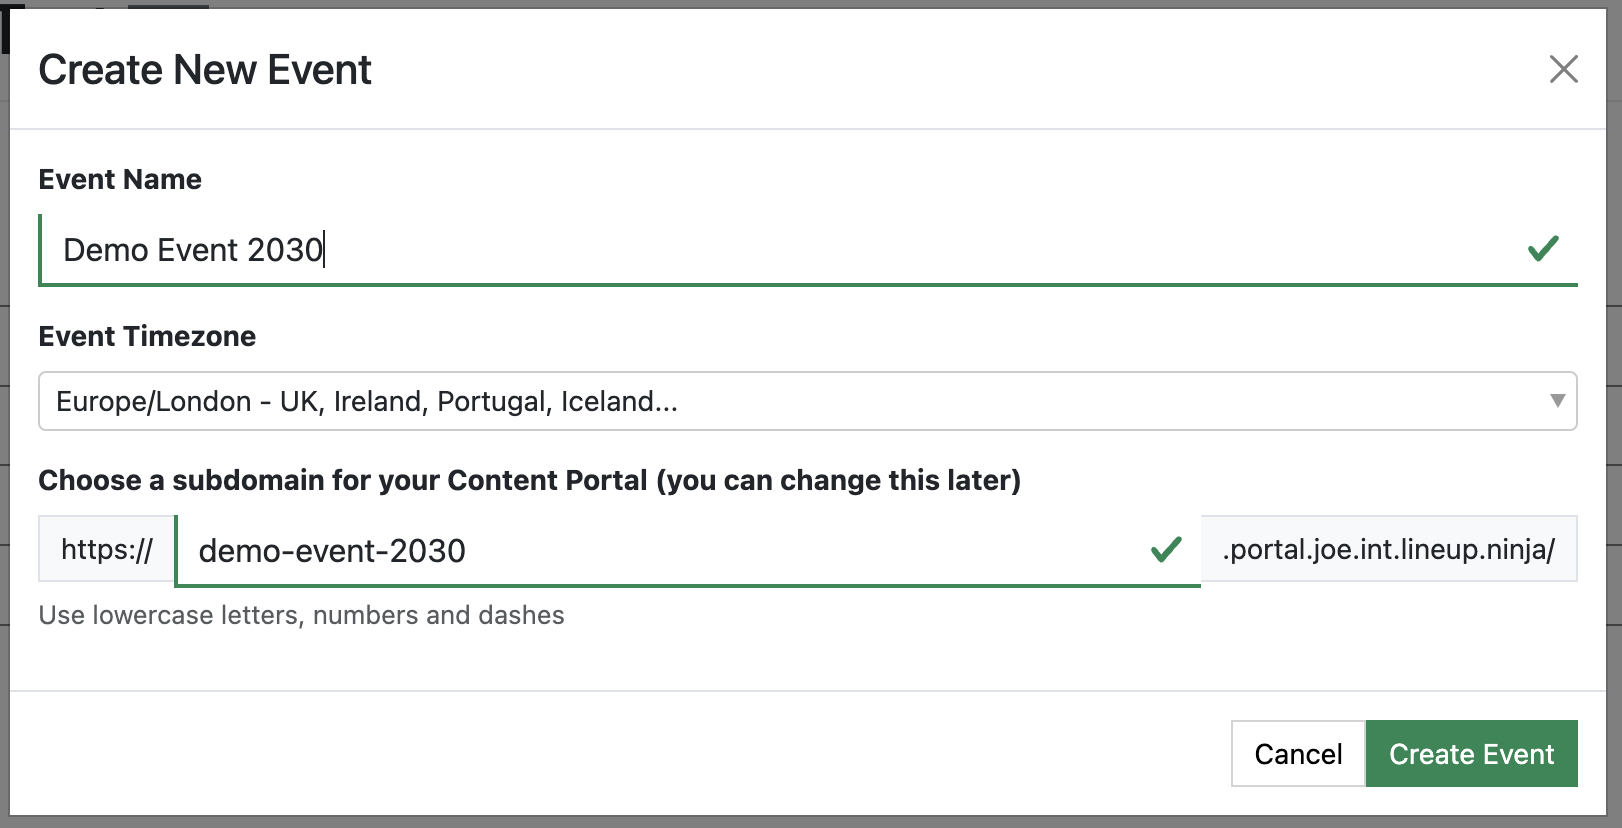
How do I create a new event?
After logging in, you will arrive at your
Home
. From here:
Click on the relevant team’s name (most people are only members of one team, so there will only be one name here)
You will be taken to
Team
where you will see two sections:
Events
Team Members
Click the
at the bottom of the Events section to create a new event.
A dialogue box will pop up. Add the Event Name, choose a timezone for the Event and a subdomain for the event’s content portal, and click ‘Create Event’
Tip
NOTE: the system will automatically generate a suggested subdomain. This must be unique, so we recommend that you include the year of the event in the subdomain:
Still can’t find what you’re looking for? Email support@lineupninja.com and one of the team will get back to you as soon as possible.
Event Settings
How do I edit my event’s name?
There are two ways to edit the event’s name:
Navigate to
Team
and click on the
at the end of the relevant event’s row
Navigate to your event’s
Event Settings
and click on the
next to the event’s name at the top of the page
How do I change the timezone for my event?
To change your event’s timezone, navigate to the relevant event’s
Event Settings
and click the
next to Timezone.
How do I set the language for my event?
The admin interface of Lineup Ninja is only available in English.
However as an event planner, you can edit almost all of the text that is displayed in both the content portal and the Agenda App yourself.
Also, time and date formats, are determines by users’ browser locale settings. For example, if a speaker is browsing the content portal, and their browser locals is set to French, they will see the appropriate time and date settings for their session times.
What is an Event Date?
An ‘Event Date’ is a period of time in which you schedule sessions. Generally, you will configure one ‘date’ for each day of your event. For example, you might have:
Tuesday 10:00 > 17:00
Wednesday 09:00 > 17:00
Thursday 10:00 > 16:00
When you are scheduling sessions within
Agenda Planning
, you will see a planning board for each of these days.
Note
Event dates are NOT the same time as the opening times for your event. Event dates set the days/ times that your locations (stages, rooms etc.) will available for sessions to be scheduled. If you are running a multi-day event, you should create a date for each day.
How do I add new dates to my event?
To add a new date at any point, navigate to
Event Settings
and click
. If you are just starting with your event, the change will be saved immediately. If you are adding the date after you have added speakers, locations or a Submission Flow, the Event Date Wizard will guide you through the options to update the existing content.
If you have a published Submission Flow with an ‘availability’ question, Lineup Ninja will ask you if you want to show the new date to submitters.
You can always change this later: just navigate into the Submission Flow form, edit the availability question and toggle off the visibility option.
Lineup Ninja will also ask you how you want to mark speakers’ and locations’ availability. You can:
Choose to mark the speakers/ locations as entirely available or unavailable for the new date
Copy their availability from an existing date (e.g. if you have configured breaks into your locations, you can copy this availability to a new date to save you from configuring it again)
How do I change the dates of my event?
To change a date/time, navigate to
Event Settings
and click the
in the row of the date/time you are changing. If you are just starting with your event, the change will be saved immediately. If you are changing the date/ time after you have added speakers, locations or a submission flow, the Event Date Wizard will guide you through the options to update the existing content.
Note
The exact pop-up you see will vary depending on what type of change you are making and what content you already have.
Changes you can make to event dates and times:
Changing to a new date
Sessions - For scheduled sessions, you can either have them scheduled at the same time on the new date, or unschedule them entirely.
Speakers - For speakers, you can choose whether their availability should be copied to the new date, or you can just mark them as available or unavailable for the new date. If you have asked an availability question on a Submission Flow, then their answer will also be updated to reflect this change.
Locations - For locations, you can choose whether the existing availability should be copied to the new date or you can just mark them as available or unavailable for the new date.
Tip
If you have configured breaks into your agenda, then you probably want to choose to use the existing availability.
Changing the start time
If you are changing the start time of a day, you have two options for the scheduled sessions and speaker and location availability (including breaks):
Move to reflect the new start time (e.g. if you are changing a start time from 09:00 > 10:00, you can move all scheduled items forward by one hour)
Keep in all sessions their existing time. This will unschedule any sessions outside the new times.
Making the day longer
If the new is longer, we will expand the current availability (or unavailability) of speakers and locations into the new time. All scheduled sessions will remain unchanged.
Making the day shorter
If the new day is shorter, the sessions that no longer fit into the available time will be unscheduled. To avoid this, you can manually reschedule sessions with Agenda Planning so they will all fit within the new day duration before making the change.
Still can’t find what you’re looking for? Email support@lineupninja.com and one of the team will get back to you as soon as possible.
Copy Event
If you are hosting an annual event or events with similar features, you may want to copy event settings from one event to another.
2. Once you have configured the dates, you will see this button:
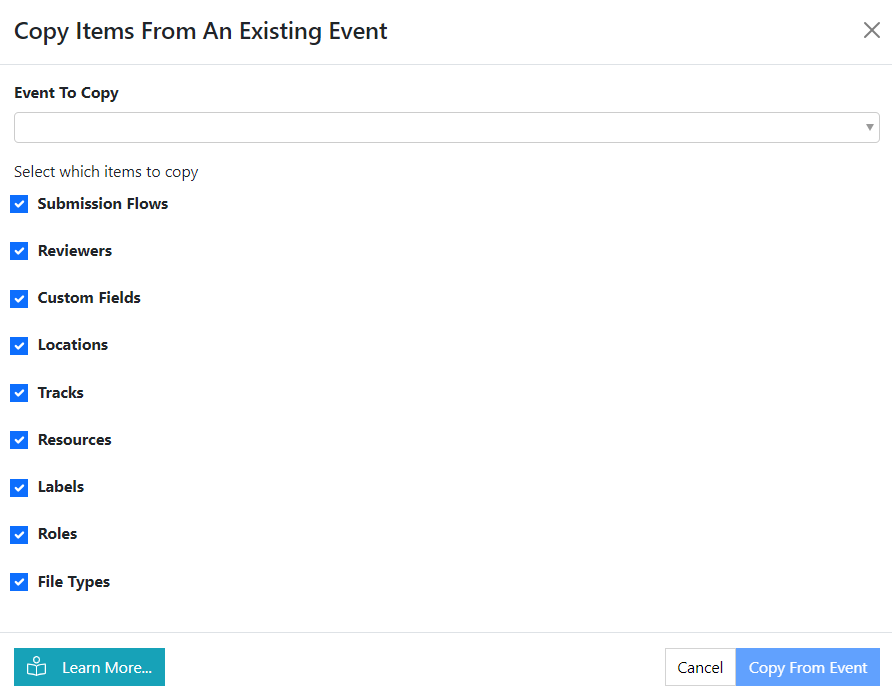
3. When you click the button, you can choose which event to copy items from and which items to copy.
Some things to be aware of:
We strongly recommend that you copy all the settings that you need in one go. This will ensure that everything remains linked together, for example sessions and tracks will remain linked to each other. If you copy sessions in one instance and tracks in another, they will lose their connection to each other
You can copy settings from multiple events.
If you don’t need all your Submission Flows from the previous event, copy them all and delete the ones you no longer need.
If you copy the same settings twice it will duplicate it, i.e. you will end up with two of everything!
Feel free to experiment, if you mess up, you can delete the new event and start over.
How do I copy Speakers (from within the same event or from one event to another)?
Navigate to
Agenda Planning
>
Speakers
To copy individual speakers:
Find the speaker you wish to copy
At the end of the row, click
Choose which event you would like to copy the speaker to and click ‘Choose Event’
Select which Labels/Custom Fields/ Files you would like to copy and the speaker’s availability
Click ‘Copy Speaker’
To copy multiple speakers:
Tick the box next to the speakers you wish to copy
Scroll to the ‘Actions’ drop-down menu at the bottom of the list and select ‘Copy Speakers’
Choose which event you would like to copy the speaker to and click ‘Choose Event’
Select which Labels/Custom Fields/ Files you would like to copy and the speaker’s availability
Click ‘Copy Speaker’
How do I copy sessions within the same event?
Navigate to
Agenda Planning
>
Sessions
To copy individual sessions:
Find the session you wish to copy
At the end of the row, click
Fill out the new session name and number of copies you wish to make
Select the session relationships to items (Speakers, Tracks, Resources, Labels) and which attributes you would like to copy (Session Code, Description, Required Capacity, Duration and Notes)
Click ‘Copy Session’
To copy multiple sessions:
Tick the box next to the sessions you wish to copy
Scroll to the ‘Actions’ drop-down menu at the bottom of the list and select ‘Copy Sessions’
Fill out the new session names and number of copies you wish to make
Select the session relationships to items (Speakers, Tracks, Resources, Labels) and which attributes you would like to copy (Session Code, Description, Required Capacity, Duration and Notes)
Click ‘Copy Sessions’
Info
Session Name - If you are copying multiple sessions then the {{original_session_name}} text will be replaced with the session name. I.e. if you leave the default option of {{original_session_name}} - Copy then a Session called Latest Trends would be called Latest Trends - Copy when created.
Note
Note that some data is not copied:
Explicit scheduling rules that have been applied to the session will not be copied to the new session. If you need this please reach out to support, we would like to understand your use case.
Files attached to sessions are not copied.
How do I copy sessions from one event to another?
Lineup Ninja does not currently support this feature. If this is something you need, please speak to one of the team.
How do I copy submissions from within the same event?
Lineup Ninja does not currently support this feature. If this is something you need, please speak to one of the team.
How do I copy submissions from one event to another?
Lineup Ninja does not currently support this feature. If this is something you need, please speak to one of the team.
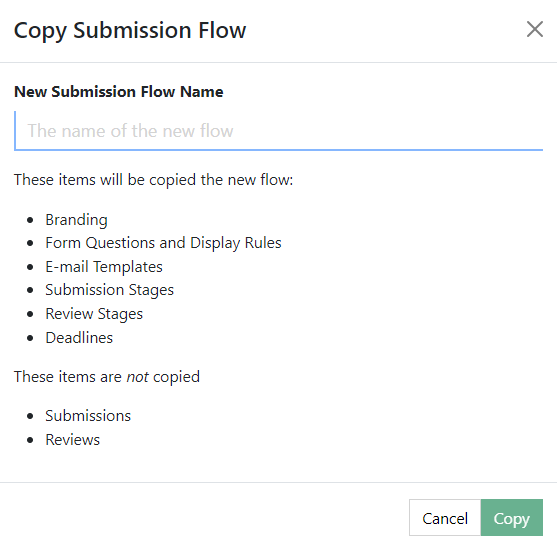
How do I copy a Submission Flow within the same event?
Navigate to
Submission Flows
Next to the Submission Flow you wish to copy, click
Name your new Submission Flow and click ‘Copy’
How do I copy a Submission Flow from one event to another?
Navigate to
Event Settings
in the event you wish to copy data to
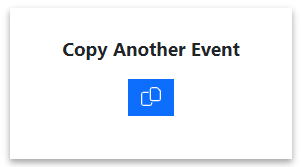
Click ‘Copy Another Event’
Choose the event you wish to copy items from and select ‘Submissions Flows’
Info
This will copy all Submissions Flows. You can delete the ones you do not need.
How do I copy reviewers from one event to another?
Navigate to
Event Settings
in the event you wish to copy data to
Click ‘Copy Another Event’
Choose the event you wish to copy items from and select ‘Reviewers’
Info
This will copy all Reviewers. You can delete the ones you do not need.
How do I copy review stages from within the same event?
To copy Review Stages, you will need to copy the Submission Flow that the Review Stages exist under.
Navigate to
Submission Flows
Next to the Submission Flow you wish to copy, click
Name your new Submission Flow and click ‘Copy’
How do I copy review stages from one event to another?
To copy Review Stages, you will need to copy the Submission Flow that the Review Stages exist under.
Navigate to
Event Settings
in the event you wish to copy data to
Click ‘Copy Another Event’
Choose the event you wish to copy items from and select ‘Submissions Flows’
Info
This will copy all Submissions Flows. You can delete the ones you do not need.
Still can’t find what you’re looking for? Email support@lineupninja.com and one of the team will get back to you as soon as possible.
Delete Event
How do I delete an event?
Warning
Use with caution: This will delete ALL data associated with the event.
This cannot be undone!
Navigate to
Team
and click
at the end of the relevant event’s row
Click on the
icon
Click the ‘Confirm’ button that appears
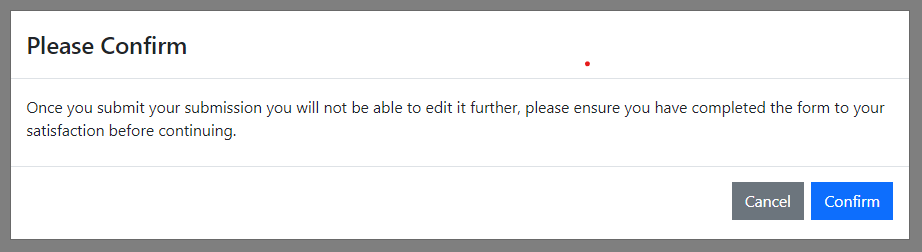
A confirmation pop-up box will appear, asking you to enter the event’s name before you confirm that you definitely want to delete it
Click ‘Confirm’
Still can’t find what you’re looking for? Email support@lineupninja.com and one of the team will get back to you as soon as possible.
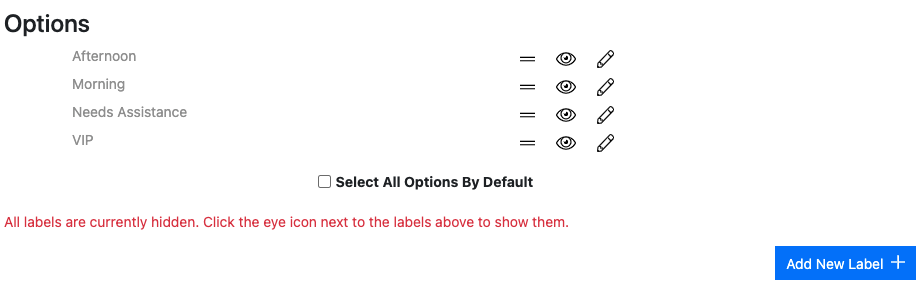
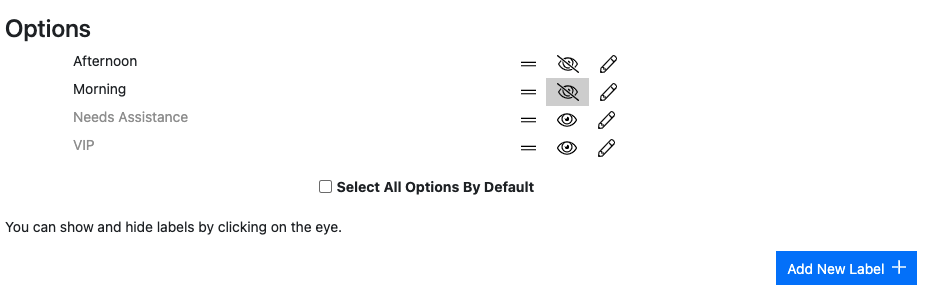
Labels
What are labels and how can I use them to help plan my event?
Labels are a way to group, categorise, or tag, items in your event. You can apply labels to all your event data, such as speakers, sessions, locations etc.
To get you thinking about how labels can be utilised within your event, we have made the following list of how our clients use labels.
Tip
For more information about Labels & Scheduling, please follow this link.
For more information about Labels & Scheduling Windows, please follow this link.
How do I create and manage labels?
Labels are easy to create:
Navigate into your event and click on
Labels
in the left-hand menu
To create a new label, click
on the bottom right hand side of the label list
Enter the name for your label and click
Once your label has been created, you can click into it to see an overview of the information associated with the label
You can assign a colour to the label and if you have create other event data, you can associate it with the label here too.
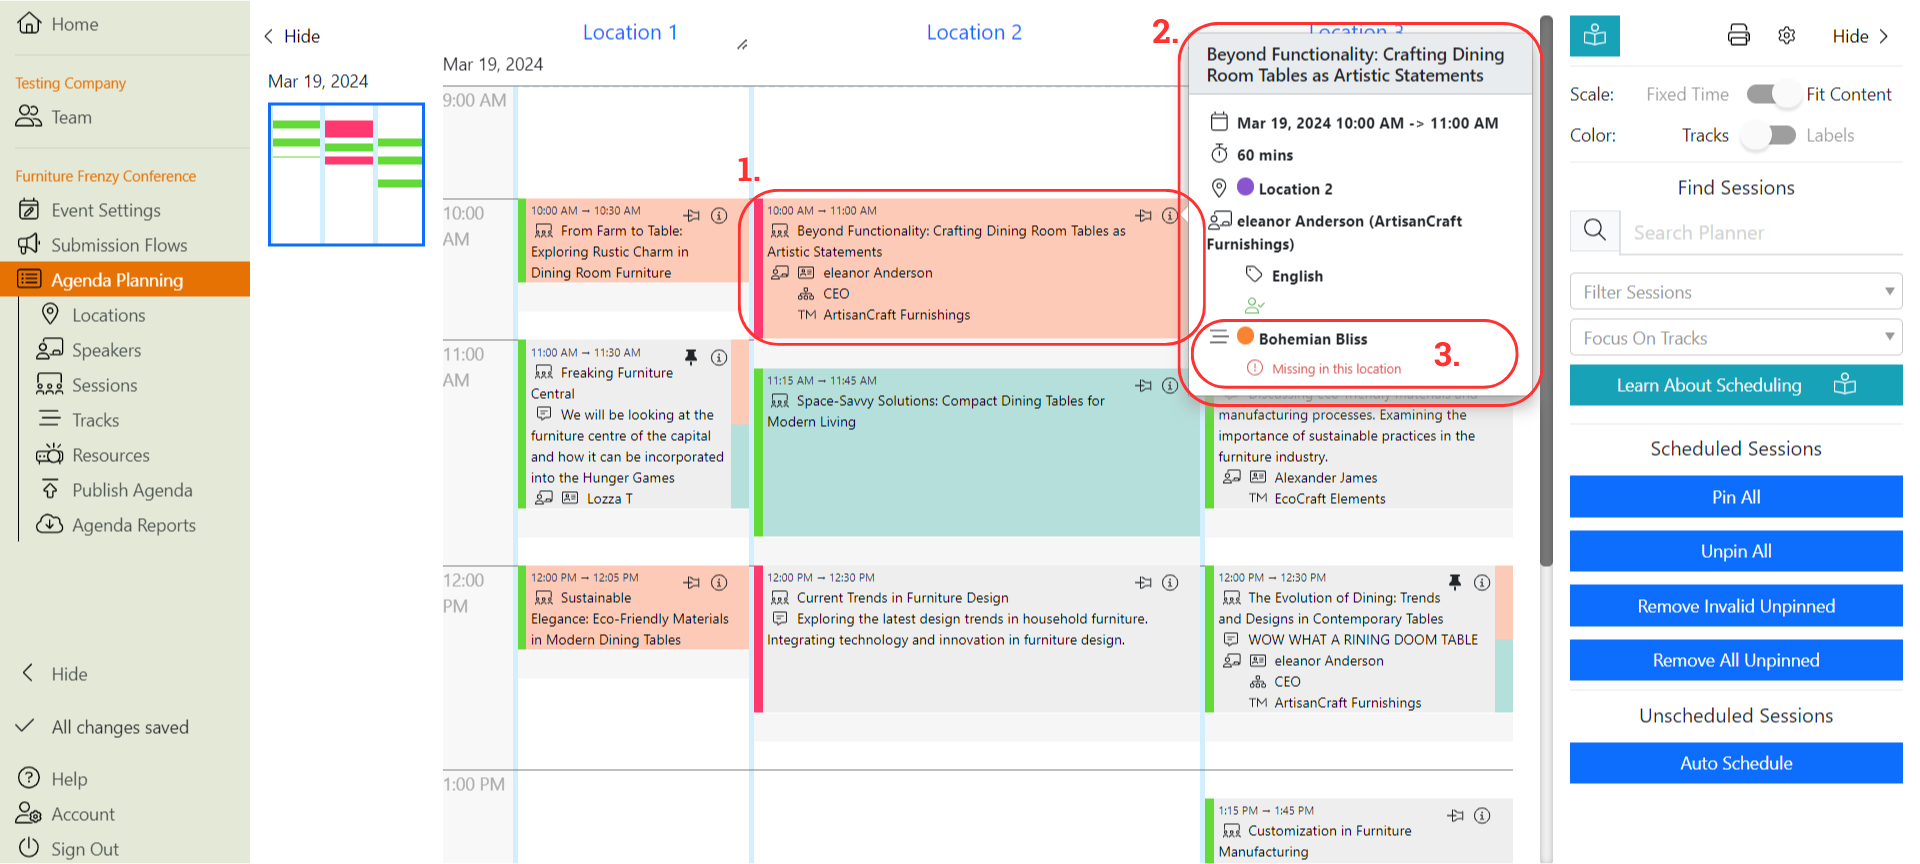
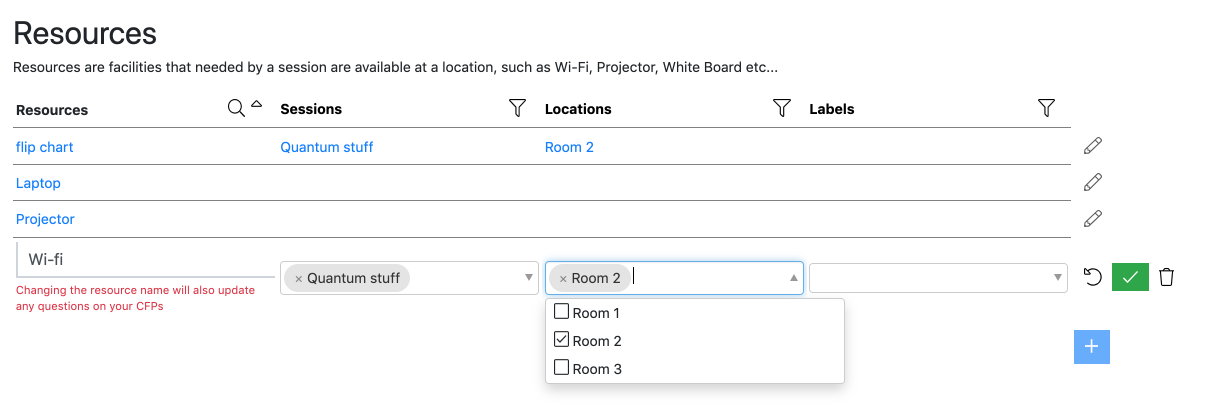
How do I add labels to submissions, sessions, speakers, resources, locations or tracks?
Navigate to the type of item you wish to add a label to, click into the item and click
next to Labels.
How do I add labels to submissions, sessions, speakers, resources, locations or tracks in bulk?
Navigate to Agenda Planning and to the type of item you wish to label. This will bring us the respective list view
Tick the items you wish to label
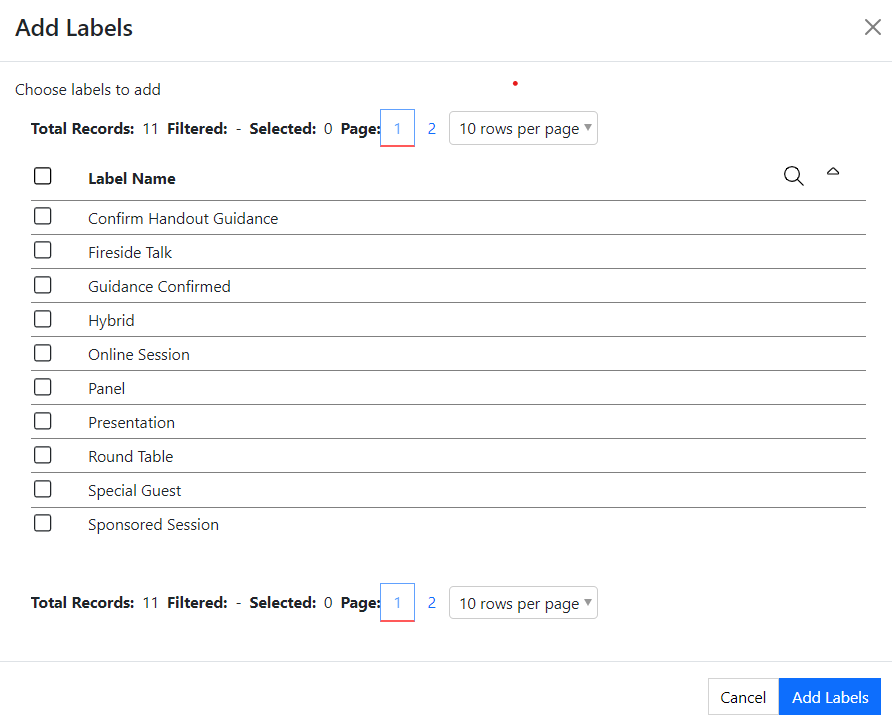
Scroll to the bottom of the list, open the drop-down Action menu and click ‘Add Labels’
The next section explores how labels can be used in relation to sessions
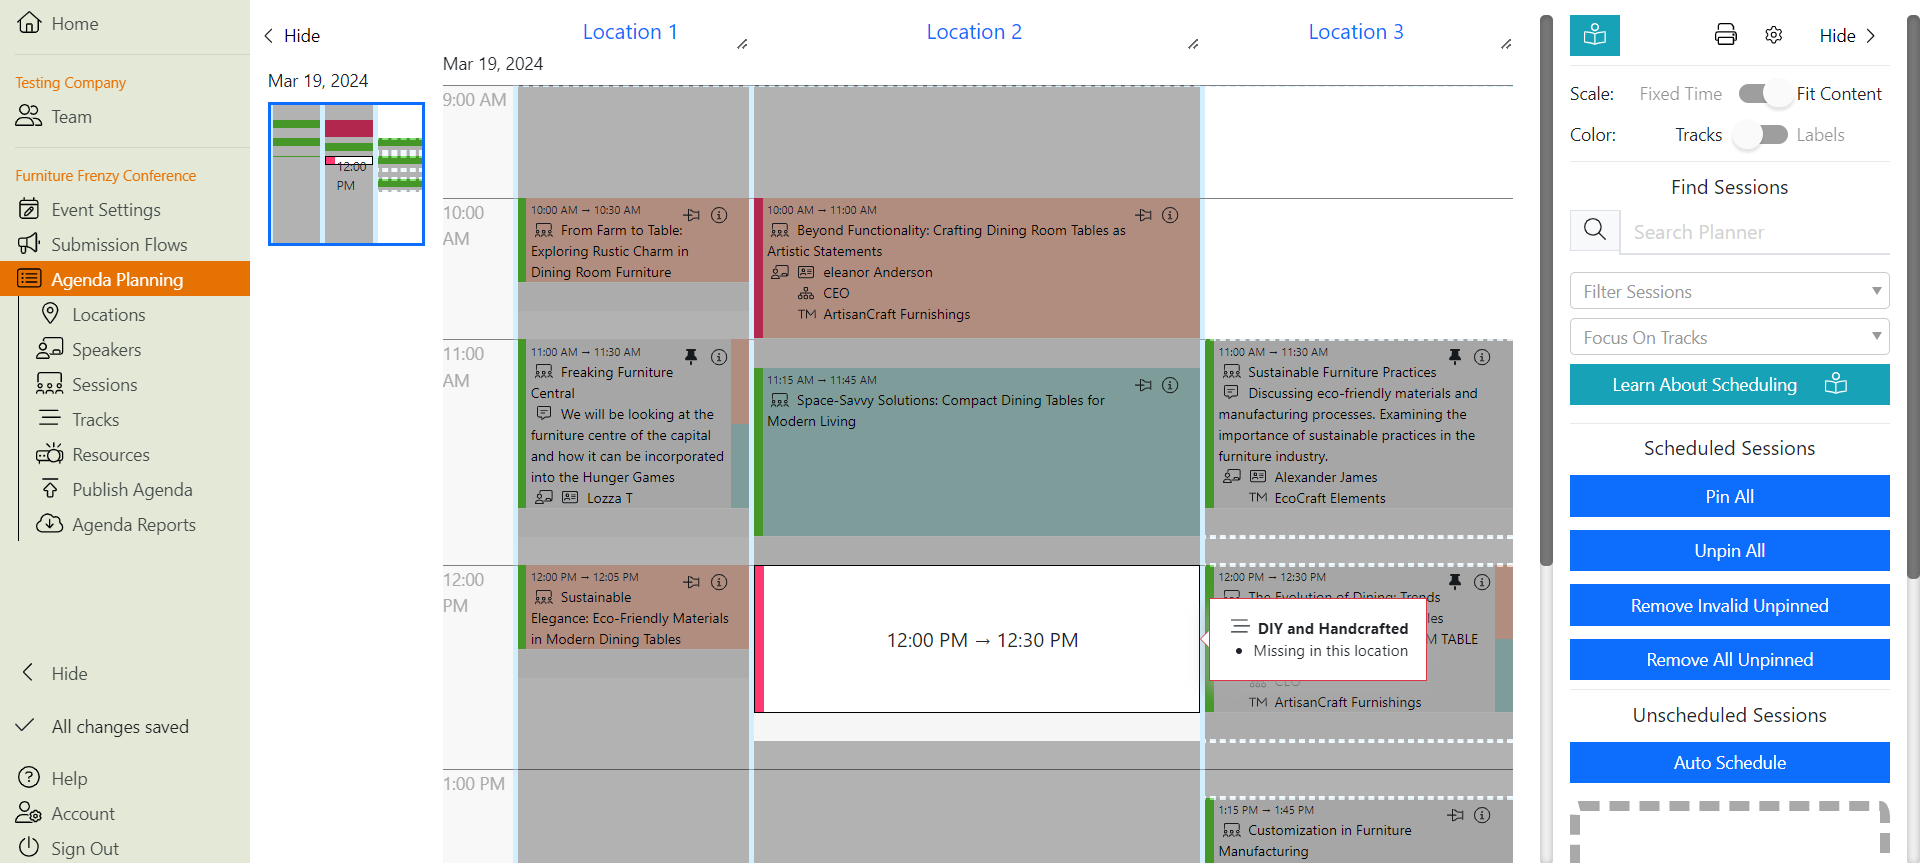
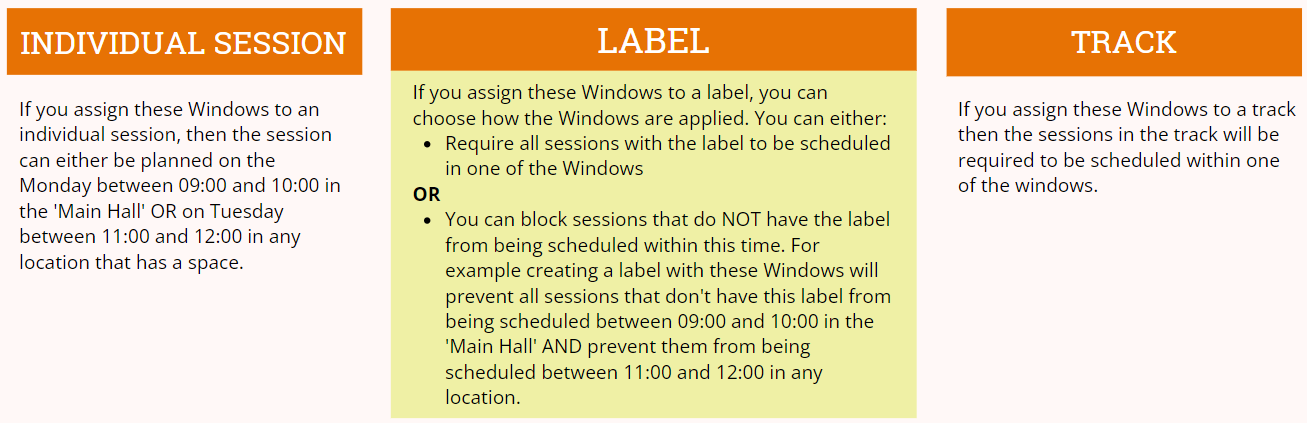
How can I use labels to schedule sessions into a group of locations?
If you have a group of similar locations, you may want to use labels to ensure a session is scheduled into one of these locations. For example, several virtual stages or breakout rooms.
Navigate into your event and click on
Labels
in the left-hand menu
Click on the label you wish to edit
Edit the ‘Locations’ row using
and select the locations you wish to include
Toggle the ‘Schedule sessions with this label in these locations’ button to on
Assign this label to relevant sessions
Lineup Ninja will now ensure that sessions with this label are scheduled into one of the selected locations.
How can I use labels to schedule sessions on a particular day or days?
You may want to use labels to ensure sessions are scheduled on a specific day/ days.
Navigate into your event and click on
Labels
in the left-hand menu
Click on the label you wish to edit
Edit the ‘Dates’ row using
and select the locations you wish to include
Toggle the ‘Schedule sessions with this label in these dates’ button to on
Assign this label to relevant sessions
Lineup Ninja will now ensure that sessions with this label are scheduled into one of the selected dates.
How do I use labels to limit the number of certain types of sessions?
You might want to limit the number of certain types of sessions . For example, to limit the number of sponsored sessions. You can use labels to do this:
Navigate into your event and click on
Labels
in the left-hand menu
Click on the label you wish to edit
Find the label that you want to edit and click on its name
Edit the value for ‘Max Sessions’ using
As you schedule your event, Lineup Ninja will be checking to ensure that the number of sessions using this label is limited to the value input.
How do I limit the number of sessions with a specific label from running at the same time?
You may want to use labels to limit how many sessions with a specific label are running at the same time. For example, to ensure two VIP sessions are not running concurrently.
Navigate into your event and click on
Labels
in the left-hand menu
Click on the label you wish to edit
Edit the value for ‘Concurrency’ using
As you schedule your event, Lineup Ninja will be checking to ensure that the number of sessions using this label concurrently is limited to the value input.
Where can I learn about using labels with Submission Flows?
To learn more about how labels can assist your Submission Flows, see Submissions and Labels
Where can I learn about using labels within the Agenda App?
Still can’t find what you’re looking for? Email support@lineupninja.com and one of the team will get back to you as soon as possible.
Custom Fields
What are Custom Fields and how can I use them to help plan my event?
Lineup Ninja has a pre-defined set of fields for data like speakers and sessions. For example, a session may have a ‘Title’ and ‘Description’.
Custom Fields allow you to add extra fields to Lineup Ninja that are specific for your event.
Here’s a list of the kinds of things people use Custom Fields for.
You can also add Custom Fields to Labels, Locations, Tracks and Resources.
Why do I need to create custom fields?
Lineup Ninja comes with a set of standard fields for things like speakers, sessions, locations etc. For example, speakers have fields for ‘first name’, ’last name’, ‘job title’, ‘biography’ etc.
When building forms in Submission Flows, Tasks, and Reviews it is important to use the question that maps to the correct field. Lineup Ninja can then store it in the correct field and copy it to your Agenda.
This means that your speaker’s first name, last name, job title and biography will all be stored in the right place to appear as expected to on your event website, mobile app, digital signage etc.
But sometimes Lineup Ninja doesn’t have a field for some data that you need to capture via a form in a Submission Flow or Task.
In these instances, we strongly advise using a Custom Field (orLabel),then adding a question to your form that maps to the new field.
Custom Fields are essential to map data from the Submission Flow side of Lineup Ninja, to the Agenda Planning side and to all subsequent integrations (website, app, digital signage).
Even if you don’t plan to publish that field (e.g. speaker’s emergency mobile phone number), if you want it to be available in the agenda side of Lineup Ninja, you must create a custom field for it.
Tip
If you create a custom question in your form that does NOT map to a Custom Field or Label, the answers can’t be copied to speakers, sessions etc on your Agenda.
This means that they’ll only be visible in the Submission Flows side of the platform.
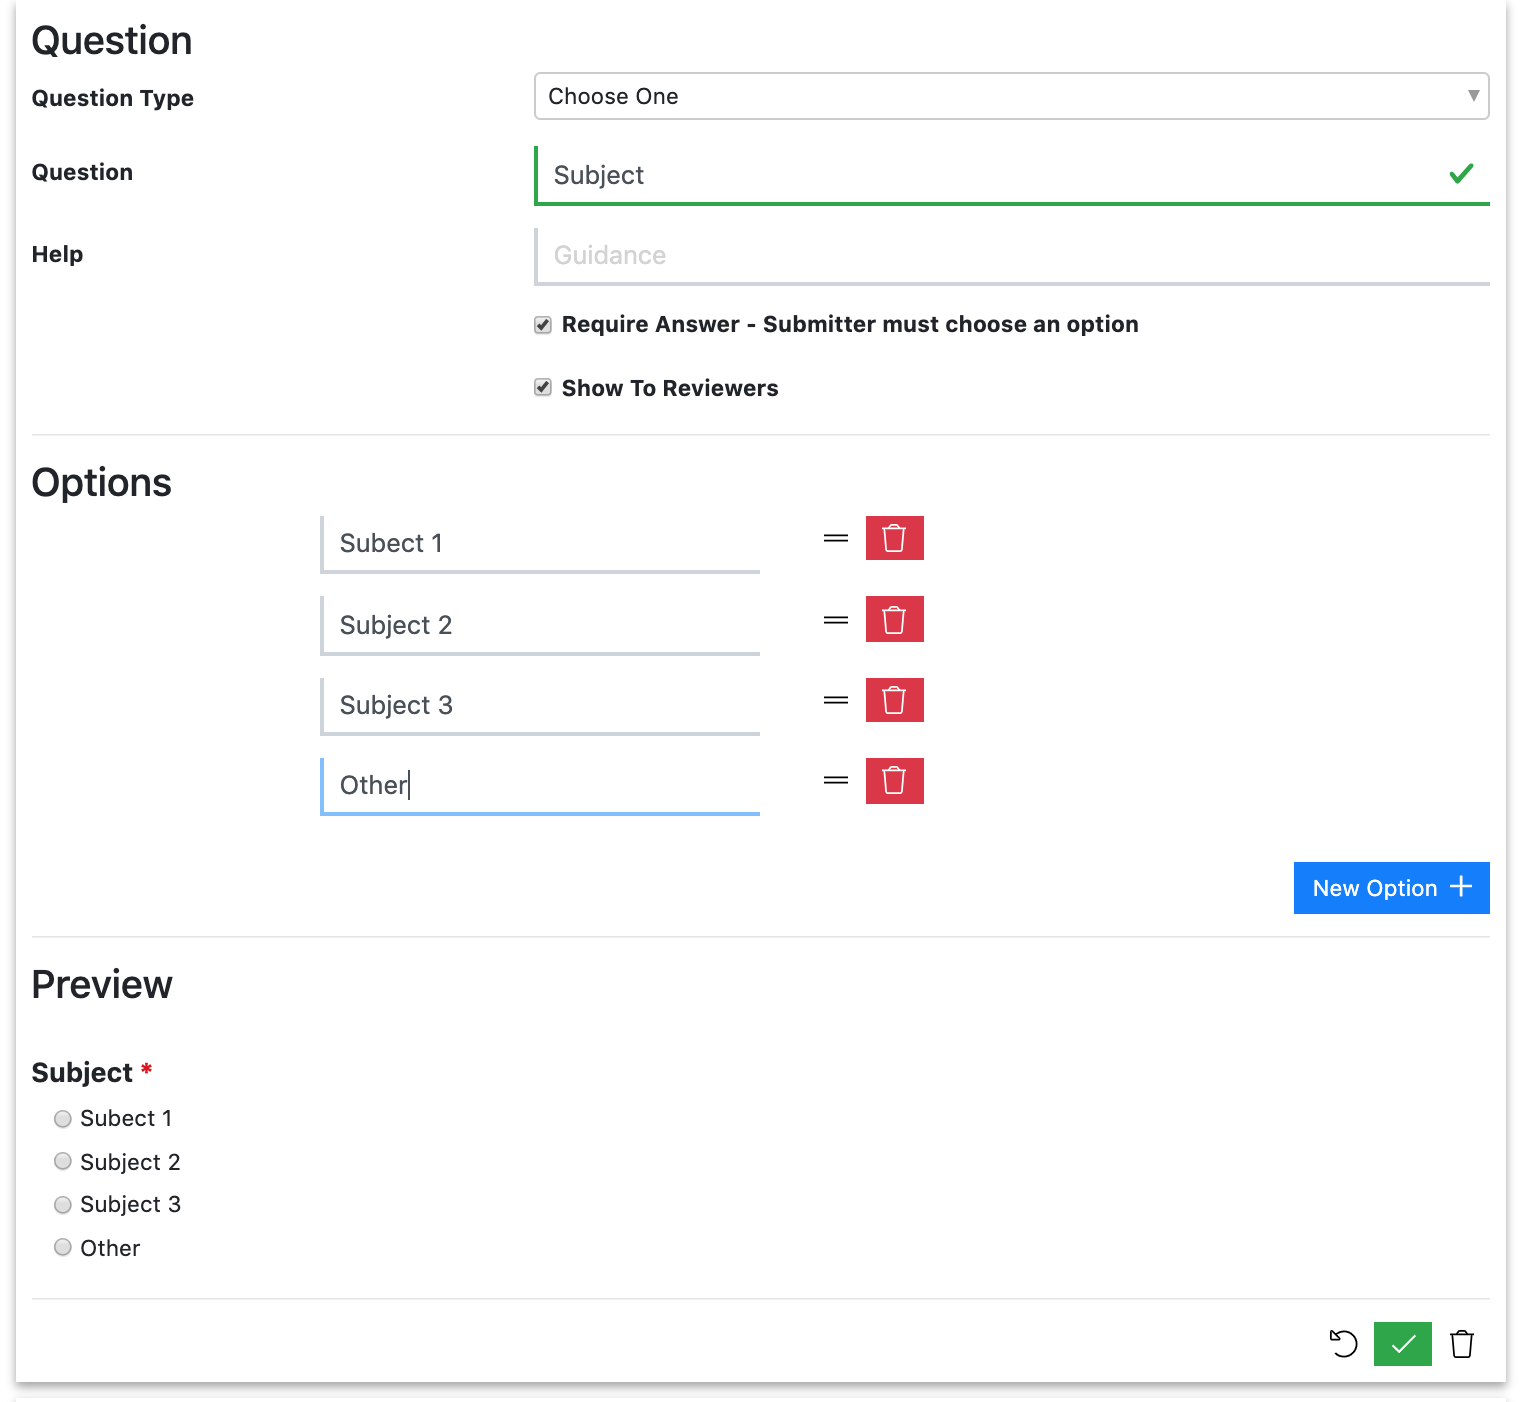
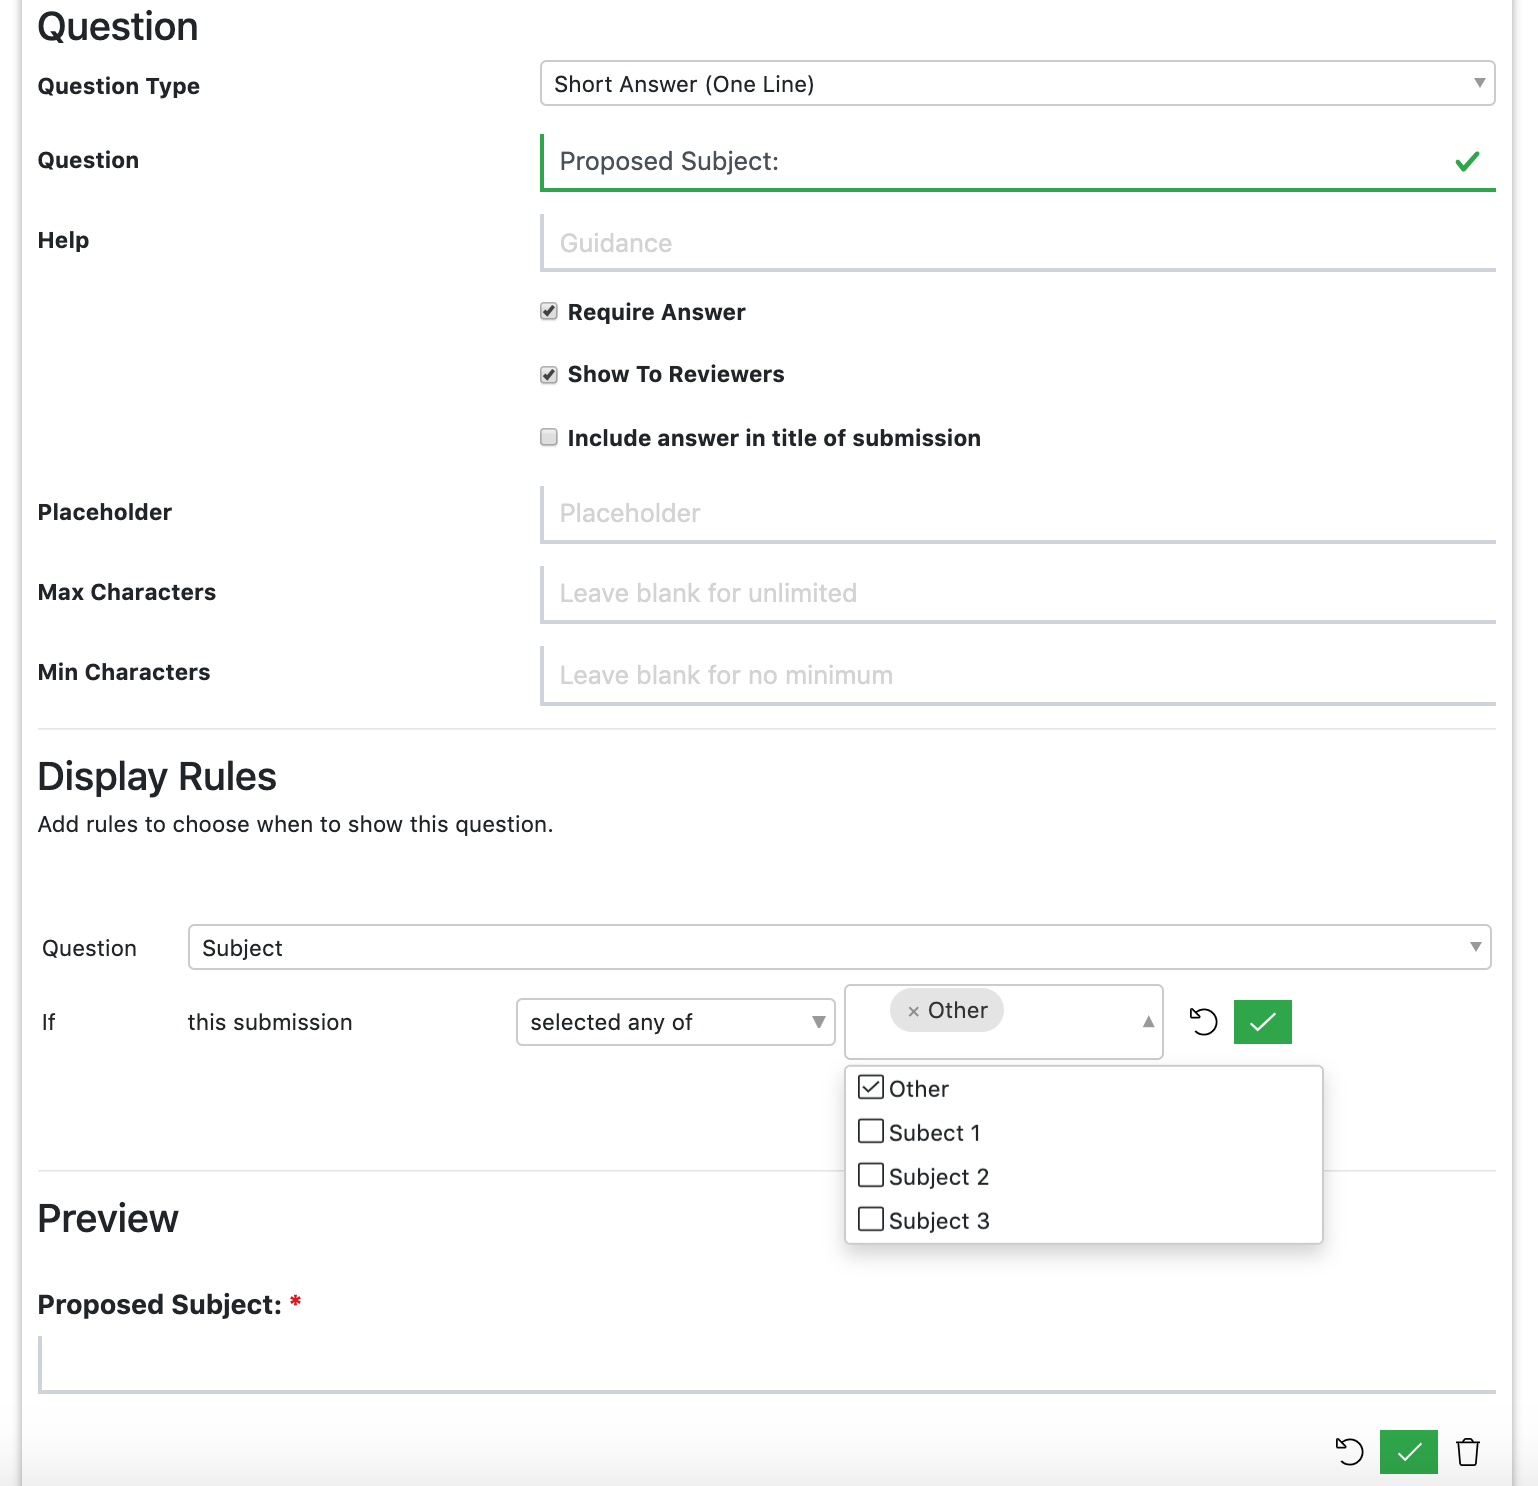
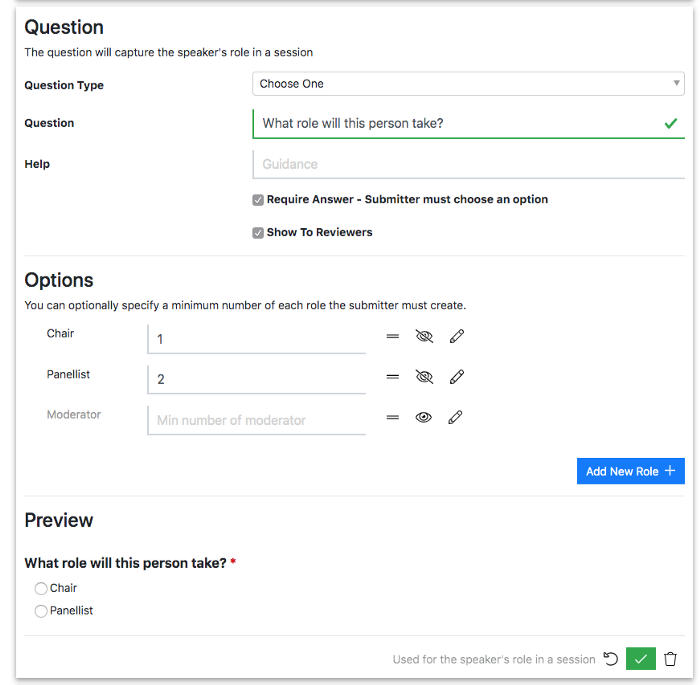
What types of data can I store in a Custom Field?
The following data types are available:
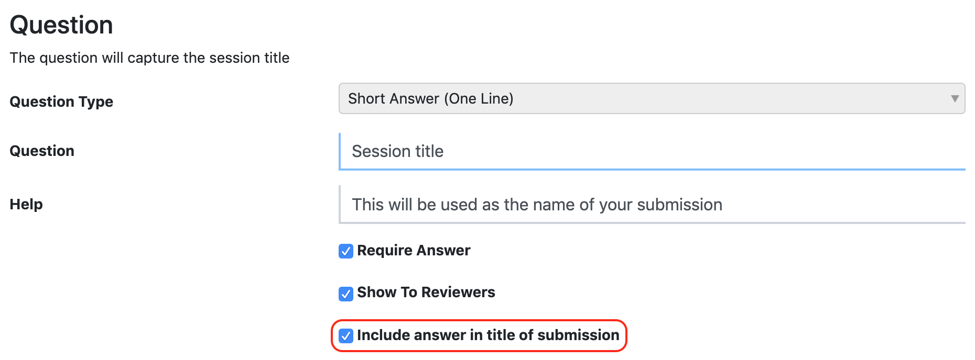
Short Answer (One Line)
Paragraph (Multiple Lines)
Number
Choose Many - Allows the selection of one or more values from a list
Choose One - Allows the selection of a single value from a list
E-mail Address
Website Address
Date
How do I create and manage Custom Fields?
Custom Fields are easy to create:
Navigate into your event and click on
Custom Fields
in the left-hand menu
Scroll down to the type of data you would like to add the field to. For example, ‘Speaker Fields’
Choose an icon for the field form the selection, or search for one from a selection of over 3,000
To create the new ‘Custom Field’, click
on the right-hand side
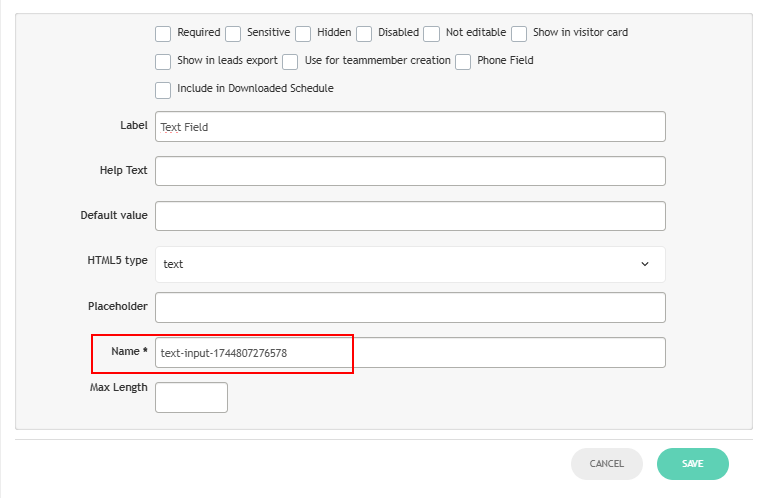
Enter the Field Name and Field Type and click save
Tip
If you choose to toggle on ‘Show this field in tables by default’, this will automatically appear for all team members in their tables. They can choose to customize their view to turn it off.
Can I change a Custom Field after creating it?
After a Custom Field has been created you can:
Change the name of the field
Change the icon for the field
Add, rename and delete the available options for ‘Choose One’ and ‘Choose Many’ fields
Choose whether the field should show automatically on tables. This setting applies to all team members. If you turn it off and on again then all team members will see the field, even if they have previously disabled it.
You cannot change the type of the field, for example, you cannot change it from number to a text field after it is created.
How do I copy Custom Fields from one event to another?
You can copy Custom Fields as part of the Copy Event process. If you copy Labels, Locations, Tracks, Resources and Custom Fields at the same time, then the values set for those objects will also be copied.
Can I use Custom Field data in email templates?
Depending on the version of Lineup Ninja you are currently using, you may have to activate Speaker Confirmation to use Custom Field data in email templates.
If you are using the
Speaker Portal
> then custom fields are available in your email templates.
Agenda Planning
>
Speakers
>
Confirmation
- If your speaker confirmation lives here, you will need to ensure it is activated to use custom fields in email templates
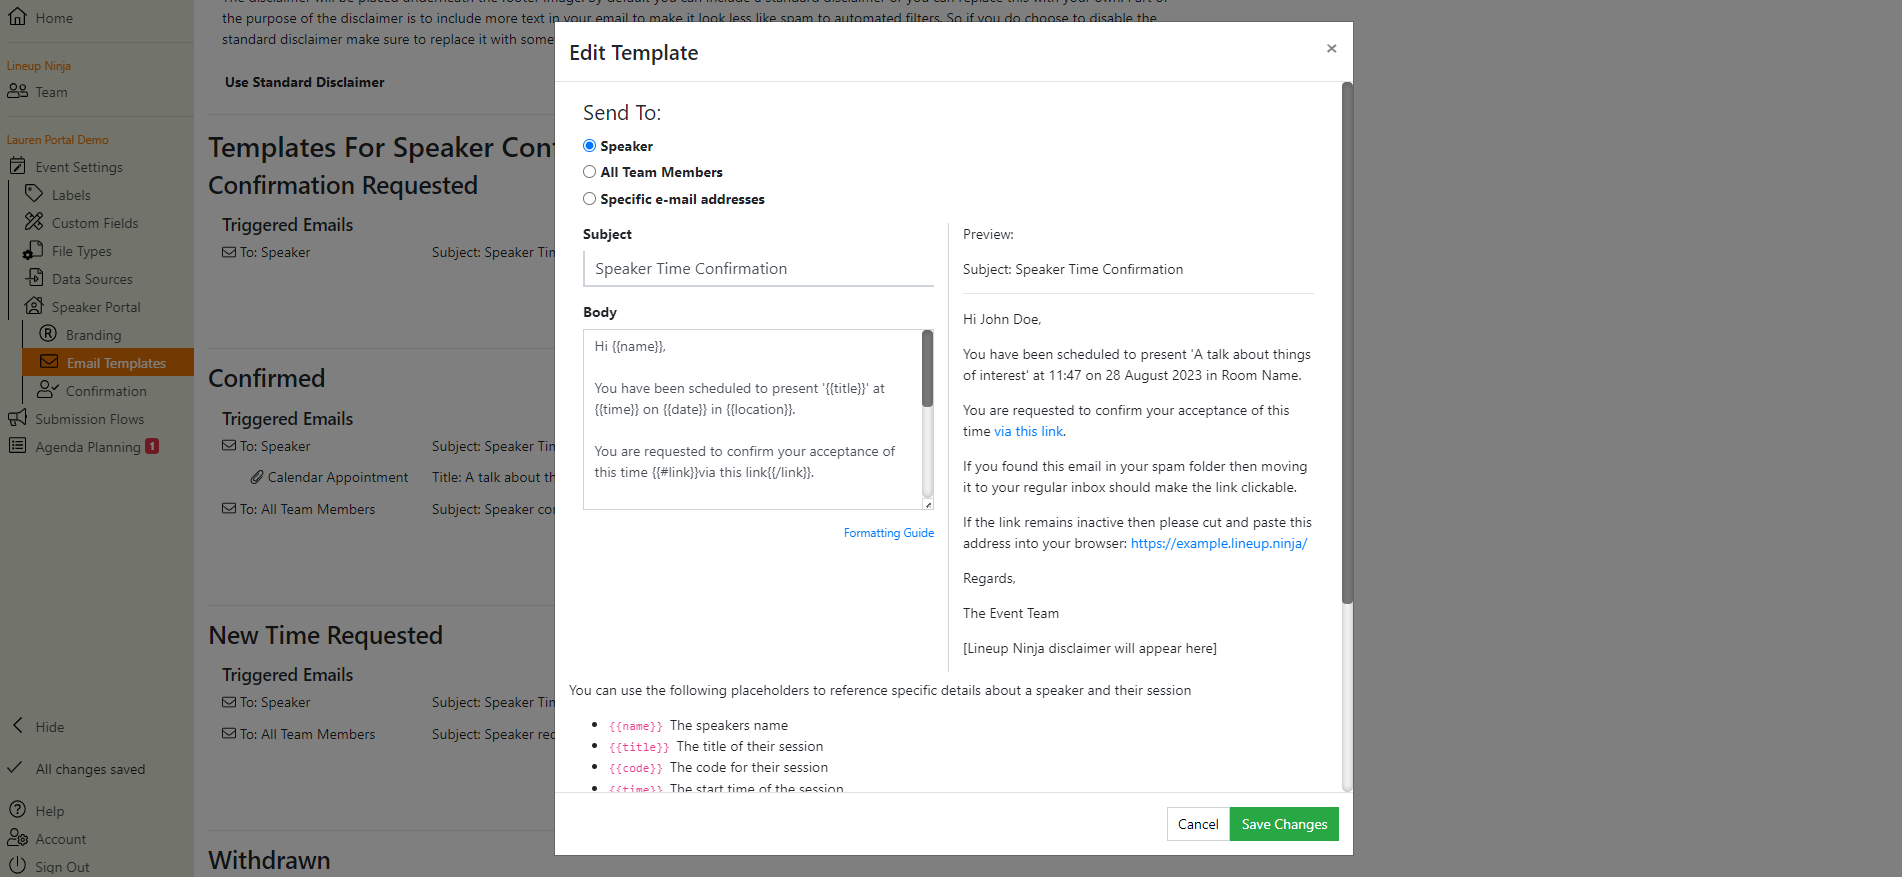
To use Custom Fields in e-mail templates, when editing you will see additional placeholder values you can use in your template. For example, if you have a custom field called Rehearsal Date then you will see a placeholder {{rehearsal_date}}. You can click on the placeholder to copy it to your clipboard and then paste it into the template.
Can I attach files to a Custom Field?
Files cannot be attached directly to a Custom Field. Instead, you should use File Types to add custom types of files.
How do I delete a Custom Field?
Warning
If you delete a Custom Field, all data you have input for that field will be deleted and cannot be recovered.
Navigate into your event and click on
Custom Fields
in the left-hand menu
Scroll down to the type of data you would like to add the field to. For example, ‘Speaker Fields’
Click
on the Field you wish to delete and click ‘Confirm’
How to use Custom Fields
How do I manually input the data for each Custom Field?
To manually input the data for each Custom Field, you have two options:
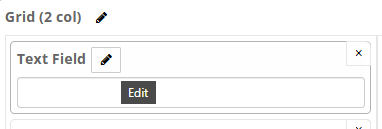
Navigate to the item you wish to input the data for (e.g. a specific speaker/ session). Scroll down to view the Custom Fields you have configured and click
to edit
Navigate to the list page of the items you wish to input the date for (e.g. speaker/ session). Click
and add the fields to your table. You can then edit the values as you would for any other column.
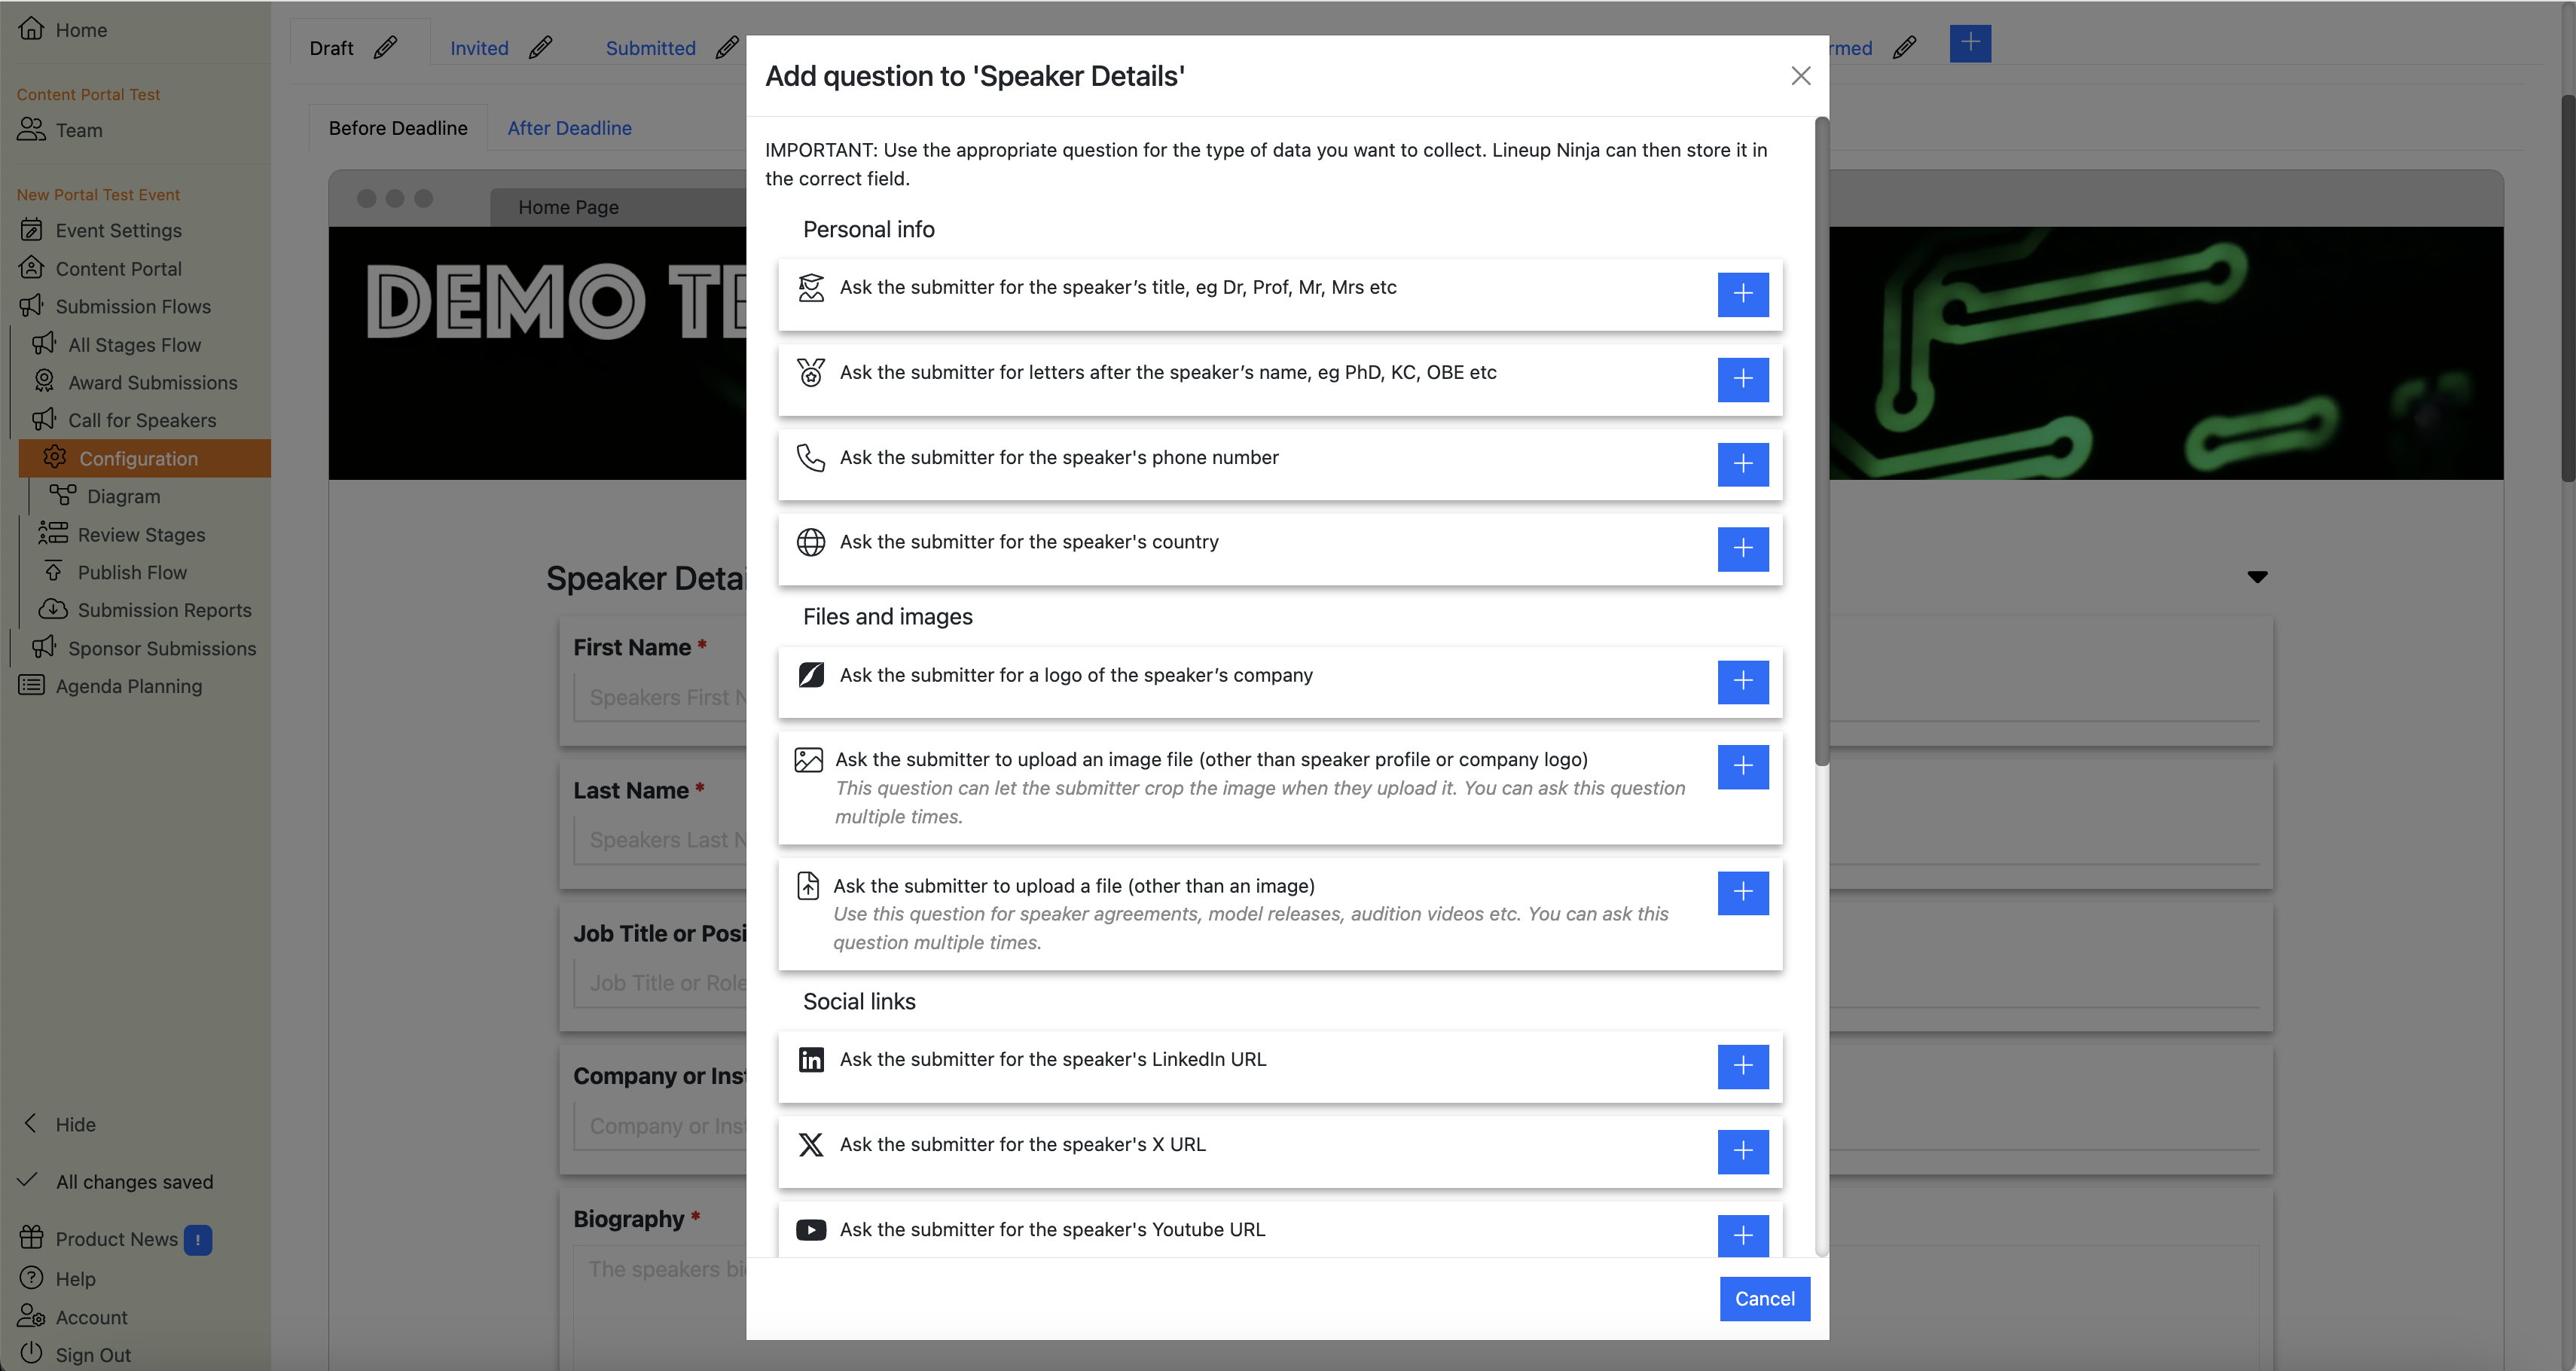
How do I use a Custom Field in a Submission Flow?
You can use Custom Fields with your Submission Flows to gather additional data from your submitters.
To add a Custom Field question into a Submission Flow, follow these steps:
Navigate to
Custom Fields
and create either a ‘Speaker Field’ or ‘Session Field’ depending on the type of data you want to gather
Now navigate to the
Form Designer
in the Submission Flow you want to add the question
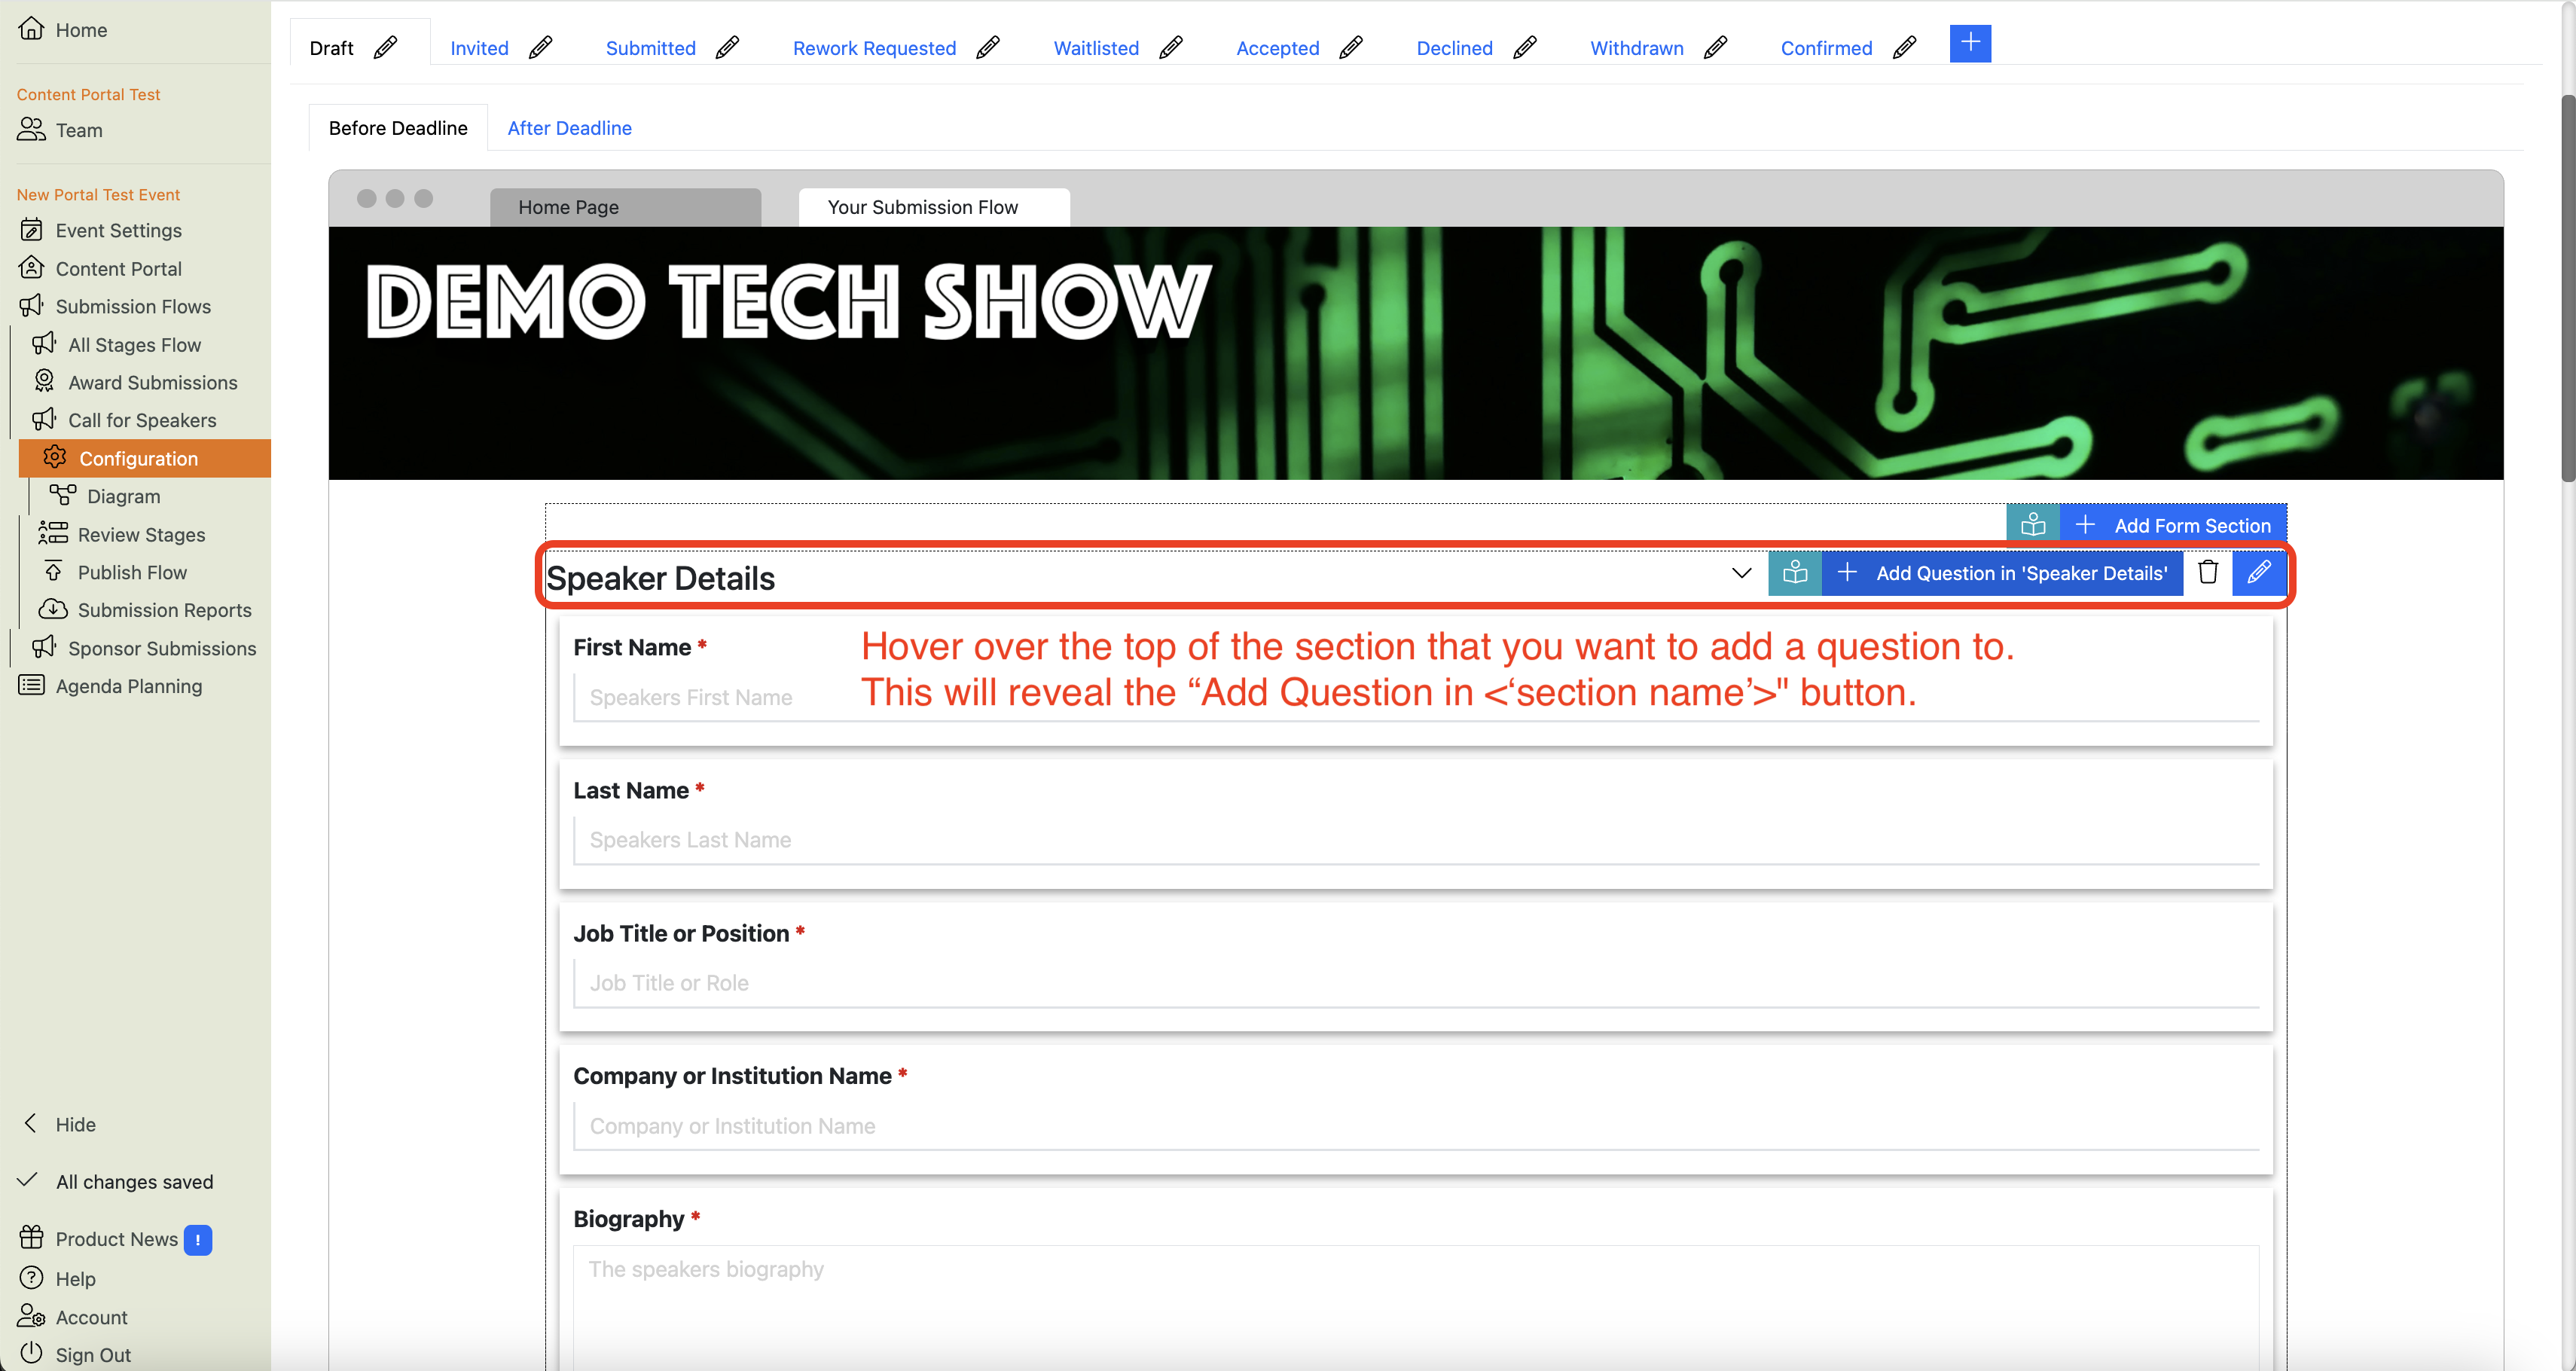
In the section you want to add a question, click
next to ‘Add a question to this section’
Click
next to ‘Ask the submitter for data that will map to a Session/Speaker Custom Field’
Select the Custom Field from the drop-down menu and click Save
Configure the question as normal and it will now be created and linked to the Custom Field
How do I use a Custom Field in the Speaker Portal?
You can use the Speaker Fields to gather additional data from your speakers in the My Profile section.
All Speaker Field types can be used in the Speaker Portal.
To add a Custom Speaker Field question to the My Profile section of the Speaker Portal, follow these steps:
Navigate to
Custom Fields
and create a ‘Speaker Field’
Now navigate to the My Profile section of the
Speaker Portal
Click the blue to edit the My Profile settings
Scroll to the bottom of the My Profile questions where you will see your Custom Speaker Field questions
Click either ‘required’, ‘optional’ ‘view only’ or ‘hidden’, depending on how you want to configure the question
Click save
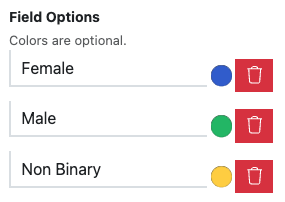
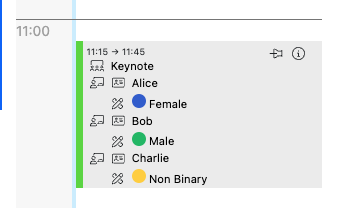
How are the colors for Custom Fields’ options useful?
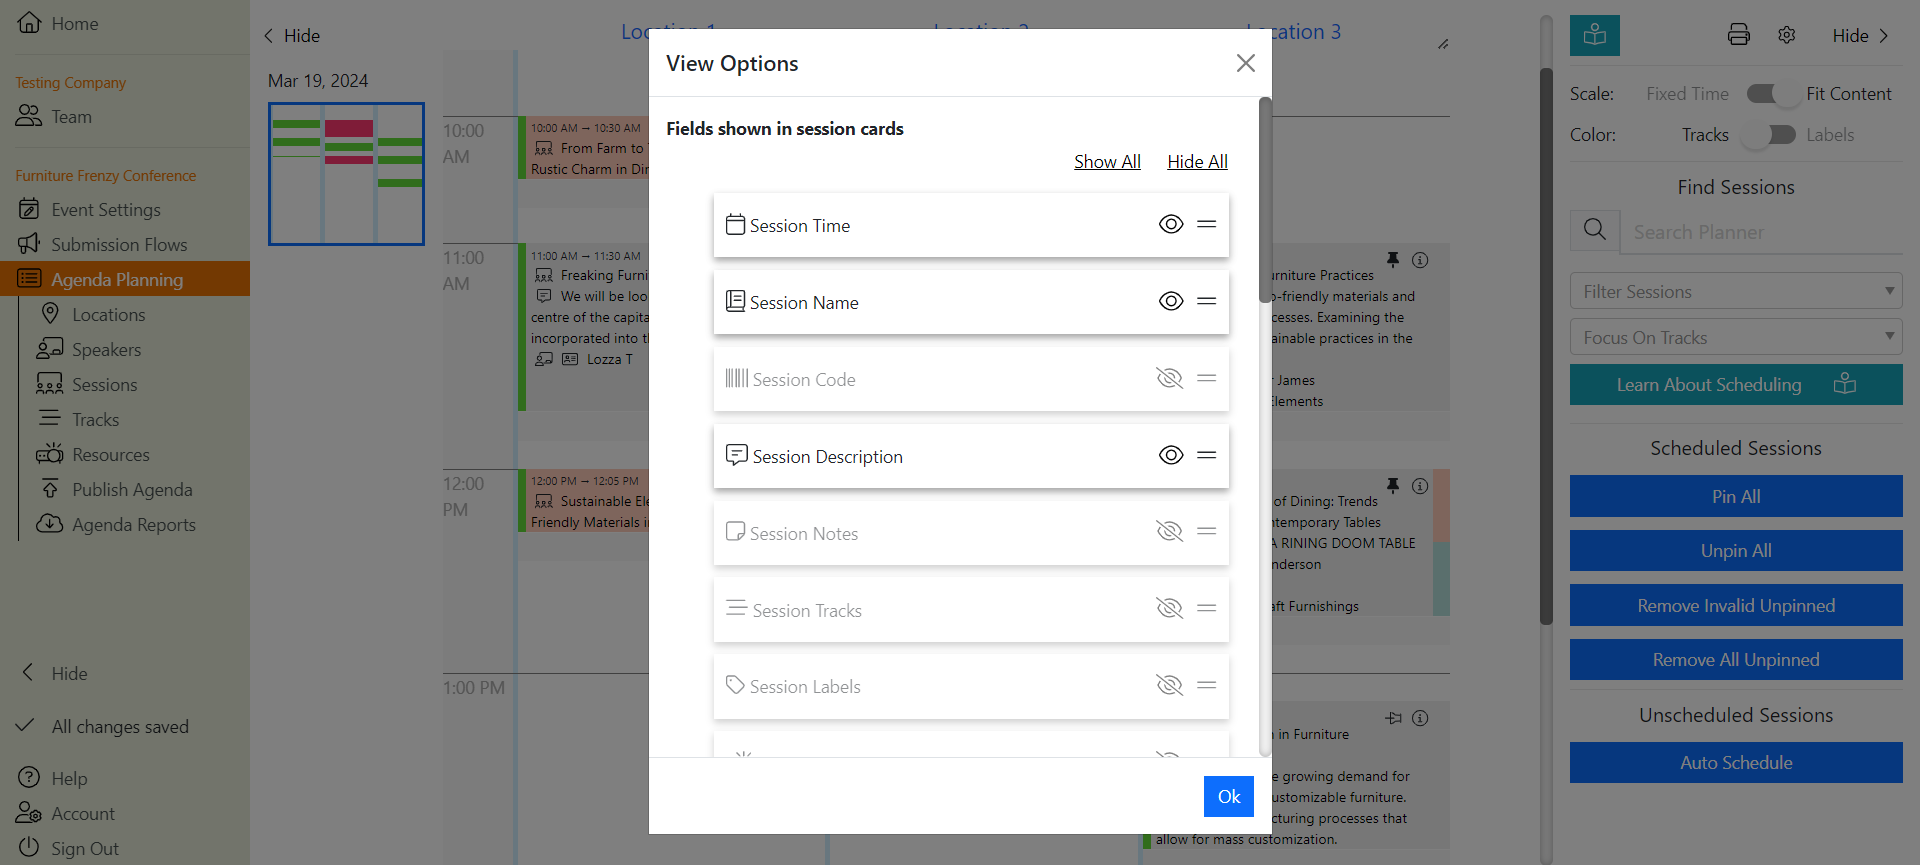
When using the ‘Choose One’ or ‘Choose Many’ Field Types you can assign a color to each option. These will then appear when the field is shown on the Agenda Planner, or in the list views. This enables you to more quickly get a visual overview of the values associated with each session.
For example you could use a Custom Field to help track gender diversity in your agenda. If you create a Custom Field for Speakers like this:
You can then show that data on the Agenda Planner:
How are the icons for the Custom Fields used?
You can choose a icon for your Custom Field. If you do it will be used in the following locations:
On the Agenda Planning board if you add the field in the settings.
When editing the corresponding Session, Speaker, Location etc..
WHen sharing the Custom Field in the Agenda App. (Currently for ‘Short Answer’ fields on Sessions only.)
To change the icon for the field edit the field on the
Custom Fields
page. Choose one of the selection or search for one from over 3,000 icons.
Still can’t find what you’re looking for? Email support@lineupninja.com and one of the team will get back to you as soon as possible.
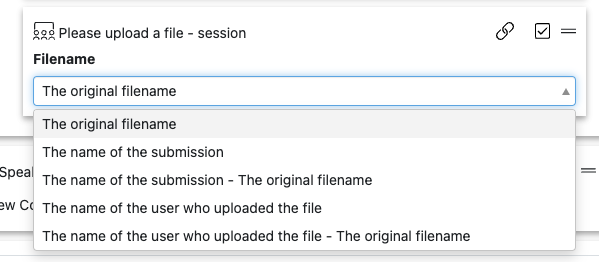
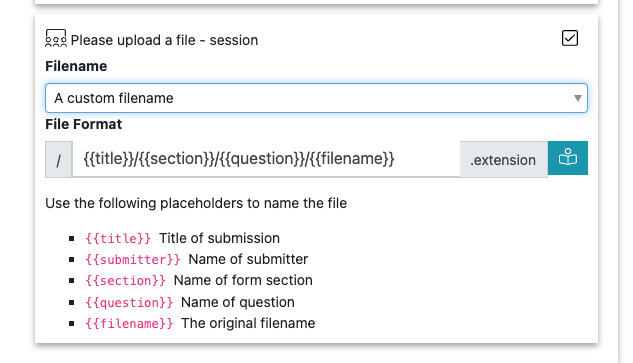
File Types
Info
When we talk about “File Types” in Lineup Ninja we don’t mean .xlsx .docx .pdf etc.
We mean things like “Speaker Profile Picture”, “Slide Deck”, “Session Sponsor Logo” etc.
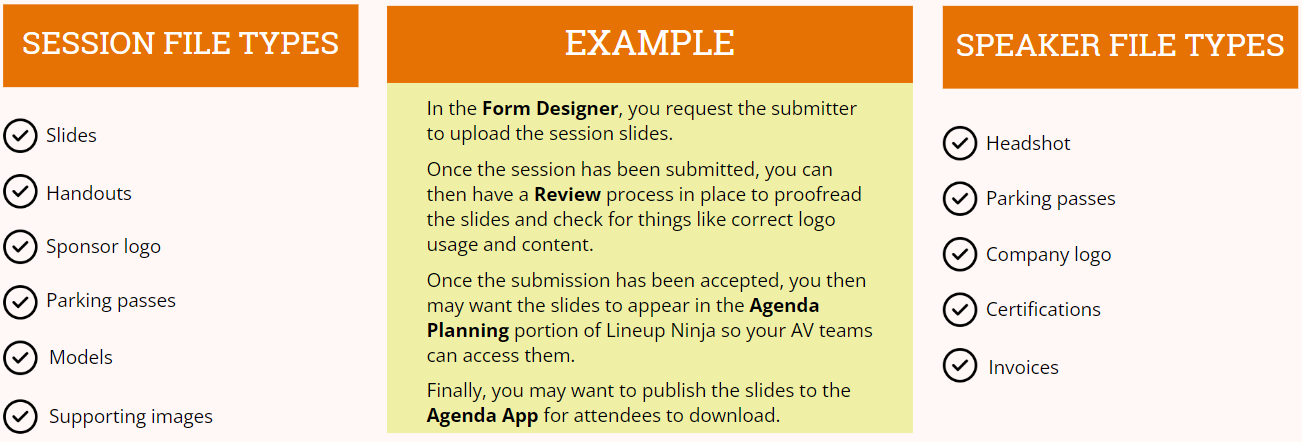
What are File Types and how can I use them to help plan my event?
Files Types help you group and identify files that your team or your submitters have uploaded to your event.
For some ideas on how File Types can be utilised within your event, we have made the following list and example of how our clients have used File Types.
There are two different kinds of File Types:
Image - You will be asked to name the image type, select how it is cropped and the format of the image
File - You will be asked to name the file type
How do I create and manage File Types?
Creating and managing File Types is easy:
Navigate into your event and click on
File Types
in the left-hand menu.
To add a new File Type - click
To edit an existing File Type - click
Note
You will find several predefined image file types in your event. These are special file types that map through from a Submission Flow to the Agenda Planning, and then out to any integrations you have configured. We strongly recommend not deleting these.
What is a ‘Generic File’?
A Generic File is any file other than an image. Generic files don’t ask submitters to crop them when they upload them. Image files do.
Are there any size limited for uploaded files?
No, you can upload files of any size.
Can I delete a File Type?
Yes. If there are existing questions in the Speaker portal or Submission Flow, or files linked to a speaker or session, then you will be asked to choose a new file type to change the existing questions and files to.
For images, if you change to a different file type with a different crop, existing images will not be changed, future uploads will get the new crop configuration.
How to use File Types
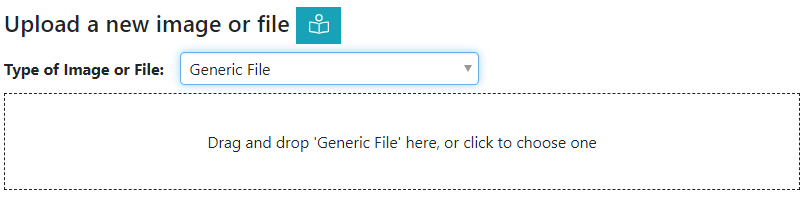
How do I manually upload files to Session/Speaker/Location/Label/Tracks?
Navigate to the list page of the item you wish to upload a file to
Click into the item you wish to upload a file to
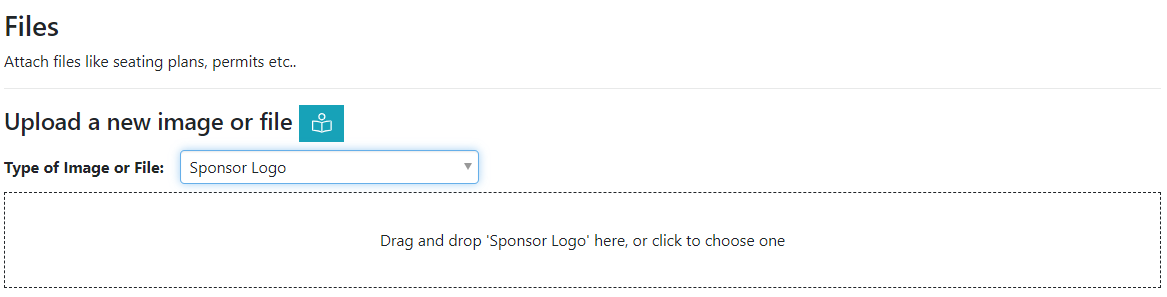
Scroll down until you see ‘Upload a new image or file’
Select the ‘Type of Image or File’ from the drop-down menu
Drag and drop into the box or click the box to upload a file
How do I use File Types in Submission Flows?
Navigate to the relevant Submission Flow and click on
Form Designer
in the left-hand menu.
Click
next to ‘Add a question to this section’.
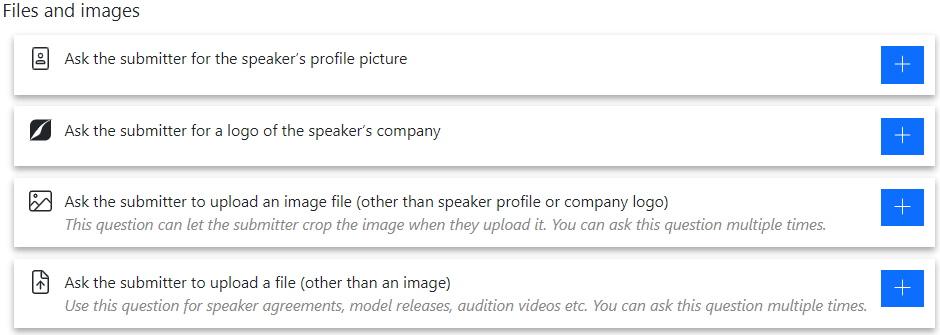
In the Speaker section, you will see the following four question options to add:
In the Session section or any additional sections created, you will see the following two question options to add.
When selecting either ‘Ask the submitter to upload an image file (other than speaker profile or company logo’ or ‘Ask the submitter to upload a file (other than an image)’, you will need to select ‘Image File Type’ to map to the created File Type.
For each File Type question added, you have the option to tick ‘Add file to speaker/ session in Agenda’. This will pull through the images/files to Agenda Planning when a speaker/session is created.
Note
If a submitter updates an image/file, it will only show on their submission until you choose to update the session. This enables you to review the new file before making it available on the agenda.
Once the session has been updated, it will replace the old file/image.
How do I add a File Type question in the Speaker Portal?
You can use File Types to gather additional files from your speakers in the My Profile section.
Navigate to
File Types
and create the relevant File Type you wish to create a question for
Now navigate to the My Profile section of the
Speaker Portal
Click the blue
to edit the My Profile settings
Scroll to the bottom of the My Profile questions where you will see your new File Type question
Click either ‘required’, ‘optional’ ‘view only’ or ‘hidden’, depending on how you want to configure the question
Click save
Still can’t find what you’re looking for? Email support@lineupninja.com and one of the team will get back to you as soon as possible.
Data Sources
Data sources allow you to pull data from another platform or system, so you cna compare the data with the speakers or sessions in Lineup Ninja.
They are a key part of how the Grip and Swapcard integrations work.
Info
Data sources are NOT used for bulk importing / uploading all of your speakers or sessions.
If you need to import such data, please reach out to support.
Still can’t find what you’re looking for? Email support@lineupninja.com and one of the team will get back to you as soon as possible.
Subsections of Data Sources
Grip
Why would I want to import Grip data to Lineup Ninja?
If you are publishing your agenda into a Grip application then you can link your Lineup Ninja data with the Speaker, Sponsor and Exhibitor data in Grip.
This ensures that sessions are correctly linked to the right speakers, and that they have the right sponsors.
The data is linked by importing it into Lineup Ninja. Where possible the data will be matched automatically. You will also be able to make any manual tweaks and then publish your agenda into Grip.
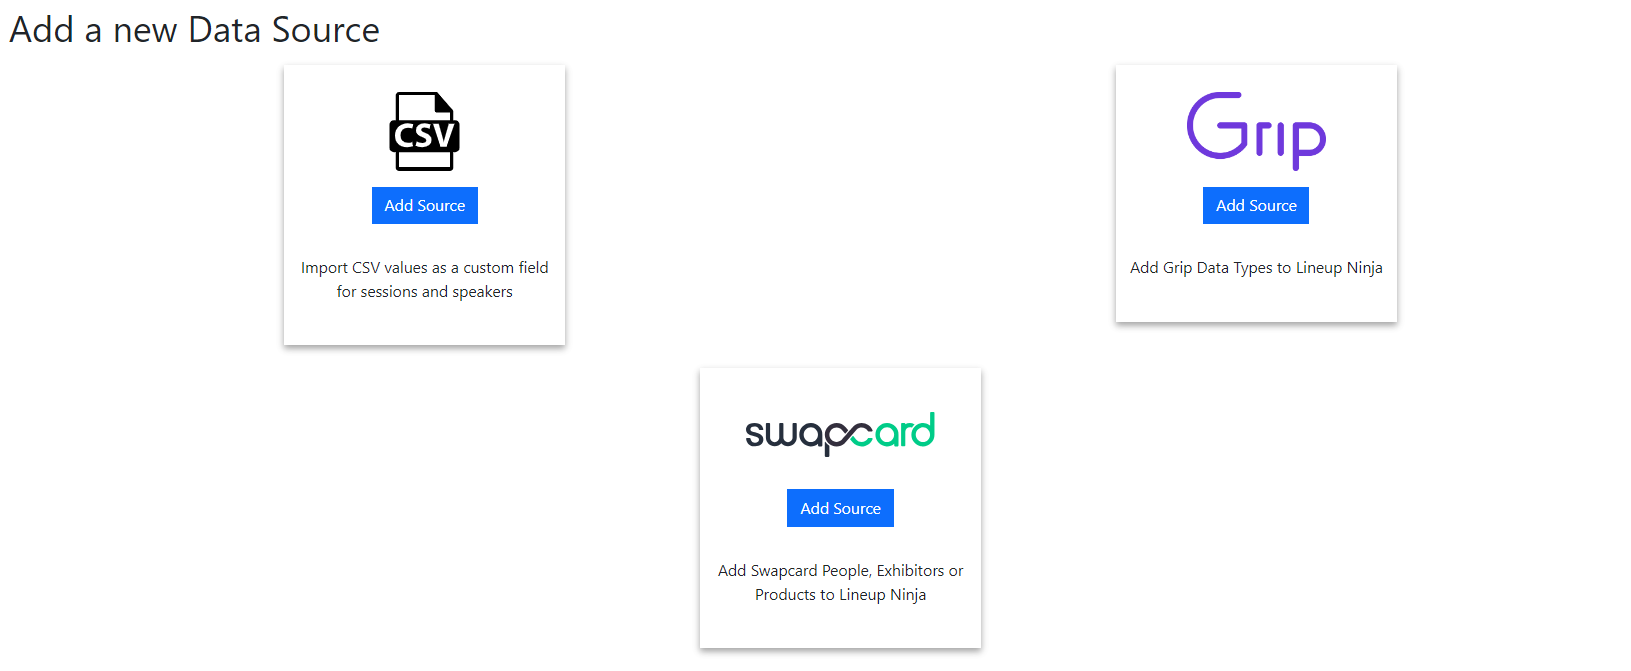
How do I add Grip data to Lineup Ninja?
Start by navigating to
Event Settings
>
Data Sources
and choose ‘Add Source’ under the Grip logo.
You will now be presented with a screen of configuration. The fields are as follows:
Name - This name will be used to show the data source in the left hand menu
Icon - Choose an icon that will help you recognize this particular data source
Event ID - The ID of you event in Grip. You can find this in your Dashboard or Grip can provide it to you
Grip Type ID’s - This is a comma separated list of numbers. You should provide all Type ID’s that may be used to represent the thing you are adding. For example if you have Visitor and Exhibitor Representative types in Grip you should add the id for both separated by a comma.
API Token - A token can be found in Grip at ‘App Settings’ / ‘API Tokens’. You should use the ‘Application Administrator’ token.
What Lineup Ninja data will this source be linked to - If you are importing registrations to map Speakers choose ‘Speakers’. If you are importing companies to link sponsors or exhibitors choose ‘Sessions’.
What kind of data are you importing - Choose Companies or Registrations as appropriate.
Automatically refresh with new data is added in Grip - Turn this on to have the data source automatically update when a new registration or company appears in Grip.
Attempts to Automatically Match Items - For speakers choose ‘By Email Address’. For Sponsors, you can tell Lineup Ninja to use the company name of a speaker to match to a sponsor.
Enable fuzzy auto matching - If enabled speakers that do not have a match on email address will attempt to match the name of the speaker. For sponsors, the company name is used. The number here allows for tweaking of how exact a match should be before it is presented to you for review.
Advanced: Things or Registrations - Choose ‘Both’ unless otherwise advised.
Advanced: Specify a format for the name - See ‘How do I set the name of imported data in Grip’ below.
Now save the changes, then press ‘Fetch Source’ this will load the data from Grip into Lineup Ninja.
How do I find the Grip Type ID for my data?
In the Grip interface select your event then browse to ‘Data Types’ / ‘Type Settings’.
The type ID is one of the columns on the page. Copy this into the configuration in Lineup Ninja.
Does the data update automatically?
The data will automatically update if you tick the ‘Automatically refresh when new data is added in Grip’ checkbox in the source configuration. What this does is configure a ‘Webhook’ in Grip which means Lineup Ninja is notified whenever the data changes at Grip.
How do I set the name of imported data in Grip?
When you import data from Grip into Lineup Ninja the records will show the ‘Name’ of the Thing in Grip. You may wish to include additional information, such as Company Name, or Job Title to help you find the correct record.
To do this edit the Grip Data Source configuration and set the value for ‘Name Format’. You can use the following placeholders. They map directly to the fields in Grip.
{{name}} - The full name of the Thing
{{first_name}}
{{last_name}}
{{job_title}}
{{company_name}}
{{job_industry}}
{{headline}}
So for example if you could set a Name Format of:
{{name}} is {{job_title}} at {{company_name}}
Which will cause imported data to look like similar to this:
Gordon Johnston is Director at Lineup Ninja
You can update the Name Format at any time. If you make a change then re-run a Fetch to update any imported data.
Still can’t find what you’re looking for? Email support@lineupninja.com and one of the team will get back to you as soon as possible.
LiveBuzz
Why would I want to import LiveBuzz Exhibitors to Lineup Ninja?
If you are running your event on LiveBuzz you can pull your Exhibitors into Lineup Ninja so that speakers can be linked to their exhibiting companies.
The data is linked by importing it into Lineup Ninja. You can then create or match Lineup Ninja Speakers against each LiveBuzz Exhibitor — multiple Speakers can be linked to a single Exhibitor, so all booth staff for one company can sit under that Exhibitor record.
How do I add LiveBuzz Exhibitors to Lineup Ninja?
Start by navigating to
Event Settings
>
Data Sources
and choose ‘Add Source’ under the LiveBuzz logo.
You will now be presented with a screen of configuration. The fields are as follows:
Name - This name will be used to show the data source in the left hand menu
Icon - Choose an icon that will help you recognize this particular data source
Environment - The LiveBuzz environment for your event. You can find this in your LiveControl URL.
Campaign - The LiveBuzz campaign for your event. This also appears in your LiveControl URL.
Type - Currently fixed to ‘Exhibitor’. Other types may be available in future.
To find the Environment and Campaign values, log in to LiveControl and look at the address in your browser. It will look like this:
In this address:
The ‘Environment’ is ’livebuzz’
The ‘Campaign’ is ’lb-event-2023’
Input the equivalent values for your address into the configuration.
Lineup Ninja Support Step
The first time you use a campaign or environment the Lineup Ninja support team may need to do some work behind the scenes to get you set up. If this is required you will see a message notifying you and a support ticket will be raised on your behalf.
The team will be in touch as soon as they have completed the necessary steps. If you have already configured a LiveBuzz publish target for the same environment and campaign, no additional authorization step is required — the existing access applies to the new data source automatically.
Once your source is configured, press ‘Fetch Source’ to pull the current Exhibitors from LiveBuzz into Lineup Ninja.
How do I match Lineup Ninja Speakers to imported LiveBuzz Exhibitors?
Once the ‘Fetch Source’ has run you will see a new menu item in the Agenda Planning section. The name and icon will match your configuration.
You will see a list of all imported LiveBuzz Exhibitors and the Lineup Ninja Speakers that are linked to each one. You can link multiple Speakers to a single Exhibitor — for example, all of the staff representing a single exhibiting company.
To change a link, edit the row with the pencil and choose the Speaker.
How do I pull in new Exhibitors?
Lineup Ninja does not poll LiveBuzz automatically. Press ‘Fetch Source’ on the data source whenever you want to pull the latest Exhibitors — new Exhibitors will appear, and any that have been removed or moved to an excluded status will disappear.
Which Exhibitors are imported?
Lineup Ninja imports every LiveBuzz Exhibitor whose status is active, pending, or incomplete. Exhibitors that are cancelled, duplicate, or rejected are not imported.
If an Exhibitor is removed from LiveBuzz, or its status moves to one of the excluded values, it will disappear from Lineup Ninja on the next ‘Fetch Source’.
Still can’t find what you’re looking for? Email support@lineupninja.com and one of the team will get back to you as soon as possible.
Swapcard
Why would I want to import Swapcard data to Lineup Ninja?
If you are publishing your agenda into a Swapcard application then you can link your Lineup Ninja data with the existing registrations in Swapcard. This ensures that sessions are correctly linked to the right speakers, and that the headshots and bio data matches your expected content.
The data is linked by importing it into Lineup Ninja. Where possible the data will be matched automatically. You will also be able to make any manual tweaks and then publish your agenda into Swapcard.
How do I add Swapcard data to Lineup Ninja?
Start by navigating to
Event Settings
>
Data Sources
and choose ‘Add Source’ under the Swapcard logo.
You will now be presented with a screen of configuration. The fields are as follows:
Name - This name will be used to show the data source in the left hand menu
Icon - Choose an icon that will help you recognize this particular data source
Event ID - The ID of you event in Swapcard. You can find this at the bottom of the ‘Event Settings’ page in Swapcard.
API Key - Generate an API Key by clicking your name in the top right of the Swapcard interface and choosing ‘API Keys’.
What Lineup Ninja data will this source be linked to - Choose ‘Speakers’ here unless otherwise advised by support.
Attempts to Automatically Match Items - Choose ‘By Email Address’.
Enable fuzzy auto matching - If enabled speaker’s that do not have a match on email address will attempt to match on the name of the speaker. You can specify a number between 0 and 100 for how accurate a match should be for it to be suggested to you. Generally around 70-80 is good.
Automatically refresh when new data is added in Swapcard - When enabled new data in Swapcard will be automatically imported into Lineup Ninja. It is recommended to leave this option enabled.
Now save the changes, then press ‘Fetch Source’ this will load the current data from Swapcard into Lineup Ninja. Future changes in Swapcard will be automatically updated in Lineup Ninja.
How do I match the Lineup Ninja data to the imported Swapcard data?
Once the ‘Fetch Source’ has run you will see a new menu item in the Agenda Planning section. The name and icon will match your configuration. There are two tabs.
On the first tab ‘By Speakers’ you will see a list of all of your speakers and the current match with a person in Swapcard. If Lineup Ninja has found a possible match it will be presented to you to either accept or decline. You can bulk accept and decline all matches at the bottom of the page.
To change an individual match edit the row with the pencil and change the person.
On the second tab ‘By Swapcard People’ you will see a list of all Swapcard people. You can use this to validate the data that was imported and you can also create individual matches on this page.
Still can’t find what you’re looking for? Email support@lineupninja.com and one of the team will get back to you as soon as possible.
CSV
How do I add custom data to Lineup Ninja?
You can add multi valued fields to your speakers and sessions. Please speak to support for assistance with configuring this.
Still can’t find what you’re looking for? Email support@lineupninja.com and one of the team will get back to you as soon as possible.
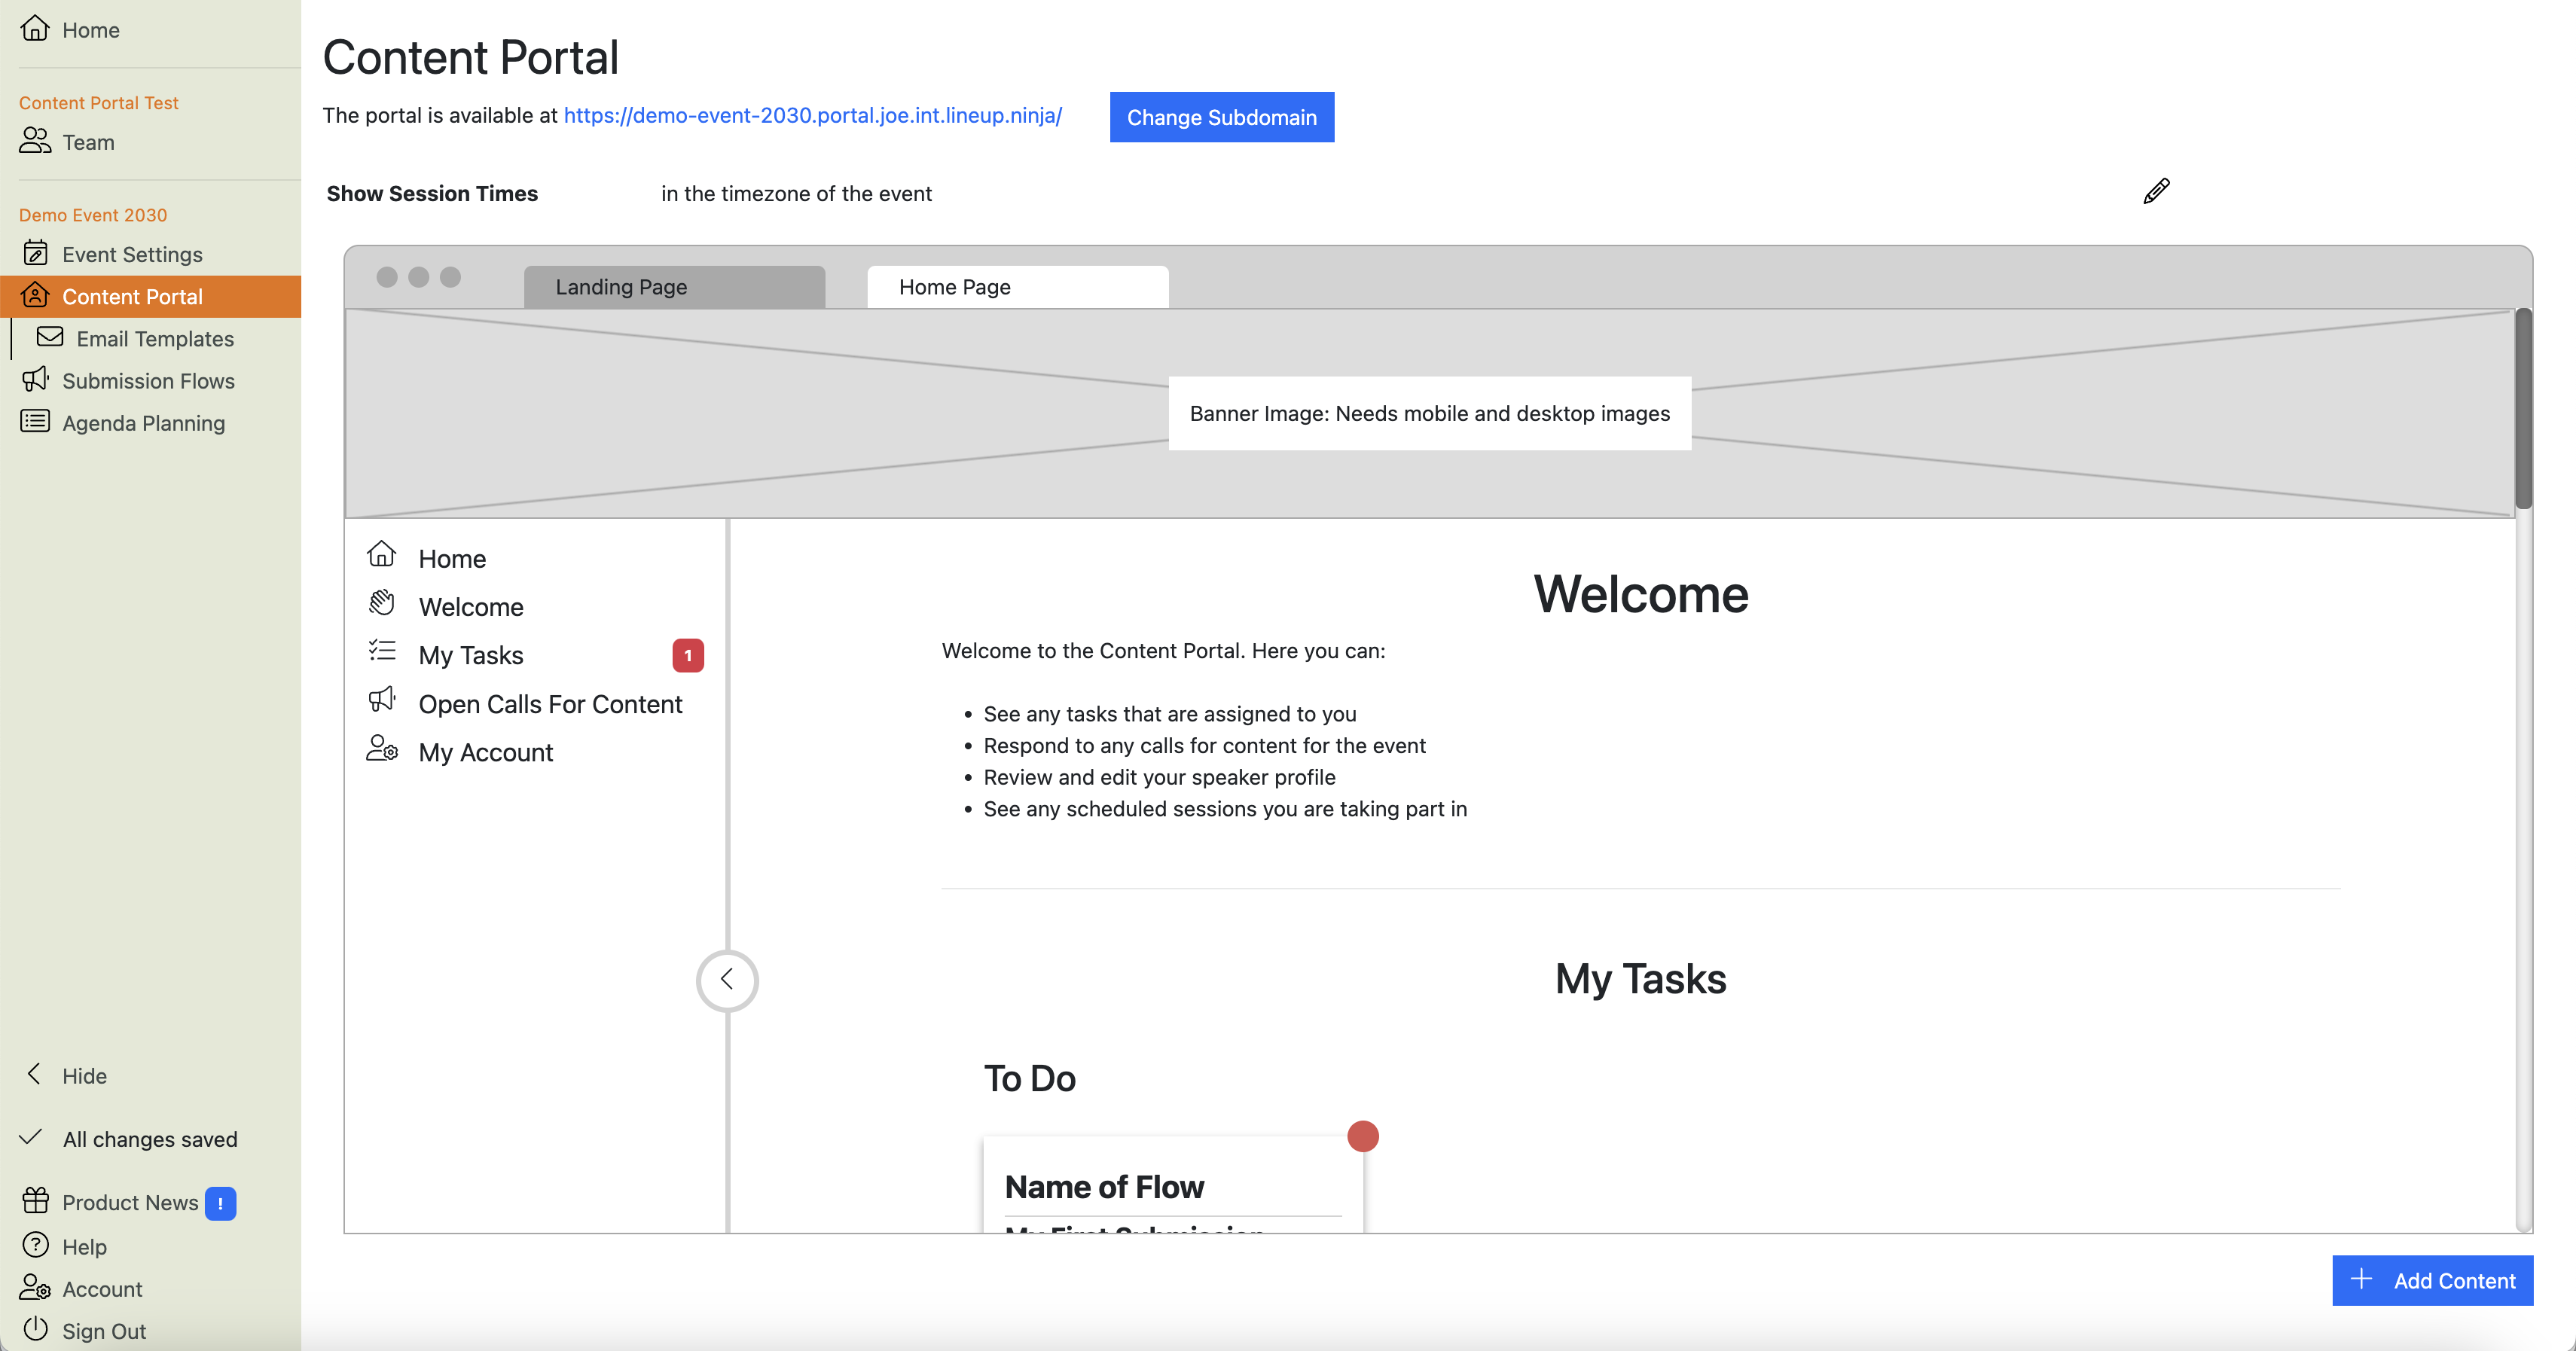
Content Portal
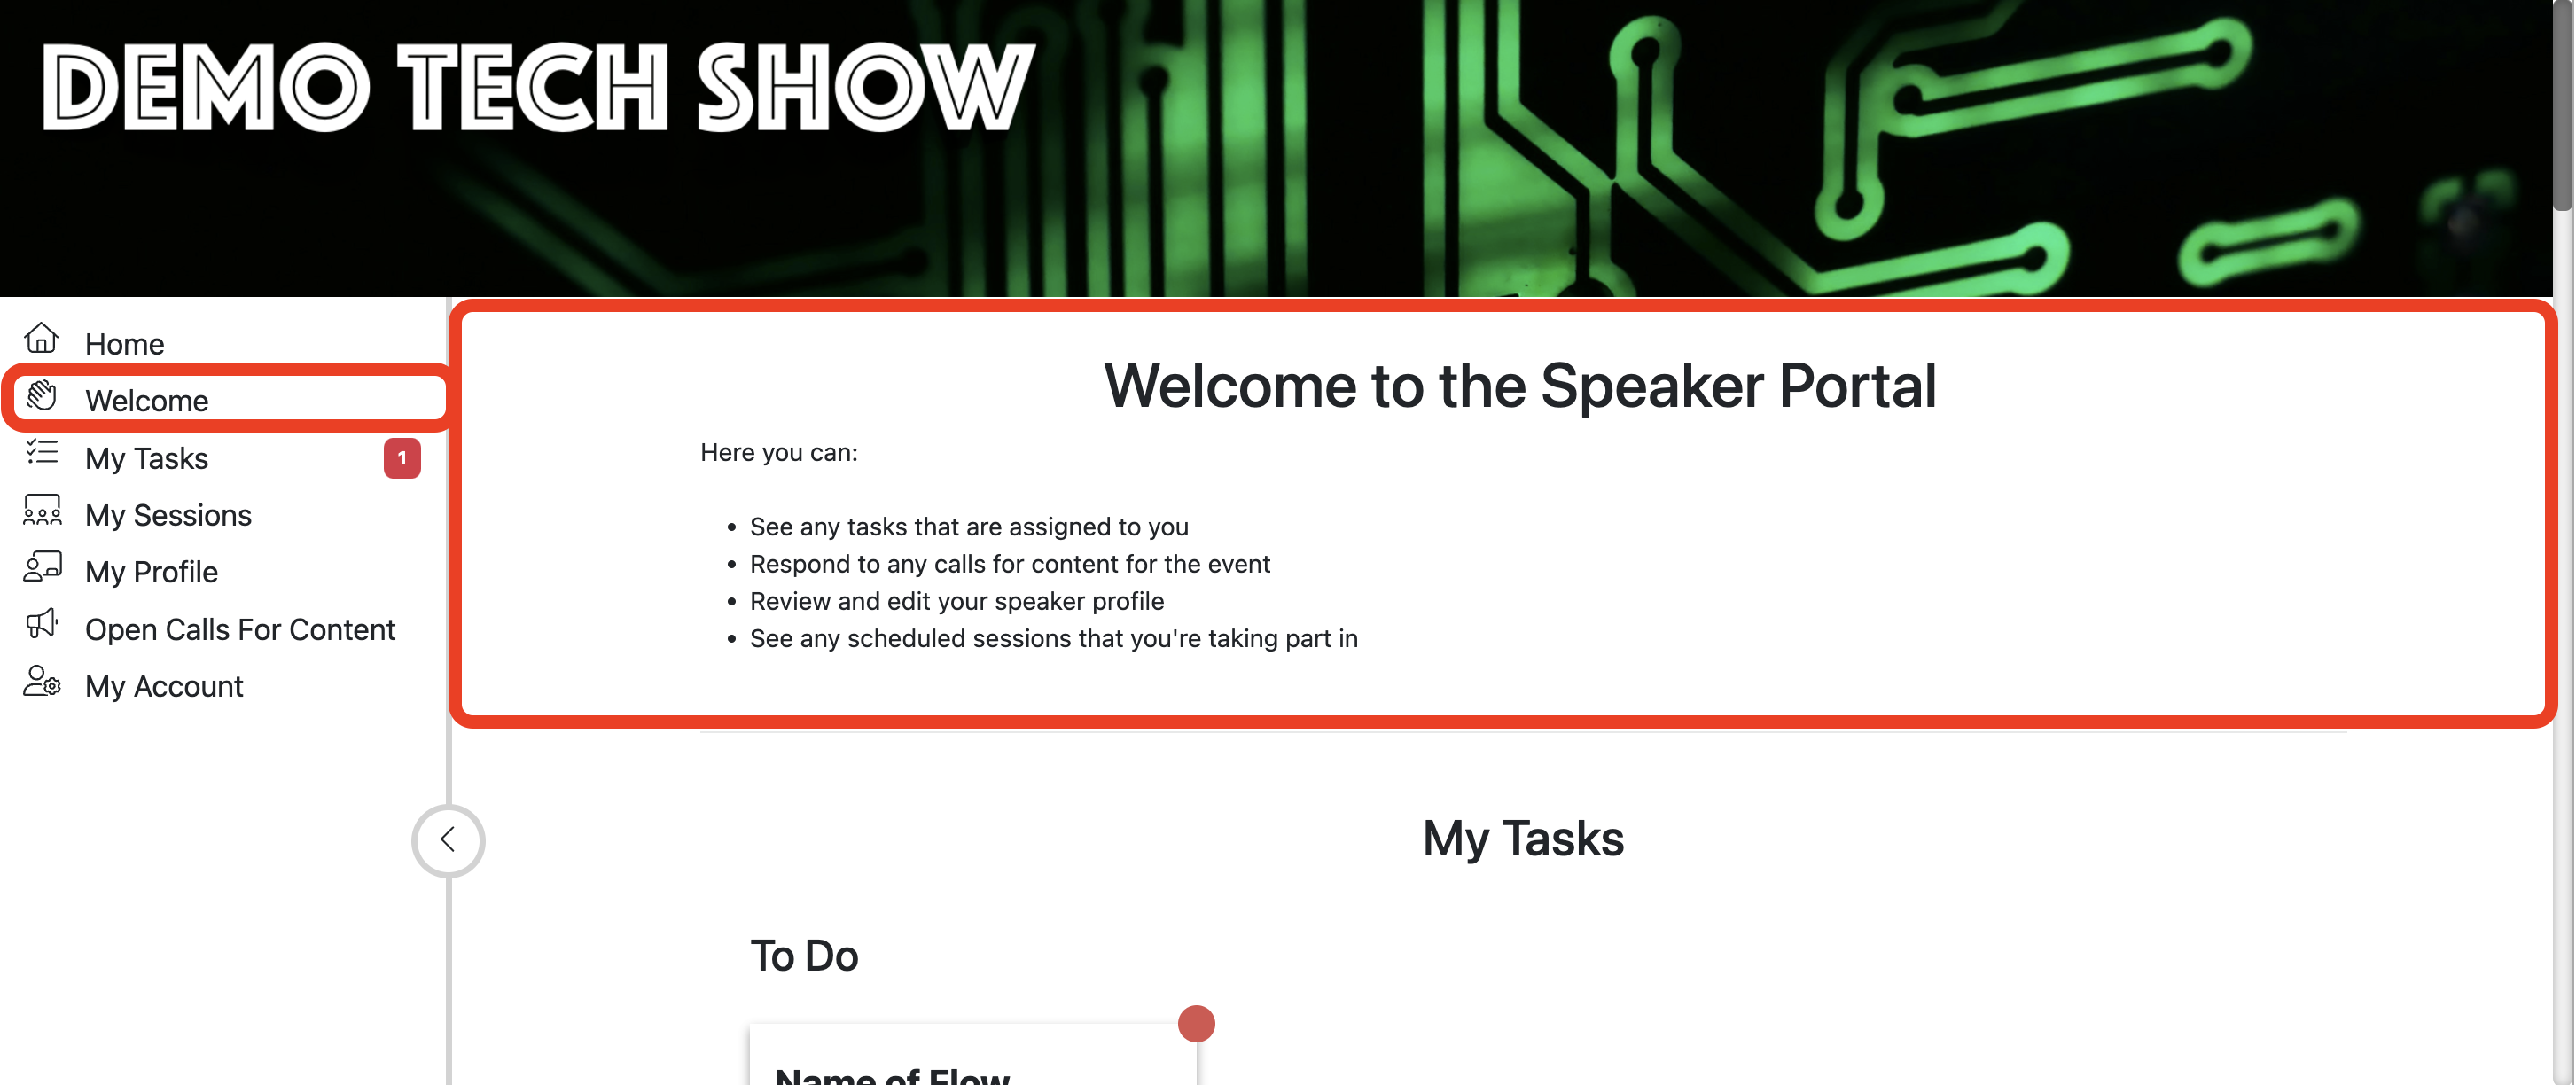
The Content Portal gives speakers (and other content contributors) a single place to:
See any tasks that are assigned to them
Respond to any calls for content for the event
Upload content
Review and edit their speaker profile
See any scheduled sessions that they’re taking part in
Learn more about creating and editing email templates for the Speaker Portal.
Still can’t find what you’re looking for? Email support@lineupninja.com and one of the team will get back to you as soon as possible.
Subsections of Content Portal
Content Portal: General Setup
General setup information and configuration options that apply to both the Landing Page and Home Page of the Content Portal.
How do I set up the portal?
When you create a new event, the New Event dialogue box will ask you to provide the portal with a subdomain (the first part of the web link). This is the link that speakers and other contributors will use to access the portal:
By default, the system will generate a subdomain based on the event name, but you can add your own custom subdomain.
Tip
The subdomain needs to be unique, so we recommend adding the year to the end of your event name or subdomain.
When you click “Create Event”, the portal will be created and published to this web address.
This is the page that portal users will see when they arrive at the web link. You can use it as a simple “Welcome”, or to provide guidance for users before they log in to the portal.
Read more about how to configure the Landing Page here.
Home Page
This is the page that users will see once they’ve logged in. It can contain several sections that users can interact with. Read more about these sections and how to configure the Home Page here.
Tip
You can apply different branding to the landing page and the home page. For example, you can add a large, impactful banner image on your landing page and a smaller image on the home page to save space.
How do I add branding to the Content Portal?
Branding is added (in the form of banner images) to the top of the Landing Page and Home Page of the Content Portal.
You can add banners to these page (e.g. a larger, impactful image on the Landing Page and more space-efficient banner on the Home Page).
Each page also allows you to add two images: one for desktop and one for mobile devices.
How do I invite Speakers to the Content Portal?
Navigate to
Agenda Planning
>
Speakers
Click
at the bottom right of the list view to add a new Speaker
Fill out their first and last name, an email address and company name. If you have already input your Sessions, you can assign them to the Speaker here too
Click to save
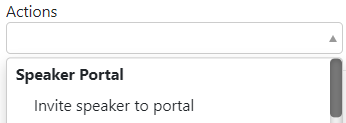
Select the Speaker(s) you wish to invite to the Speaker Portal
using the tick box on the left hand side
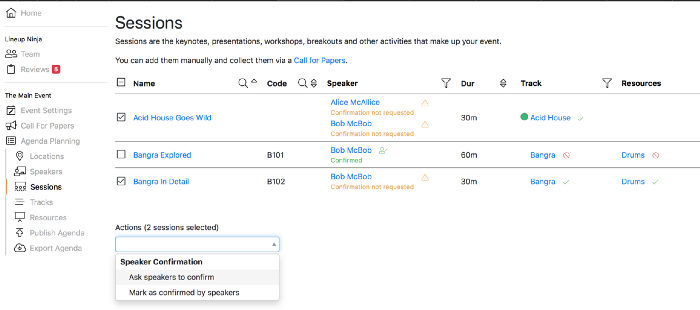
Scroll to the ‘Actions’ drop down and select ‘Invite Speakers to Portal’
A popup will appear, containing the email that will be sent to the Speaker, in which you can select what group of people the email is sent to
Note
For more information about configuring and customising Email Templates and Branding, follow this link.
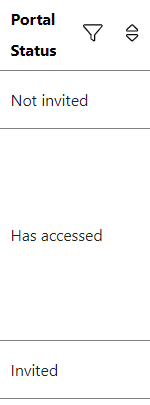
How do I see who has and has not been invited to the Speaker Portal?
Within the Speaker List on
Agenda Planning
, there is a column indicating the Portal Status for each Speaker:
Not Invited - Speaker has not yet been invited to the Portal
Invited - Speaker has been invited to the Portal but has not yet accessed it
Has Accessed - Speaker has been invited to the Portal and has accessed it (logged in)
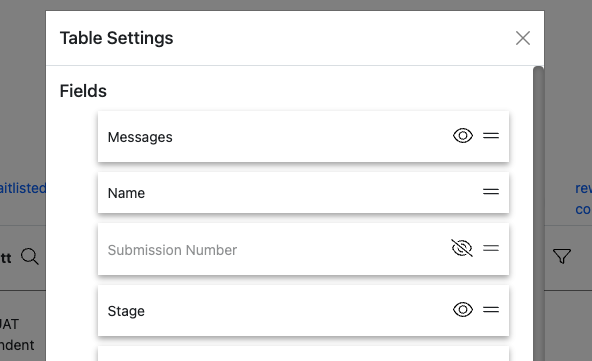
Tip
If the column does not appear, navigate into the settings by clicking on the Settings Wheel in the top right corner. Here you can hide/unhide columns using the Eye Icon.
Still can’t find what you’re looking for? Email support@lineupninja.com and one of the team will get back to you as soon as possible.
Content Portal: Landing Page
This is the page that portal users will see when they arrive at the web link. You can use it as a simple “Welcome”, or to provide guidance for users before they log in to the portal.
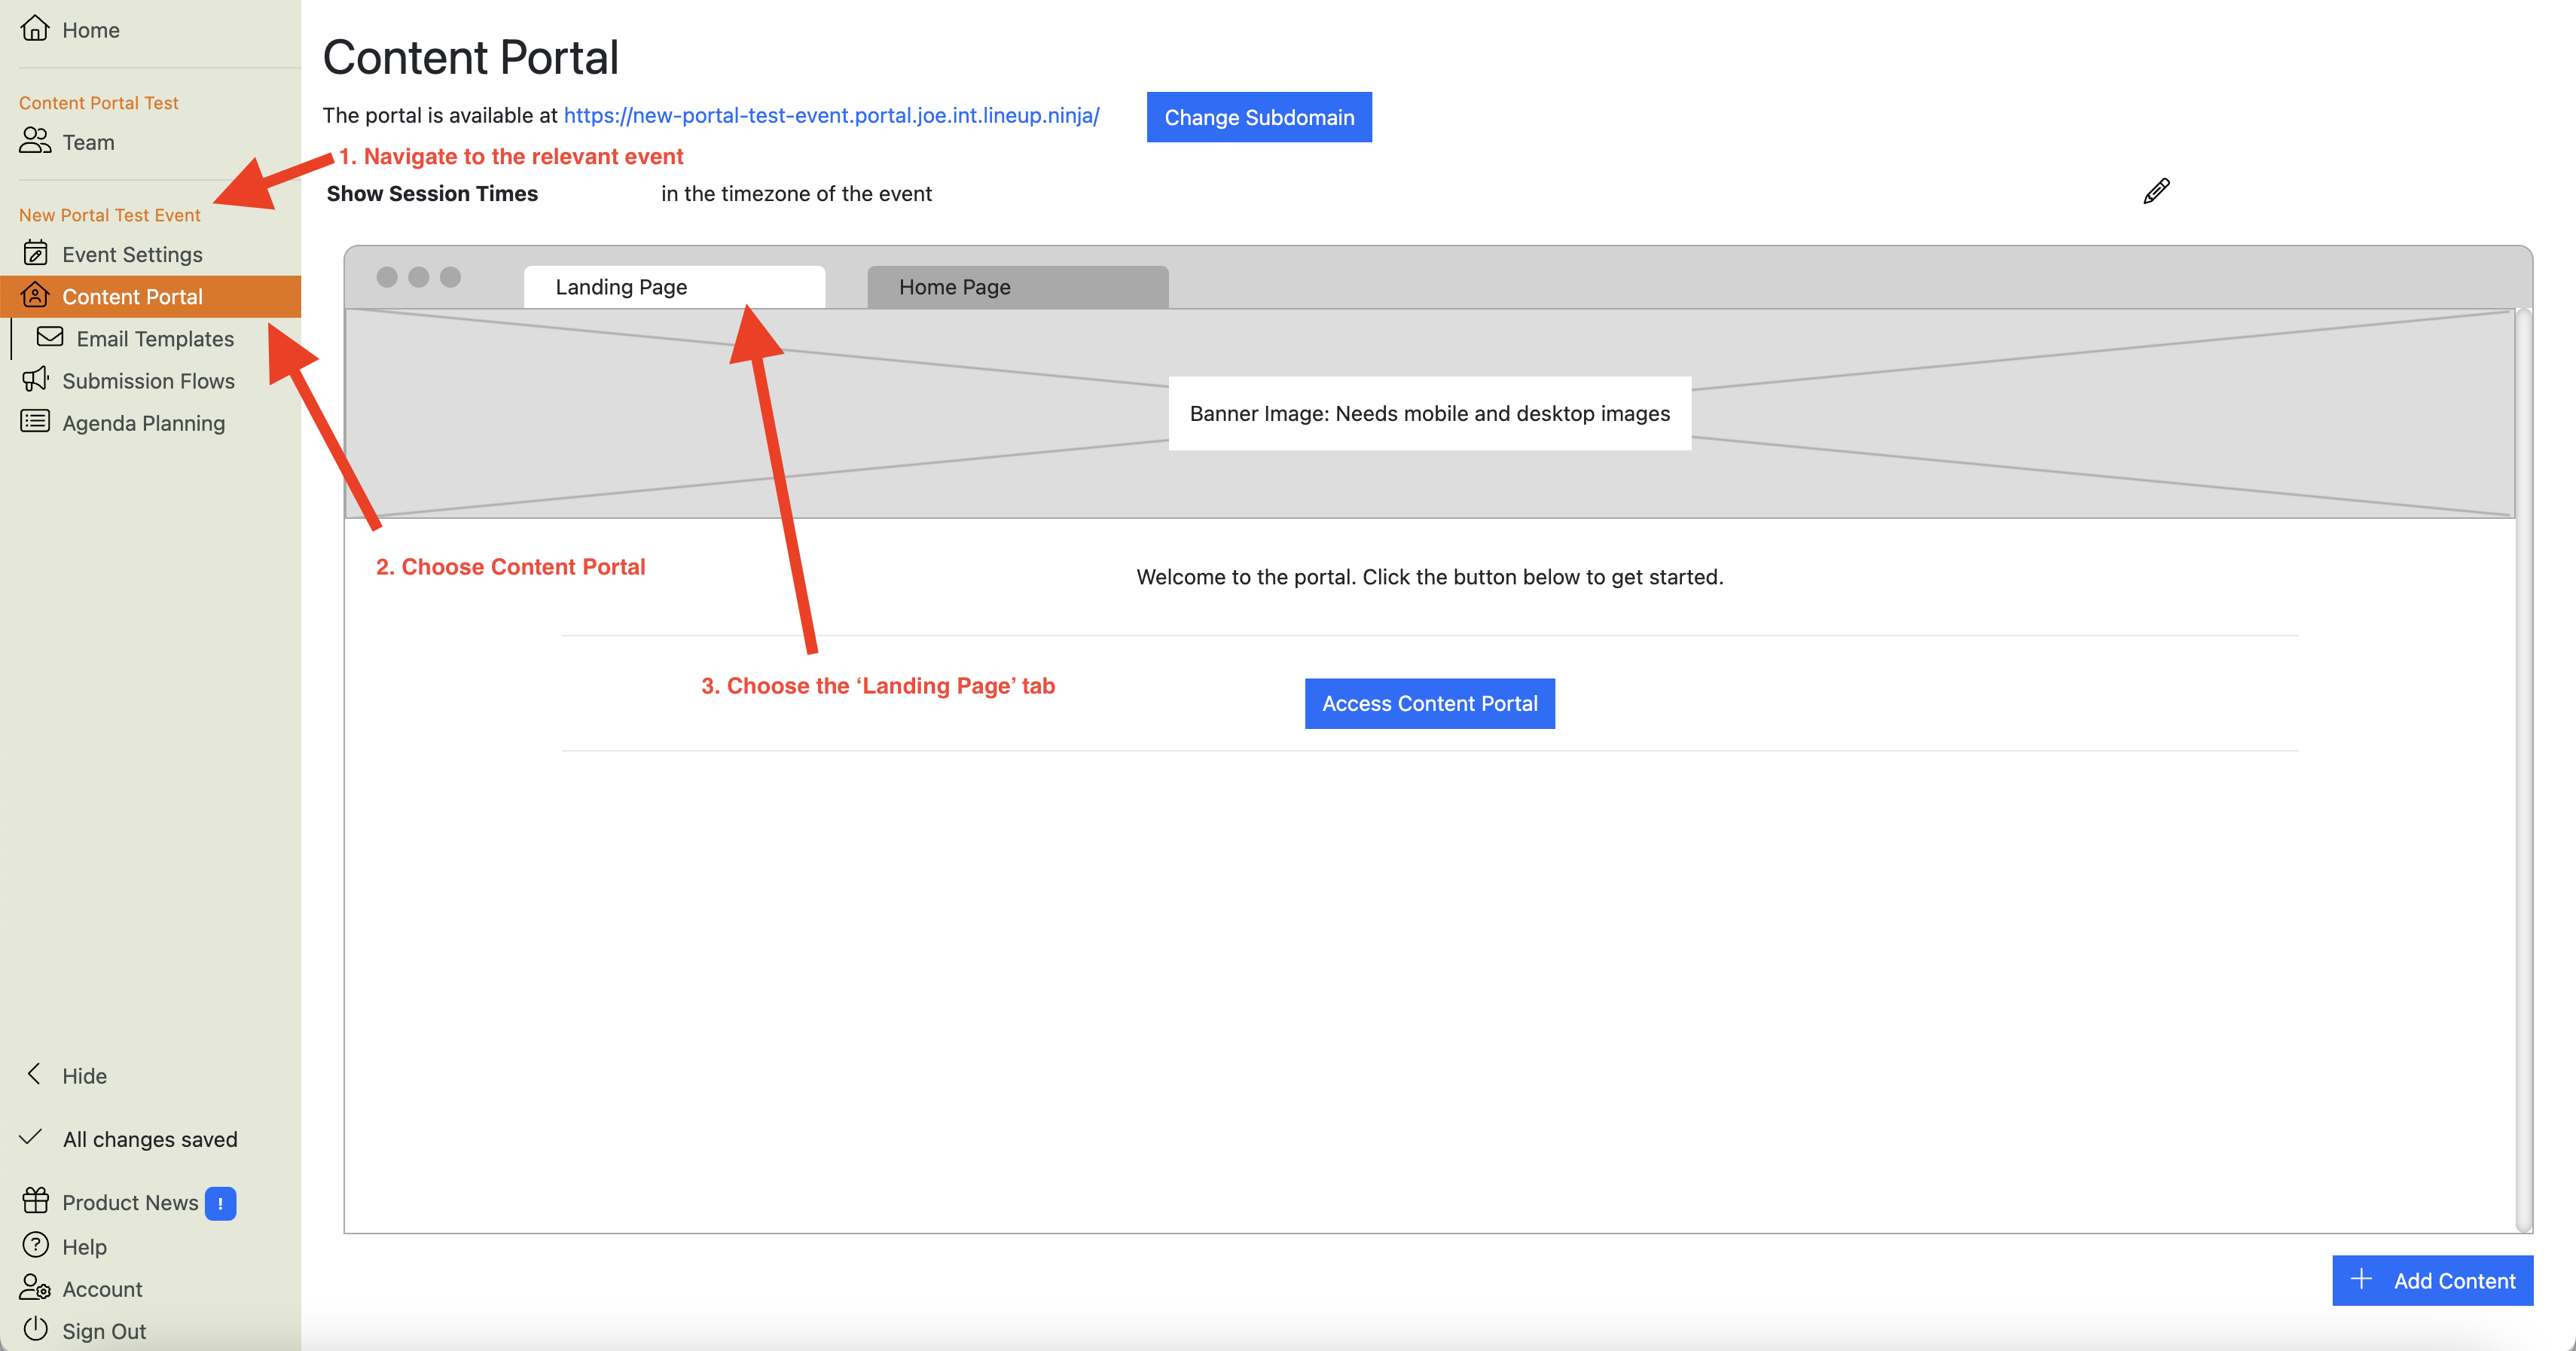
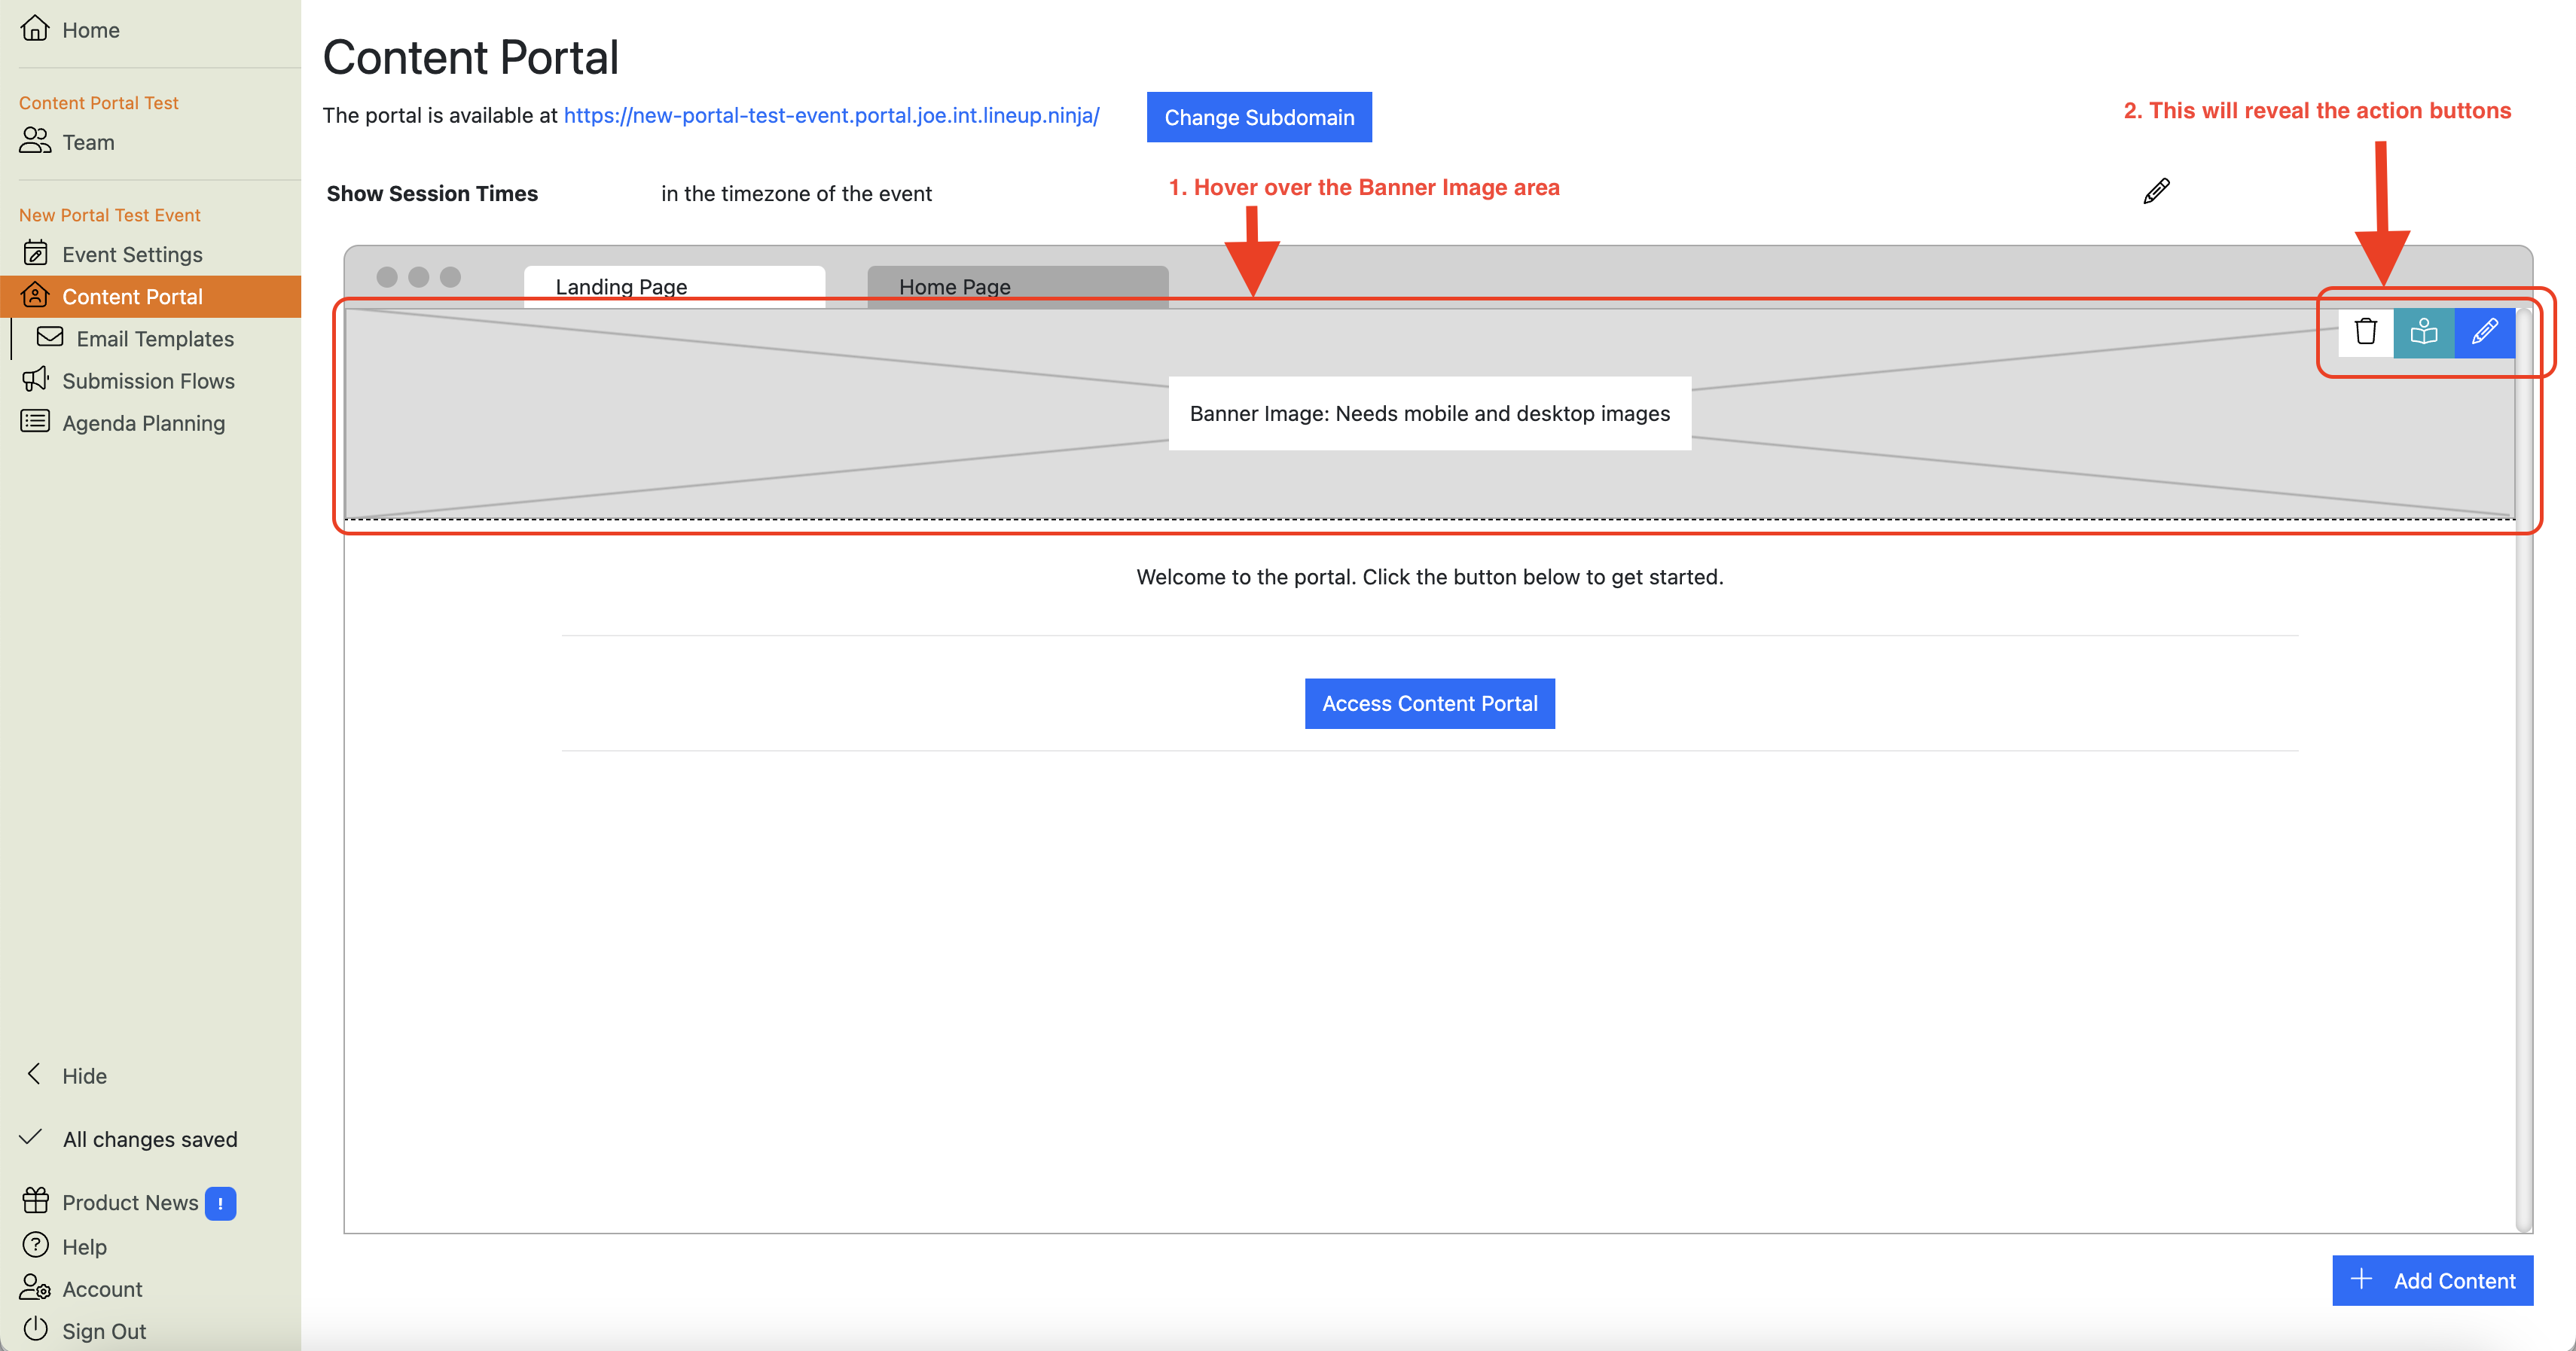
How do I add branding to the Landing Page in the Content Portal?
You add branding to the Landing Page from the portal configuration view.
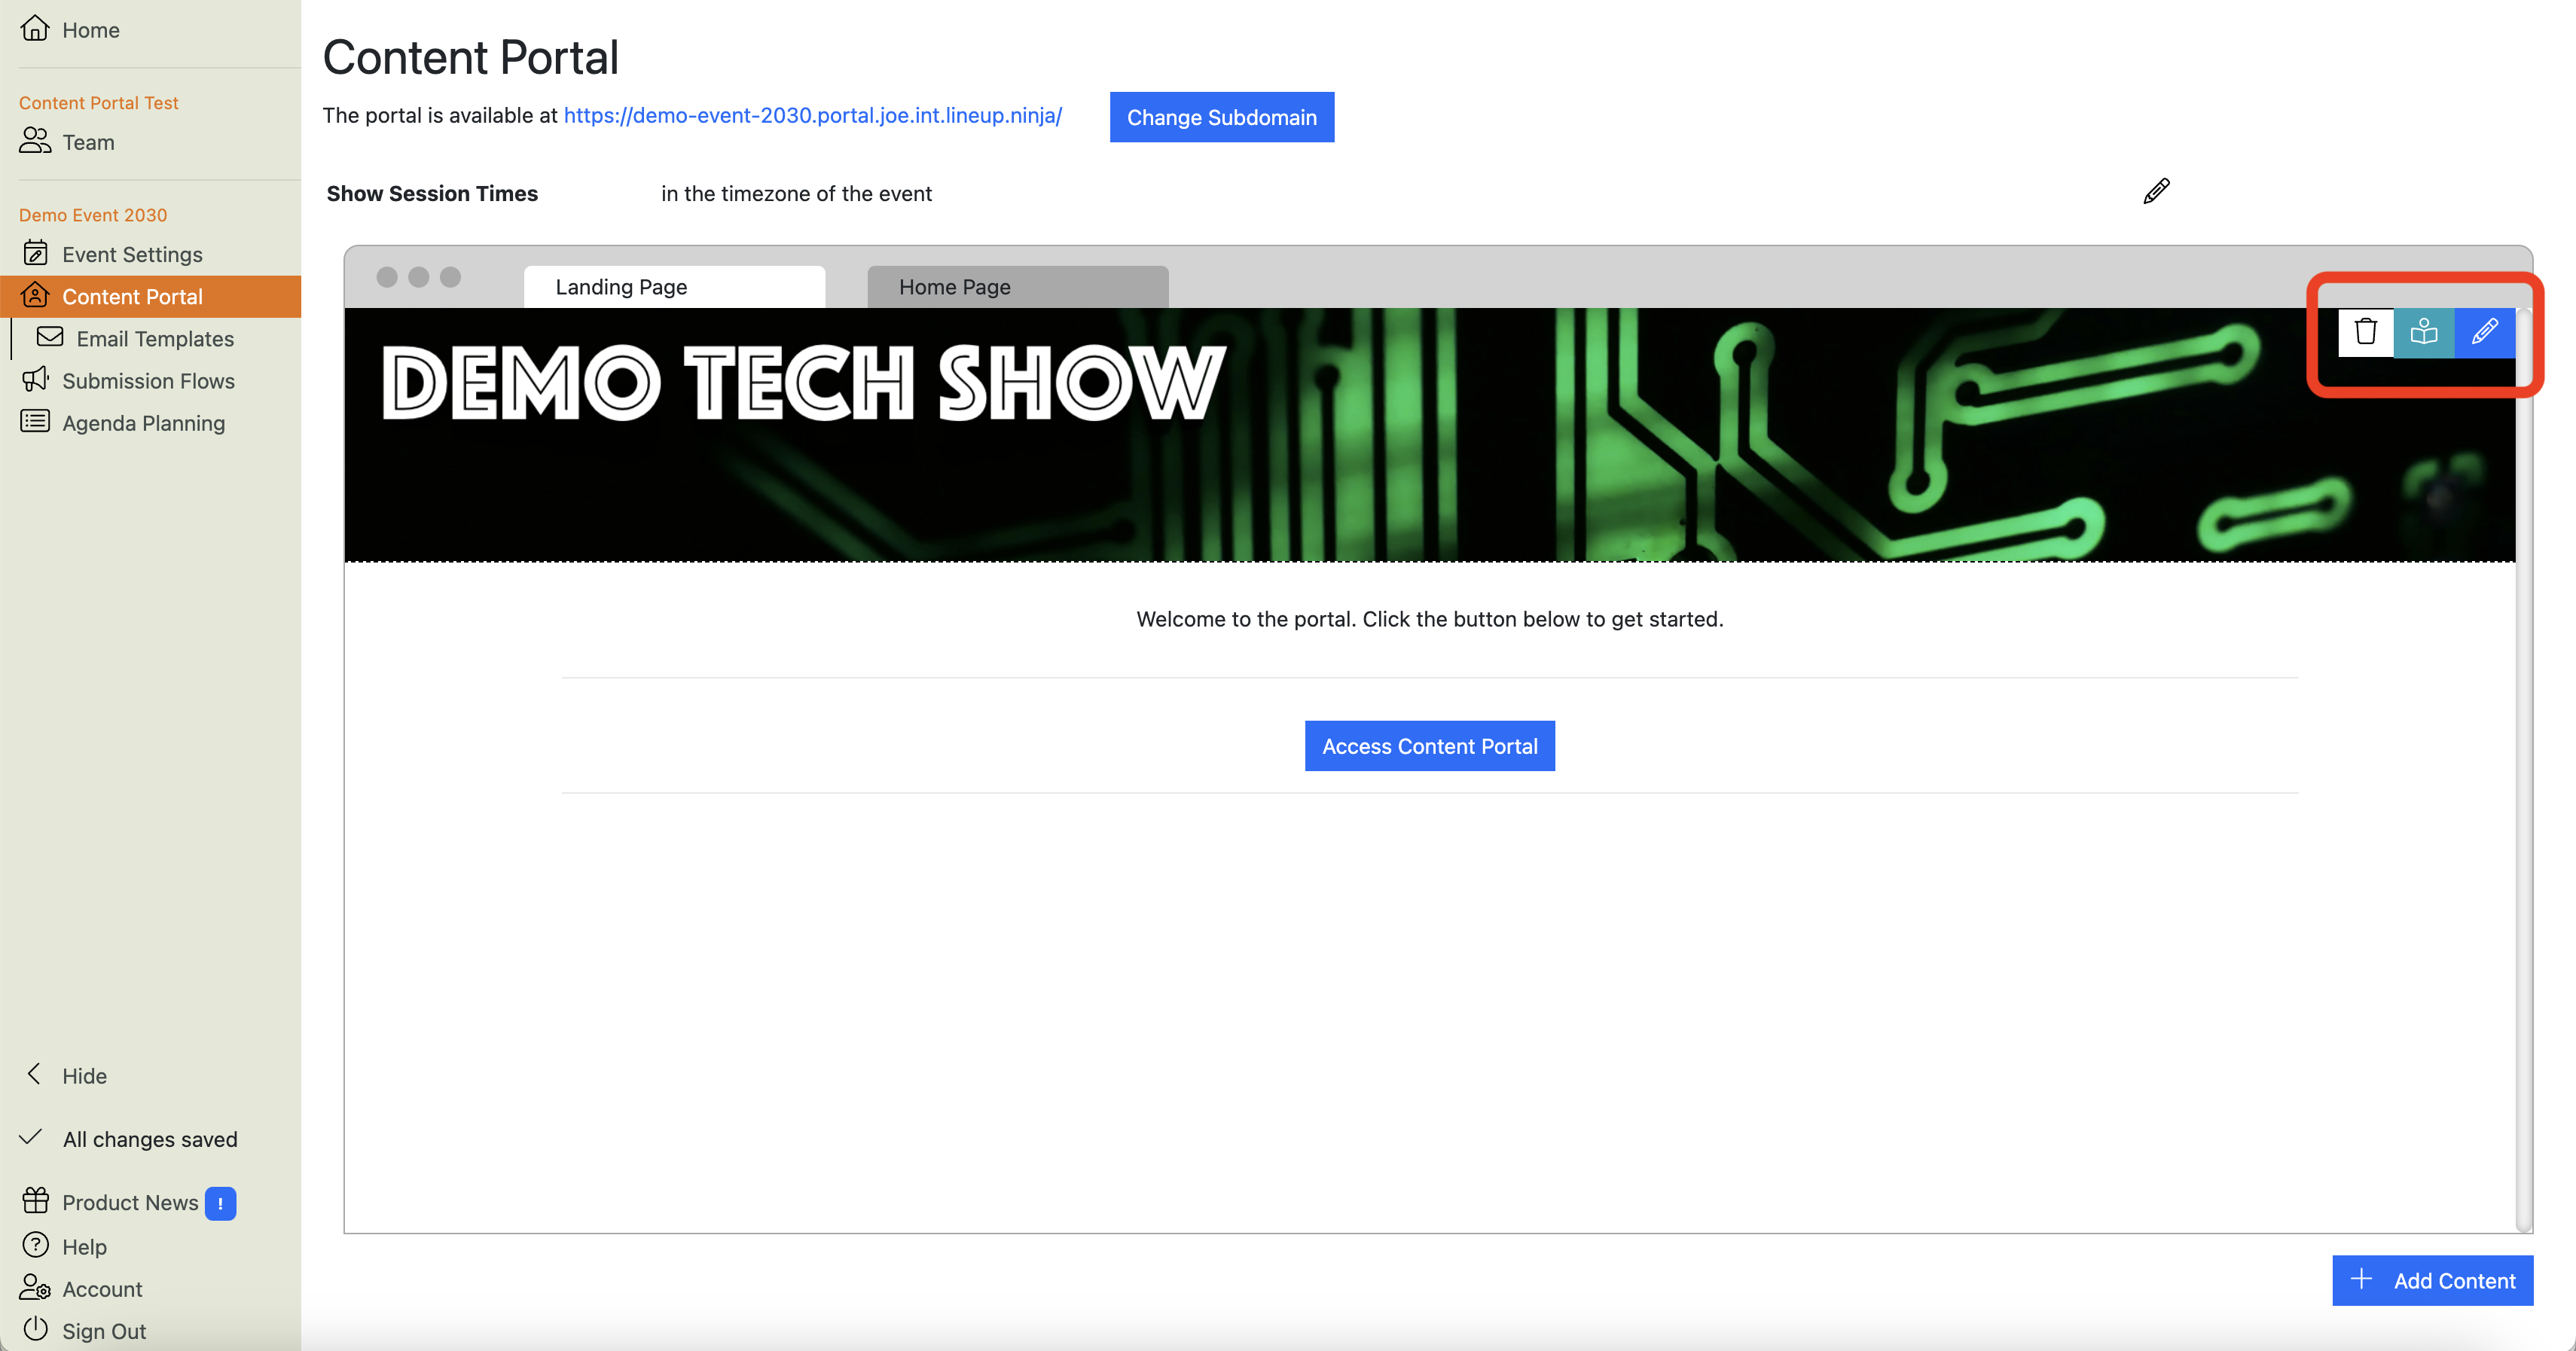
Hover your cursor over the grey “Banner Image” area of the Landing Page preview. This will reveal the action buttons that are relevant to that section:
Click on the blue
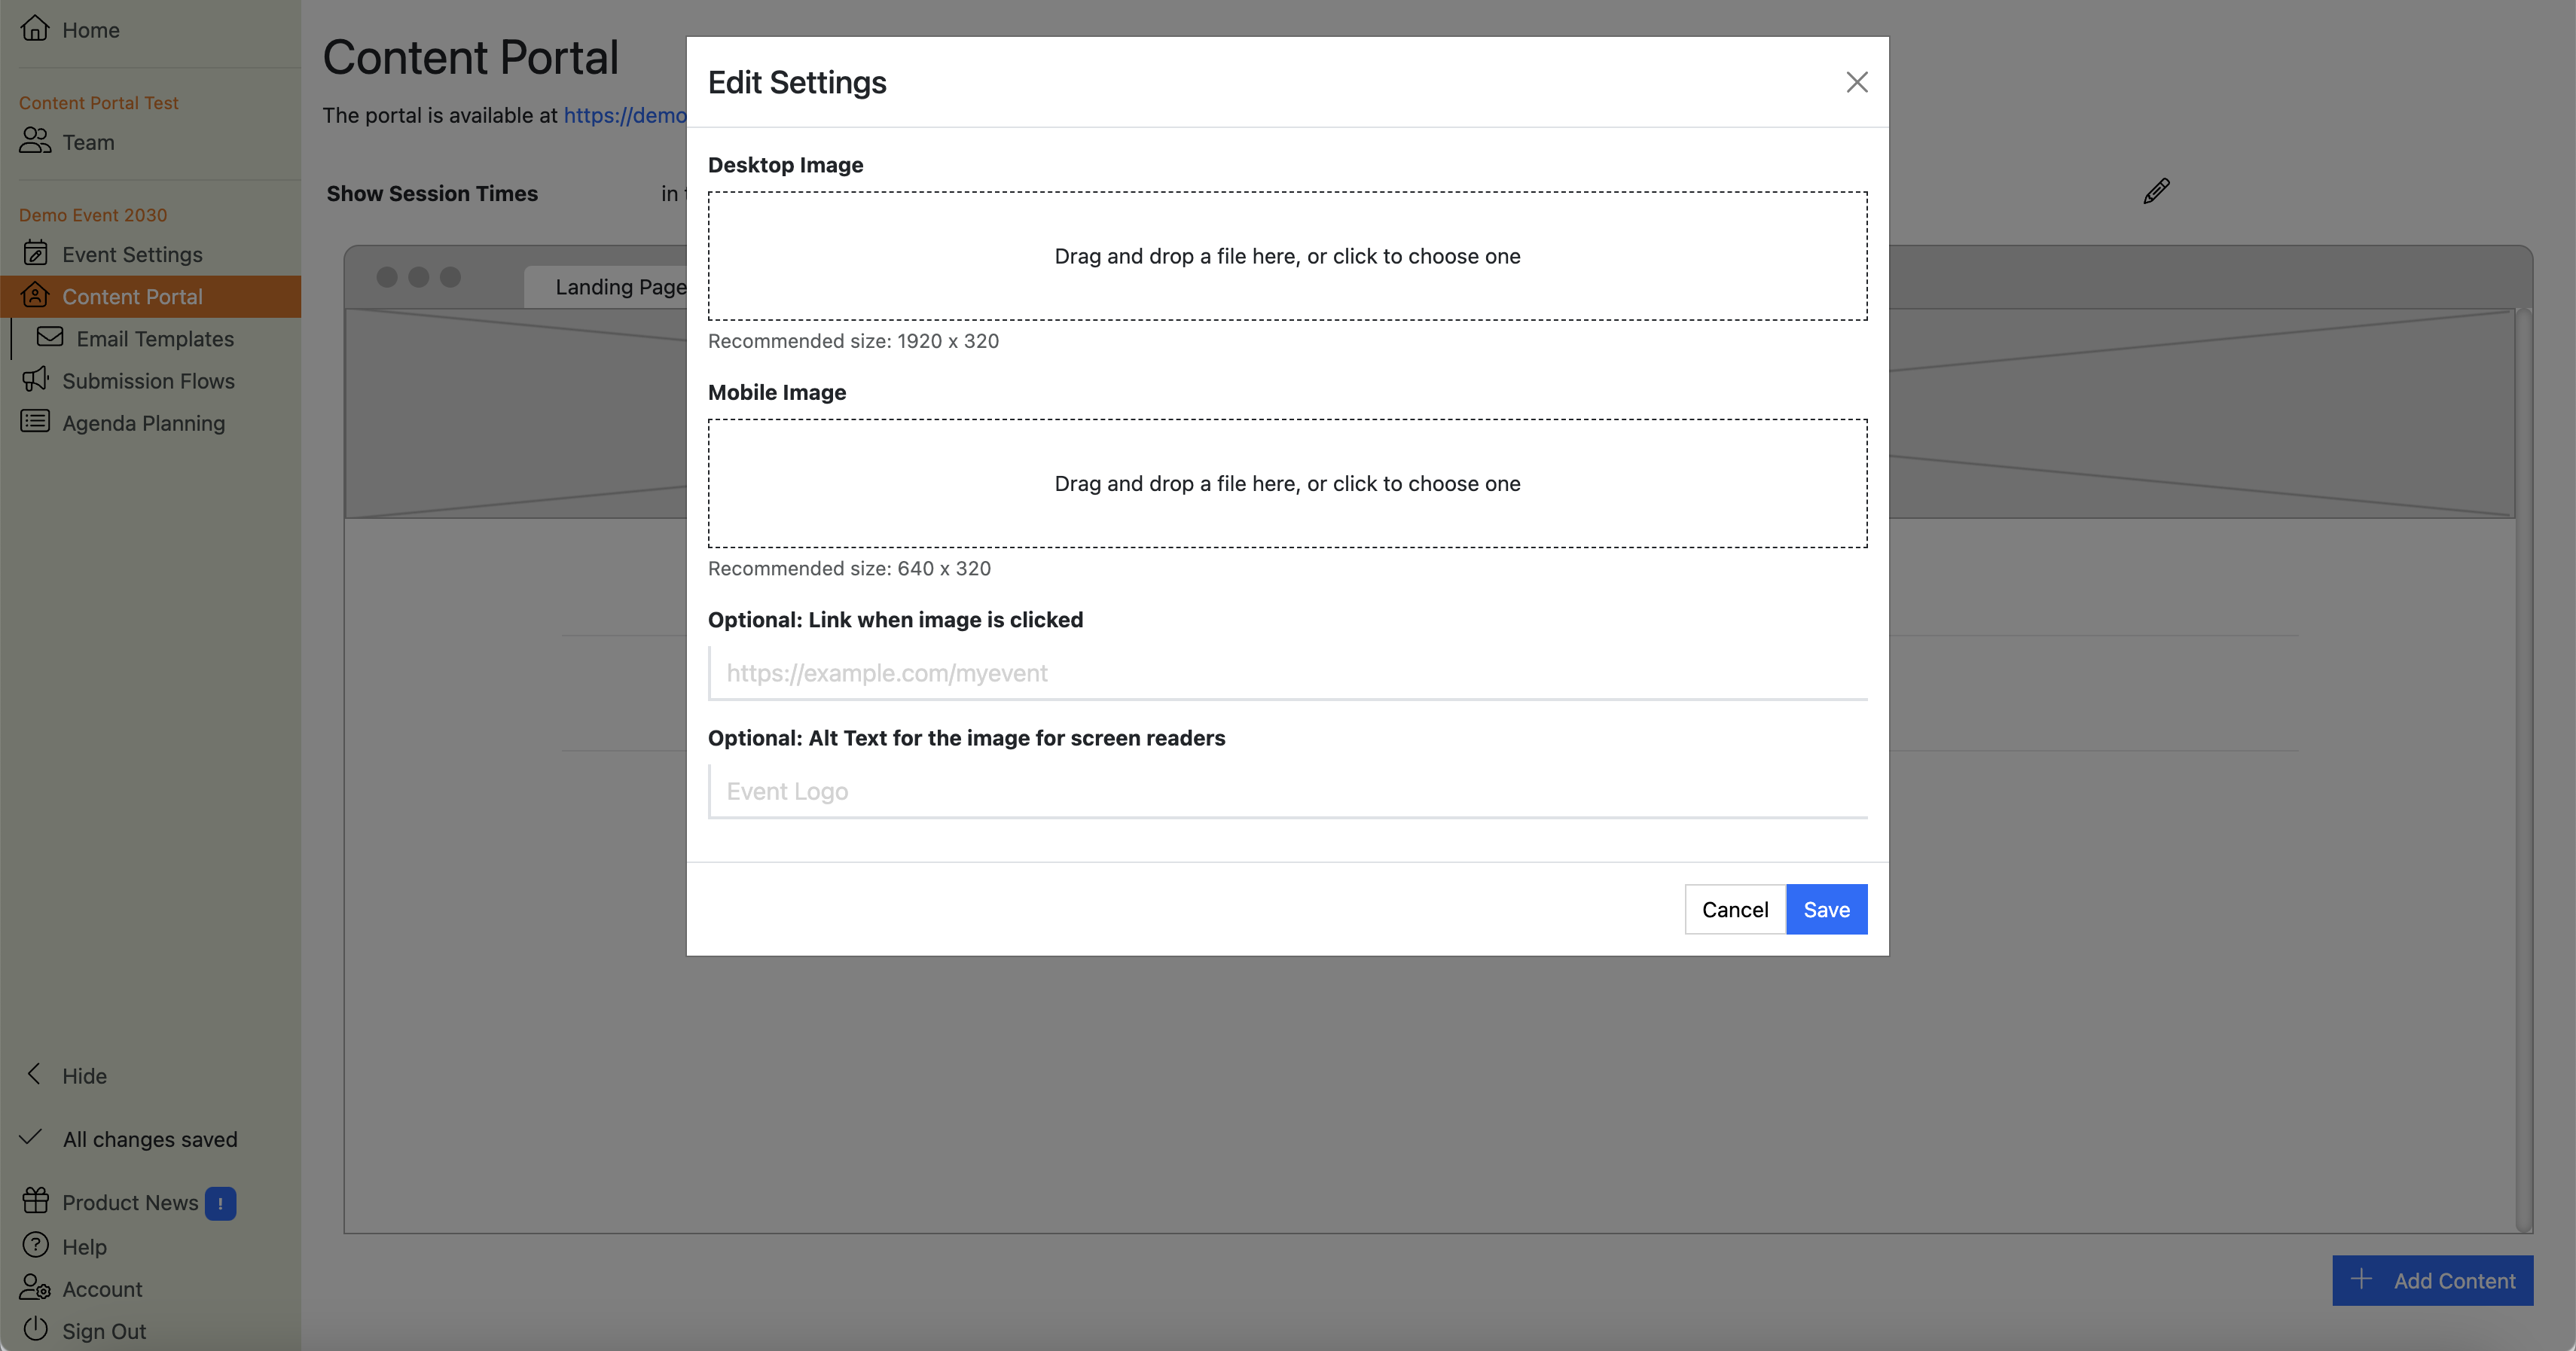
button to launch the Banner Upload dialogue box:
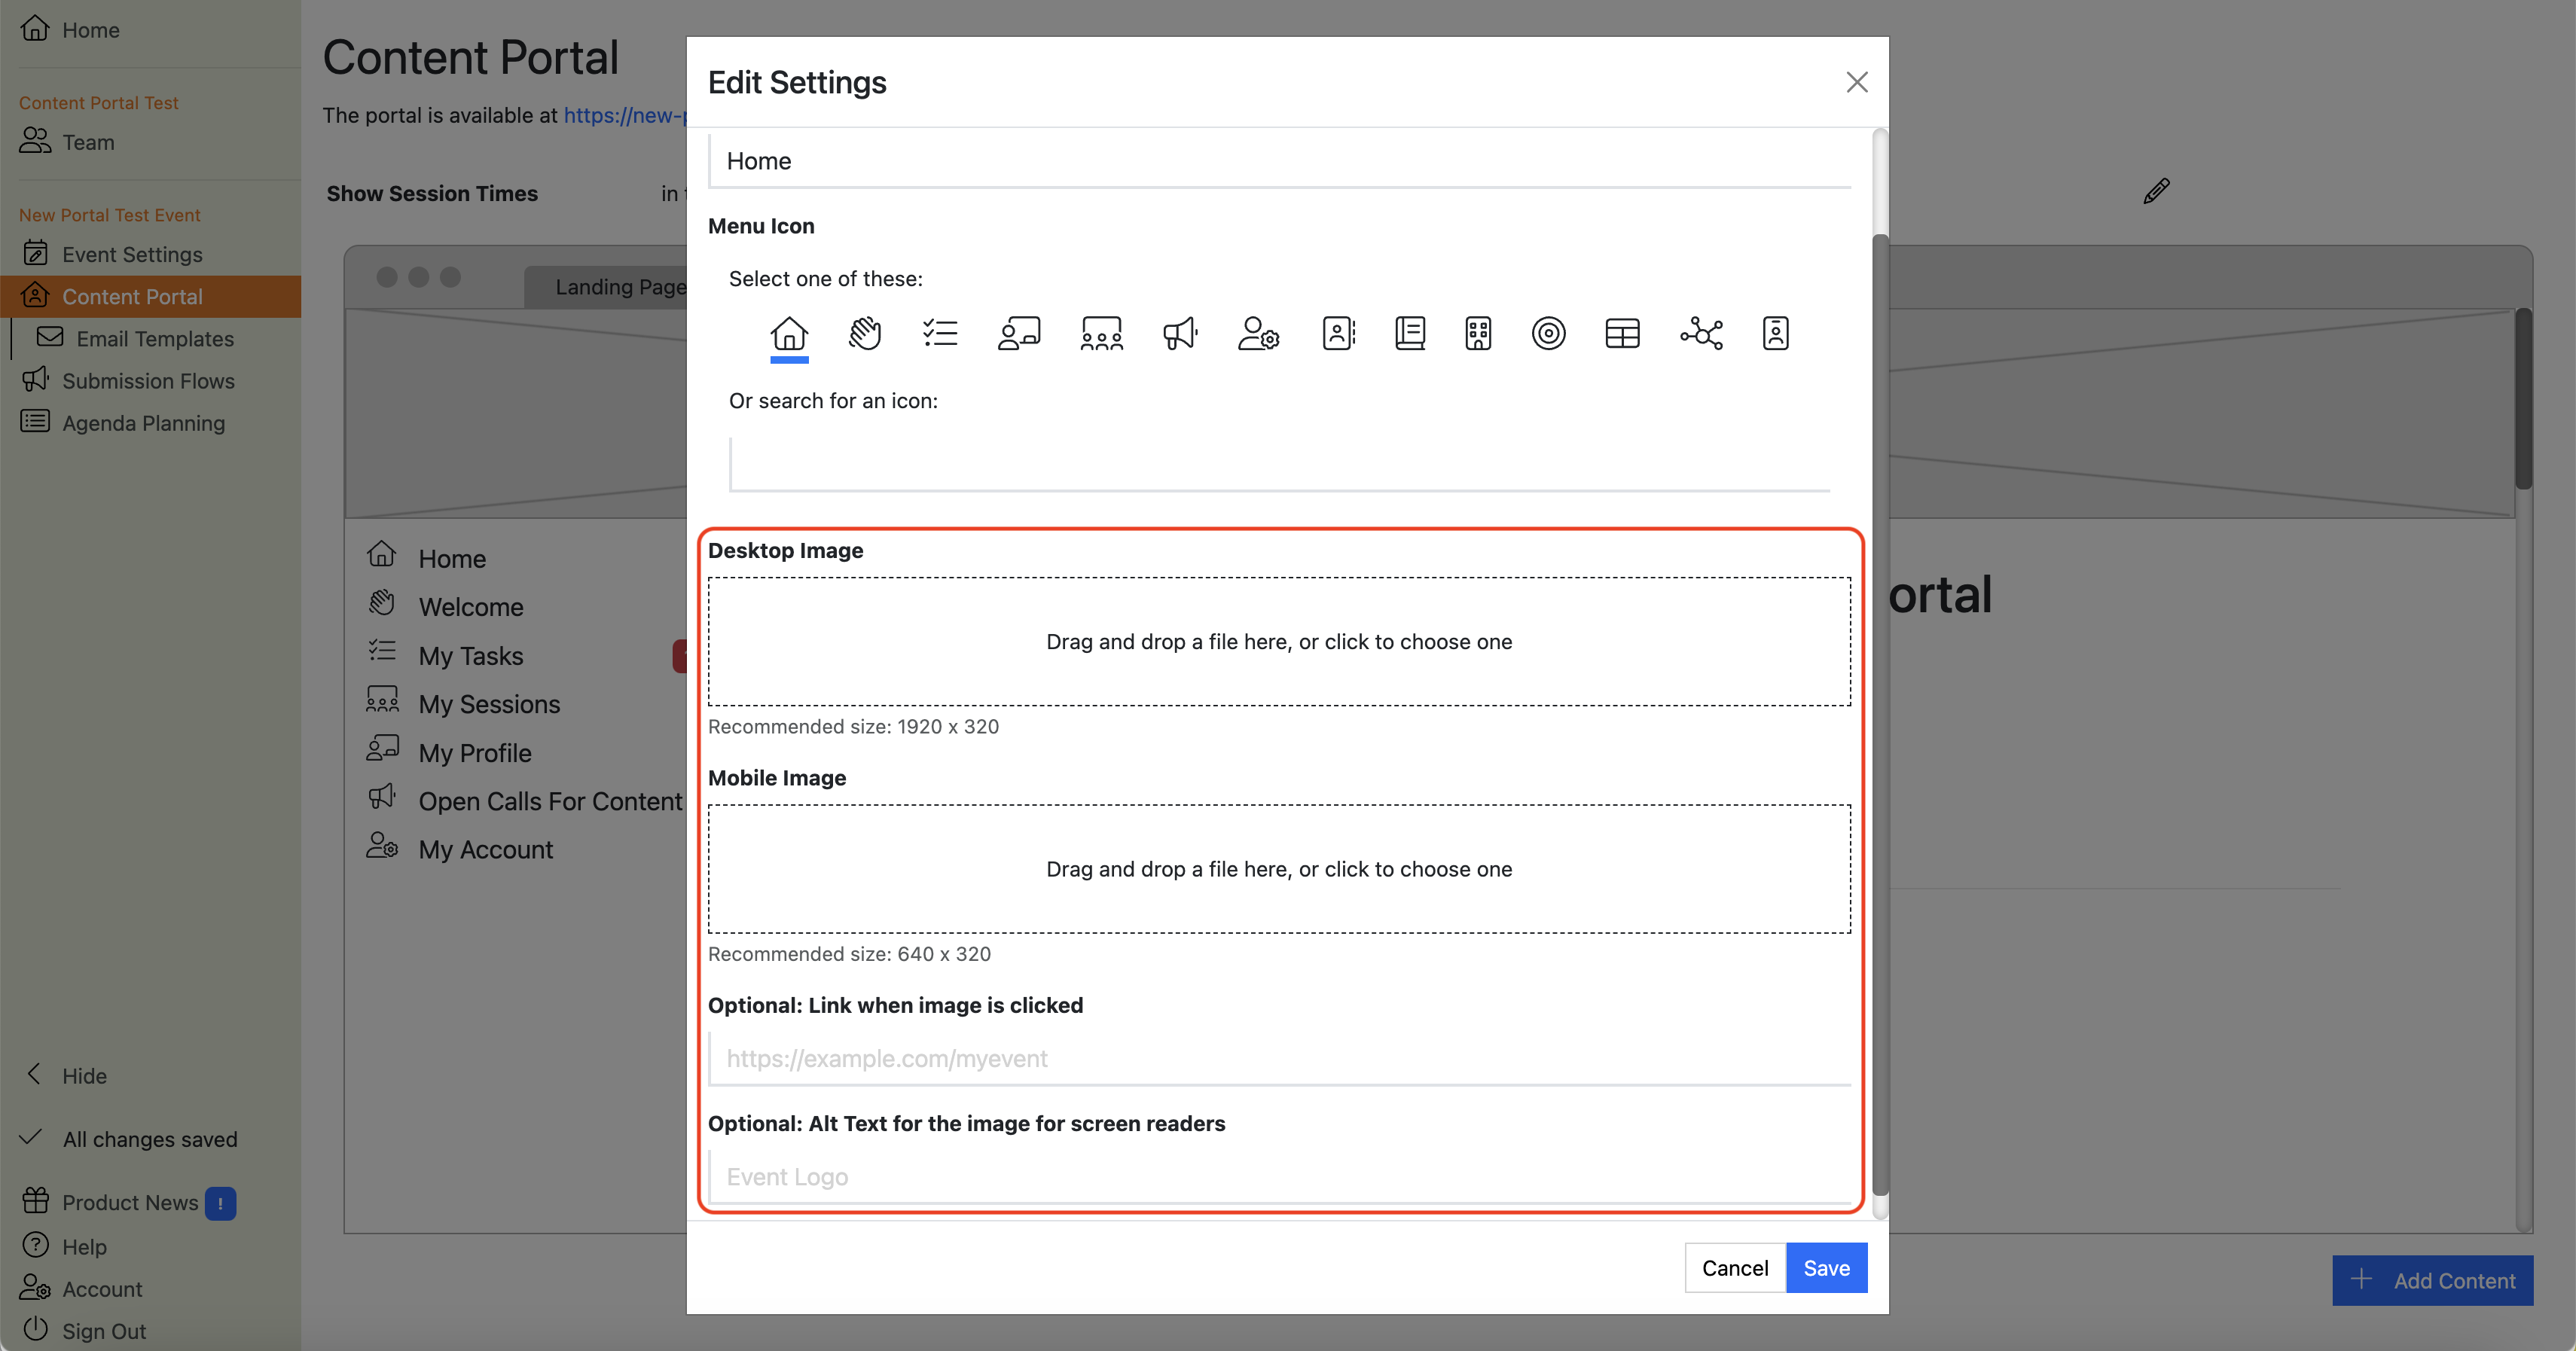
Here you can upload different banner images for display on desktop and mobile devices. The dialogue box shows you recommended dimensions for each.
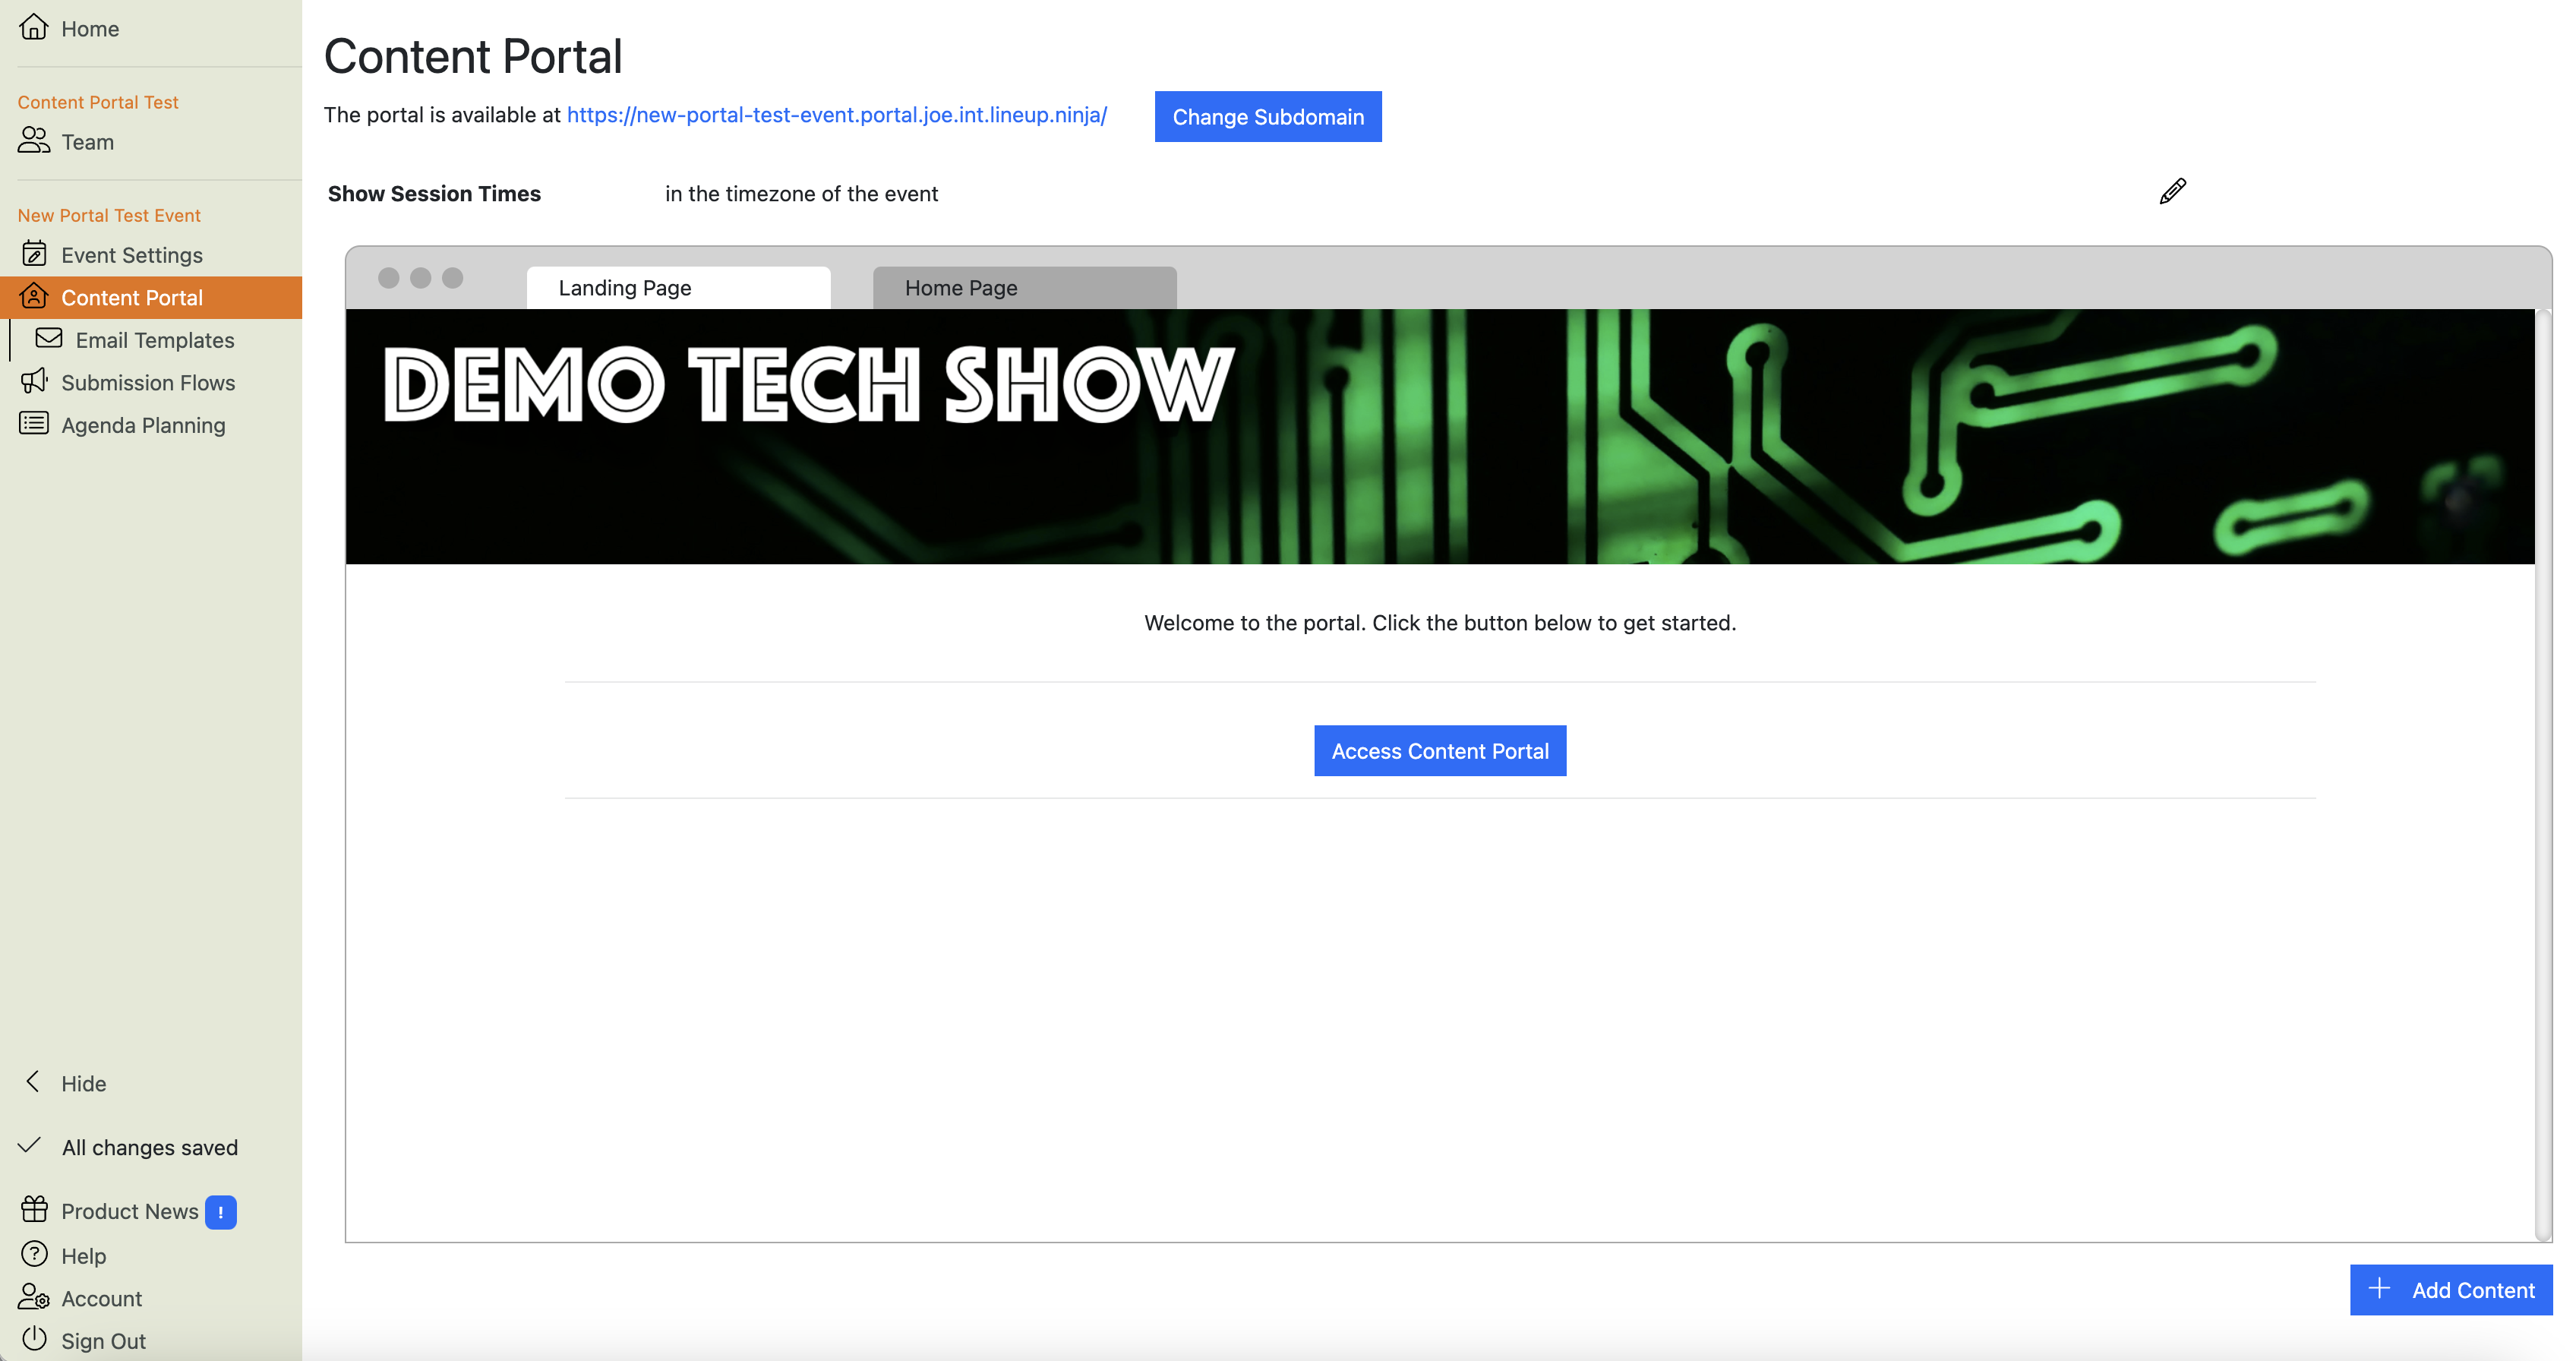
Once you have uploaded your banner images, you will see them in the preview, like this:
Info
If you only upload one image (e.g. you only upload a desktop image and no mobile image), the preview will remain grey. This is to remind you to upload both images.
NOTE: If you publish the portal with only one image, whichever one you have uploaded WILL be shown to users.
So, if you only upload a desktop image, it will stay grey in the preview. Portal users will see the desktop image on both desktop and mobile devices.
When you upload the mobile image, you will see the images in the preview and portal users will see the correct image for the type of device they are using to access the portal.
Tip
Once you have uploaded desktop and mobile banner images, to preview them both, change the size of your browser window: i.e. leave your browser full-width to see the landscape banner image, and resize the window to make it narrow to see the mobile banner image.
If you want, you can add a link to these images, so when users click or tap the image, they will be taken to that link.
You can also add alt-text for the images so that screen readers can read the text to partially-sighted users.
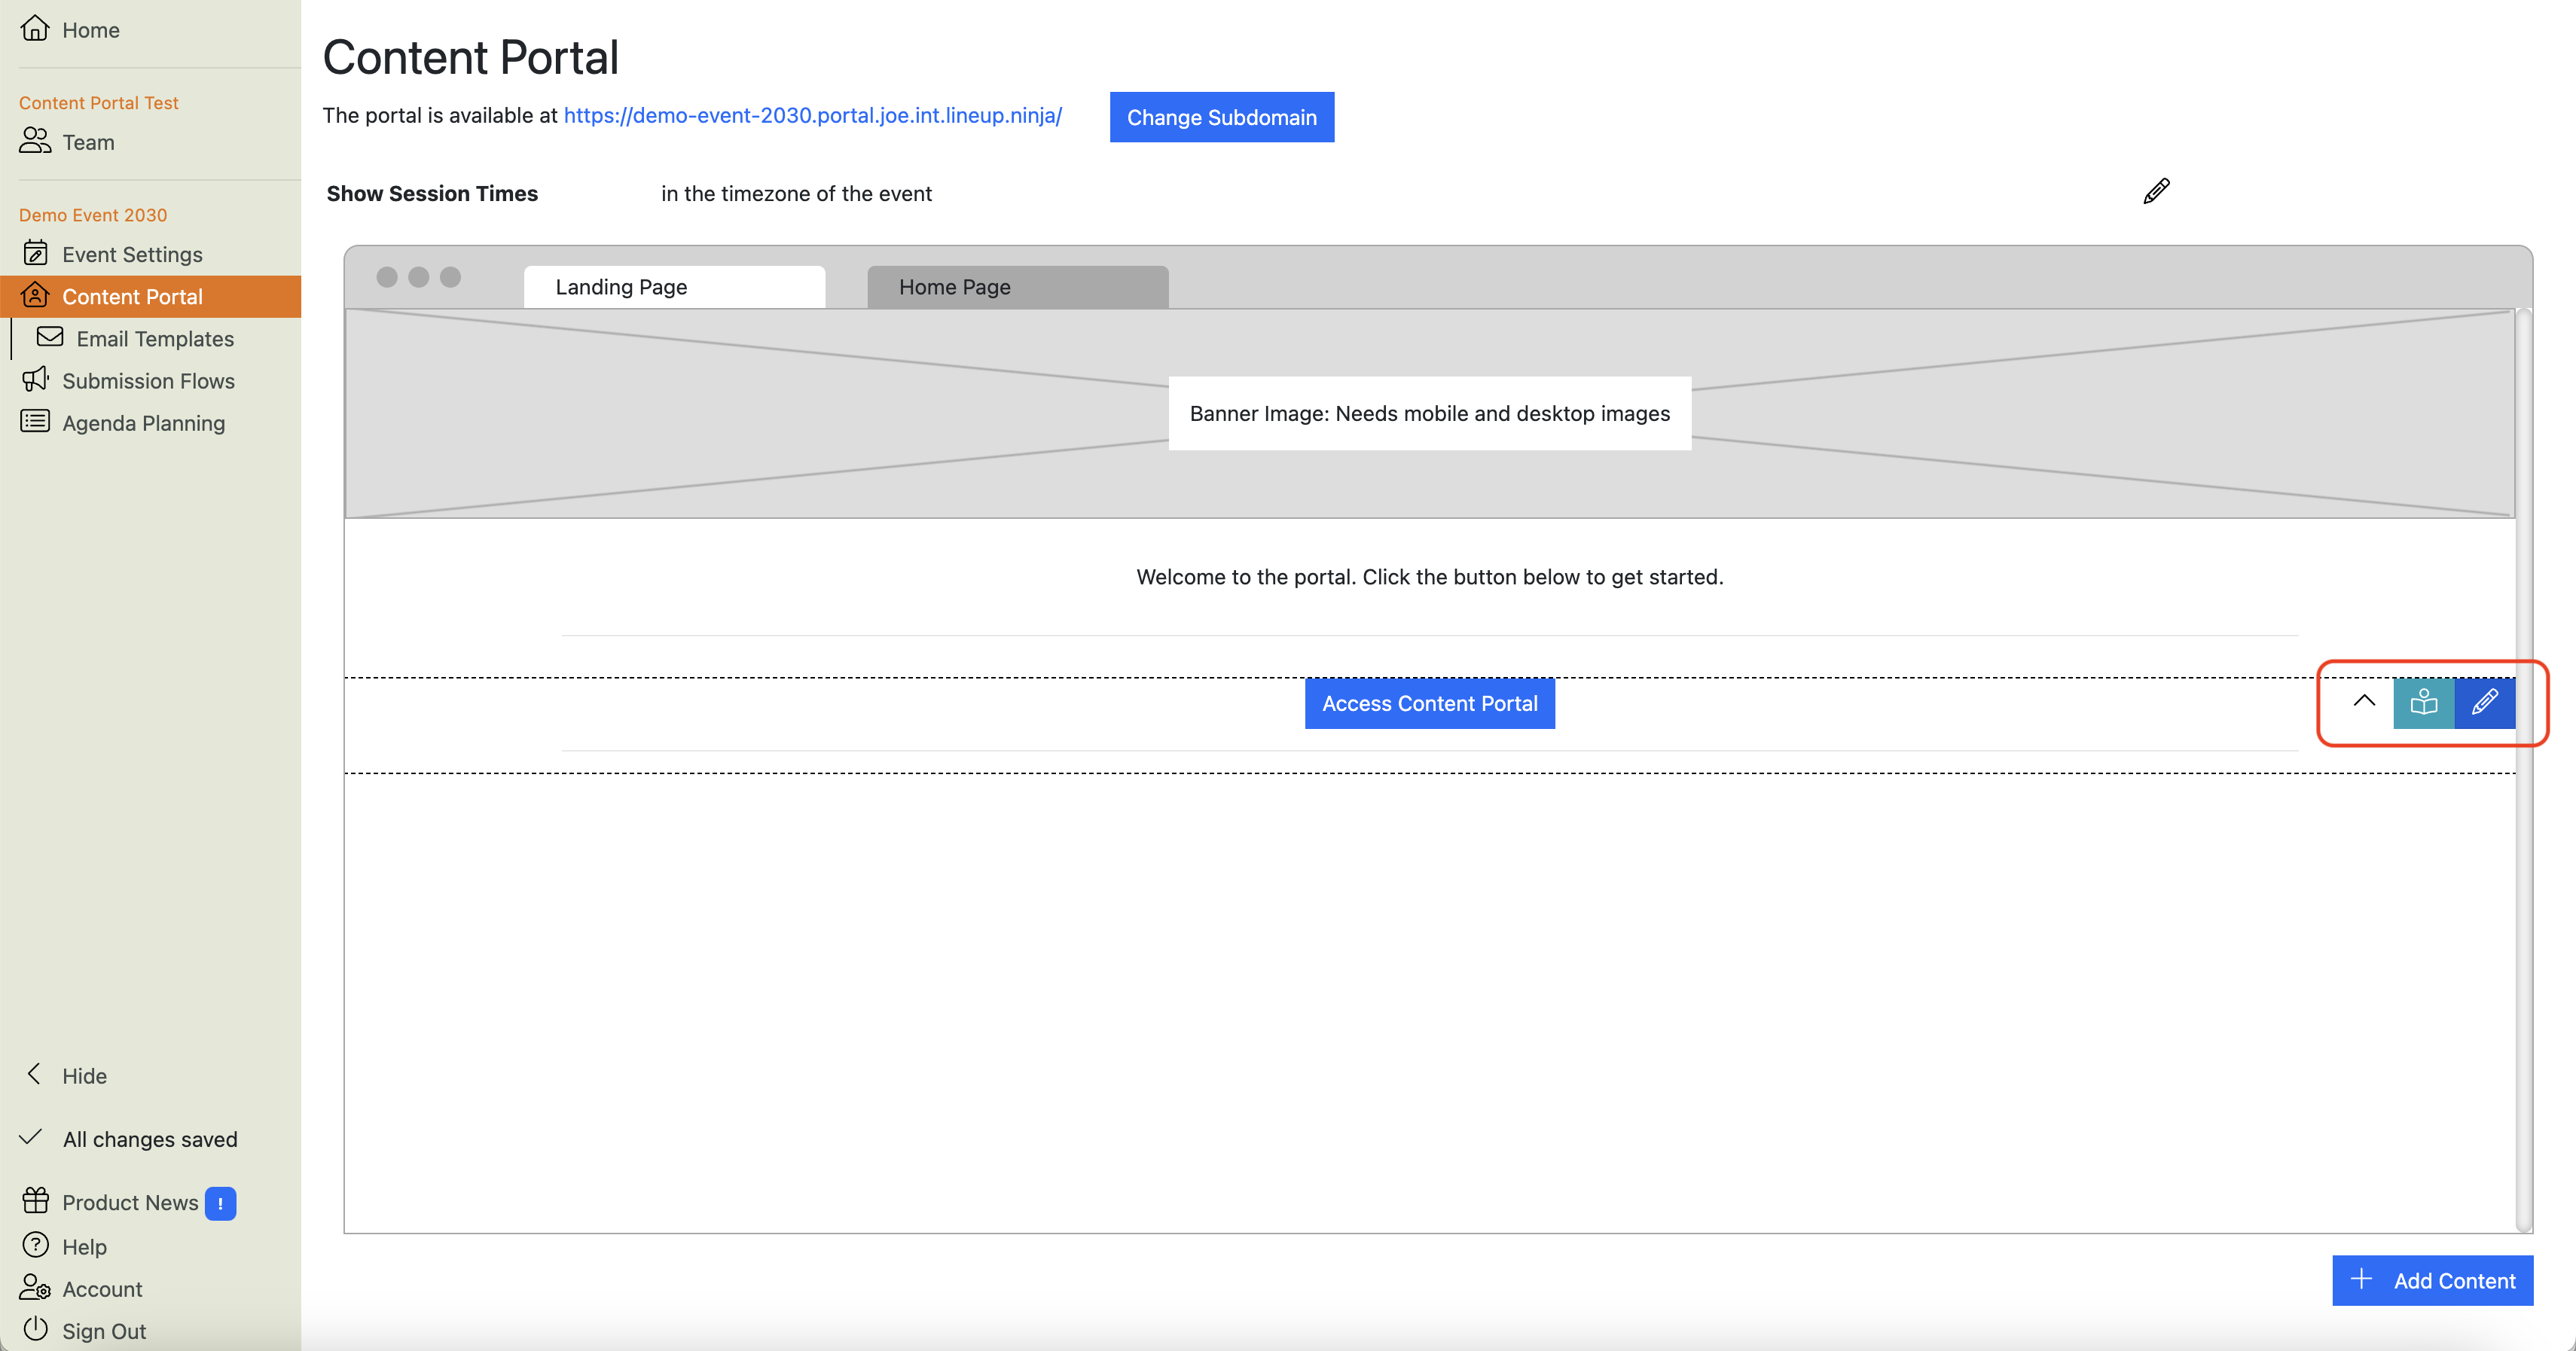
How do I remove the banner on the Landing Page in the Content Portal?
Hover your cursor over the banner image on the Landing Page preview. This will reveal the action buttons:
You can now either:
Click the white
"Delete" button to delete the branding section entirely, or
Click on the “Edit” button (the blue one with a pencil icon) to delete the desktop and mobile versions of your banner individually, but retain the banner section so you can upload different images.
Info
If you delete the branding section entirely, you can add it back in later by clicking the ‘Add Content’ button in the bottom-right corner of this page.
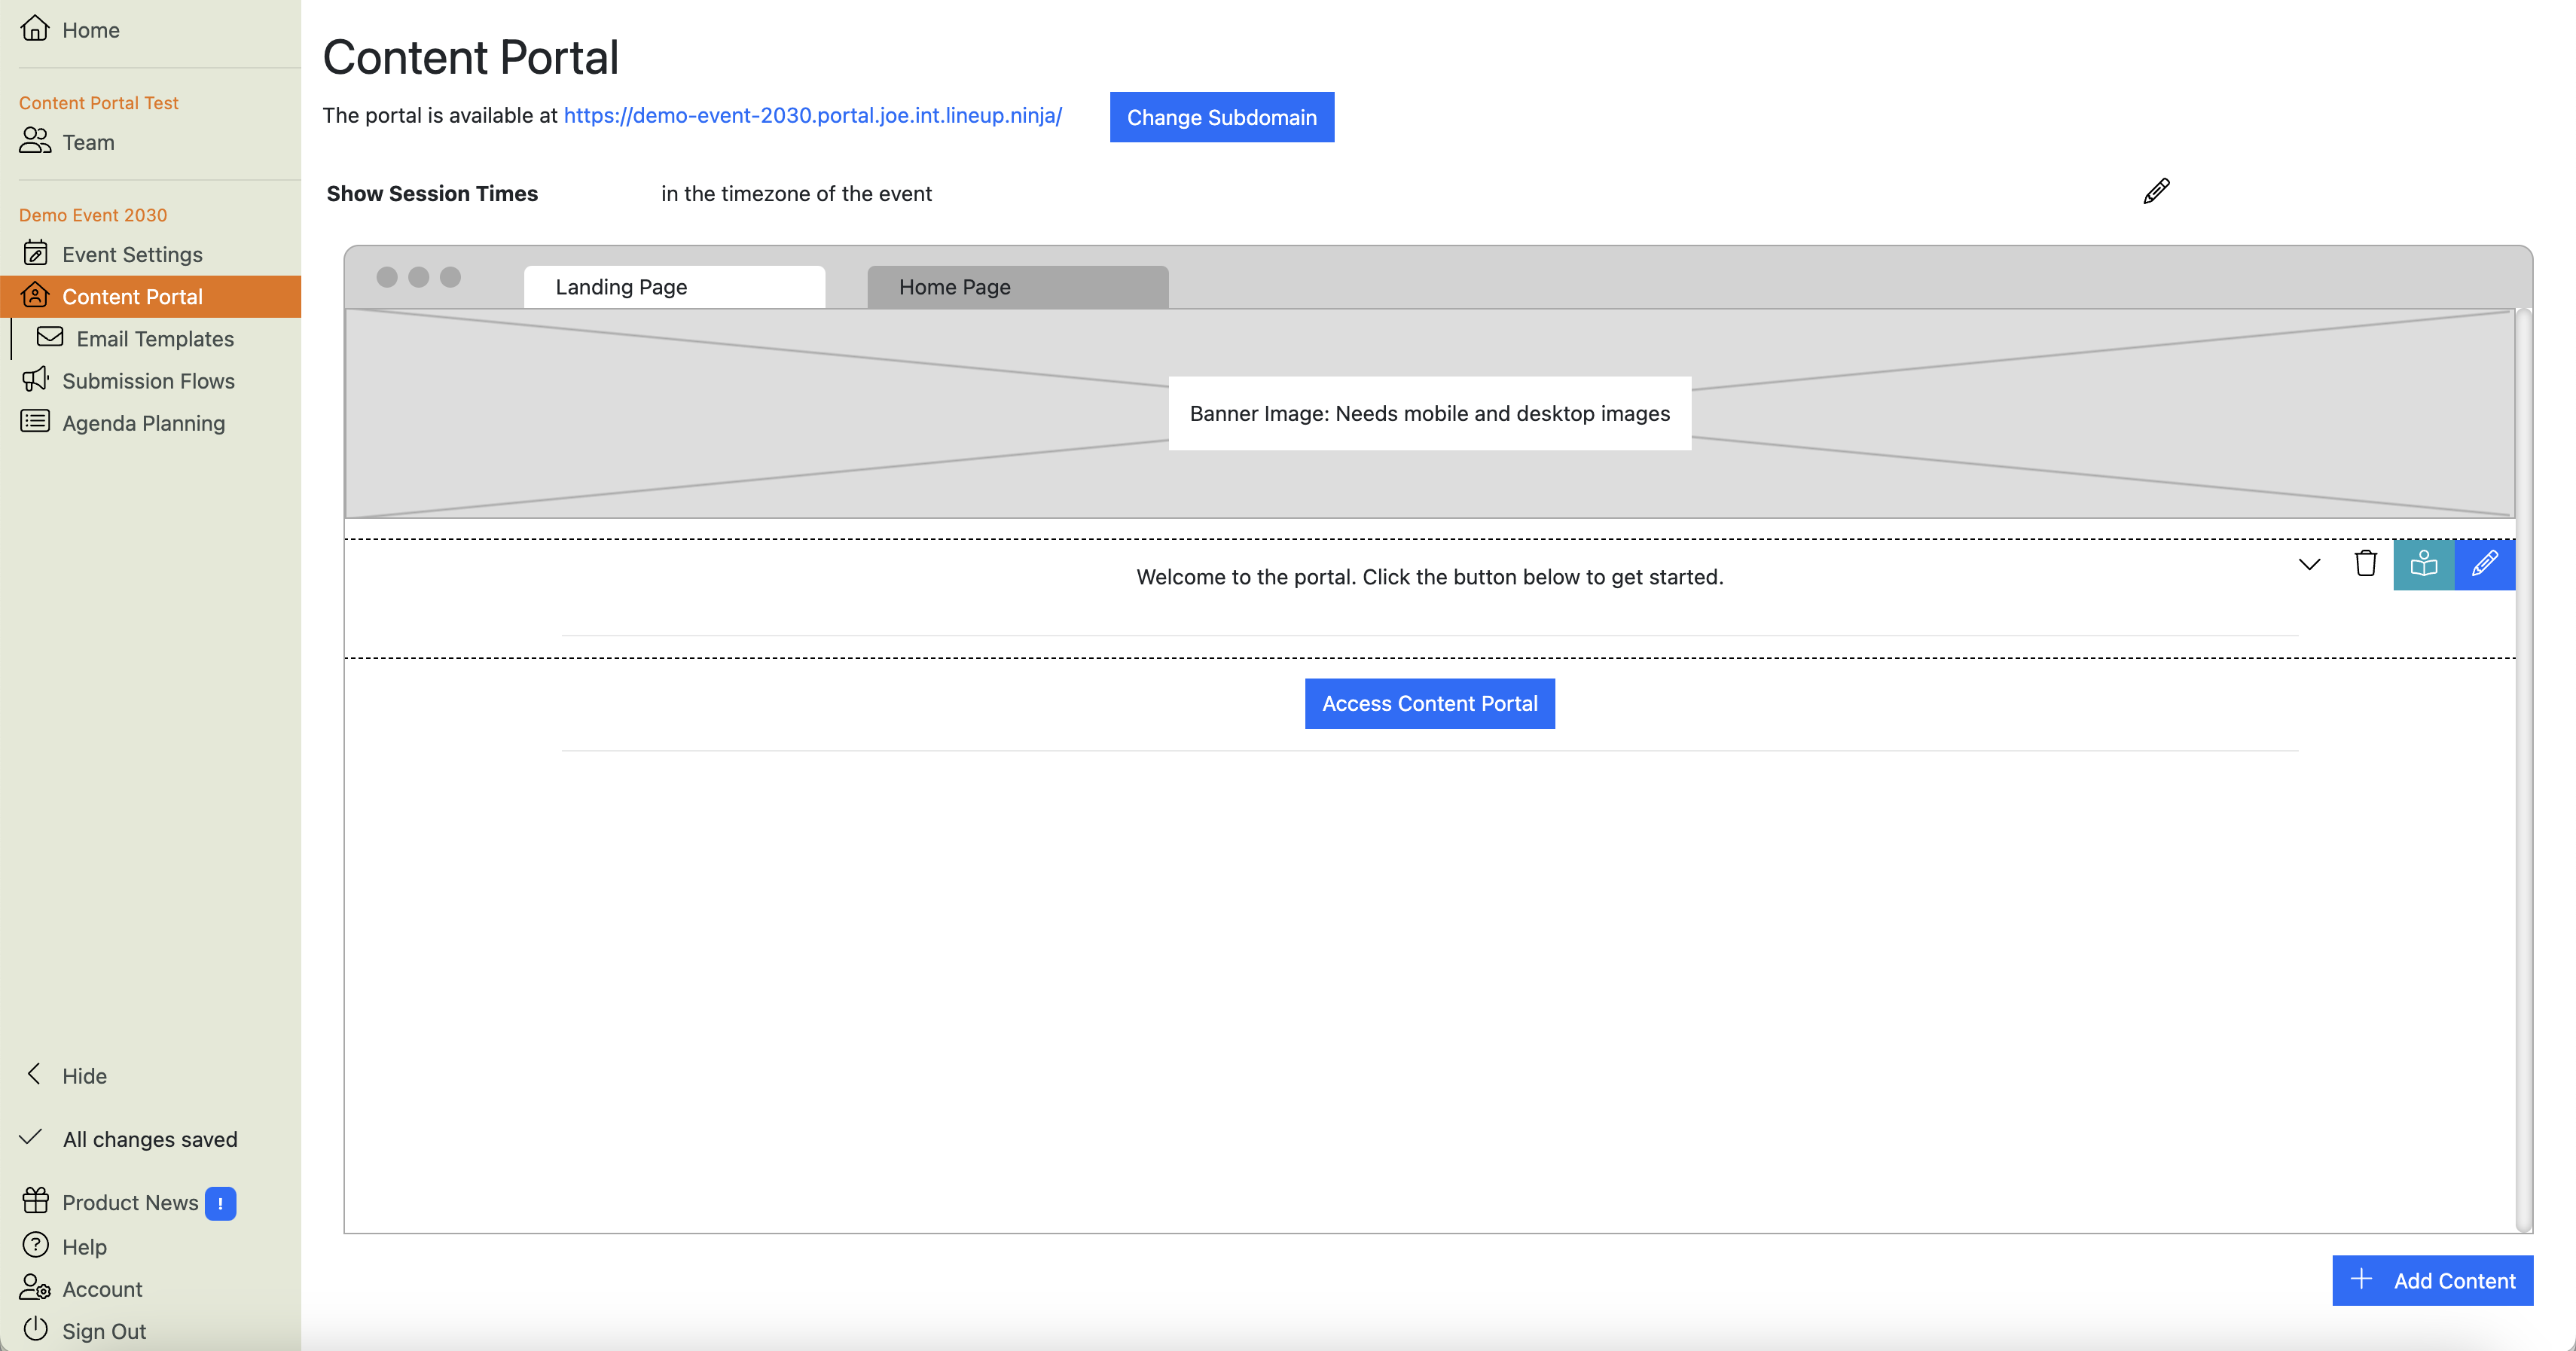
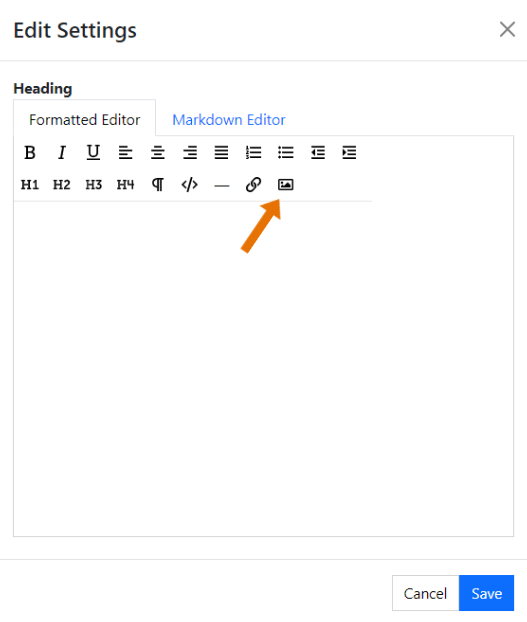
How do I edit the text on the Landing Page in the Content Portal?
Hover over the text area on the Landing Page preview. This will reveal the relevant action buttons in the top-right corner of the section. Click the blue button:
This will launch the text editor:
Now you can edit the text and apply formatting. Click the blue
button to save your changes.
Info
You can delete this section entirely. If you do, you can add it back in by clicking the ‘Add Content’ button in the bottom-right corner of this view.
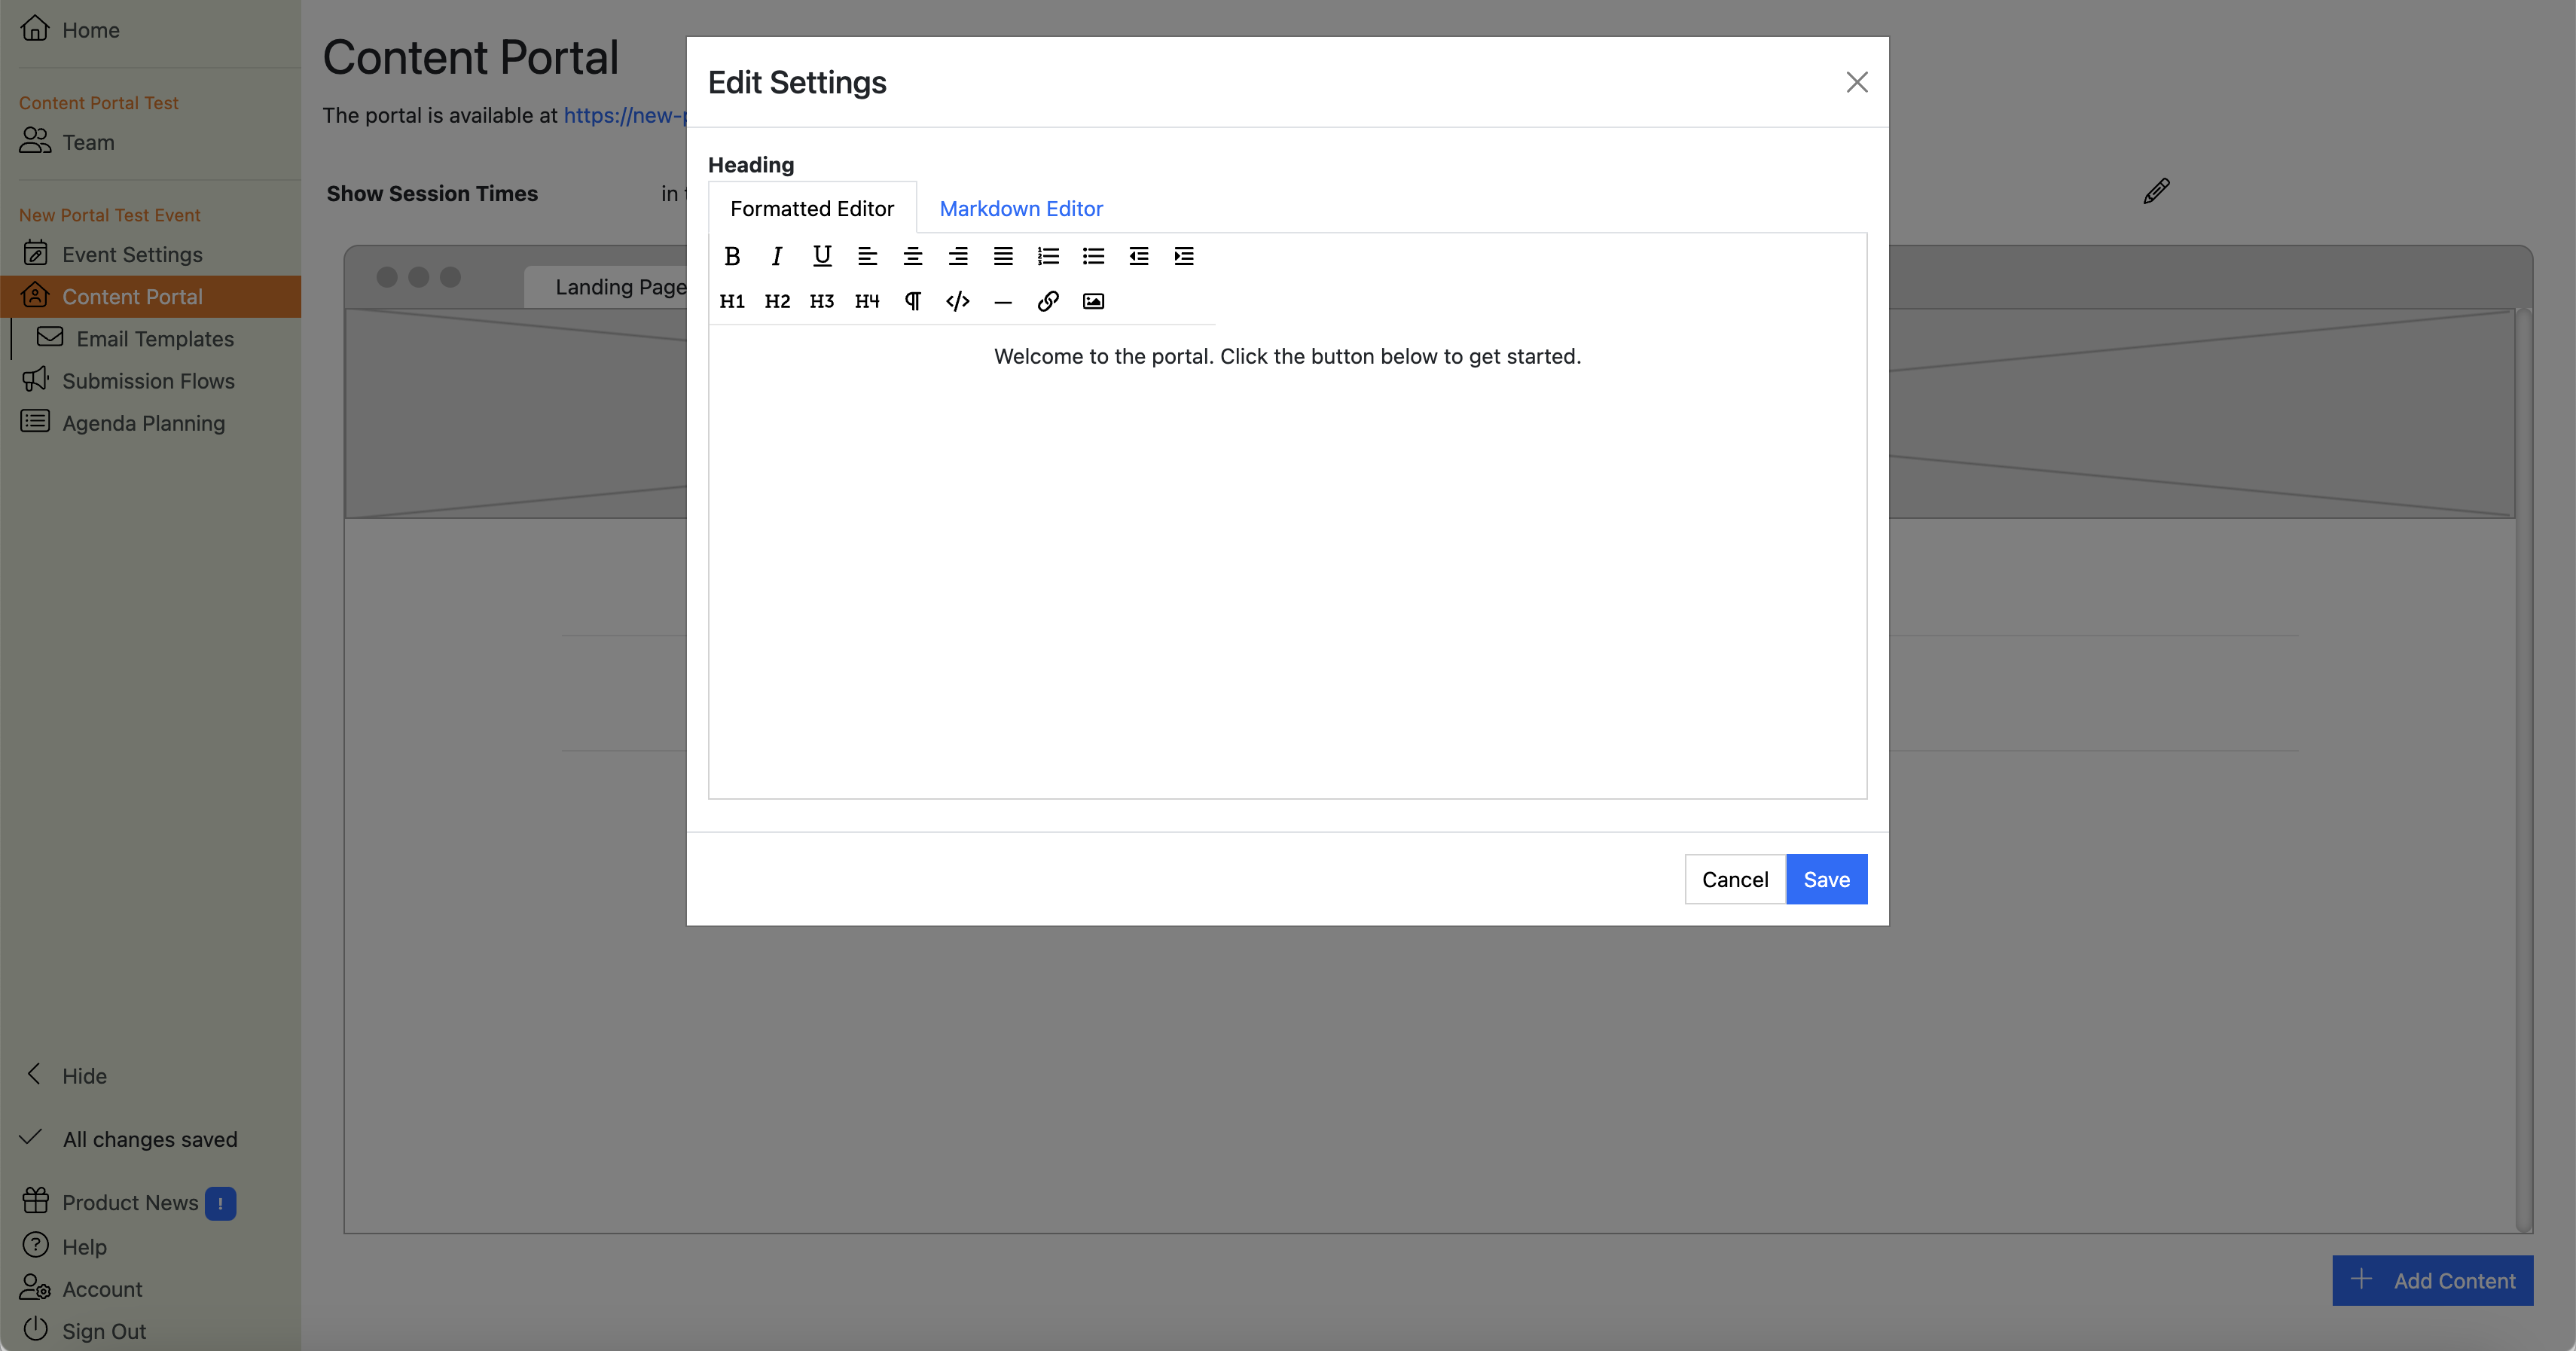
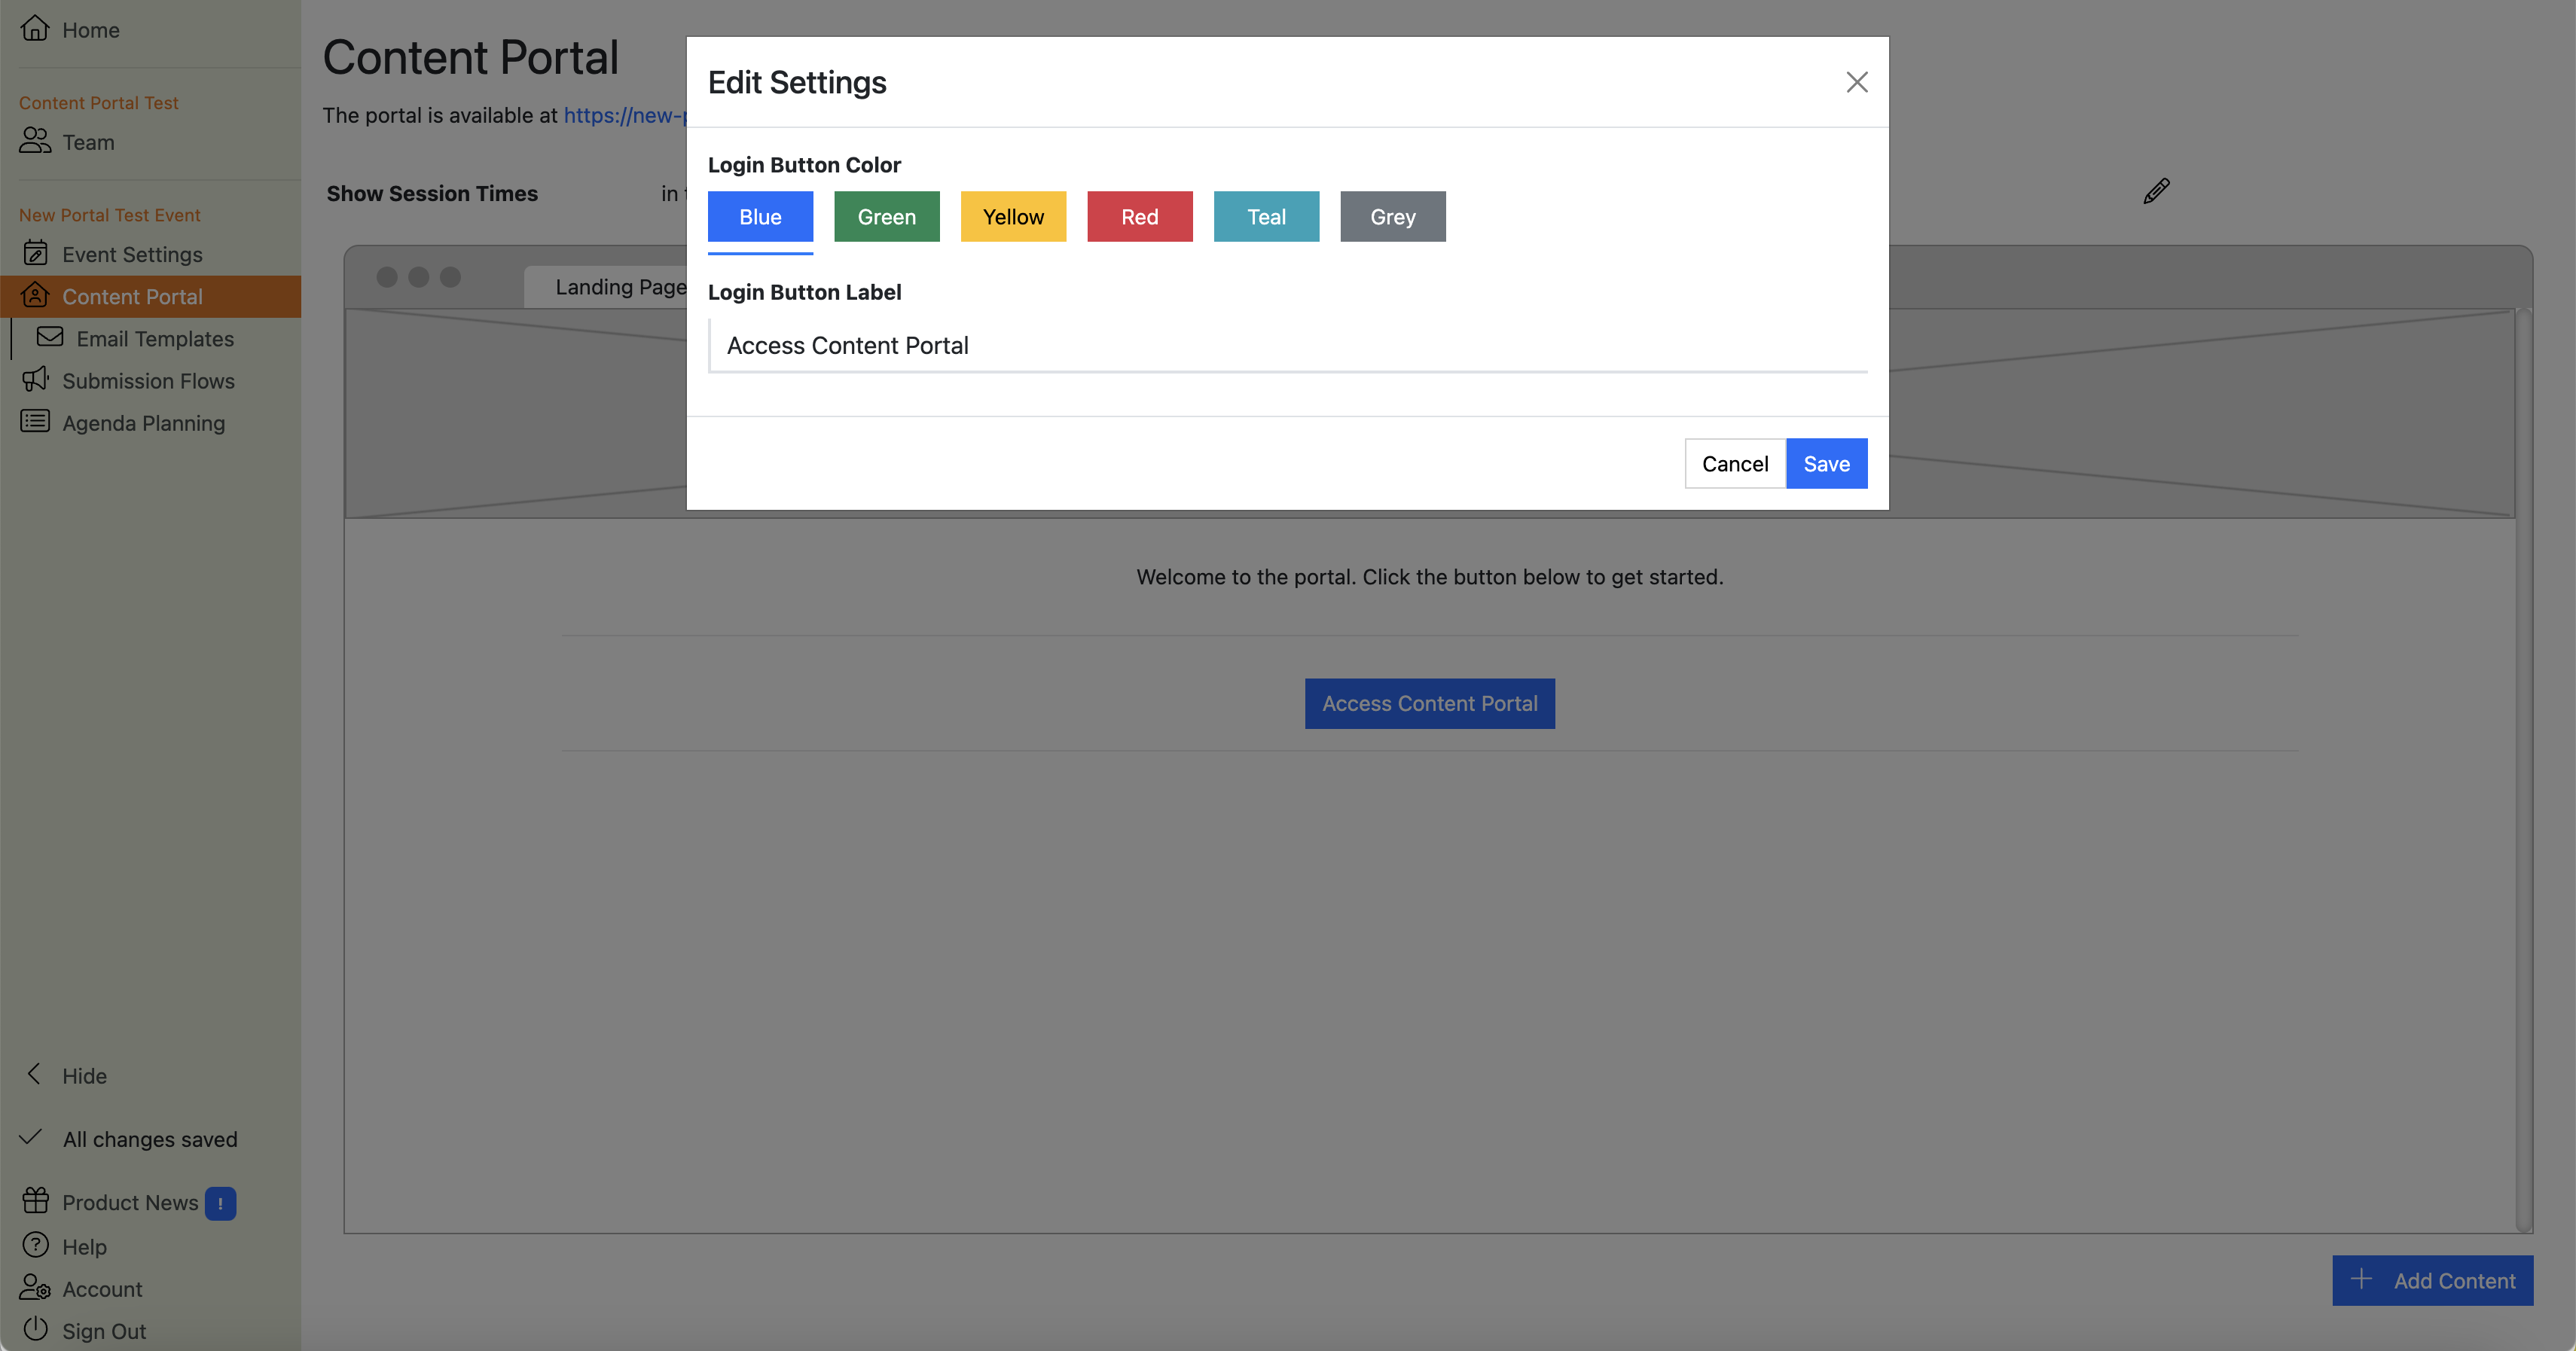
How do I edit the button on the Landing Page in the Content Portal?
Hover over the button area of the Landing Page in the Content Portal configuration view. This will reveal the relevant action buttons. Click the blue :
This will launch the button editor:
Here you can change the color of the button and the text that is displayed on the button.
Note
You can only choose from a limited color palette for buttons. This is to help you give users a consistent experience.
Info
You can’t delete this section. If you did, users wouldn’t be able to access the portal, which would rather defeat the point of the whole thing.
Content Portal: Home Page
The Home Page is what portal users see once they’ve logged in. It can contain several sections that users can interact with.
This page explains:
What each section is for
How to add, edit, reorder and delete sections
How you can use Display Rules to show different sections to different users
What does each section of the Home Page in the Content Portal do?
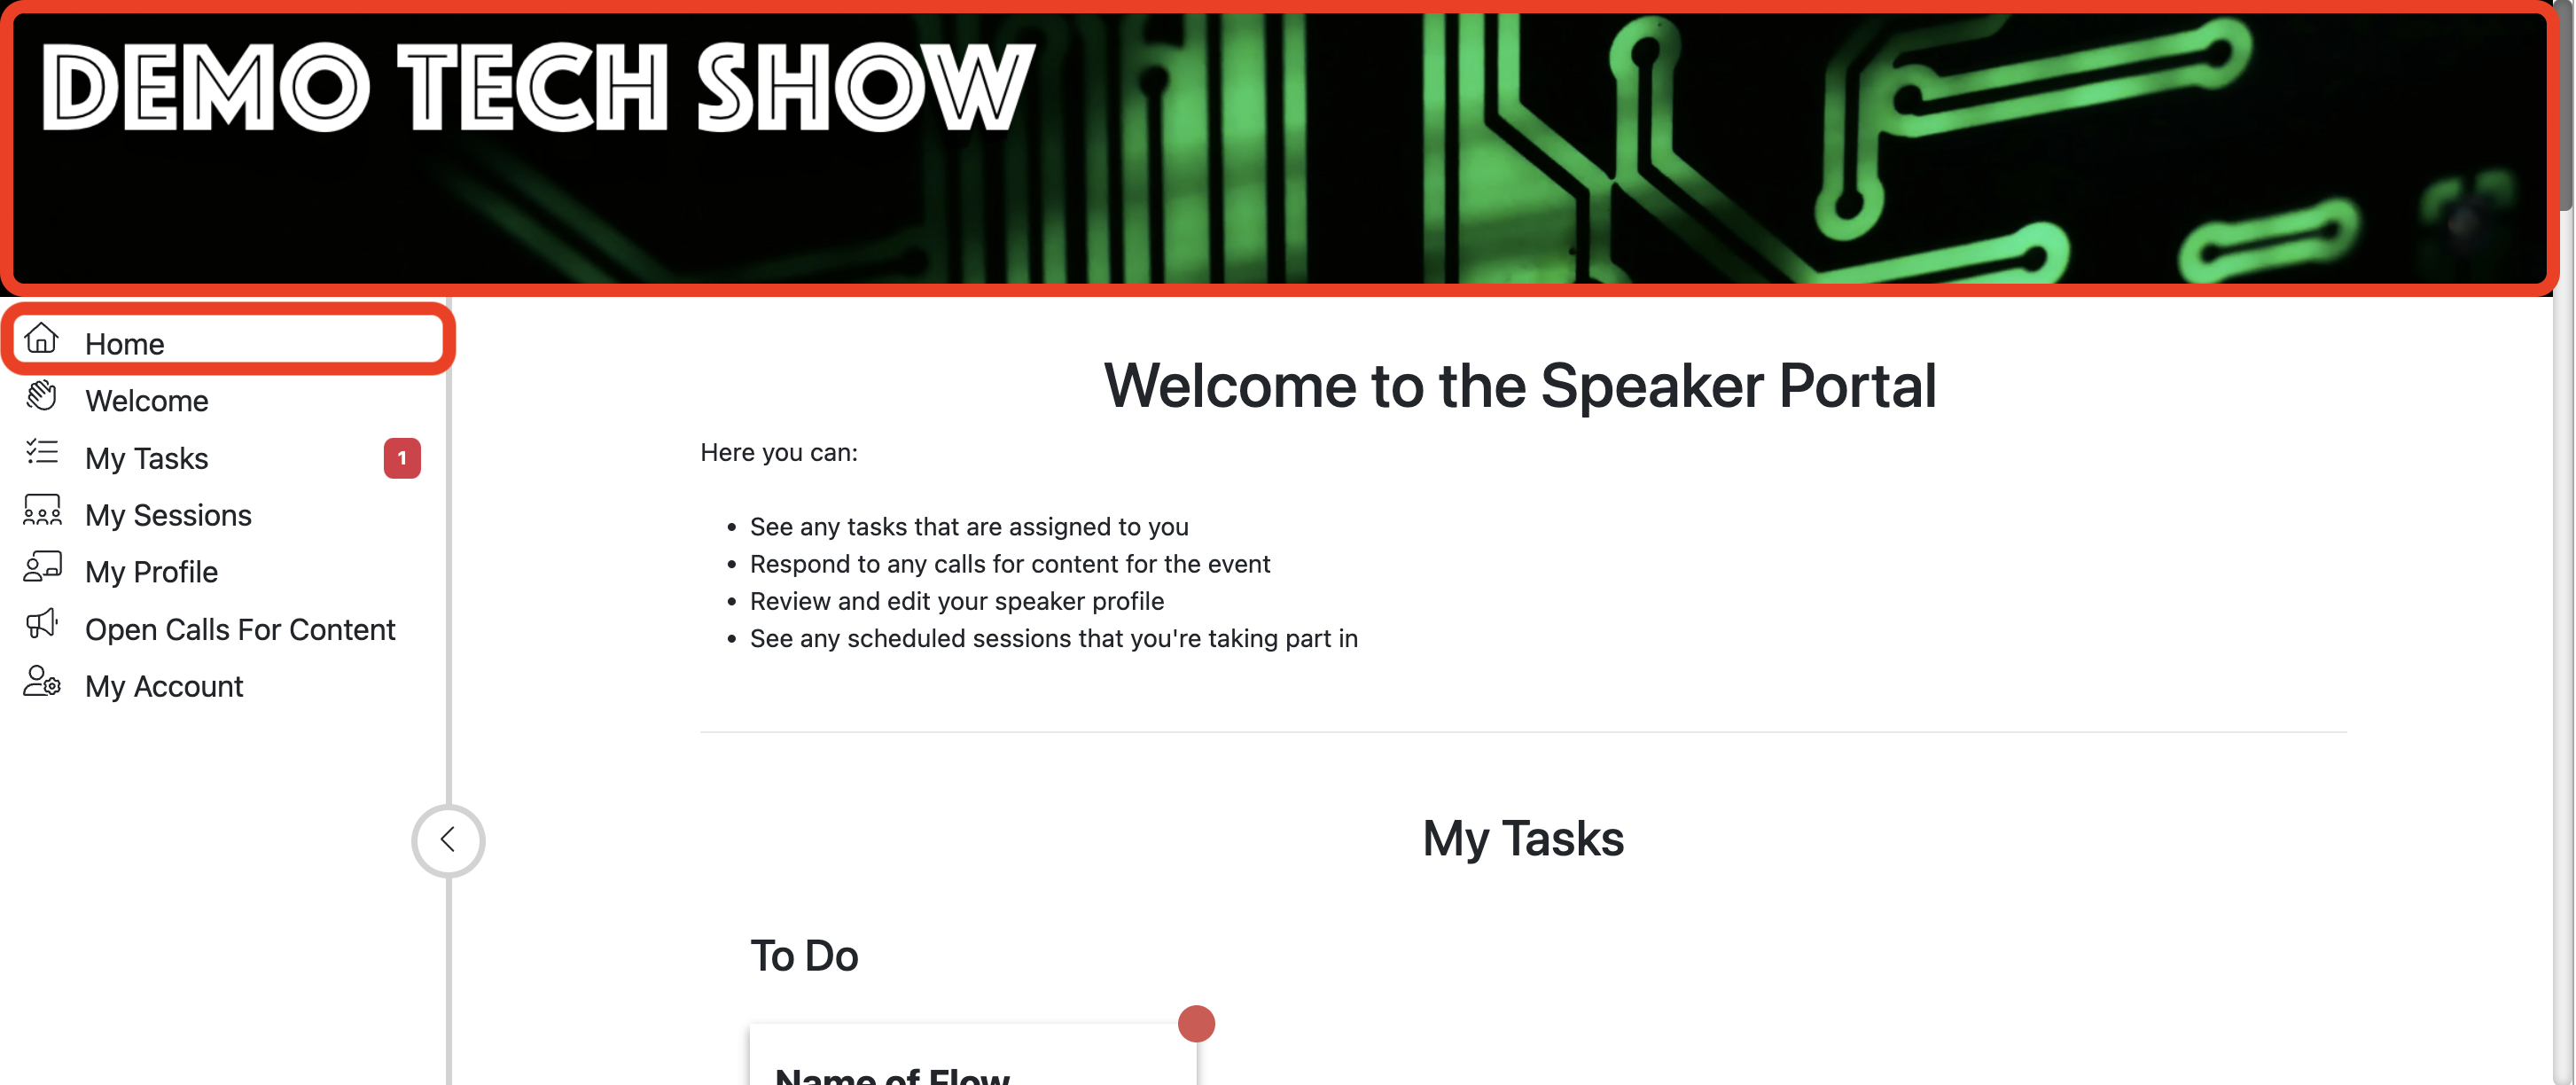
The Home Page has several sections. Each of which performs different functions:
Home: The top of the page and banner that will be displayed after login
Welcome: A space for some text to orientate the user
My Account: Where the user can edit their account details.
Additional text type sections: you can add as many text type sections as you like.
There is more detail about each section and some usage tips below…
Note
Several sections will only be shown to users if they have relevant content.
For example, if a portal user is not associated with any sessions, they won’t see the “My Sessions” section.
You have more granular control over which content gets shown to which users, and when. See each section’s documentation for more details.
Info
The preview of each section contains dummy data to help you visualize what portal users will see.
You can edit some of this data (e.g. the text in the ‘welcome’ section), but not some other data (e.g. the Keynote session with John and Jane Doe in the ‘My Sessions’ section).
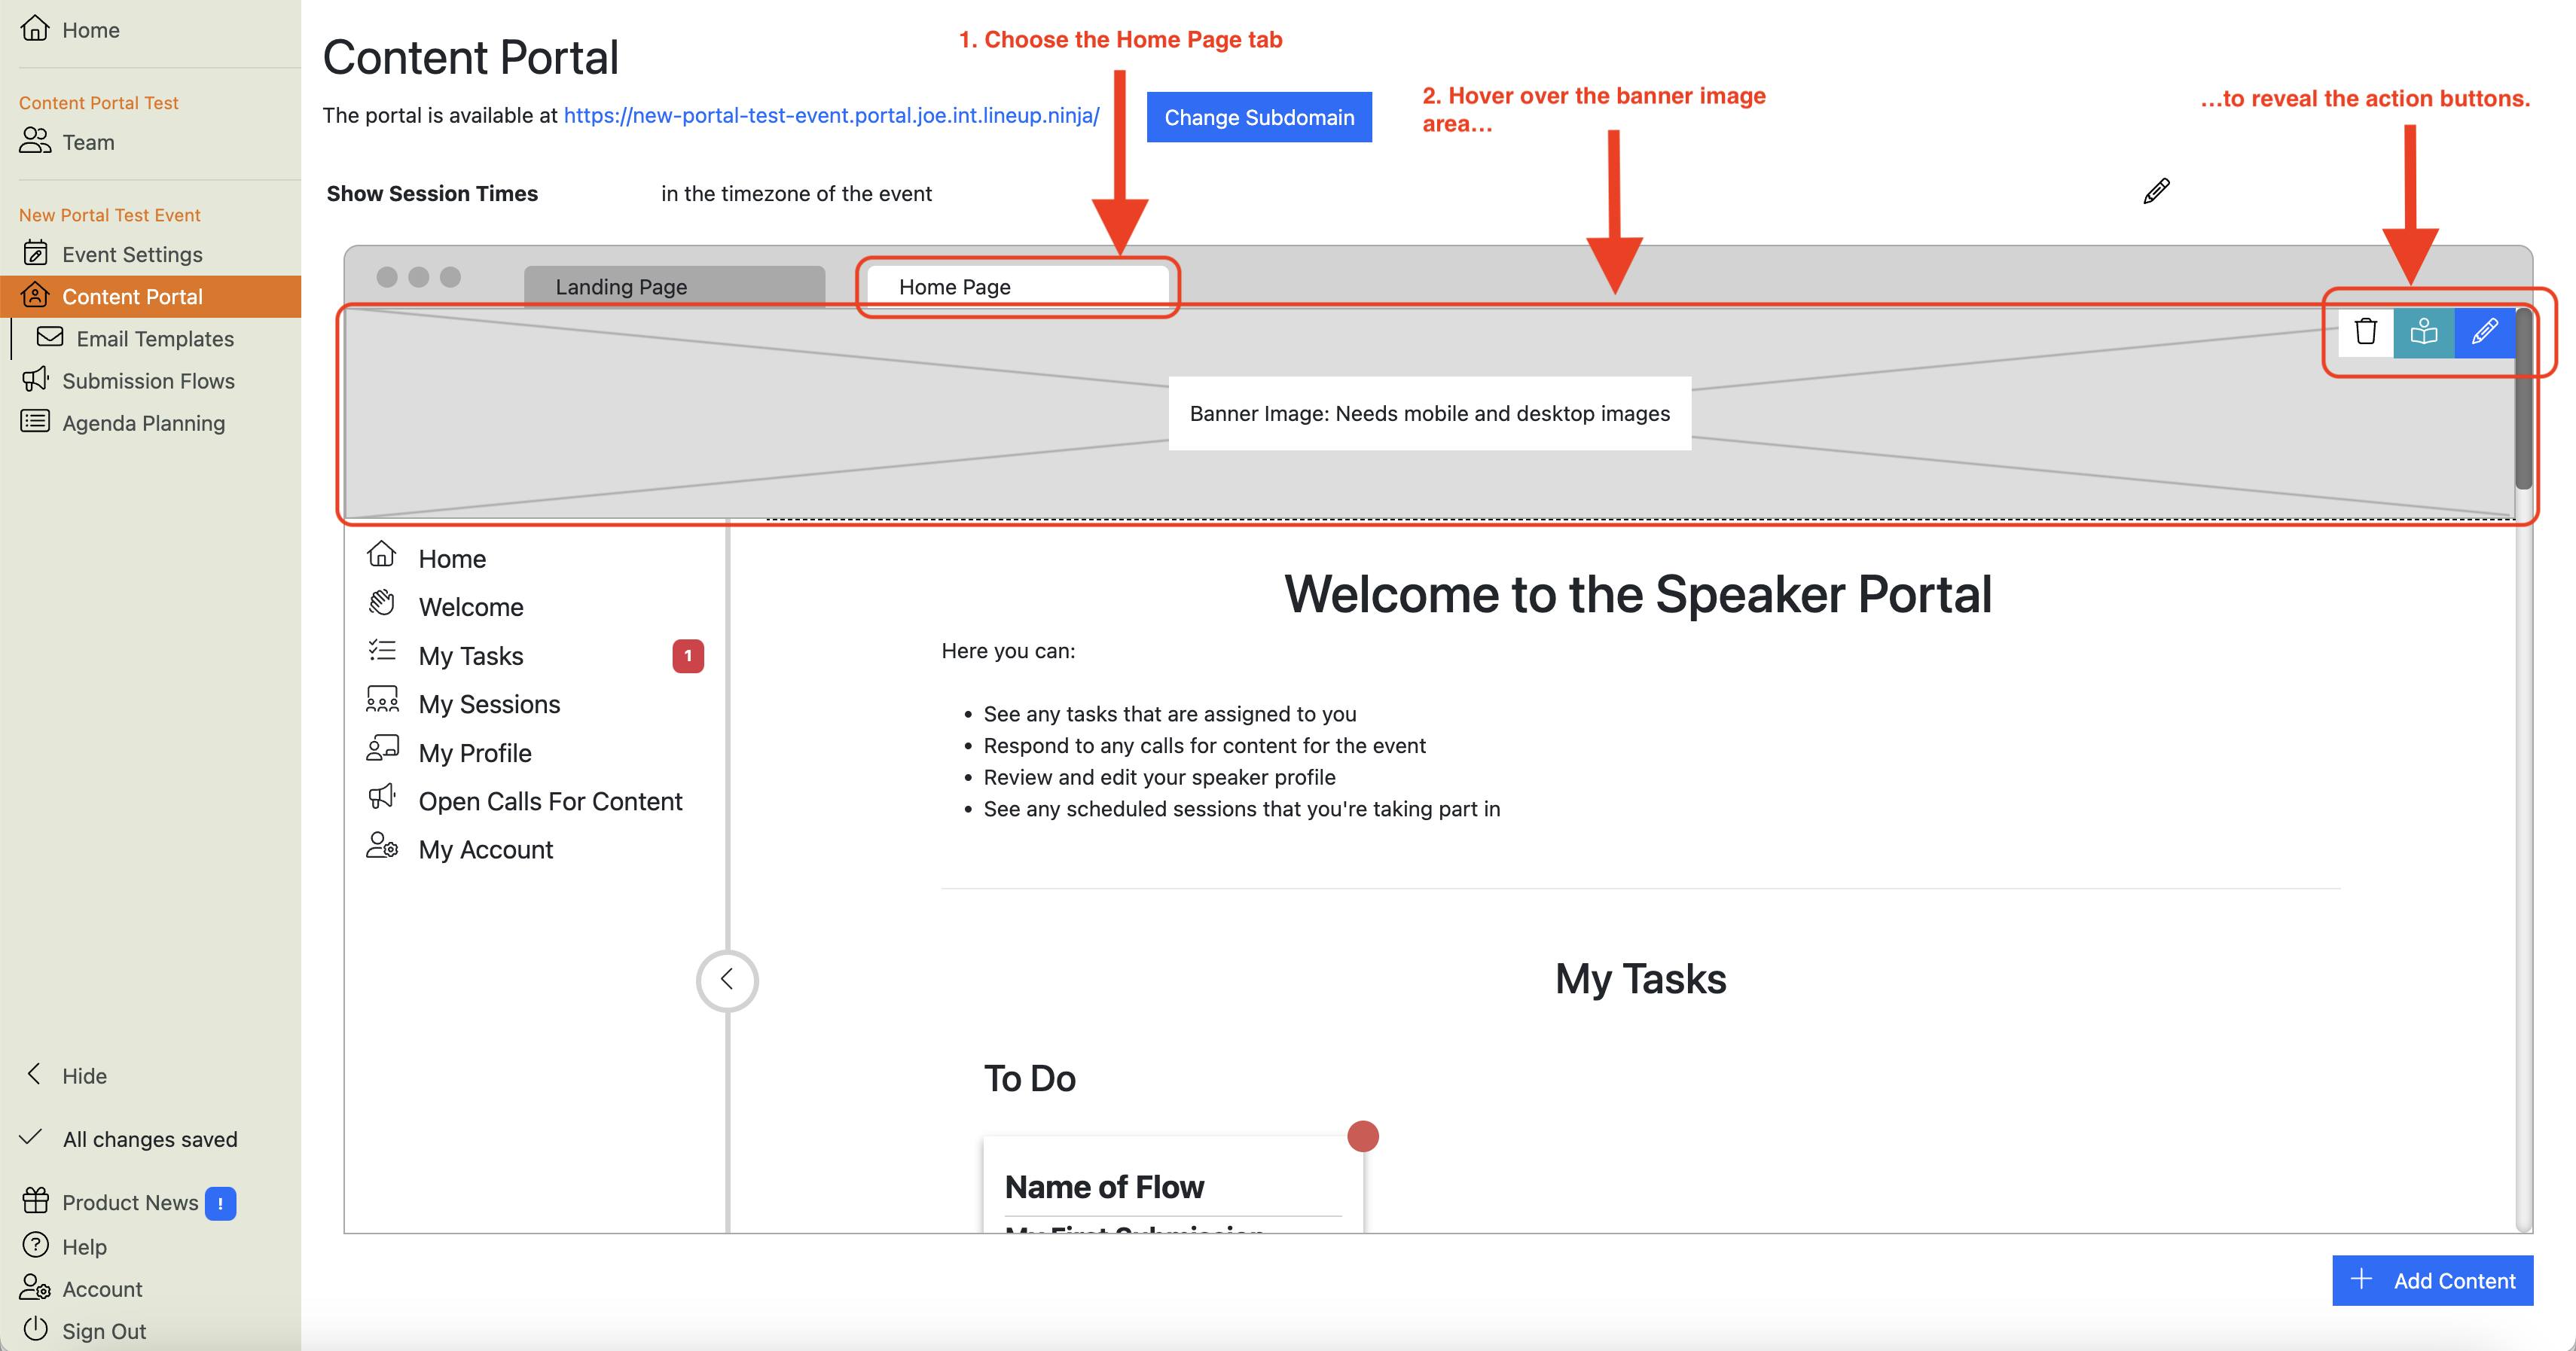
How do I add branding to the Home Page in the Content Portal?
To add a new banner to the Home Page, navigate to the Content Portal preview, hover your cursor over the Banner Image area and click the blue
button:
This will launch the “Home” section editor dialogue box. Here you can configure a few things:
The name for the section as it appears in the left-hand menu.
The icon for the section as it appears in the left-hand menu.
Desktop and mobile banner images
Alt text for the banner images
A link that will be embedded in the image, so when users tap or click the image, they will be taken to the link.
What does the Home section of the Home Page do?
This section contains the banner images (one for desktop, one for mobile) that will be applied to the top of the Home Page.
Tip
You can reuse the images from the Landing Page, but we suggest using different versions that take up less vertical space to leave more room for the content..
What does the Welcome section of the Home Page do?
This section allows you to add formatted text. You can use it to provide orientation and guidance information for users.
Tip
The Welcome section is a text type section.
You can embed links in the text, so text type sections are useful for sharing links to things like:
Speaker agreements
Slide templates
Registration pages
You can add as many text type sections as you like, so those links don’t have to go in the Welcome section!
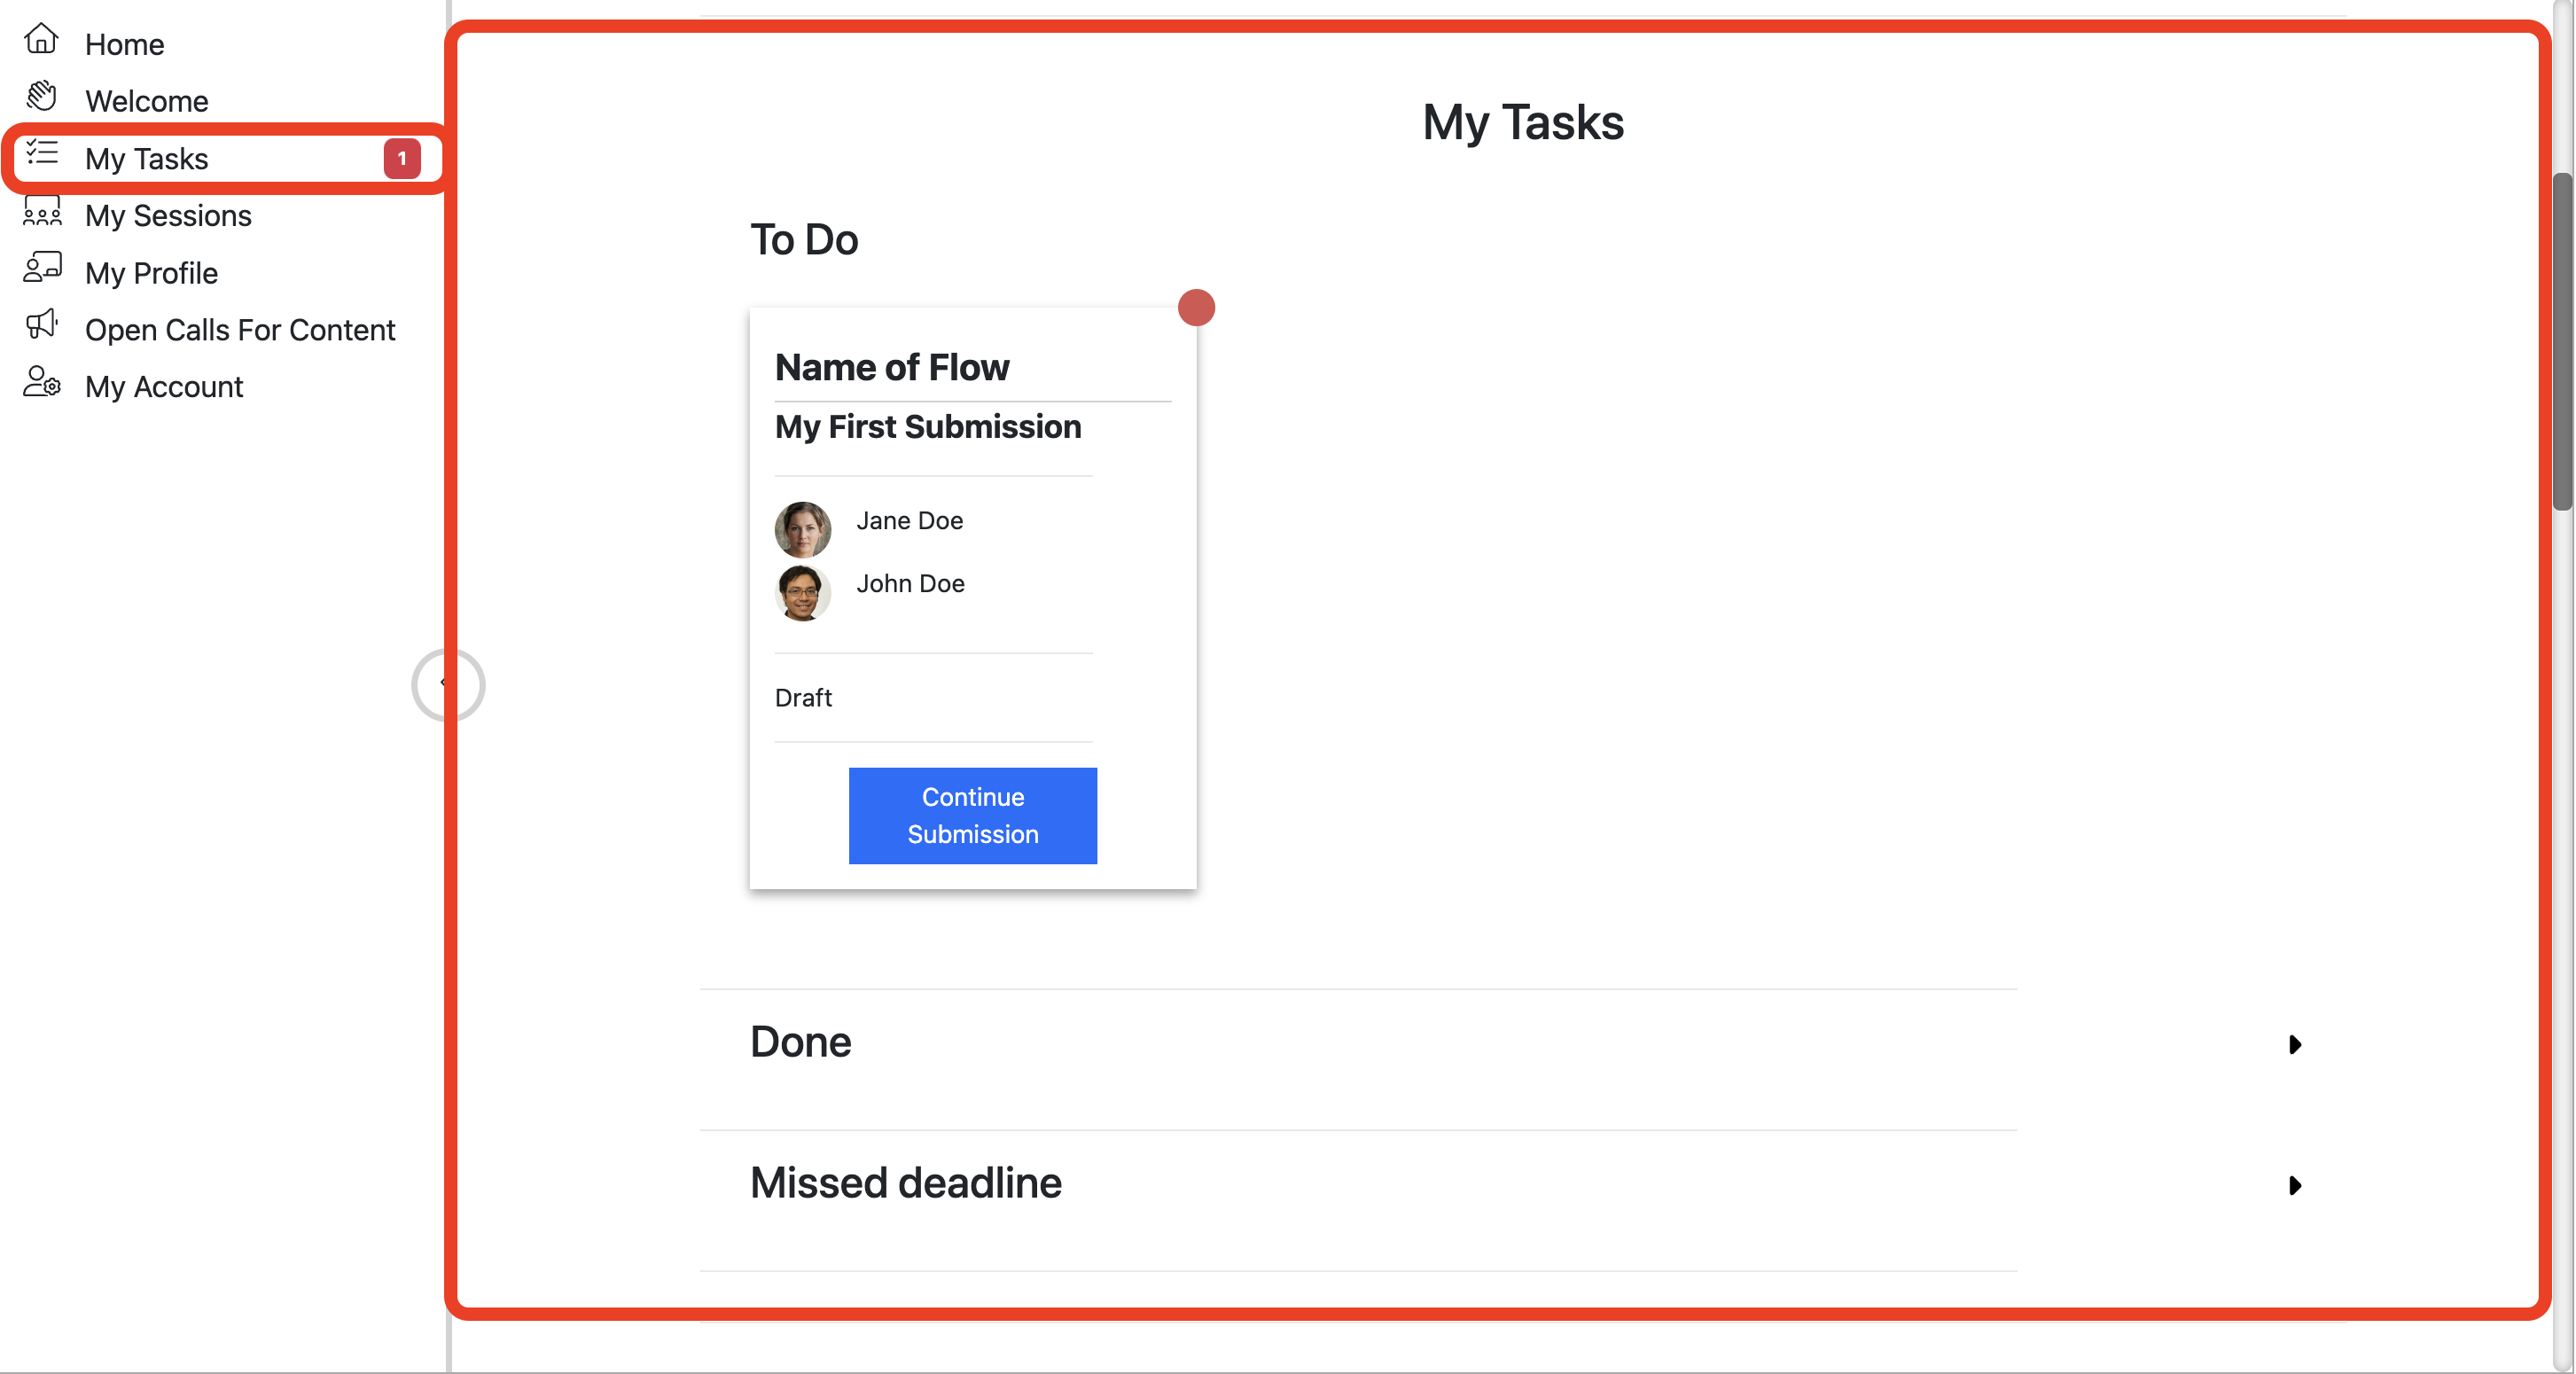
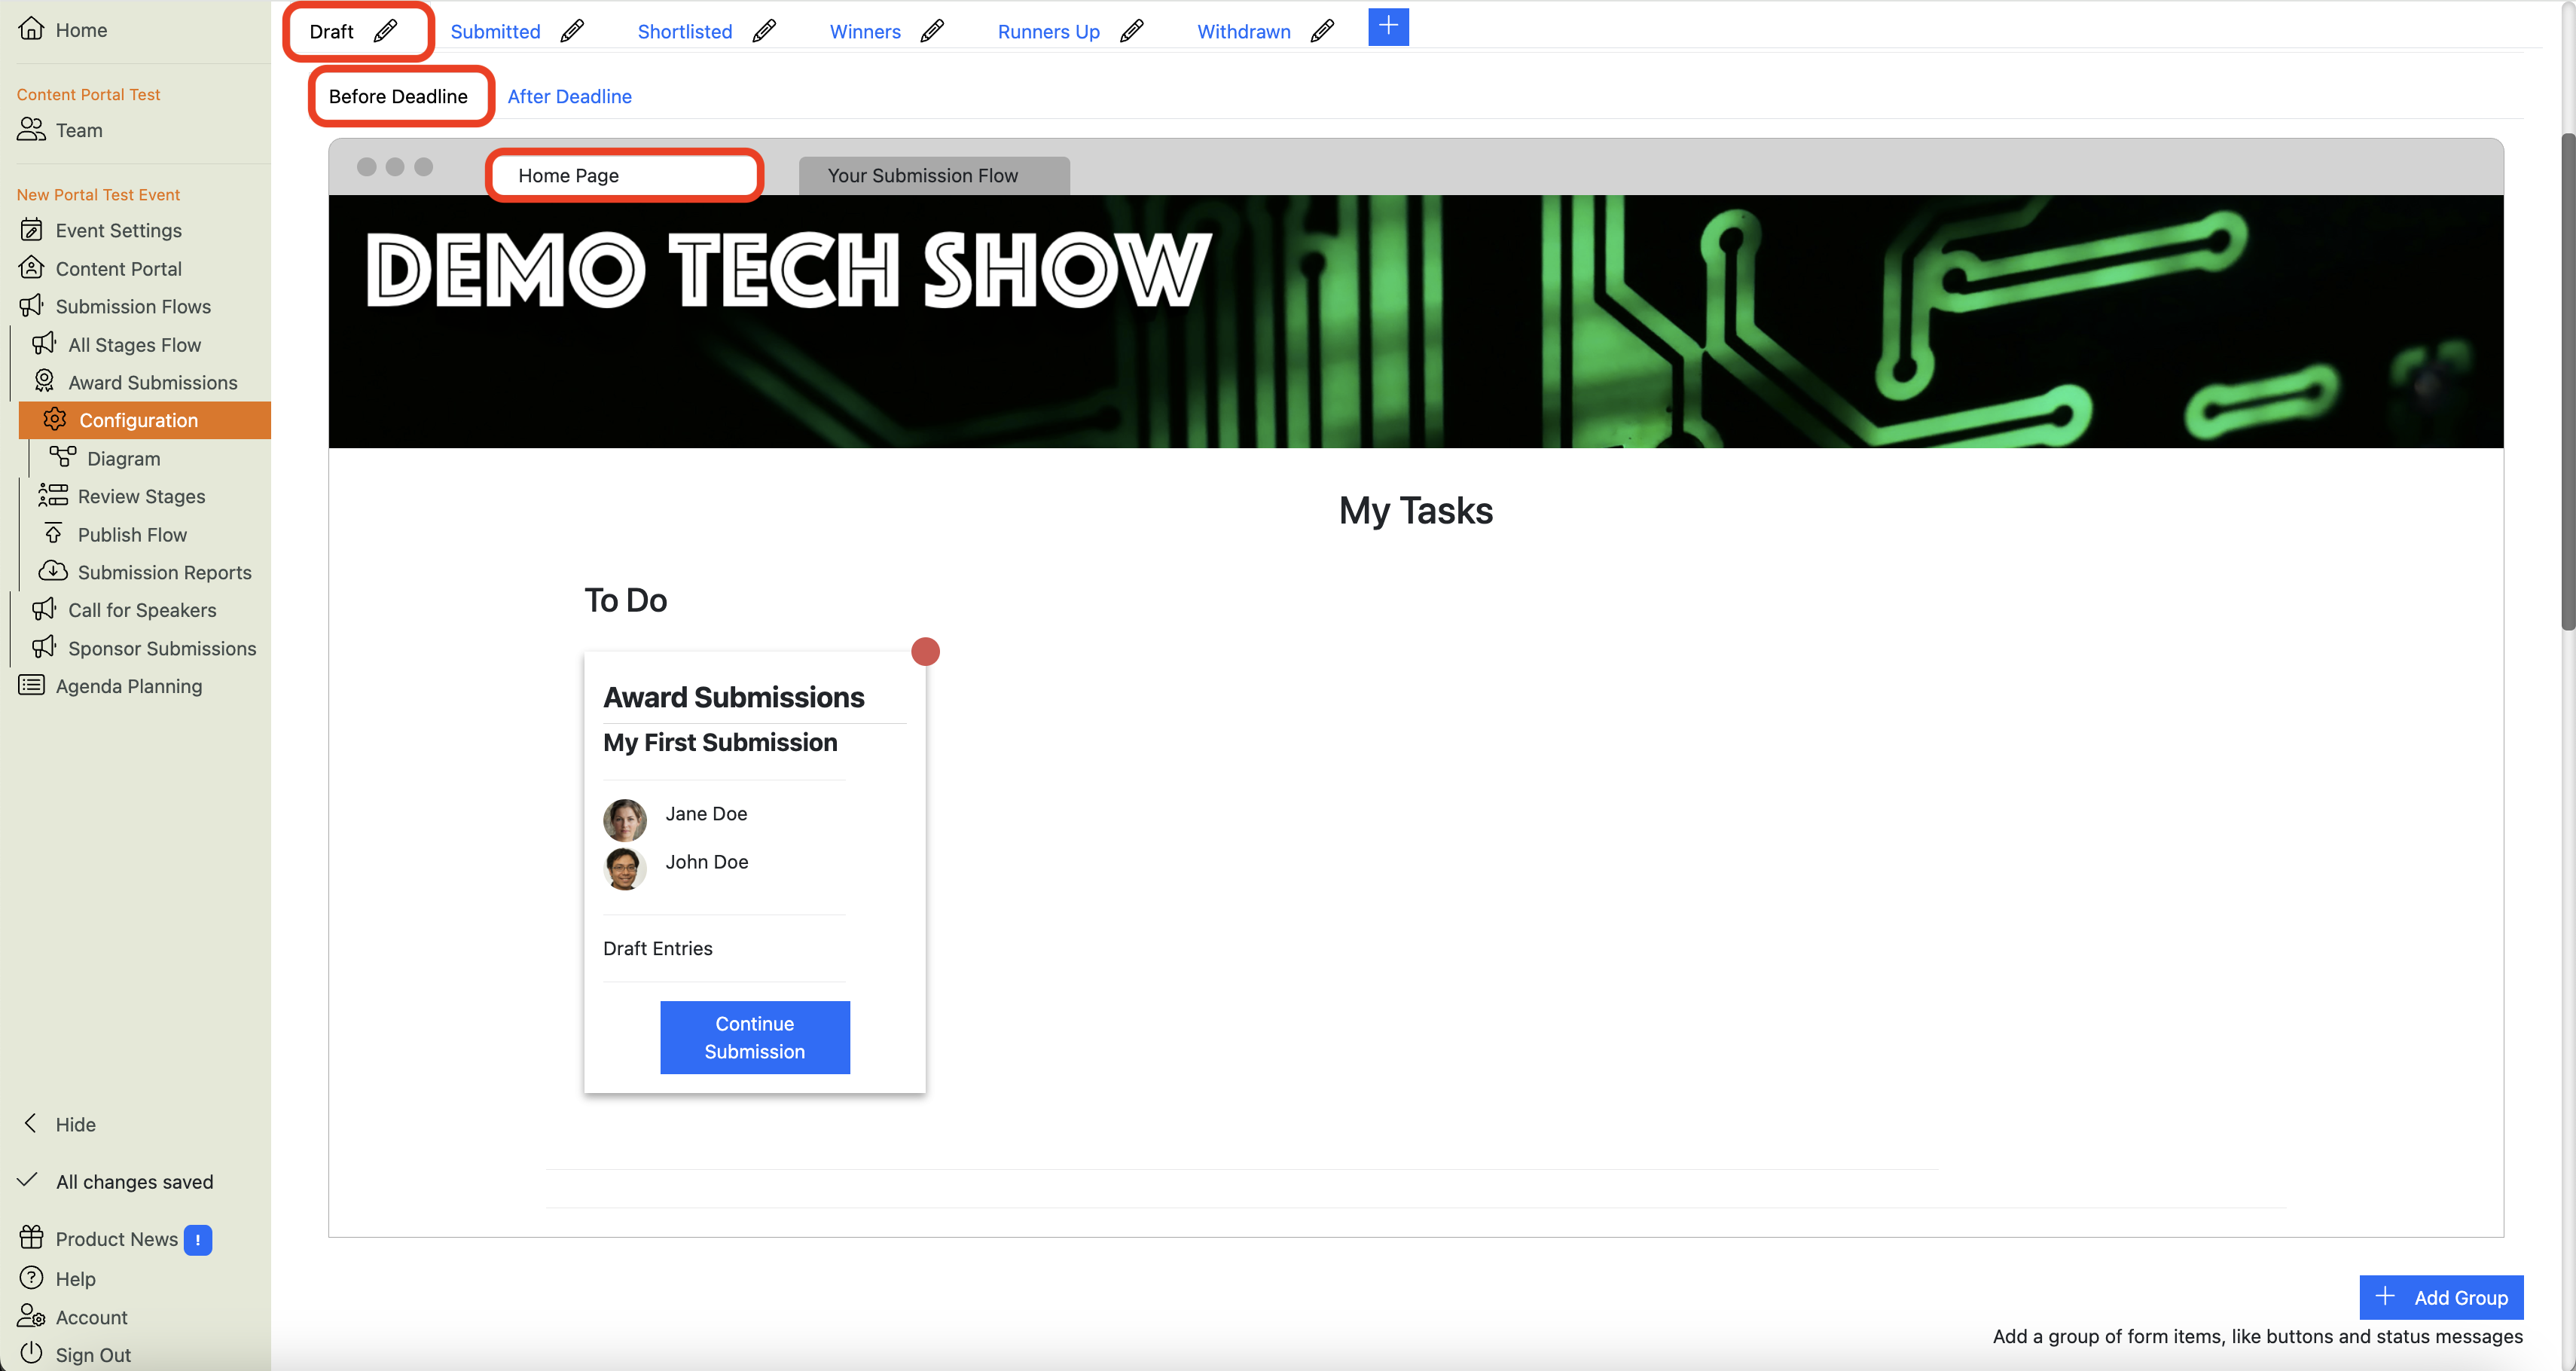
What does the My Tasks section of the Home Page do?
This section shows the users’ Tasks and Submissions. It has three sections of its own:
To Do - Submissions that are open for editing* and Tasks that require attention
Done - Submitted Submissions** and Completed tasks
Missed Deadline - Submissions and Tasks for which the user missed the deadline
* technically, this means Submissions that are in a Submission Stage which has the configuration option “Does Submitter need to take action?” set to Yes, AND for which the deadline has not passed. The tip below explains where to find this option.
** technically, this means Submissions that are in a Submission Stage which has the configuration option “Does Submitter need to take action?” set to No. The tip below explains where to find this option.
Tip
You can find the “Does Submitter need to take action?” option in the Submission Flow configuration.
Navigate to the Submission Flow, then click the pencil icon in the next to the relevant Submission Stage.
This will bring up the Submission Stage configuration dialogue. You will see a section called “View of a Submission on Portal Home Page”. Expand this section and you will see the configuration option.
Info
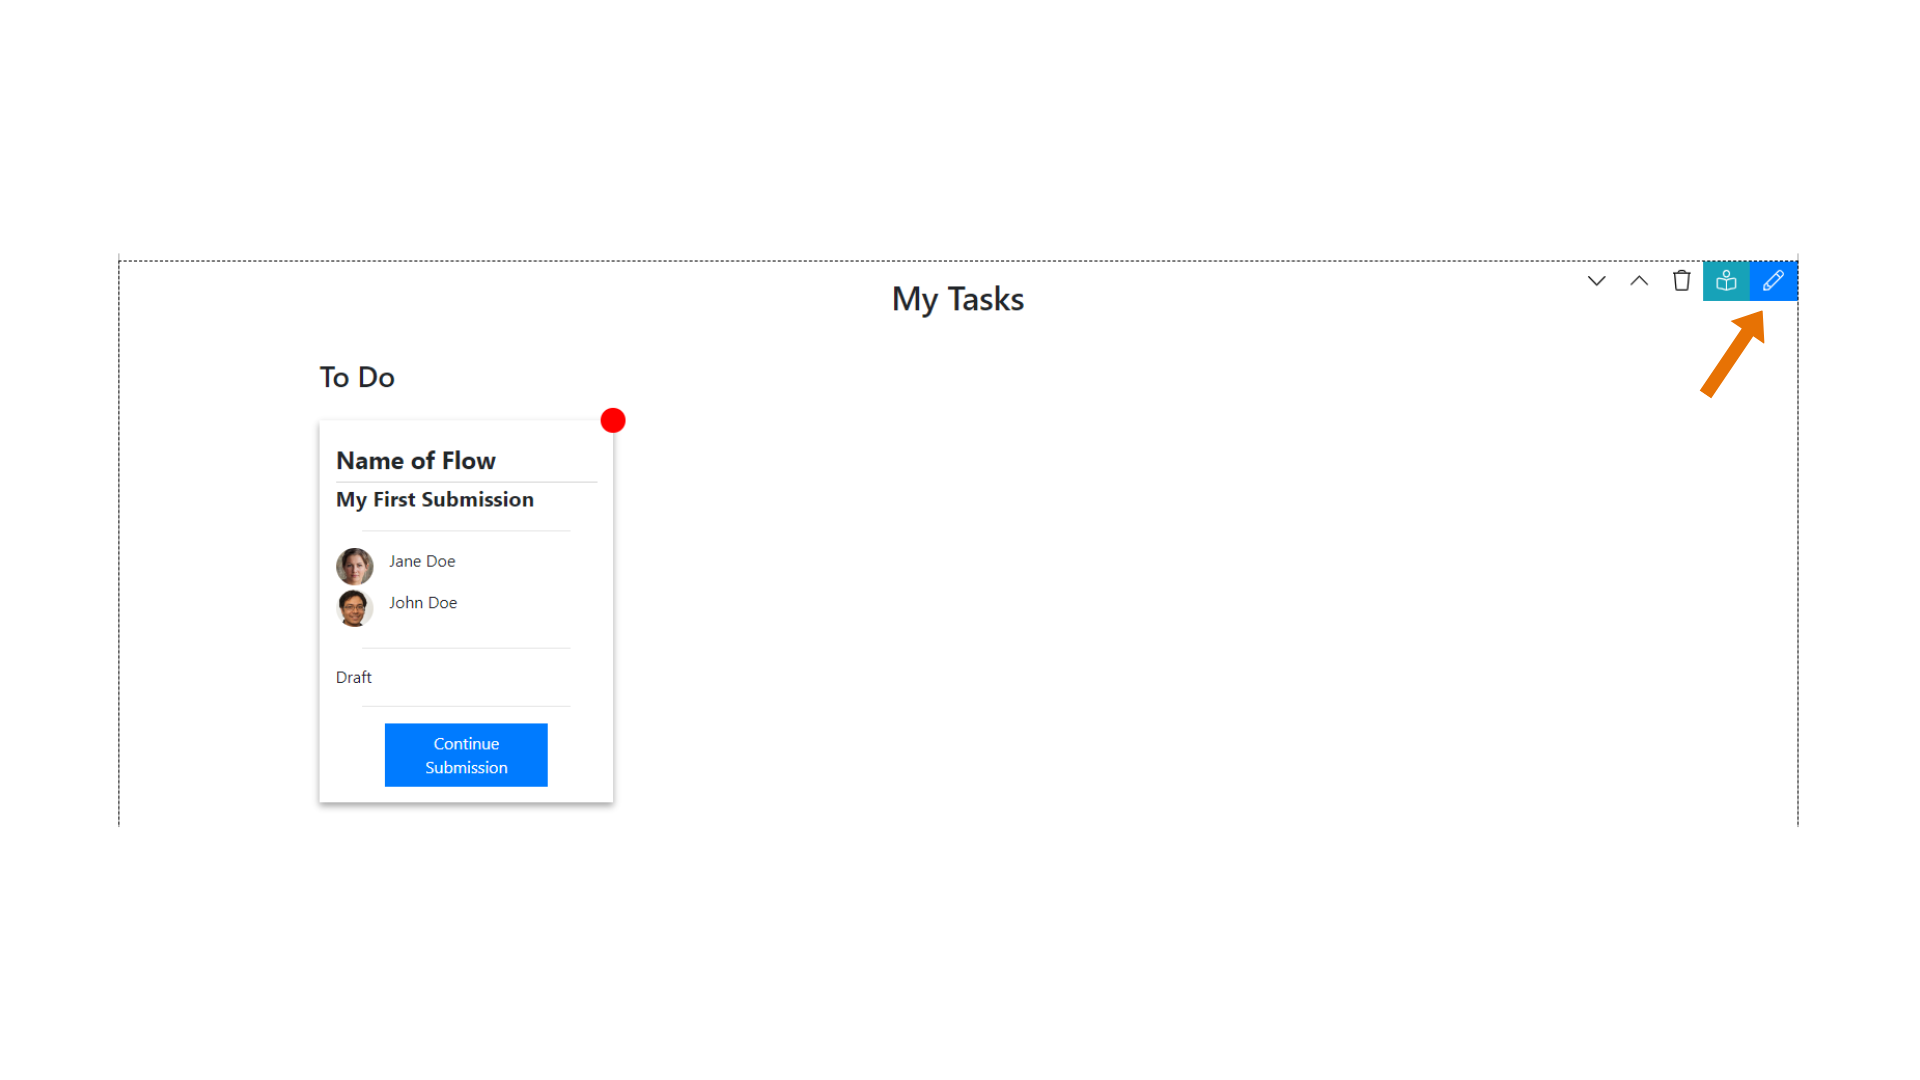
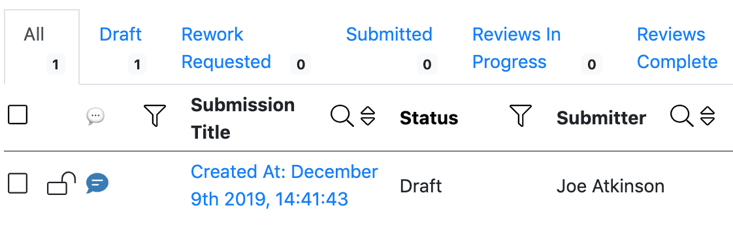
The preview of the My Tasks section contains a dummy task with some dummy data:
Submission title: ‘My First Submission"
Submission Flow: “Name of Flow”
Two speaker profiles: “Jane Doe” and “John Doe”
The Submission stage: “Draft”
A button: “Continue Submission”
All of these will be replaced by the relevant data for each submission or task belonging to the portal user. They are only shown here to help you visualize what your users will see.
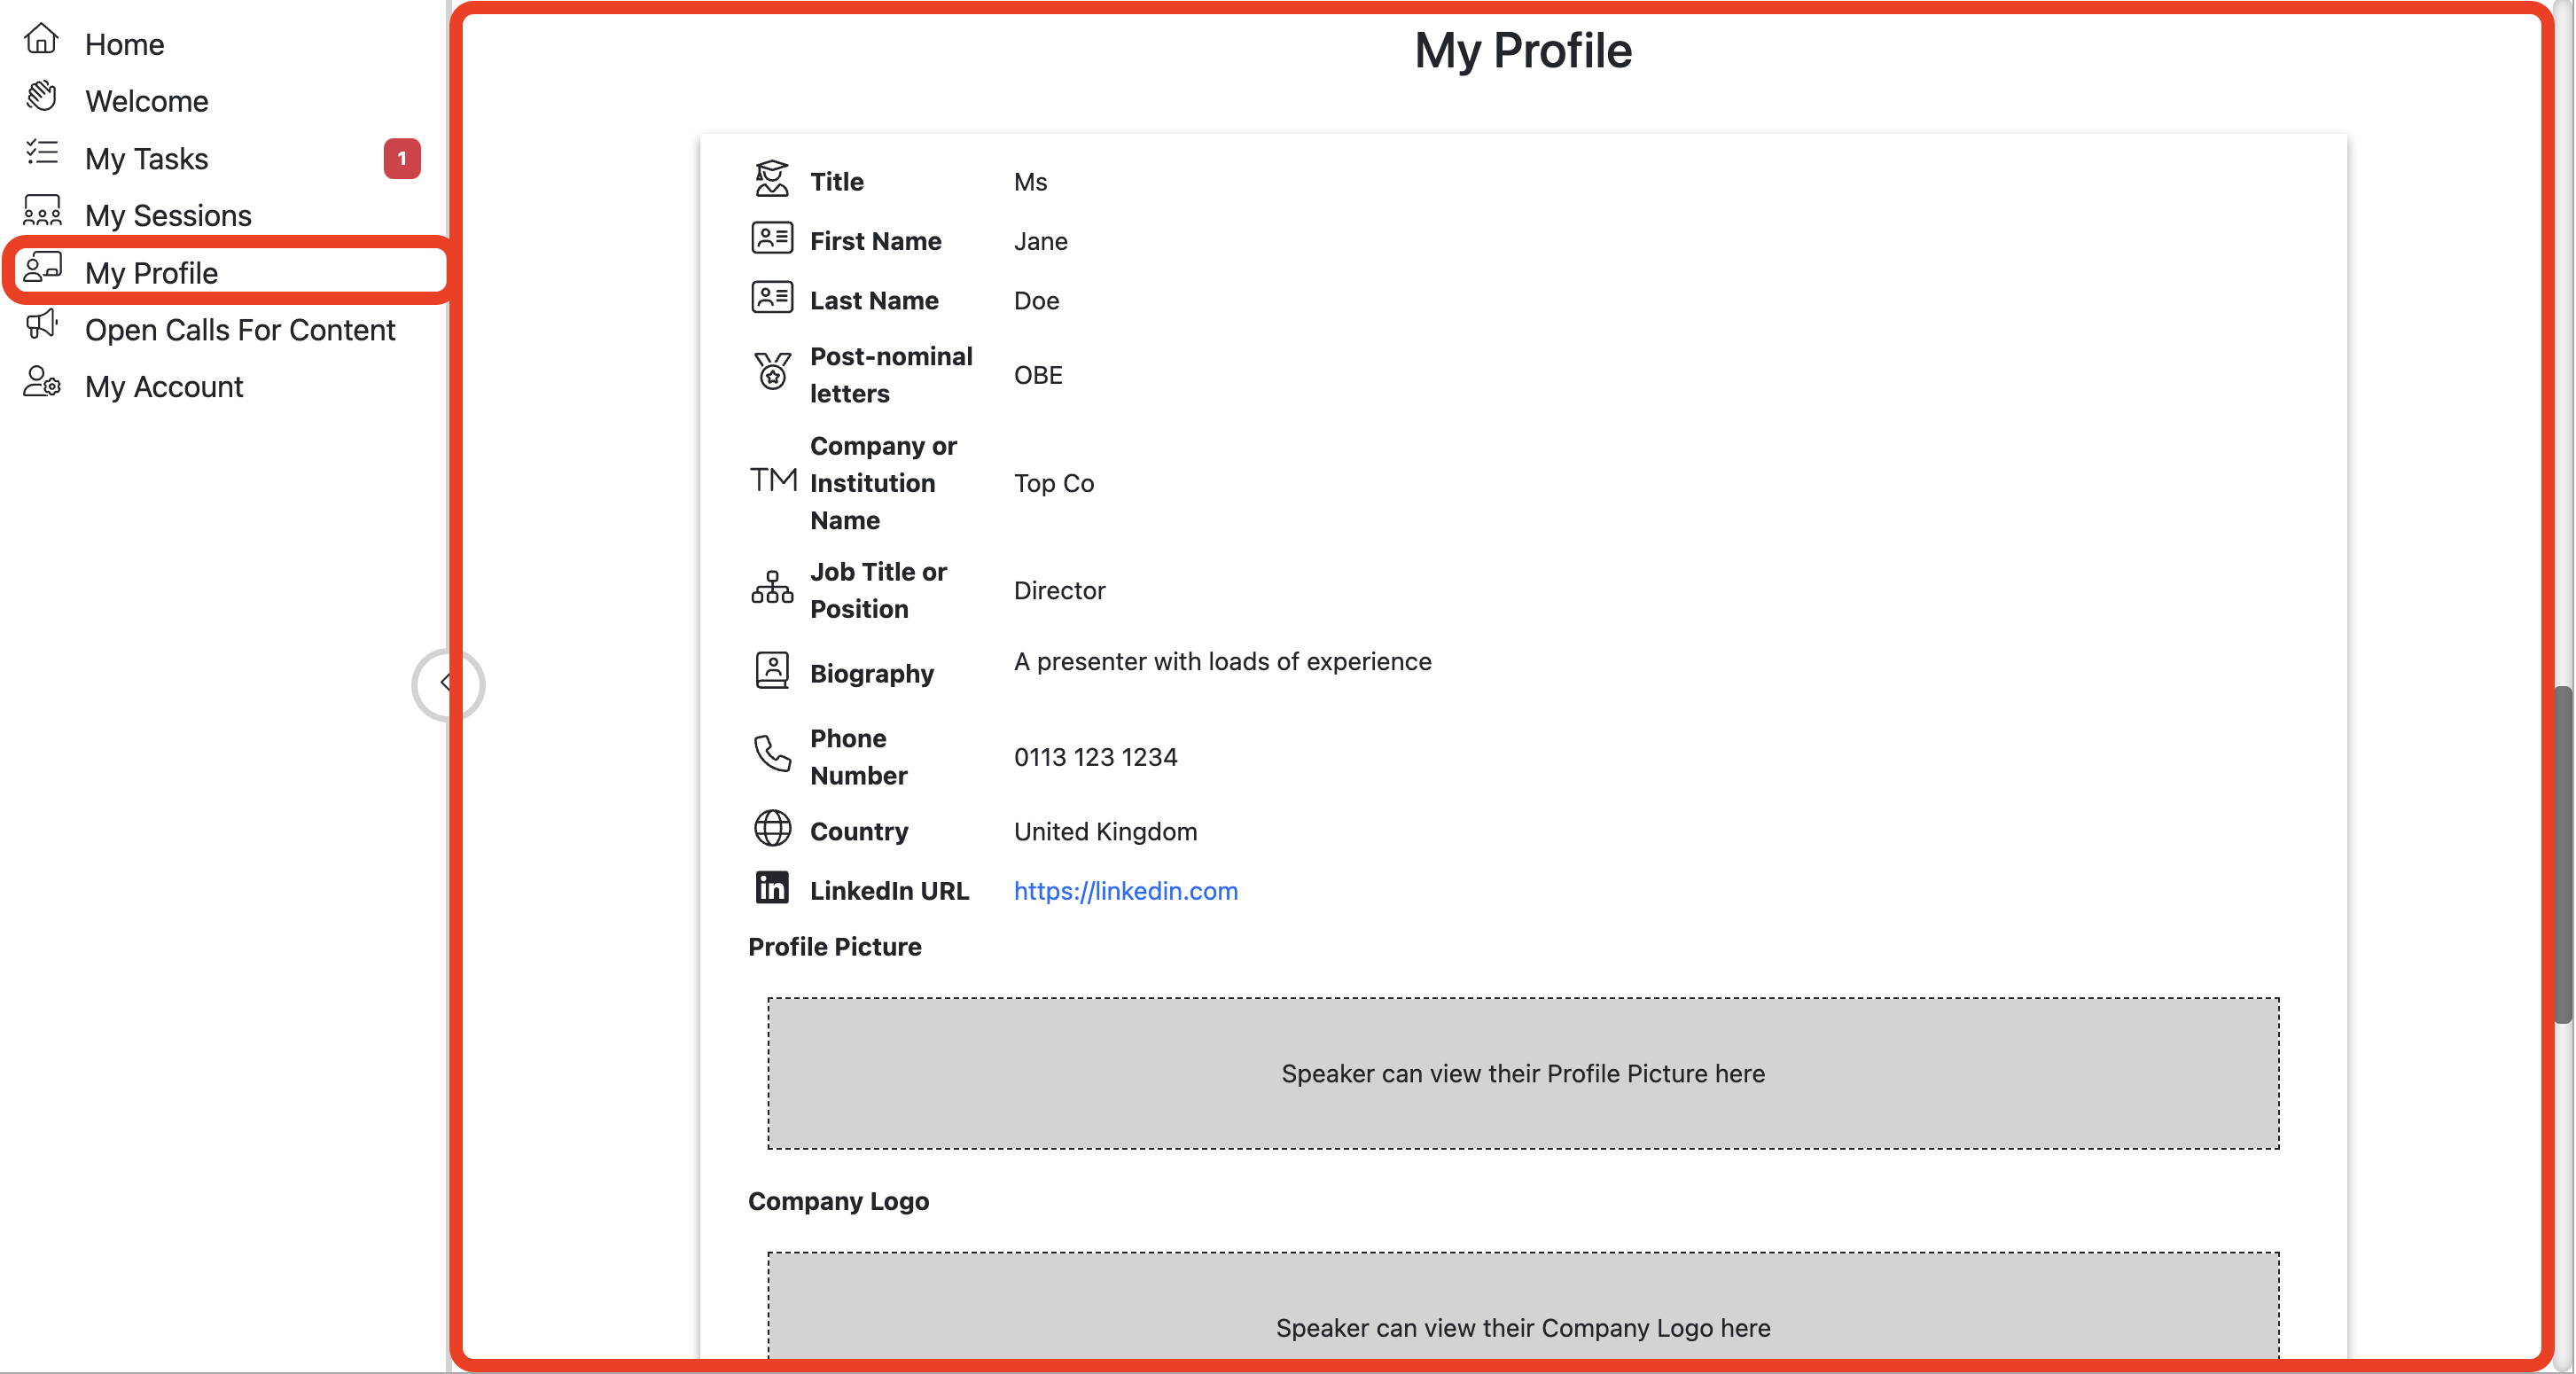
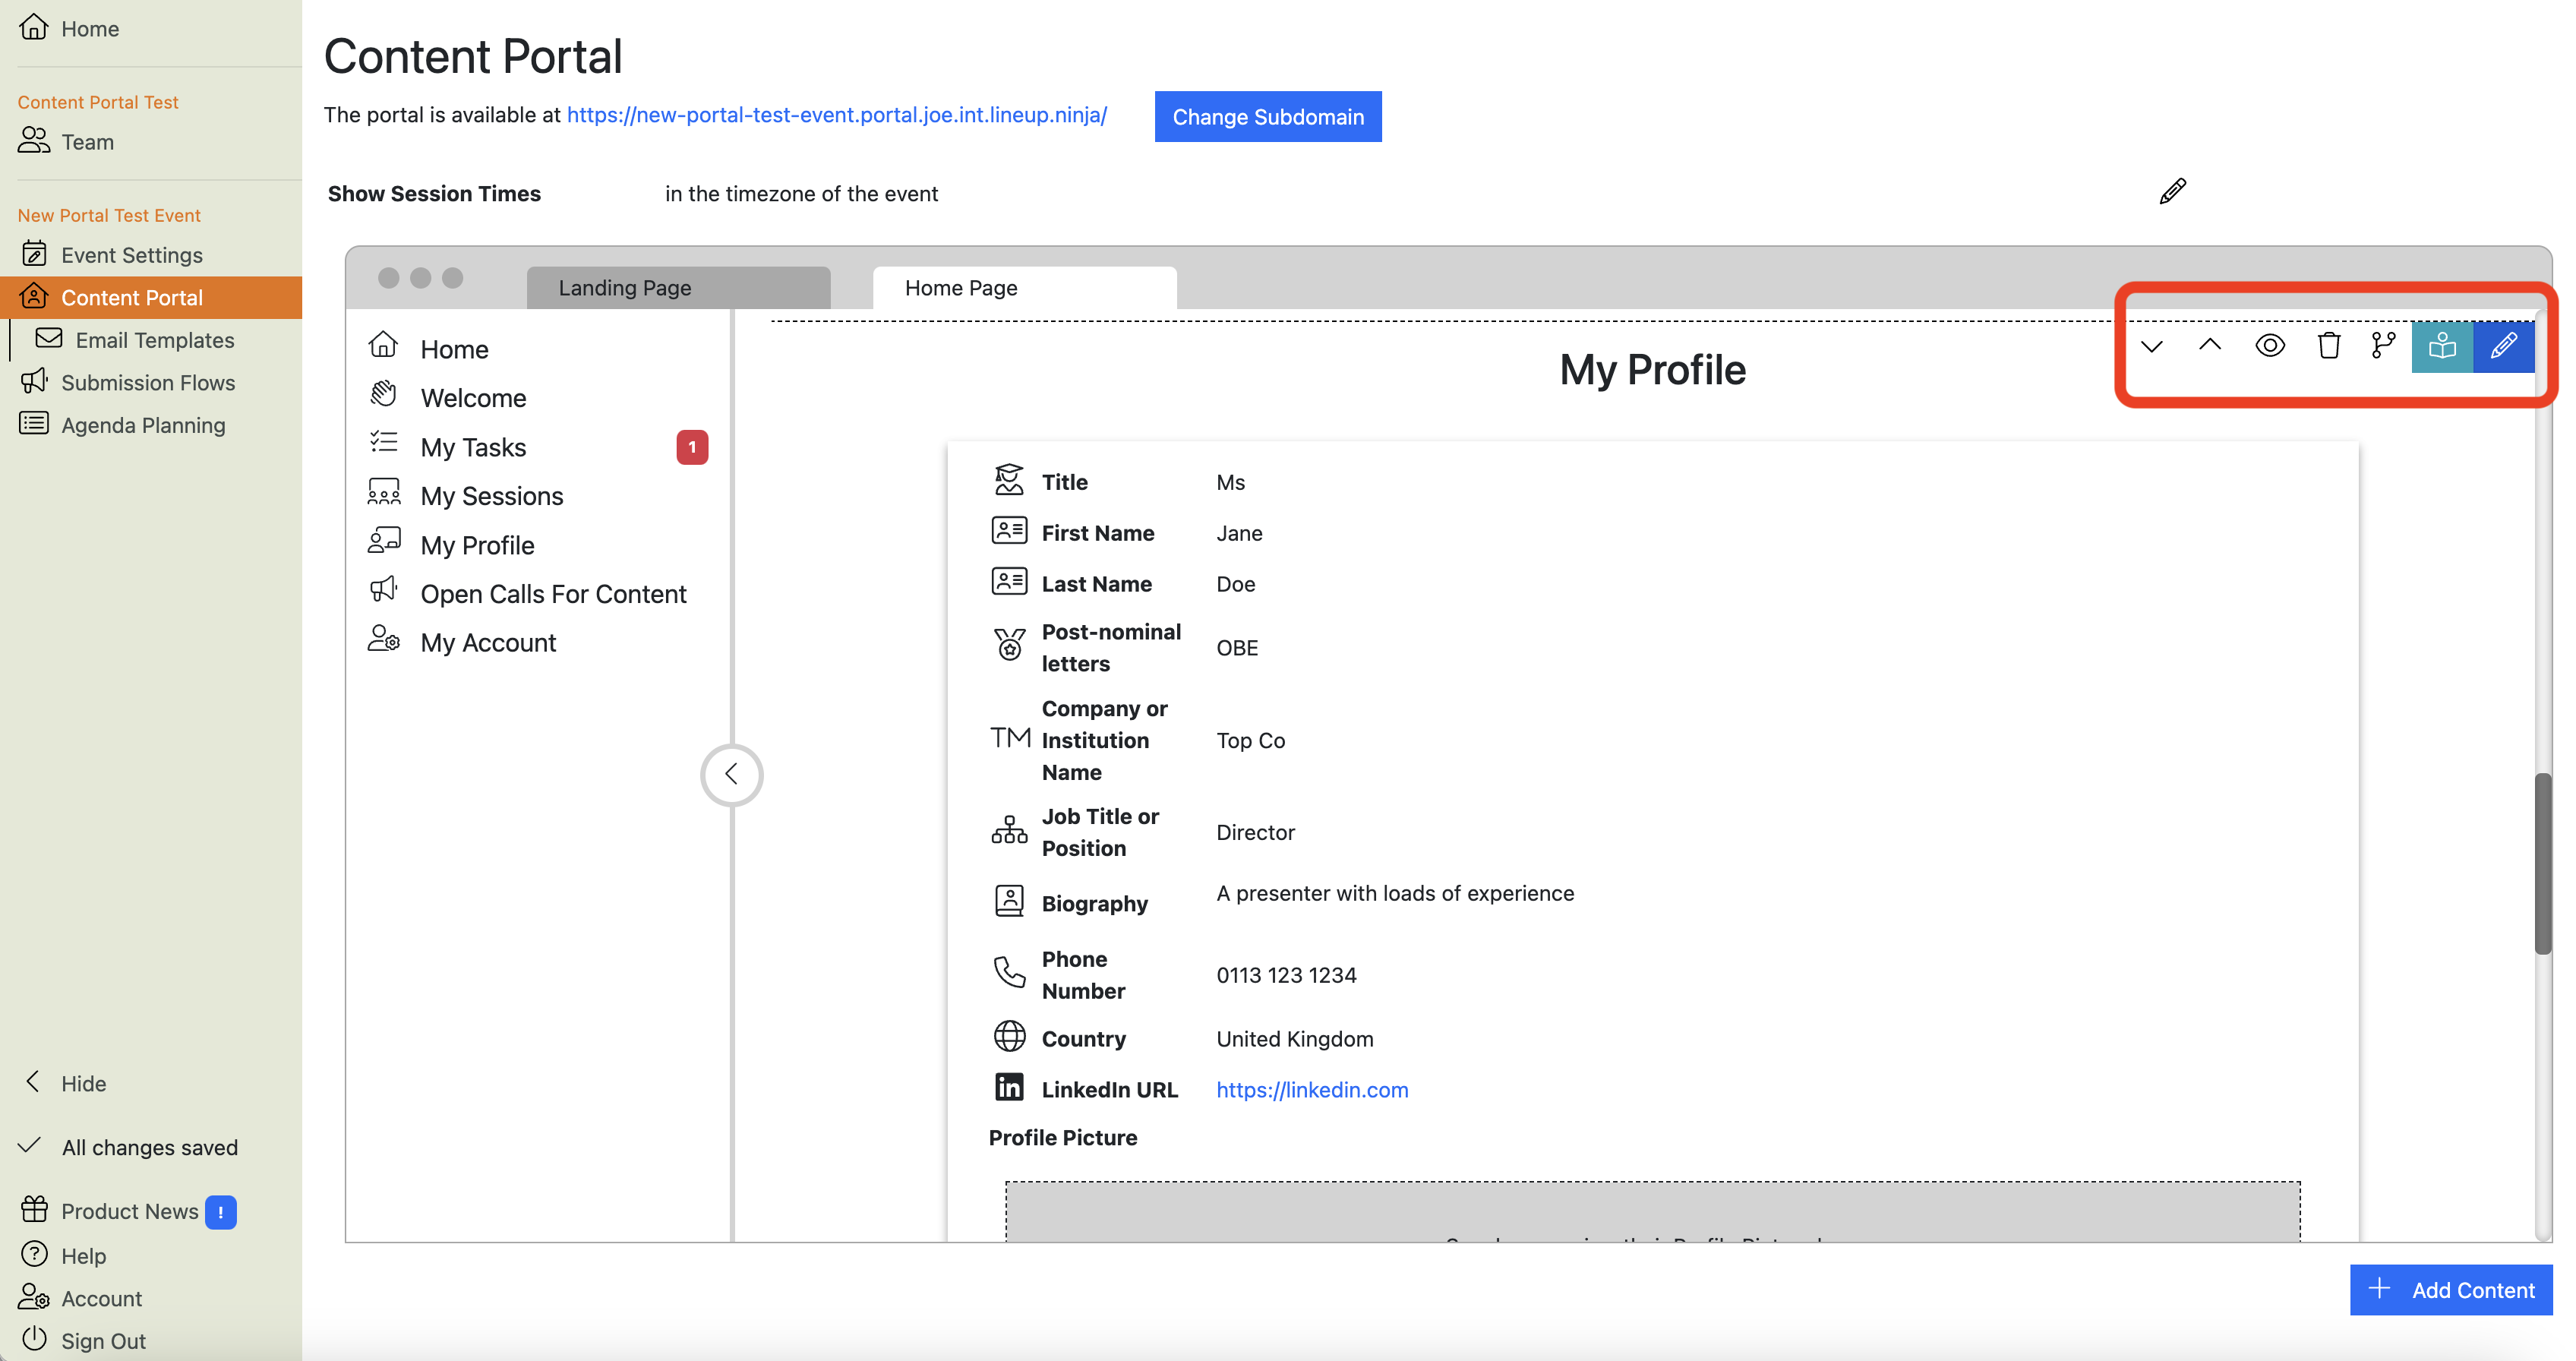
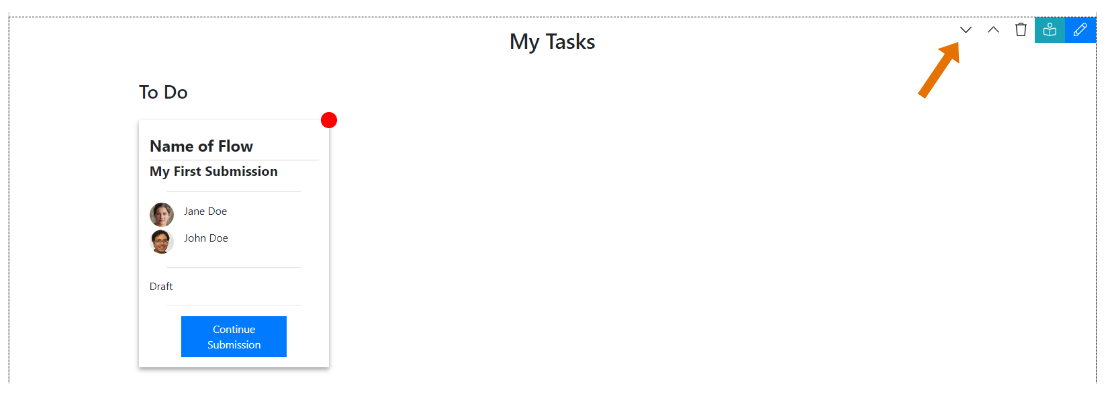
What does the My Profile section of the Home Page do?
This section shows speakers the data that you hold for them in the Agenda Planning part of Lineup Ninja.
Portal users can only see the details of speaker records that have the same email address that they have logged into the portal with.
Most of the time in Lineup Ninja, each speaker has a unique email address, so each portal user will only see one speaker record - their own.
However in some instances, several speaker records will have the same email address (for example, where there is a single contact for several speakers). In this case, the user will be able to see several speaker records.
Warning
This is the speaker profile that will be published to your event’s website, mobile app, signage and other digital assets.
You can allow speakers to make changes here, but be aware that their changes may be published without anyone reviewing them.
Note
If you have gathered speakers’ profiles via a Submission Flow, the data will only appear here after you have created speakers on the agenda.
Also, if speakers are allowed to edit their profiles via the submission flow, any changes will only appear here once you’ve updated their profile on the agenda.
Info
The preview of the My Profile section contains some dummy data for the imaginary speaker, Jane Doe.
This will be replaced with the relevant data for each speaker, and iis only shown here to help you visualize what your users will see.
You can configure various parts of the My Profile section: The text at the top of the section; which fields are shown to users, and some guidance text for mandatory fields.
To edit the My Profile section, hover over the section to reveal the action buttons:
Click the blue
edit button to open the section editor:
Here you can edit the menu name and icon.
Scroll down to edit the text that appears at the top of the ‘My Profile" section:
Scroll down to the the next section, and you can choose for every speaker field whether it should be:
Required (i.e. editable and mandatory)
Optional (editable and optional)
View-only (visible but not editable)
Hidden (not visible to the user)
This list of fields that you can choose from includes all the Speaker fields - including any custom fields you’ve added, and any fields that get added by integrations, such as the link to speakers Gleanin assets.
You can also add text asking users to fill in mandatory fields (when they still have some mandatory fields that haven’t been filled in yet), and if they have filled all the mandatory fields, thanking them for doing so:
How do I add new questions to the ‘My Profile’ section?
To add new questions to the My Profile section of the speaker portal, you must add these as Custom Fields first. They will then automatically appear in the list of fields that you can make Required, Optional, View-only or Hidden (see the My Profile section for more detail).
See Custom Fields for more information on how to add custom fields.
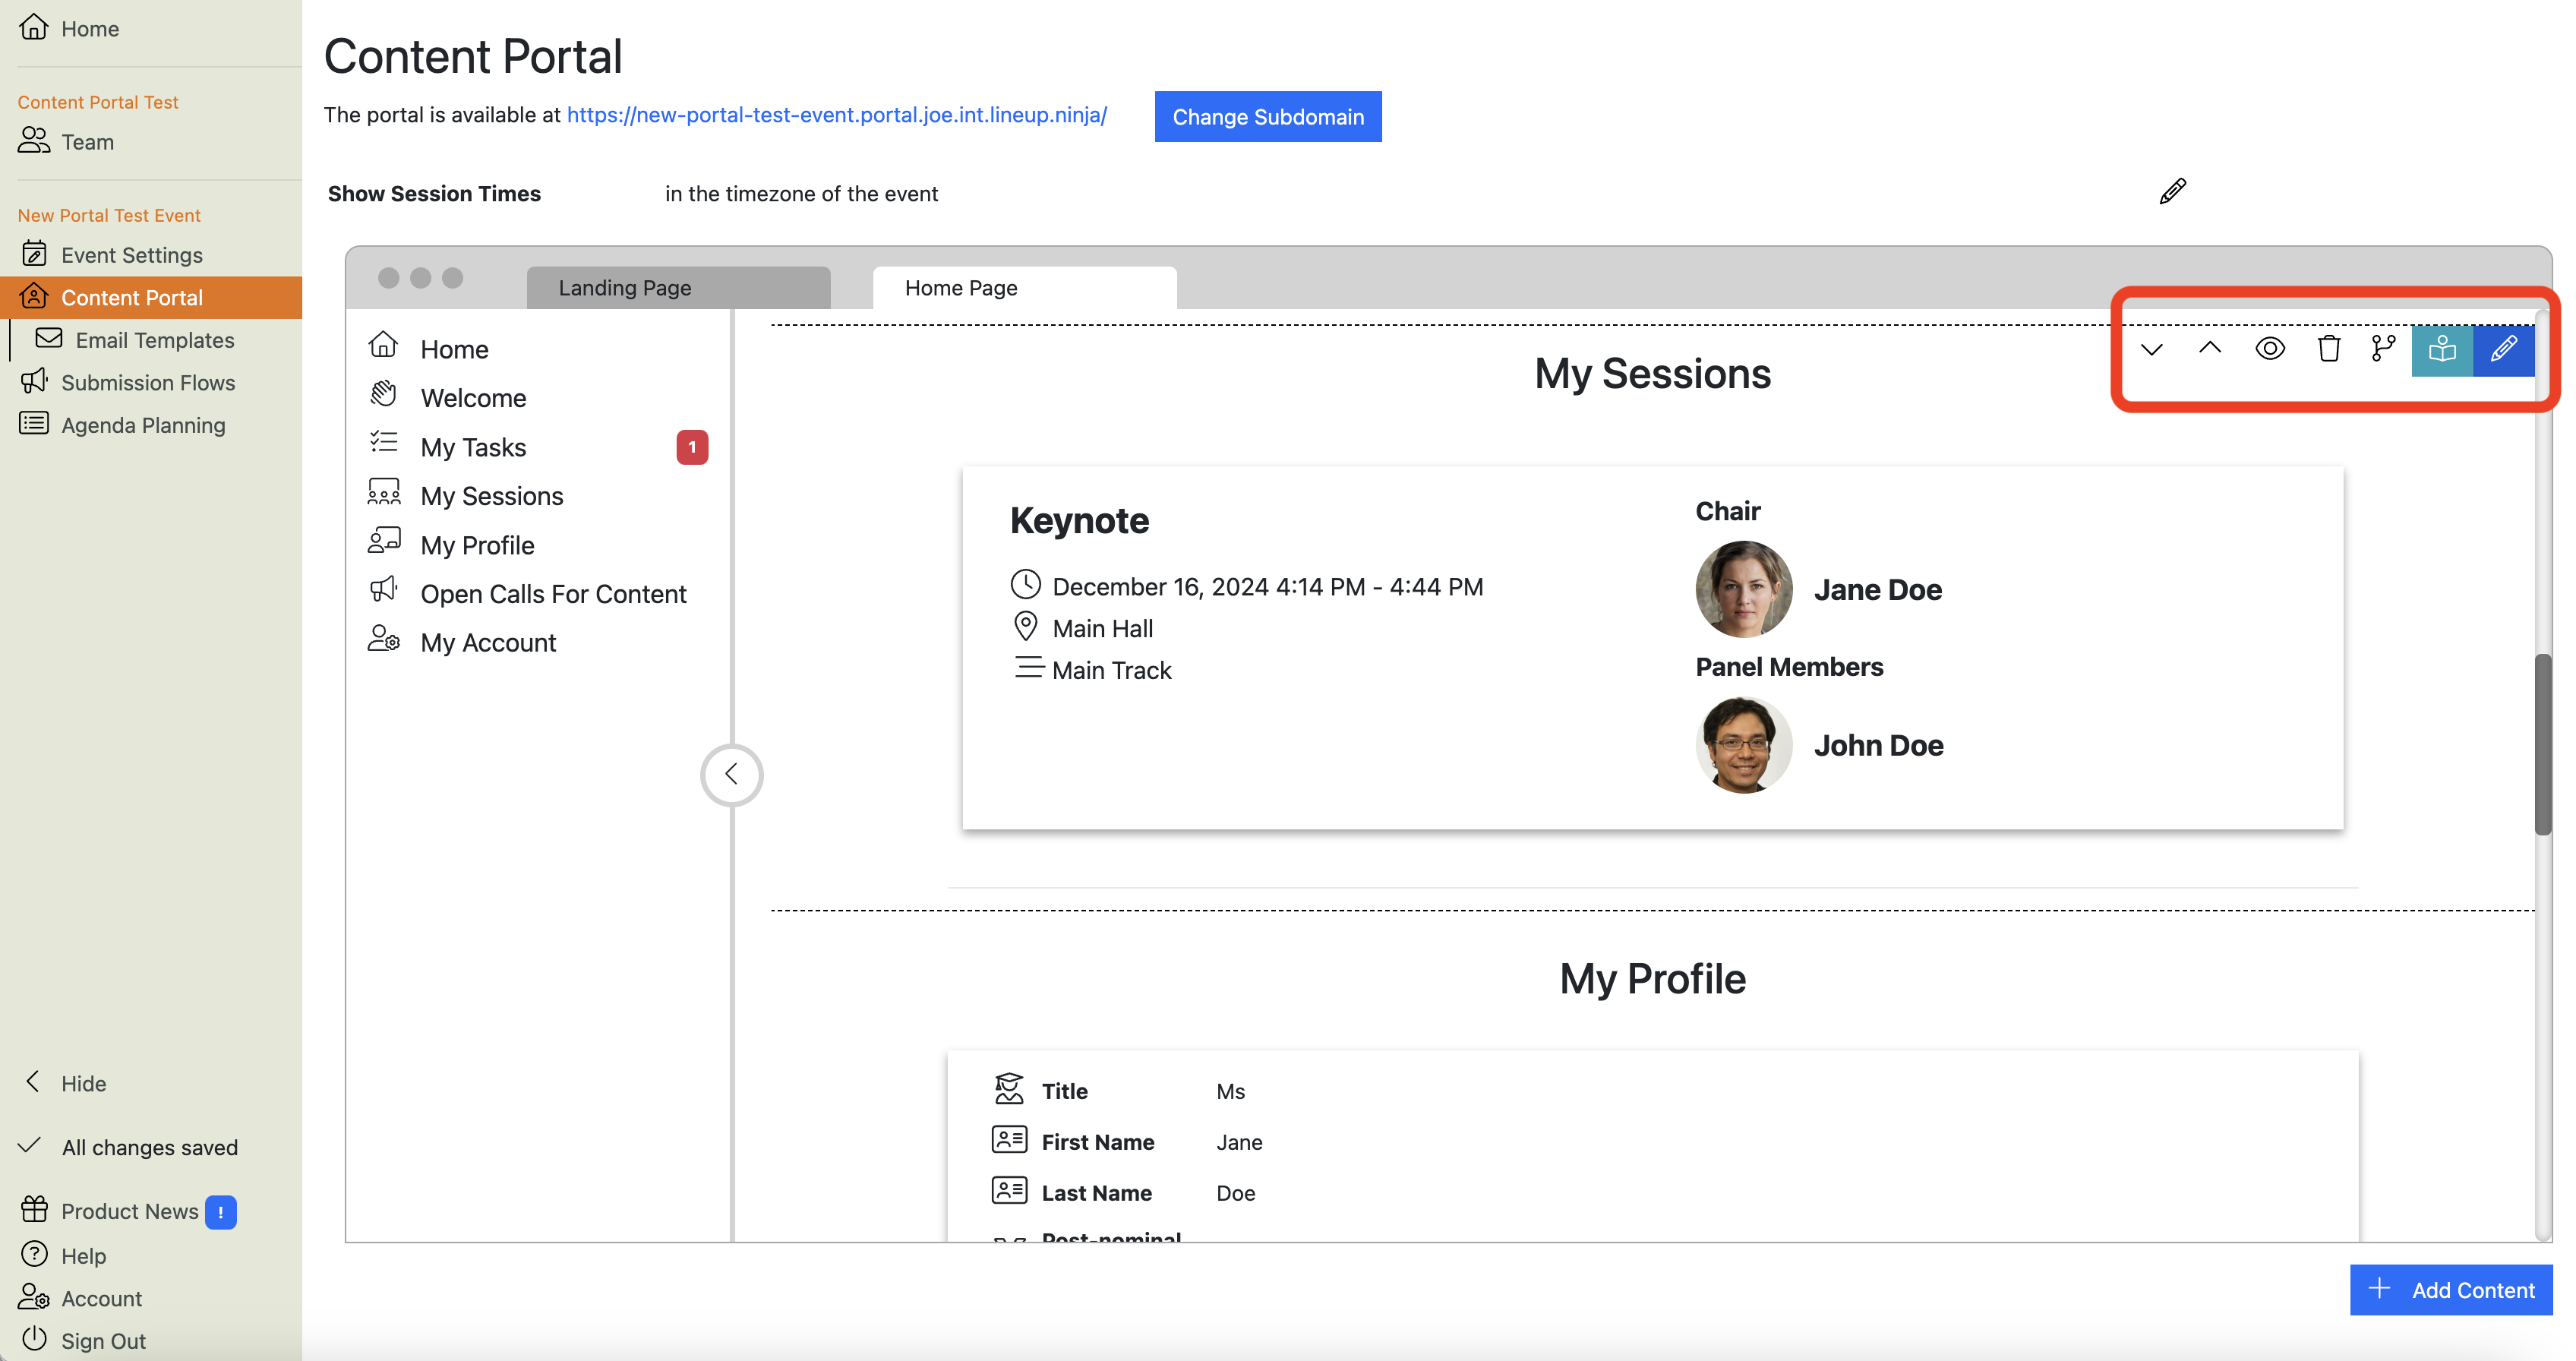
What does the My Sessions section of the Home Page do?
This sections shows the sessions that the speaker is taking part in. Portal users cannot edit the content in this section.
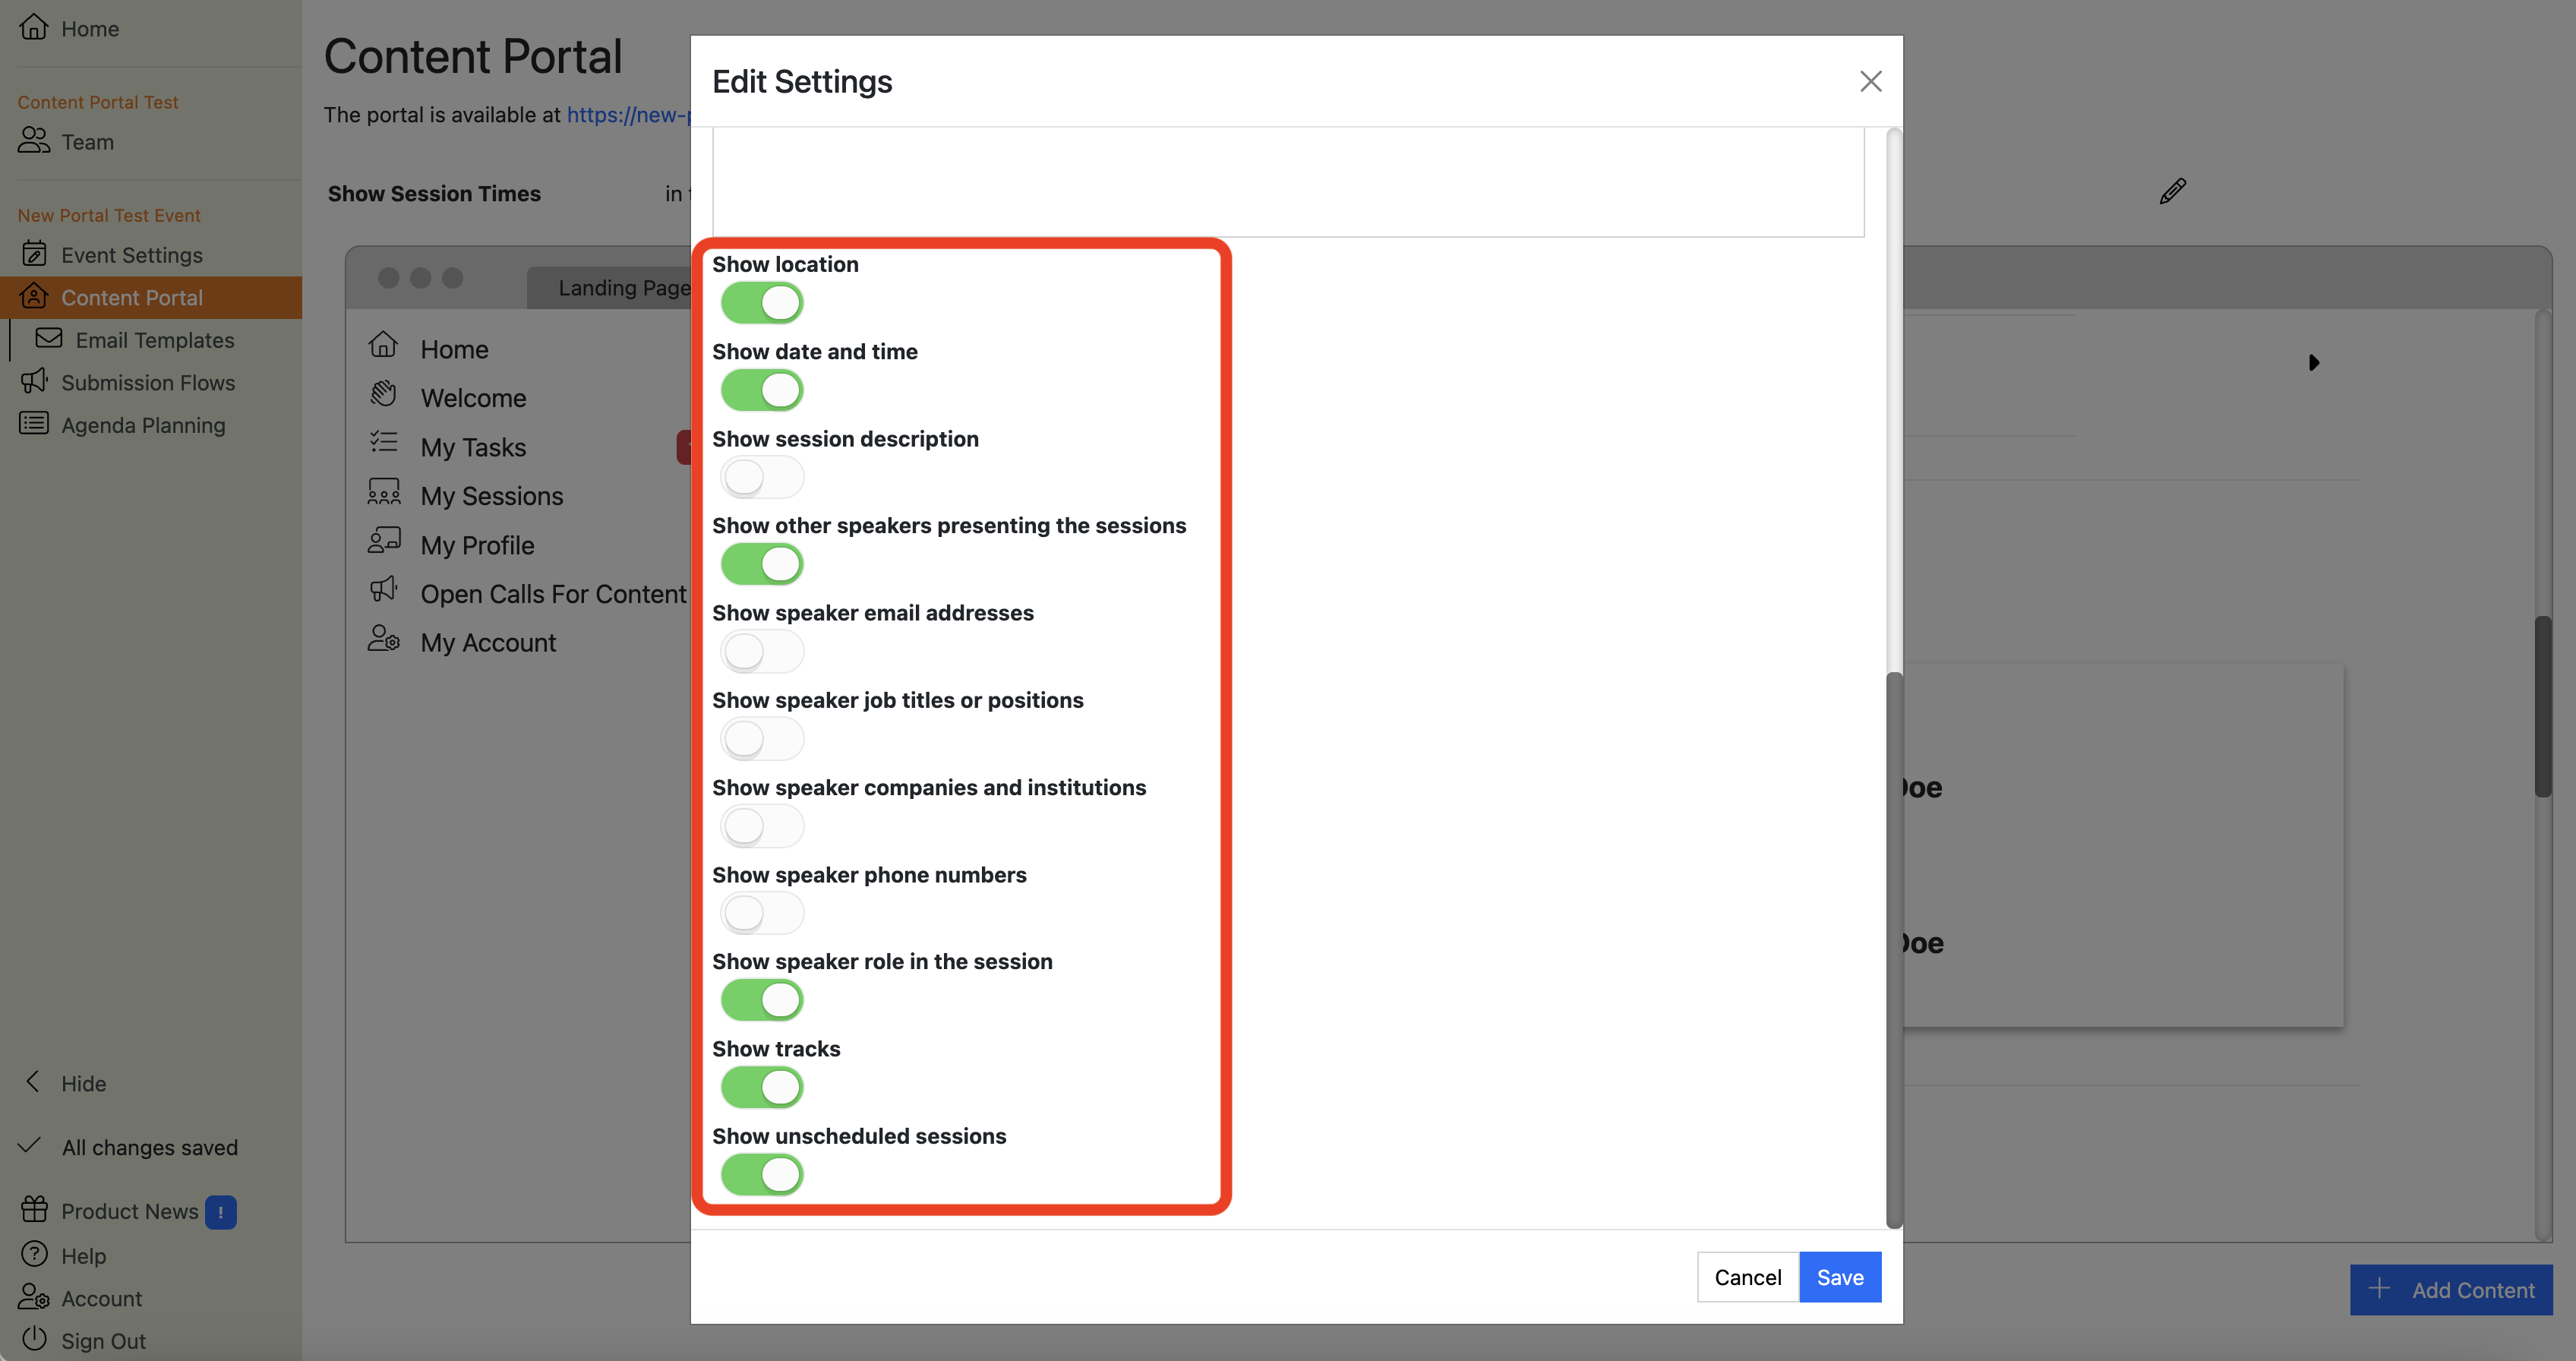
You can configure which fields are shown to users in this section. Hover over the section to reveal the action buttons:
Next, click the blue
edit button to bring up the section editor, and scroll down. Here you will see a set of toggles for various fields related to the sessions and their speakers:
Tip
You might find it useful to show different users different sets of fields in this section.
For example, if you have a panel and you want to share the panelists’ contact details with the chair (so they can convene a meeting before the conference), but not with each other (for data protection / GDPR purposes).
In this case, you can create two “My Sessions” sections: one that shows speakers’ contact details and one that does not. You can then use Display rules on the sections so that users with the Role “Chair” see the version of the section with the contact details, and users with the role “Panelist” see a version of the section without them.
The preview of the My Session section contains some dummy data for an imaginary session:
Session Title: “Keynote'
Date and time: Today’s date
Location: Main Hall
Track: “Main Track”
Chair: “Jane Doe”
Panel member: “John Doe.”
Headshots of the speakers
This will be replaced with the relevant data for each session and speaker and is only shown here to help you visualize what your users will see.
What does the Open Calls for Content section of the Home Page do?
This section shows any Submission Flows that are currently accepting public submissions. Invite-only flows are not shown in this section. You can choose which flows are included, and their order, by clicking the edit button.
What does the Manage Account section of the Home Page do?
This is where users can access their account to perform actions related to their account:
Change their display name
Change their password
Add / edit their phone number
Switch on two-step verification (AKA 2 factor authentication)
Manage cookie consent
Log out
This section is mandatory and cannot be removed but you can change the menu item text and icon, as well as the text on the button.
-–
How do I embed an image into the Home Page of the Content Portal?
To embed an image into the Speaker Portal, your image will need to already be hosted online somewhere (e.g. Google Drive). To add the image, add a blank ‘Text’ section and click the blue
button to edit. Select the image icon and input the image URL.
Can I share documents for speakers to view/download in the Home Page of the Content Portal?
Yes. Follow these steps:
Make the document available on a shared drive, such as Sharepoint, Google Drive, Dropbox etc.
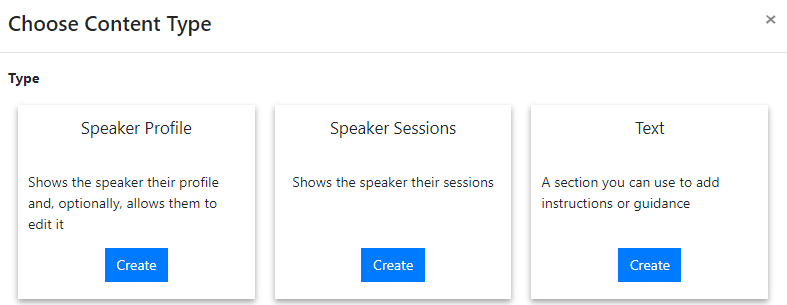
To add a new section, scroll to the bottom of the Speaker Portal page and click the blue ‘Add Content’ button.
This will open a pop up with guidance on how to add new content types.
Note
Please note that if you add multiple ‘Speaker Profile’ or ‘Speaker Session’ sections, you must configure Display Rules to avoid showing the speaker duplicated content.
Tip
Whilst there are many ways that you can utilise the ‘Text’ option, we have listed a few ideas to get you started.
Images - Upload images of the venue/ floor plan/ theatre layout/ directions etc.
Speaker Brief - Insert a link to a speaker brief or write it directly into the text box
Contract - Insert a link to a contract for the speaker to sign
Link to parking permits/ hotel details etc.
Evaluation - include a form for evaluation questions and schedule an email for after the event to gather evaluation data
How do I edit a section on the Home Page?
To edit a section, hover over the section and click the blue
in the top right-hand corner:
This will launch the relevant editor for that section.
How do I reorder sections on the Home Page?
To reorder sections, hover over a section and click the up or down arrows in the top right-hand corner.
How do I delete a section on the Home Page?
To delete a section, hover over the section and click
in the top right-hand corner.
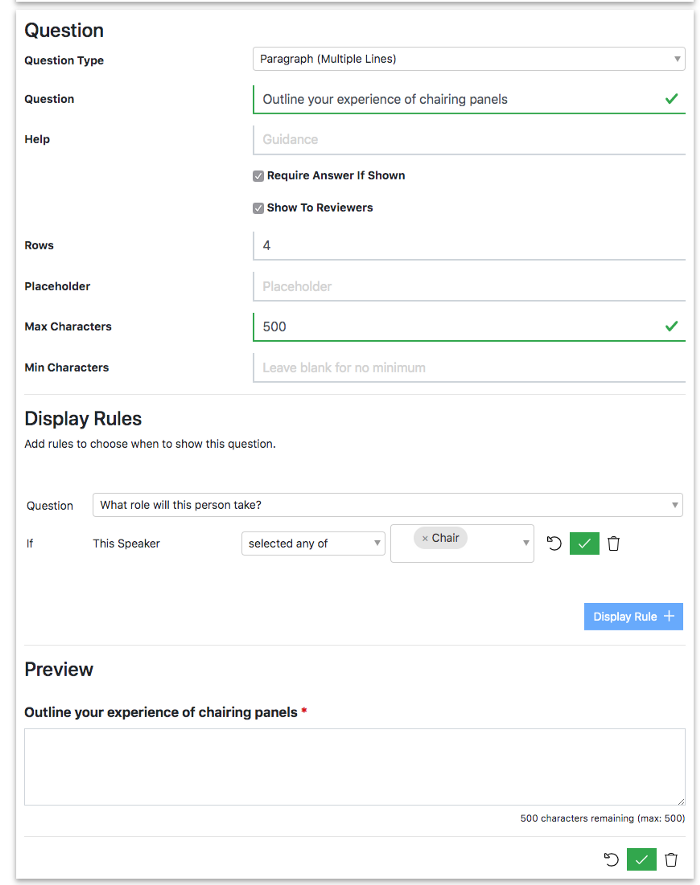
What are Display Rules on Home Page sections?
Display rules allow you to show sections to some users and not others. They can be added to Text, My Sessions and My Profile sections.
The rules can be based on conditions such as which role the speaker has (e.g. “Show the My Session section to speakers with the role Moderator”).
You can configure multiple sections of each type with different rules.
Tip
You might find it useful to show different users different sets of fields in this section.
For example, if you have a panel and you want to share the panelists’ contact details with the chair (so they can convene a meeting before the conference), but not with each other (for data protection / GDPR purposes).
In this case, you can create two “My Sessions” sections: one that shows speakers’ contact details and one that does not.
You can then use Display rules on the sections so that users with the Role “Chair” see the version of the section with the contact details, and users with the role “Panelist” see a version of the section without them.
To configure Display Rules, scroll over the section and click the branch icon in the top right corner.
Content Portal Email Templates
Lineup Ninja has templates for various emails that you’ll need to communicate with portal users.
System Templates:
Invite: to use if you invite users to the Content Portal
Submitter or Speaker Login: an email to the user with a login link
Speaker Confirmation Templates:
If you choose to use the Speaker Confirmation tools for your event, there are various emails associated with the different Speaker Confirmation Stages. These email templates can also be accessed via the Content Portal’s Email Templates page:
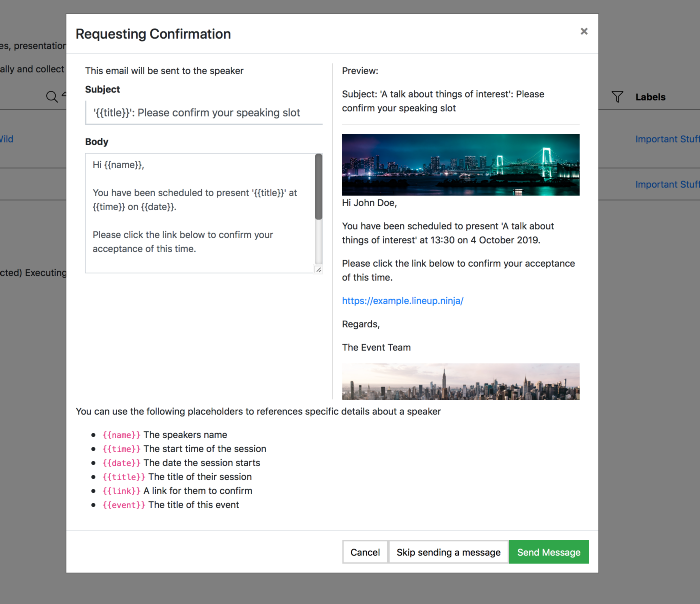
Request Confirmation: an email telling the speaker their session time and location, containing a link to a confirmation page.
Speaker time confirmed:
An acknowledgement email to the speaker, with a calendar appointment attached.
A notification email to the event management team that a speaker has confirmed their session time.
Speaker Time Change Requested:
An email to the speaker acknowledging that they’ve requested a change to their session time.
A notification email to the event management team that a speaker has asked for a change to their session time.
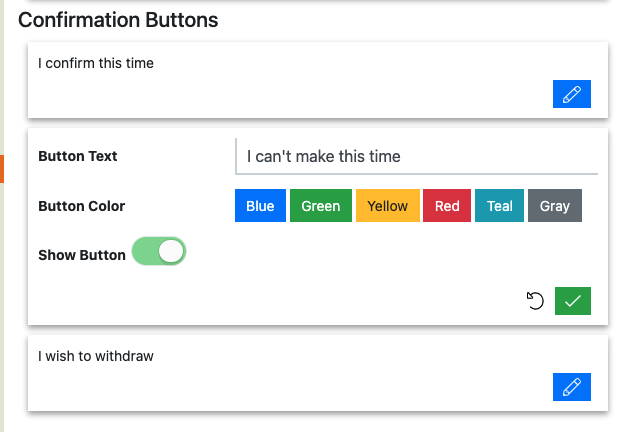
Speaker Withdrawn:
An email to the speaker acknowledging that they’ve indicated that they wish to withdraw from the event.
A notification email to the event management team that a speaker has said that they wish to withdraw from the event.
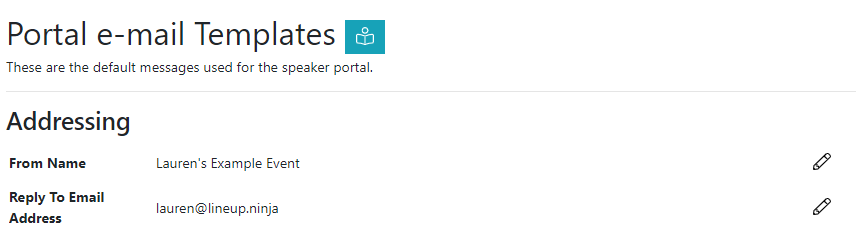
What can I edit in the ‘Addressing’ section?
From Name: By default this will be the event name, but you can change it
Reply To Email Address: By default, this will be set to the team owner’s email address. To change this, click
on the right hand side.
Tip
You can verify the domain of your reply-to address so emails are sent from it rather than from a Lineup Ninja address. Recipients are more likely to trust mail from a domain they recognize, and it improves deliverability.
To Name: A ‘mail merge’ field for how you’d like to address your recipients. First name, last name or both.
How do I add branding to an automated email?
Event Settings
>
Speaker Portal
>
Email Templates
What can I edit in the ‘Branding’ section?
Header image
Footer image
Disclaimer
What is the best size for my header/ footer images?
We recommend 1200 x 300px, but it depends on what visual effect you’re trying to achieve.
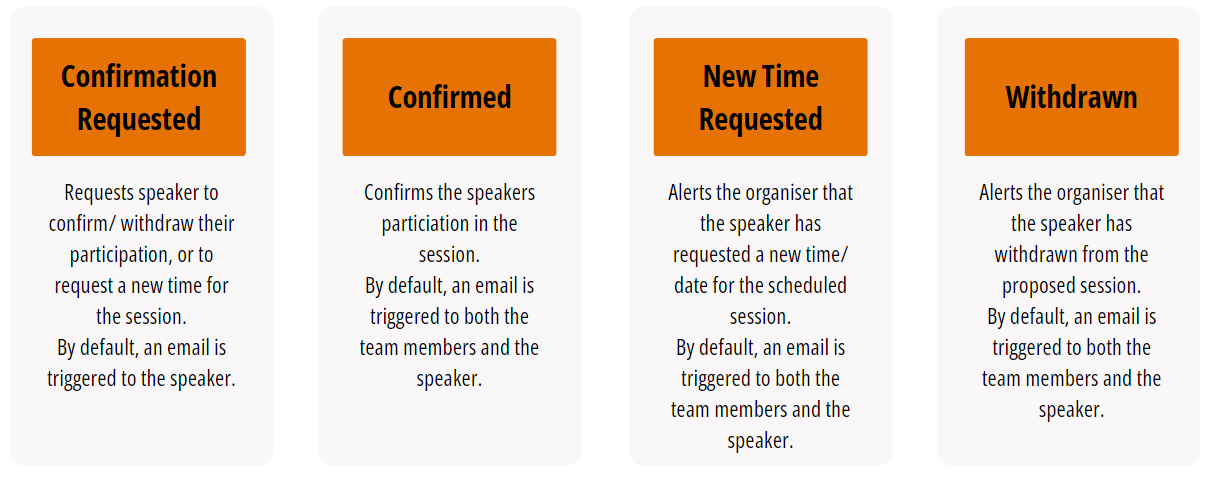
What are the default triggered email templates for Speaker Confirmation?
There are four default triggered email templates pre-built into the Speaker Confirmation for the Speaker Portal. You can edit or delete these depending on how you want to configure your email templates.
Confirmation Requested
Confirmed
New Time Requested
Withdrawn
What are the default triggered email templates for System Admin?
There are two default triggered email templates pre-built into System Admin for the Speaker Portal. You can edit or delete these depending on how you want to configure your email templates.
Invite - This is an email inviting the speaker to access the speaker portal for the first time
Submitter or Speaker Login - This is an email containing the login link for a speaker to access the portal
How do I create a new email template?
To create a new email, navigate to the section you would like to create an email within and click the blue add email button on the right hand side. This will bring up a pop up box that will enable you to create a new triggered or scheduled email.
What is the difference between a ‘Triggered’ and ‘Scheduled’ email?
Triggered - Sends an email automatically when a Speaker Profile moves into this stage. When you move the Speaker Profile manually, you will be prompted to confirm whether you would like to send the email (or not)
Scheduled - Sends an email for all Speaker Profiles in this stage at a specific time (e.g. to nudge all incomplete Speaker Profile)
How do I edit an email template?
To edit an email, click
on the right hand side of the email. This will bring up a pop up box that will enable you to edit the following details:
Send To
Subject
Body
How do I delete an email template?
To delete an email, click
on the right hand side of the email.
How do I test send an email?
The easiest way to test your templates is to go through the process of creating a speaker profile and moving it through the stages of the portal. This way, you can get an understanding for how the process works, ahead of using it with your speakers.
We also recommend having a read of this page for more information about Email Templates, particularly in relation to Submission Flows.
Still can’t find what you’re looking for? Email support@lineupninja.com and one of the team will get back to you as soon as possible.
Subsections of Portal Email Templates
Ensuring Email Delivery
When an email is sent to a submitter or reviewer there is a chance that it will be marked as spam by automated filters. Spam filters assess a mixture of technical details (to do with how the email was sent, and who it was sent from), and the content of the emails.
We’ve taken several technical and content-related steps to improve the delivery rate of your emails, but there are also important things you need to consider when designing your email templates.
For example, speaker invitation emails may well be the first time a recipient receives an email from Lineup Ninja. In that email may be some text asking the recipient to click a link and submit personal information. There is a high risk of spam filters seeing this as an unsolicited phishing email. So, we recommend that you do some research and think carefully about the wording of such emails.
You can find an excellent guide on what spam filters look for when assessing emails and ways to avoid falling foul of them here. This guide really relates to email marketing campaigns, which are slightly different to the ’transactional’ emails that you’re sending from Lineup Ninja, but it still contains useful information on improving delivery rates.
Send From Your Own Domain
The single most effective step you can take to improve delivery is to send your emails from your own domain instead of from Lineup Ninja’s. Recipients and their spam filters trust mail from a domain they recognize far more than mail from an unfamiliar third party, so this alone can sharply increase the number of emails that reach the inbox, especially at strict corporate mail servers.
Tip
We strongly recommend setting this up before you invite your speakers. It takes only a few minutes and a small change to your DNS. See Sending From Your Own Domain.
Email Subject
The subject of an email is critically important for delivery, particularly to Office 365 users. For example, in testing we found ‘Your submission received’ would not be acceptable but ‘Thanks for your submission’ is fine. The default subjects we have provided were all tested successfully, if you change the subject we suggest you test your email (see below).
Email Content
The main body of the email is also important. Certain words and phrases make your emails look more like spam. See this list of spam trigger words to avoid in your templates.
Again, we recommend reading the guide mentioned above to understand more about how your content affects delivery rates.
If you embed header and footer images into your emails, this may affect their deliverability. Spam filters generally ’like’ a specific ratio of 80% of the email’s space being taken up by text, and only 20% taken up by images. You can check how your emails compare to this ratio by using a testing service like Mail Tester - see the testing section below.
Email Disclaimer
By default, we include a ‘Lineup Ninja’ disclaimer on all emails that are sent. This disclaimer serves two purposes:
Allows users to unsubscribe and informs them of the Lineup Ninja privacy policy
Makes the content of the email longer. This reduces the chance of the email being marked as spam
The disclaimer appears beneath any footer image you provide and in smaller text to the body to distinguish it from the body.
There is an option to toggle this disclaimer on or off as you wish and you can replace it with your own. If you toggle it off we strongly suggest you replace it with something of a similar length.
Testing Your Templates
The easiest way to test your templates is to just try them with your email address. Invite yourself to give a submission then process it through the Submission Stages.
We have found that Office 365 is the most picky service regarding marking email as Junk. You can test Office 365 by signing up for a free account at Outlook.com and then creating a submission with that email address.
You may also want to try a spam testing and reporting tool. We like Mail Tester - it’s user-friendly and gives you a detailed report of how your emails should perform. There are a few important things to note:
Mail Tester only checks the content against Spam Assassin’s database - other email services (Outlook, Google, Apple) will have their own spam words databases and algorithms for detecting spam. So, Mail Tester isn’t a substitute for testing emails to Office 365, Google etc. It just gives you more detail.
Mail Tester may give you a warning about a missing DMARC record: this is incorrect: Lineup Ninja’s DMARC record does actually work, but doesn’t show up in Mail Tester’s report for technical reasons (see “Technical Aspects” below). This doesn’t affect the overall score and you can disregard this warning.
Mail Tester may show a warning about a missing “unsubscribe header’. We have implemented unsubscribe in a very specific way due to other considerations around how to handle user accounts. This doesn’t affect the overall score and you can disregard this warning.
Mail Tester only gives you 3 free tests per day!
If you are struggling with testing your templates then please reach out to support.
Technical Aspects
There are several technical aspects to achieving successful email delivery. We have put in place the following:
Dedicated IP addresses - We don’t share our infrastructure with bulk email senders
SPF Records - A technical measure to ensure other people can’t send emails from lineup.ninja
DKIM - A technical measure to ensure the content of your email cannot be changed by a 3rd party and to validate that it is being sent by Lineup Ninja.
DMARC Records - a policy that allows the sender to tell the recipient that the emails are protected by SPF / DKIM and give instructions for what the recipient should do if neither of them passes. Lineup Ninja has a DMARC policy in place for its top level domain ("lineupninja.com”), and this policy cascades to subdomains (e.g. “in.lineup.ninja”).
Still can’t find what you’re looking for? Email support@lineupninja.com and one of the team will get back to you as soon as possible.
Sending From Your Own Domain
By default, your emails come from a Lineup Ninja address. You can instead send them from your own domain. Recipients see a sender they recognize, which builds trust and can improve delivery.
Setting this up takes two people: the Lineup Ninja user who starts and finishes the process, and whoever manages your domain’s DNS, who adds a few records. If that’s the same person, you’ll do both parts yourself.
Note
Not the person who manages this team? If Lineup Ninja prompted you to verify a domain but you don’t have access to set it up, send this page to your Lineup Ninja team administrator. They can follow the steps below.
For the Lineup Ninja user
In Lineup Ninja, open your team from the left-hand menu and select Domains.
Click Add Email Domain and complete the form:
Name — a label for this integration, for your own reference only (for example, “Email Domain”).
Domain — the domain you want to send from.
E-mail From Name and E-mail From Address — the sender for team-wide system emails, such as login messages. Each event can set its own sender, so these only need to cover system mail.
Lineup Ninja then shows you the DNS records that need to be added to your domain, which prove to email providers that Lineup Ninja is authorized to send on your behalf. Choose how to add them:
I’ll add the records myself shows the records in a table. Add each one to your DNS provider, exactly as shown.
My domain administrator manages the DNS produces a ready-to-send message containing the records and step-by-step instructions, with no Lineup Ninja login needed. Send it to whoever manages your DNS. The message links them to the domain administrator instructions below.
Once the records have been added, come back to Lineup Ninja and click Validate Records in the Validation Status section.
The validation state tells you where things stand:
Pending — you haven’t validated yet. Add the records, then click Validate Records.
Validated — everything is in place and your emails will now be sent from your own domain. You’re done.
Failed — one or more records couldn’t be verified. The Validation Status section lists which, and why, and the records table flags them too. Check that each record was added exactly as shown — type, host, and value — then click Validate Records to re-test.
For your domain administrator
If you manage DNS for a domain and someone has asked you to authorize email sending for it, here’s what you need to do. You don’t need a Lineup Ninja login.
The person setting this up is enabling email sending for their domain through Lineup Ninja. The records facilitate SPF and DKIM — the standard email-authentication mechanisms that let receiving mail servers confirm the messages genuinely come from this domain and haven’t been tampered with in transit. Without them, mail sent on the domain’s behalf is far more likely to be rejected or marked as spam.
Note
These are all CNAME records. They point at the sending infrastructure, which publishes the actual SPF and DKIM entries on the domain’s behalf. You do not need to create any TXT records, or write your own SPF or DKIM records — just add the CNAMEs exactly as shown.
Lineup Ninja shows the sender several CNAME records, each with a Type, a Host, and a Value — they’ll pass these exact values on to you.
To add them:
Sign in to the service where the domain’s DNS is managed.
Add each record exactly as shown — type, host, and value.
Save your changes.
Once the records are in place, the Lineup Ninja user will verify them — there’s nothing further you need to do.
Domain already verified elsewhere
Occasionally a domain has already been verified by another Lineup Ninja team. If that happens, you’ll see a state telling you that access has been requested and that our support team will be in touch. You don’t need to do anything else — we’ll follow up with you.
If you’d like to move things along, email support@lineupninja.com and we’ll help get it sorted.
Still can’t find what you’re looking for? Email support@lineupninja.com and one of the team will get back to you as soon as possible.
Common email delivery problems
Below are some of the most common email delivery problems encountered by Lineup Ninja users, and the order in which we suggest you troubleshoot them.
Tip
Sending from your own domain heads off many of these problems before they start. Mail then arrives from an address your recipients already trust, rather than from an unfamiliar third party. If email delivery matters to you, set this up first. See Sending From Your Own Domain.
Email address contains a typo
Yep. Really. The most common reason for emails not getting delivered is that the user typo’d their email address when entering it, and now Lineup Ninja is trying to send emails to a non-existent (or worse, existent but incorrect) email address.
Double-check that it’s the right email address if you haven’t already.
Email is in user’s spam folder
Unfortunately, even if you’ve followed our ’ensuring email delivery’ advice, some users’ inbox spam filters will still see the first emails from Lineup Ninja (e.g. a ’login link’ email, or a ‘You’ve been invited to submit your speaker details’ type email), and think “hmm. this looks like a suspicious, unsolicited email. Let’s pop it in the junk folder.”
Recipient’s corporate email server quarantined or dropped the email
This is very similar to the above problem (Spam folder), but the spam filter on the recipient’s corporate email server made the same judgment before delivering the email to the recipient.
In this situation, the recipient’s corporate email server might do one of the following.
Reply to our server, saying “I dropped that email you sent because it looked suspicious.” But there’s a problem with doing this: if we actually were sending spam or phishing emails, we’d now know that our emails aren’t working, so we’d adapt them to try to get through the filter.
In our experience it’s more common for company email servers to do the following:
Reply to our server with a lie, saying “Yes, I delivered it. All good.”even though it didn’t actually deliver it.
In both scenarios, we suggest that you ask the intended recipient to contact their IT team / email administrator, and ask them to look on the server to see if the email(s) is there, AND to ask them to add an exception to their spam filter rules to allow emails from lineupninja.com to be delivered.
Tip
A better alternative: authorize Lineup Ninja to send from your own domain. Mail then arrives from an address the recipient’s systems already trust, so it is far less likely to be quarantined in the first place, and you avoid asking their IT team to whitelist a third party. If you send to strict corporate domains, we strongly recommend setting this up. See Sending From Your Own Domain.
Still can’t find what you’re looking for? Email support@lineupninja.com and one of the team will get back to you as soon as possible.
Submission Flows
Submission Flows are used to collect content from submitters. You can use them to manage:
You can run multiple Submission Flows per event to gather different types of content.
Submission Flows are made up of some key elements:
Submission Stages: the various steps a submission passes through, from draft to submitted, to accepted/declined etc.
Forms: the form containing the questions that submitters fill in, guidance text and action buttons (e.g. “Save for Later”, “Submit for review”).
Email Templates: the automated emails that are sent to submitters as a submission moves through the submission stages (e.g. “Thanks for submitting”, “You’ve been accepted” etc).
Review stages: the reviewing/judging system, which includes its own forms and email templates for reviewers/judges.
All these elements are highly configurable, so you can map out your own processes, configure your own questions, write your own email copy etc.
Here’s a high level overview of Submission Flows in Lineup Ninja, explaining how these elements work together:
How do I Run a Call for Speakers?
Lineup Ninja includes a Submission Flow template for a Call for Speakers. It has many configurable options which you’ll want to edit to match your process.
Here’s a high-level overview of how to use our template for your event’s Call for Speakers:
In your event, navigate to the
Submission Flows
page.
Check that the Submission Stages are correct for your event’s process: add and delete Submission Stages as required.
Edit the questions to use your own terms (e.g. “Session description” vs “Synopsis” etc.).
Edit the email templates to ensure you’re happy with the copy.
Optionally add deadline reminder email templates and schedule them.
If you’re using reviewers to grade submissions, design your review process:
Create a Review Stage for the Submission Flow.
Decide which answers to show to reviewers (e.g. NOT speaker’s name and email if you want to run a blind review!)
Decide what questions to ask your reviewers:
Score
Recommendation
Feedback for submitters
Internal comments
Decide whether reviewers should be able to see other reviewers’ responses, and if so, which answers, and from which review rounds.
Publish your Submission Flow to the Content Portal
Review how the submission flow appears in the Content Portal
Test your Submission Flow by making some test submissions.
If you’re using reviewers to grade submissions, test your review process:
Test the review process by assigning some submissions to reviewers
Review reviewers’s scores and comments
After testing is complete, reset your Submission Flow to delete any test submissions and reviews
Publicise your Call for Speakers through your usual comms channels
Monitor your submissions in the Submissions List view in the Submission Flow
If you’re using reviewers to grade submissions, manage reviews:
Invite reviewers
Assign submissions to reviewers (this will trigger notification emails to reviewers)
Monitor reviewers’ progress in the Submissions List view.
Review submissions’ review scores, recommendations and reviewers’ comments
Decide which sessions to accept, waitlist and decline and move the submissions into the relevant stages. By default, this will trigger automated notification emails to submitters, although you can opt not to.
Create sessions on your agenda from accepted sessions.
Note
By default, when you move a Submission into the “Accepted” Submission Stage, Lineup Ninja will ask the submitter to confirm that they still want to speak at the event.
You can disable this behaviour by editing the “Accepted” Submission Stage and its corresponding Email Template.
How do I Run a Call for Abstracts / Call for Papers?
Lineup Ninja includes a Submission Flow template for a Call for Papers. By default it uses terms like “Speaker” instead of “Author”, and “Session Description” instead of “Abstract”. However, you can change these terms easily as you set up your Call for Abstracts and tailor it to your own event.
Here’s a high level overview of how to use our Call for Papers template for your event’s Call for Abstracts:
In your event, navigate to the
Submission Flows
page.
The New Flow wizard will take you through setting up the Submission Flow. After you’ve finished with the New Flow wizard, you’ll probably still want to make some changes and set other things up…
Check that the Submission Stages are correct for your event’s process: add and delete stages as required.
Edit the questions on the form to use your own language and terms (e.g. “Speaker” vs “Author”; “Session description” vs. “Abstract” etc.).
Edit the email templates to ensure you’re happy with the copy.
Optionally add Deadline Reminder email templates and schedule them.
Create a Review Stage(s), and decide:
Which data to show reviewers (e.g. NOT author name and email address if you’re running blind reviews!).
Which questions to ask your reviewers:
Scores
Recommendations (Accept, Maybe, Decline)
Feedback for submitters
Internal comments
Whether reviewers should be able to see other reviewers’ responses, and if so from which review rounds.
Publish your Submission Flow to make it visible in the Content Portal
Review how the submission flow appears in the portal
Test your Submission Flow by making some test submissions.
Test your review process:
Test the review process by assigning some submissions to reviewers
Review reviewers’s scores and comments
After testing is complete, reset your Submission Flow to delete any test submissions and reviews
Publicise your Call for Speakers through your usual comms channels
Monitor your submissions in the Submissions List view in the Submission Flow
Manage reviews:
Invite reviewers
Assign submissions to reviewers (this will trigger notification emails to reviewers)
Monitor reviewers’ progress in the Submissions List view.
Review submissions’ review scores, recommendations and reviewers’ comments
Decide which sessions to accept, waitlist and decline and move the submissions into the relevant stages. By default, this will trigger automated notification emails to submitters, although you can opt not to.
Create sessions on your agenda from accepted sessions.
Note
By default, when you move a submssion into the “Accepted” Submission Stage, Lineup Ninja will ask the submitter to confirm that they still want to speak at the event.
You can disable this behaviour by editing the “Accepted” Submission Stage and its corresponding Email Template.
How do I Run an Awards Program?
Lineup Ninja includes a Submission Flow template for a awards. It has many configurable options which you’ll want to edit to match your process.
Here’s a high-level overview of how to use our template for your event’s Call for Speakers:
In your event, navigate to the
Submission Flows
page.
Create a new submission flow - choose “Create Awards Flow”:
The New Flow wizard will prompt you for a name and (optionally) a deadline for the Flow:
Click “Create Flow”, and you’ll be taken to the Flow Configuration view, where you can review and change settings.
Click “Save” and you’ll now see the Submission Stages and the Form Designer. Check the rest of the flow configuration:
Check that the Submission Stages are correct for your awards process: add and delete stages as required.
Add and edit the questions on the form to use your own language and terms
Edit the email templates to ensure you’re happy with the copy.
Optionally add Deadline Reminder email templates and schedule them.
Create a Review Stage (AKA Judging round) and decide:
Which answers to show to reviewers/judges
Which questions to ask your reviewers/judges:
Scores
Recommendations (by default, “Accept”, “Maybe”, “Decline”, but can be changed to eg “Winner”, “Shortlist”, “Not this time”)
Feedback for entrants
Internal comments
Whether reviewers/judges should be able to see other reviewers’/judges’ responses, and if so from which review rounds.
Publish your Submission Flow to make it visible in the Content Portal
Review how the Submission Flow appears in the portal and make any changes
Test your Submission Flow by making some test submissions/entries
Test your review/judging process:
Test the process by assigning some submissions/entries to reviewers/judges
Review judges’ scores and comments in the Submissions List view
After testing is complete, reset your Submission Flow to delete any test submissions/entries and reviews/judges’ scores
Publicise your awards entry process through your usual comms channels
Monitor your submissions/entries in the Submissions List view in the Submission Flow
Manage reviews/judging:
Invite reviewers/judges
Assign submissions to reviewers/judges (this will trigger notification emails to reviewers)
Monitor reviewers’/judges’ progress in the Submissions List view.
Review submissions’/entries’ scores, recommendations and reviewers’/judges’ comments
Decide which entries are shortlisted and which are winners.
Note
By default, when you move a submission into the “Shortlisted” submission stage, Lineup Ninja will send an email to the submitter telling them that they’ve been shortlisted (although you can change this behaviour if you want).
When you move a submission into the “Winner” or “Runners Up” Submission Stages, Lineup Ninja will NOT email the submitter to tell them that they have won!
Find ‘Draft’ under ‘Templates For Submission Stages’
Here, you can schedule an email to nudge all submitters in the ‘Draft’ stage to complete their submissions.
Tip
You can also schedule emails to be sent automatically. This can be scheduled for, perhaps, one week and one day before the deadline.
Option 2:
Navigate to
Submission Flows
>Submissions
Click the ‘Draft’ tab
Select all using the tick box on the left-hand side
Scroll to the ‘Actions’ drop down and select ‘Email Submitters’
Write the email and click ‘Send Message’
How do I create deadline reminder emails for Submission Flows?
You can create scheduled email templates for Submission Flow Stages that are sent at a specific time.
So for example, if you want to send a reminder to submitters that the deadline for the Draft Submission stage is approaching, create an email template for the Draft stage, and schedule it to be sent before the Deadline.
Click on the Stage that you want to create a reminder for
Scroll down to the bottom of the page, you will find the Emails section
Create a new email template
This will open a dialogue popup offering two choices: Triggered or Scheduled email
Choose “Scheduled Email”
Use the date picker to choose when the email should be sent
Write the email copy, adding a link to their submission.
Save the template
You’re done!
Tip
You can create several deadline reminders and send them at increasing frequency during the run-up to the the deadline:
2 weeks
1 week
72 hours
48 hours and
24 hours before the deadline
You might event want to send an email after the deadline saying “You’ve now missed the deadline, too bad!”
Emails that belong to Submission Stages are only sent to submitters who have submissions in the stage. So, you don’t need to worry about sending irrelevant spam to ALL yous submitters.
These emails will only go to submitters whose submissions are in the Submission Stage that the emails belong to.
Can a speaker edit their submission once it has been submitted/accepted?
This is highly configurable.
By default, submissions are locked when they pass from the Draft and Invited Submission Stages to the Submitted stage.
Also by default, if you move submissions from Submitted into the Rework Requested stage (if you chose to create this stage when you set up the submission flow), they will be unlocked again when they move into Rework Requested.
However, you can configure each question on the form to be unlocked (AKA editable), locked and hidden in each stage. Here’s the Job Title question as an example:
While the Submission is in the Draft or Invited Stages, the question is editable (AKA unlocked).
When it is in Submitted, it is locked. In Rework Requested it is editable again, and when the Submission moves into Accepted, Declined or Withdrawn, it will be locked.
If you want to change any of these settings, simply click the relevant button: if you want the question to be unlocked when it is in ‘Submitted (Maybe you want speakers to be able to update their own submission if they get a promotion), simply click ‘Editable on the relevant row’.
How do I unlock submissions so that submitters can edit them?
To unlock submission(s):
Navigate to the relevant Submission Flow
Find the submission in question
Move the submission it to a Submission Stage that will unlock the relevant questions, e.g.
Invited
Draft
Rework Requested
Decide whether to use Lineup Ninja’s email template to notify them that the submission has moved into the new stage.
You’re done!
How can a submitter add an additional speaker to their session?
Navigate to Submission Flow’s configuration page. Click the blue “Configure” button to open the Configuration dialogue popup, and then toggle ‘Allow Multiple Speakers Per Submission’ on
Navigate to
Submission Stages
and move the submission to ‘Request Rework’
Open their submission and message the original submitter, telling them to update their submission by clicking on the blue ‘Add another speaker’ button, inputting the details, and clicking ‘Save changes’
Once this is done, if a session has already been created, navigate into the relevant submission and ‘Update Session/Speakers’ to add the new speaker to the session
Why are my submissions called ‘Created at date and time’?
By default, submissions take their name from the ‘Session Title’ question. If you have not included this question, or you have included it, but the submitter hasn’t answered this question, then the submission title will default to ‘Created at date and time’
You can configure where submissions take their name from in the Form Designer. Various questions contain an option: ‘Include answer in title of submission’ You can use multiple questions, for example if you wanted the submitters’ first and last names to be used for the Session Title.
How do I find a specific submission?
Navigate to the Submission Flow’s list of Submissions.
In the submissions list view, you can click on various column headings to search
, filter
or sort
.
Alternatively, you can use the ‘Advanced Search’ to build a query and find the specific submission
How do I change the submitter for a submission?
If a submitter changes, you can reassign the submission to someone new by navigating into the submission and clicking ‘Change Submitter’.
Lineup Ninja will then:
If necessary, Create an account for the new submitter
Change the ownership of the submission to the new account
We do not send notifications to the original or new account email addresses. If you wish to notify the new user you can click ‘Email submitter’ on the submission after making the change.
Note
Please note you must have approval from the original Data Subject to transfer the access of the data to the new account holder.
As the event manager, can I edit submissions?
Yes:
Navigate to the Submission Flow’s Submissions List, and click on the submission you want to edit
Scroll down to the ‘Submission’ and click
next to the field you wish to edit
How can I flag a submission for follow-up?
You can do this in one of two ways:
Create a ‘follow-up’ Label and assign it to the submission.
Set the in-app messaging flag for follow-up:
Click into the submission and scroll to ‘Messages’
Click on the blue ‘Flag For Follow Up’ button
This will now set a flag that can be seen in the messaging column in the submissions list view
What happens when the organising team request a rework from a submitter?
When you create a new Submission Flow, the new flow setup wizard prompts you to decide whether to create a “Rework Requested” Submission Stage. The following answer assumes that you answered ‘Yes’…
To view what has been configured, navigate to the Submission Flow’s Configuration page.
By default, the following things happen:
When the organising team move a submission into the ‘Rework Requested’ stage, an email to the Submitter is triggered, informing them that their submission has been flagged for rework.
The submission moves into the ‘Rework Requested’ stage, and all answers in all sections are unlocked
When the submission is updated and submitted by the submitter, the submission moves into ‘Submitted Stage’ and an email is triggered to both the Submitter and All Team Members, notifying them of a new submission in ‘Submitted’
Note
Please note, by default, reworked submissions are not labeled as ‘Reworked’ or ‘Amended’, they just return to the Submitted Stage. If you would like to configure this via a label, please follow this link.
How do I create a Session from a Submission?
Navigate to the Submission in question and click on its detail view. You will see Several buttons near the top of the page.
Note
When linking submissions to existing sessions, you should be careful.
Sessions can have multiple speaker associated with them, but they can only have one session title, description etc.
Lineup Ninja doesn’t currently allow you to merge this data from several submission flows into a single session, so you’ll have to choose which Session Title and description to use.
You can, of course, manually update the Session Description to reflect the multiple descriptions that may have been provided.
How do I delete a Submission?
To delete a submission, follow these steps:
Navigate to the relevant Submission Flow
This will bring up the list of submissions (NOTE: for pre-Content Portal events, you’ll also need to navigate into ‘Submissions’).
Find the submission(s) you want to delete and select them
At the bottom of the page, you will find the ‘Actions’ drop-down menu.
Click on the drop-down box to open it.
Scroll to the bottom of the menu.
Here you’ll see ‘Delete Submissions’. Click it
You’l be asked to confirm by typing ‘delete #’ (where # is the number of submissions to be deleted).
And that’s it! Here are some screenshots to help guide you through the process:
Still can’t find what you’re looking for? Email support@lineupninja.com and one of the team will get back to you as soon as possible.
Filter & Sort Submissions
How do I see all submissions in a given stage?
Navigate to
Submission Flows
> <submission flow>
Here you will see a table view of all your submissions, with different tabs for each Submission Stage
How do I edit which fields (headings) appear in the table view of submissions?
Navigate to
Submission Flows
> <submission flow>
Towards the top right of the table view of your submissions, click
button.
This will reveal a pop-up of the fields that you can add to (or hide from) this table. You can also re-order fields by using the ‘=’ drag handle.
You can also add a column for any question that you asked on your submission flow form in here.
How do I filter the list of submissions?
Navigate to
Submission Flows
> <submission flow>
Here you will see a table view of all your submissions, with different fields (headings).
Some of the headings have a filter button:
Click on the filter button, where you will be able to select a value to apply that filter.
Clicking minus sign in the box in the top-left will toggle between selecting all the options and clearing them all.
Clicking on invert will invert the current selection.
How do I sort the list of submissions?
Navigate to
Submission Flows
> <submission flow>
Here you will see a table view of all your submissions, with different fields (headings).
Some of the headings have a sort button:
Clicking on the button will sort the list into ascending order. You can then click on the button to toggle between ascending and descending order.
How do I search the list of submissions?
Navigate to
Submission Flows
> <submission flow>
Here you will see a table view of all your submissions, with different fields (headings).
Some of the headings have a search button:
Click on the button to reveal a text input box which will allow your to search accross submissions.
How do I find all submissions that match a certain condition?
If you’re looking for submissions with a given answer to a question in your Submission Flow, you have a couple of options:
Add a column to the submissions list view for that question, then use the search tool on that column’s heading to filter out the list
Use the advanced search tool to build a complex query with multiple conditions
Submissions & Reviews
How do I find the submissions with the highest scores?
Navigate to
Submission Flows
> <submission flow>
The ‘Score’ column has a sort button
Click the button to sort the list into descending order (i.e. the submissions with the highest scores will appear at the top)
Note
If you have multiple score questions, the score column displays the weighted average of those scores bu defauly but you can filter out the scores you are interested in and sort the list by those filtered results.
How do I find the submissions that most reviewers recommended for acceptance?
Navigate to
Submission Flows
>
Submissions
The ‘Recommendations’ tab will contain a sort button
Click the button to sort the list into descending order (i.e. the submissions with the most positive recommendations will appear at the top)
Still can’t find what you’re looking for? Email support@lineupninja.com and one of the team will get back to you as soon as possible.
Messaging
What is ‘Messaging’?
Lineup Ninja helps you communicate with your submitters and keep that communication in one place.
When a submitter is working on their submission, or after they have submitted it, they can send a message to your team via a field at the bottom of their form that looks like this:
When a new message has been received you will receive an e-mail to inform you and we will also flag this in the list of submissions.
This email will contain a link to the submission. Follow the link and then scroll to the bottom of the page to find the message thread.
You may notice that automated emails to the submitter are also included in this thread. This is so you can see a chronological list of all the communication with that submitter in one place.
How do I see submissions that have unread messages from submitters?
Navigate to the Submission List view for your Submission Flow.
Submissions that have unread messages show
in the messages column, like this: You can filter all of your submissions to find the ones that have unread messages by clicking on the filter icon in the messages column heading:
How do I see a preview of a message thread?
Navigate to the Submission List view for your Submission Flow.
Hover over the speech bubble icon in the messages column for a submission:
This will display a pop-up with a preview of the most recent messages between the submitter and the admin team.
Note
The messages preview shows the last 5 or so messages that have been sent from Lineup Ninja to the submitter.
This may include a preview of any automated emails that have been sent by Lineup Ninja to the submitter.
How do I read and reply to messages from submitters?
You can read - and reply to - messages from the submitter at the bottom of the Submission Detail view.
You can get here either by clicking on the link in a ‘New message’ notification email, or by navigating to the submission via the Submission List view for your Submission Flow, and clicking on the submission title.
Once at the Submission detail view, scroll to the bottom of the page. Here you will find the messaging tools.
The most recent messages are at the bottom of this section. This is where you can write and send your replies:
Still can’t find what you’re looking for? Email support@lineupninja.com and one of the team will get back to you as soon as possible.
Submission Numbering
How are submissions numbered?
To help you reference submissions with a short identifier they are given a number when created. This starts with 1 and then goes from there.
Each flow will start the count from 1. To ensure identifiers are different for each flow a ‘Submission ID Prefix’ will be added to the number.
For example if the prefix is ‘ACME-’ and the submission number is 12, then the submission will be numbered ‘ACME-12’
How do I show the submission number in the list of submissions?
The number for the submission is not shown by default in the list of submissions. To add it, click
in the top right-hand corner, then click the eye next to the ‘Submission Number’ field to add it.
How do I change the submission id prefix?
Navigate to
Submission Flows
/ <Submission Flow>
Click on the name of the submission flow
Set the value for ‘Submission id prefix’
Info
Flows created after 31st August 2023 will have a prefix given to the flow automatically, flows from before this date will not automatically have a prefix, you can add one if needed.
Is the submission number included in the submission reports?
Yes, the number is included in the ‘Submission Number’ column. To change the order of the columns configure a custom report.
Still can’t find what you’re looking for? Email support@lineupninja.com and one of the team will get back to you as soon as possible.
Still can’t find what you’re looking for? Email support@lineupninja.com and one of the team will get back to you as soon as possible.
Subsections of Submission Flow Configuration
Create a New Submission Flow
This page explains the process of creating a new Submission Flow for a Call for Speakers or Call for Abstracts in detail. The process of creating an Awards Submission Flow is different and slightly simpler.
Within your event, go to
Submission Flows
and create a new Submission Flow:
Clicking on “Create Flow” will launch a dialogue box asking you to give the Submission Flow a name.
Call it something that will be easy for you and your submitters to understand.
Tip
If your event has multiple Submission Flows, give them clear, descriptive names so it’s easy to tell them apart.
If you want, you can set a deadline for the “Draft” Submission Stage here, or you can leave it blank. Either way, you can change this later if you need to.
Click the green “Create Flow” button to proceed.
This will bring up the New Flow Wizard, which will guide you through the process.
Public or Invited Submissions
The first step in the New Flow Wizard asks if the flow should be “open for public submissions or invited submissions only”.
If you choose “Public submissions”, the flow will be visible in the “Open Calls for Content” section of the Content Portal (although you can override this in the Portal configuration). This means that anyone with a login to the portal will be able to create a submission.
The new flow will also be created with its first Submission Stage called “Draft”. When submitters login and create a submission, it will begin in the Draft stage.
If you choose “Invited submissions only”, the flow will NOT be visible in the “Open Calls for Content” section of the Content Portal (although you can override this in the portal configuration).
The new flow will be created with its first Submission Stage called “Invited”, and an invitation email template will be created. This template contains a ‘magic link’ to the submission flow.
When you invite submitters to an “Invited Submissions” flow from the platform, Lineup Ninja will:
Create a Portal account for the submitter, and
Create a draft submission in the “Invited” stage for that submitter,
Send the invitation email template will be used when you send invitations to submitters from the platform.
When invited submitters click on the ‘magic link’ in the email, they will be logged in and taken to the submission flow.
If you choose “Public and Invited submissions” your flow will be created with both of the above configurations / sets of functionality, and the flow will be visible within the Content Portal by default.
What content are you gathering?
The next step in the New Flow Wizard asks what type of content you want to gather in your flow.
If you choose “Session and speaker details”, the submission form in your flow will have two sections: one for questions about Session details, and another for Speaker details.
The form is split into two sections like this because this allows for submissions with multiple speakers to reuse the speaker section for each additional speaker.
If you choose “Speaker details only”, the form will be created with only one section: for questions about the speaker(s).
If you choose “Session details only”, the form will be created with only one section: for questions about the session.
Info
If you’re running a Call for Abstracts, the “Speaker” section can be used to capture details about authors, and the “Sessions” section can be used to capture details of the abstract / paper.
You can add and remove both speaker and session sections later if you need to.
Speaker Data
The next step in the New Flow Wizard will ask you what data you want to collect about your speakers (or authors if you’re running a Call for Abstracts).
It presents Lineup Ninja’s standard speaker questions, with some of them already selected:
Choose the data you want to collect, and Lineup Ninja will add these questions to the form when the submission flow is created.
Once the flow has been created, you can edit these questions’ text, character limits, whether they’re mandatory, and more.
You can add more questions - including your own custom questions - later if you need to.
Info
If you enable “Allow Multiple Speakers per Submission”, Lineup Ninja will add an “Add another speaker” button to the form.
Submitters can then click that button, which causes the whole speaker section to be repeated, so they can fill it in for as many speakers as they need to.
Session / Abstract Data
This section asks you what data you want to collect about the sessions (or abstracts, if you’re running a Call for Abstracts).
Again, you can edit these questions later, and add more - including custom - questions if you need to.
Waitlist Submissions?
This section asks if you will waitlist submissions.
If you choose “Yes” it will create a “Waitlisted” Submission Stage in the flow. If you choose “No”, it won’t.
If you’re unsure, choose “Yes”: it will be better to have the stage built and configured and not need it later, than to need it later and have to build it from scratch.
Rework Submissions?
This section asks if you might want to ask submitters to rework their submissions. This is useful if you are running a review process, and your reviewers ask submitters to make corrections or other changes to their submission before it is accepted.
If you choose “Yes” it will create a “Rework Requested” Submission Stage in the flow. If you choose “No”, it won’t.
If you’re unsure, choose “Yes”: it will be better to have the stage built and configured and not need it later, than to need it later and have to build it from scratch.
Submitter Confirmation?
Note
Submitter Confirmation is NOT the same as Speaker Confirmation!
Submitter Confirmation is intended to be used in the situation where:
A submitter has offered a session/abstract/paper.
The review and decision process has taken a fairly significant amount of time (a few weeks or months).
The submission has been accepted and you want submitters to confirm that they still intend to deliver the session
It is NOT used for confirming session times with speakers - see Speaker Confirmation for that.
This section asks if you will want to ask submitters to confirm that they still intend to deliver their session.
If you choose “Yes” it will edit the “Accepted” stage, adding a button to the form and asking submitters to confirm that they still intend to deliver their session.
The rationale for this feature is that it can potentially be several months between the submitter offering their session / abstract, and the decision about whether it will be accepted being made. During this time, the speaker’s circumstances may have changed, and they may no longer wish to speak at the conference.
Click the green “Next” button, and Lineup Ninja will now build the Submission Flow based on your choices.
When the new flow has been created, the “Flow Configuration” dialogue box will appear.
Still can’t find what you’re looking for? Email support@lineupninja.com and one of the team will get back to you as soon as possible.
Configuring Flows
The Flow Configuration dialogue box allows you to set various configuration options for your submission flow. At the top of this dialogue box are the ‘general settings’.
Here you can adjust the following general settings:
Flow Name: set the name of your Submission Flow. This is the name that will be displayed in the portal (although you can override that in the portal configuration).
Icon: this is the icon for the flow that will appear in your left-hand menu (i.e. in the back end).
Multiple Speakers per submission: If you enable “Allow Multiple Speakers per Submission”, Lineup Ninja will add an “Add another speaker” button to the form. Submitters can then click that button, which causes the whole speaker section to be repeated, so they can fill it in for as many speakers as they need to.
Maximum Submissions per Submitter: set a limit on how many submissions any one submitter can create. If you set a limit, you will be prompted to write the message that appears when a submitter reaches the limit.
Submission ID prefix: each submission receives a number that is unique within the submission flow: The first submission is number 1, the second is number 2 and so on. You can optionally create an alphanumeric prefix here. This is particularly useful if you’re running multiple Submission Flows in a single event, as it helps you to identify which flow a submission belongs to.
For example, your event has two flows: one is a call for speakers, and another is an awards program. You set a prefix of “CFS-” for your call for speakers flow, and “Award-” for the awards flow. Your call for speakers submissions will be numbered: CFS-1, CFS-2, CFS-3 etc, and your awards submissions will be numbered: “Award-1, Award-2, Award-3” and so on.
Do you want to perform reviews? This setting determines whether a
Review Stages
item will appear in your left-hand menu. If you choose “Yes, reviews will be performed”, you will need to click on that menu item and configure the review stage(s) for the submission flow.
Submission Flow Configuration: Deadlines
Below the general settings in the Flow Configuration dialogue box are the Deadlines settings:
This section allows you to set deadlines for any and all of the Submission Stages.
Note
Deadlines for Review Stages are configured in the Review Stage configuration.
The first deadline in the list, “New submissions can be created by submitter until” does exactly what it says: after this date, submitters can no longer create new submissions.
The rest of the deadlines control the behaviour of the submission form in each of the Submission Stages. For example, if you set a deadline on the draft stage, before the deadline, the form will appear to users like this:
…and after the deadline, the form will appear like this:
You can edit the “Deadline Expired” notice by hovering over it to reveal the action buttons:
These action buttons allow you to:
^ reposition the notice to below/above the form.
Delete the notice
Add a new notice / information section
Edit the title and appearance
Tip
Deadlines are mainly used for submission stages where the submitter is required to take some action, such as the “Draft”, “Invited”, and “Rework Requested” stages.
It is usually unnecessary to set deadlines for Submission stages that don’t require the submitter to do anything, for example “the Submitted” stage.
Submission Flow Configuration: Stage Order
This section simply allows you to choose the order in which the Submission Stages appear in your admin view. It does not affect your submitters’ experience.
Can a submitter add multiple speakers?
Yes, if you choose to allow them to.
Go to / Submission Flows / <Flow Name> / Configuration
Click The blue ‘Configure’ button to launch the Configuration Dialogue popup
Switch on the “Allow Multiple Speakers per Submission” toggle:
Can I limit the number of submissions one person can create?
Yes.
Go to / Submission Flows / <Flow Name> / Configuration
Click The blue ‘Configure’ button to launch the Configuration Dialogue popup
Enter a number in the “Maximum Submissions Per Submitter” field:
Submission Flow Configuration: Advanced Settings
At the bottom of the Flow Configuration dialogue box are the ‘Advanced Configuration" settings:
Here you can see / change the following advanced settings:
Submission Title: You can control how submissions’ titles are generated. By default, the submission title will be generated from submitters’ answers to certain questions:
If you chose to create your flow with a Session Details section, by default the Submission will take its name from the Submitter’s answer to the question: “What is the title of your session”? *
If you create a flow with only a Speaker section, by default the session title will be generated from the submitter’s answer to the “Speakers First Name” and “Speakers Last Name” questions.*
You can change these defaults. When designing your form, each question has an option: “Include answer in title of submission”. Checking this option means that the submitter’s answer to this question will form part of the submission title:
* You can edit the text of these questions, so for example, if you change the “What is the title of your session” question to read “Abstract Title”, you will see “Abstract Title” appear here.
In which stage should public submissions start? This option allows you to set which Submission Stage new public submissions should be in when they are first created. By default, this will be the Draft stage, but you may have reasons to start submissions in another stage.
If you leave this option blank, new public submissions will not be able to be created - this effectively makes the Submission Flow an invitation-only flow.
In which stage should invited submissions start? This option allows you to set which Submission Stage new invited submissions should be in when they are first created. By default, this will be the Invited stage, but you may have reasons to start submissions in another stage.
For example, if the Flow is both open for public submissions and for invited submissions, you may want all submissions to start in the Draft stage.
Create Sessions In: When you create a session on the agenda from a submission, by default it will create that session in the same event.
However, you can create the session in another event. This can be useful if, for example, you want to reuse a submission from an older event on the agenda for a newer event.
Still can’t find what you’re looking for? Email support@lineupninja.com and one of the team will get back to you as soon as possible.
Subsections of Configuring Flows
Submission Stages
What are Submission Stages?
Submission Stages are the states a submission will pass through as it is moves from Draft to Confirmed.
For example, a submission may start life as a Draft, then be Submitted. At which point you might choose to Accept it, Decline it, request it to be Reworked, or Waitlist it for the future. Or the Submitter may Withdraw it.
These stages are highly customisable and a number of tasks can be automated. As a result, things can get quite complex!
When you create a new Submission Flow, Lineup Ninja’s new flow Wizard will guide you through the process, and set up Submission Stages based on your choices.
It will configure these stages with sensible default options, but you may well want to make changes. If you would like help with using Submission Stages then please reach out to support and we’ll work with you to understand your process and find the best configuration for your event.
How do I get started with Submission Stages?
When you create a new Submission Flow, the type of Flow you selected (i.e. Call for speakers/papers vs Awards), and the choices you make in the New Flow wizard will determine the Submission Stages.
For example, the Submission Stages for a Call for Speakers Submission flow might look like this:
And the Stages for an Awards Submission flow might look like like this:
Can I rename a Stage?
Of course! Click the pencil icon next to the Stage’s name to bring up its configuration pop-up:
If you would like to show a different name to the submitter then you can also change the ‘Name shown to submitter’ field.
This can be useful, for example, if you have an stage called ‘Only if desperate’ but would rather show ‘Under Consideration’ to the submitter!
How do I add a new Stage?
Navigate to the Submission Flow’s Configuration page and click the blue plus button next to the ‘Stages’:
You will be asked to give the name and an optional deadline for the new Stage.
You have the option to copy an existing Stage or start from scratch. We recommend you copy a stage that serves a similar purpose to the one you are creating. This will give you more of a starting point for configuring the new stage.
How do I reorder Stages and does the ordering matter?
Each stage can have its own deadline. To set them:
go to the Submission Flow’s configuration page, and
click the blue ‘Configure’ button to open the configuration dialogue pop-up.
Scroll down to the ‘Deadlines’ section:
Click the pencil icon on the row of the Submission Stage that you want to set a deadline for.
Choose a date and time for the deadline, click save and you’re done.
How do I delete a Stage?
To delete a Submission Stage:
Navigate to the stage in question.
Scroll to the bottom of the page.
Lineup Ninja will check your data and configuration to ensure that:
There are no submissions in that stage
Other stages aren’t linked to it: e.g. the Draft stage has a ‘Submit’ button which moves submissions into the ‘Submitted’ stage
If Lineup Ninja doesn’t think it’s safe for you to delete the stage, it will tell you why:
When stages can be deleted, Lineup Ninja will tell you like this:
Submission Stages: Preview
As submissions move through a flow’s stages, some of the things that submitters can see and interact with need to change, such as:
Which submissions appear in which section of the submitter’s task list, e.g.
To-do / action required
Done / no action required
Missed deadline
Which questions on the form are visible, editable and locked
Status messages at the top (or bottom) of the Submission form
Which buttons are available at the bottom of the form
You can configure all of these items, and preview them in Submission Flows’ configuration main view.
Here’s an example of an Awards Submission Flow, showing the preview of how the different elements change…
When submissions are in the Draft Stage, before the deadline, the submission appears like this in the Task List on the Home Page of the Content Portal:
After the Draft Stage’s deadline, (assuming the submitter failed to submit their entry) the submission will appear like this in the Task list on the Home Page (i.e. it has moved from their To do list, to the “Missed deadline” list:
Before the deadline for the stage, while the submission is in draft stage, the form for the submission will look like this, and there will be ‘Save for Later’ and ‘Submit entry’ buttons below the form:
If the submitter missed the deadline, the submission will gain a notice at the top of the form to say that the deadline has passed, the questions are locked, and the ‘save’ and ‘submit’ buttons at the bottom of the form have now been replaced with a single ‘Done’ button:
However, if the submitter DOES submit their entry and it moves into the Submitted stage, the submission will gain a different notice at the top (to say it’s been submitted), the form is locked again, but this time the submitter also has the option to withdraw their submission:
How do I control which questions are editable, locked or hidden in a given Submission Stage?
In the Submission Flow’s Configuration Main view, click on the pencil next to the Stage’s name:
This will open a configuration dialogue pop-up. Near the bottom of this pop-up is the “Question Visibility in this Stage” section. This allows you to set each question as editable, locked or hidden. YOu can also set all questions at the same time by clicking on ‘Toggle All’:
How do I add notices and buttons to the top and bottom of the form?
To add notices and buttons to the page, click ‘Add Group’. This will add a simple group with a single button. Hover over the section, where you will have the option to move, edit, add new items and delete the group.
Editing a Group - Plain vs Featured
Plain - This is a basic configuration of the Group, with a plain white background and basic buttons
Featured - This is a more configurable Group, where you can select a colour to hightlight the Group and add Display Rules to buttons
For example here is a ‘Featured’ group set to ‘Column’ layout containing both text and button items.
Editing a Group - Text & Buttons
Hover over the button or text, where you will have the option to move, edit, add new items and delete the group.
Editing the text is straightforward. You can either use a formatted editor, or if you prefer you can use Markdown formatting.
Editing a button lets you configure both what the button looks like, and what it will do when pressed. You can add these actions to be performed when a button is pressed:
Move Submission To State - This saves the form and moves the submission to a new state. This triggers any emails and any automation you have configured (see below for more on that)
Save and Exit - Saves the form and returns the submitter to their list of submissions
Exit without Saving - Returns the submitter to their list of submissions without saving the form
Show Popup - Shows a Popup, this can be useful to ask the user to confirm before submitting or withdrawing their submission
What does the toggle ‘Require form to have valid answers for button to be pressed’ do?
When this is enabled, the submitter can only click the button when they have completely filled in the form.
For example, if the button is used for ‘Submit Final Entry’ this toggle should be selected. If the user presses the button the form will be validated and the submitter guided to complete any missing or invalid answers. If the form is valid the ‘When pressed perform these actions’ will happen.
If the button is ‘Save for Later’ then this toggle should not be enabled, this allows the user to save a partially completed form.
For questions that are not mandatory the effect the toggle has is to ensure that if a value is filled in that it is a valid value.
For example, if a field ‘Website URL’ is marked optional then:
If the toggle is enabled: The user can press the button when either the field is empty entirely (i.e. the user has not answered it) OR the field has a valid value (e.g https://example.com)
If the user has input something like ‘my super website’, then they cannot press the button.
If the toggle is disabled. The user can press the button regardless of the value in the field. That said, their invalid value will NOT be saved to the database.
What is a Popup?
A Popup is a dialog box that displays over the submission. You can use this to ask the user to confirm their action before performing it. To create a Popup, click ‘Add Popup’. They are configured in the same way as the Groups on the page, hover over the Popup to see the buttons and to add content.
How do I configure emails for a stage?
Emails can be ‘Triggered’ when a submission is moved into a stage or ‘Scheduled’ to all submissions in the stage at a specific time.
For each email you configure, you can send it to:
Submitter
All Team Members
Specific email addresses
You can add multiple emails, sending different ones to different people. For example the default ‘Submitted’ stage send an acknowledgement to the Submitter and a notification to All Team Members.
You can add a scheduled email to automatically nudge Draft submissions to complete their submission. For example, you may want to schedule an email to notify submitter that there is one week until the deadline date, then again when there is one day remaining.
For more information about emails, follow this link.
What is Automation?
In the Automation section you can configure actions to happen automatically when a submission moves into or leaves a stage.
The actions occur regardless of who initiates the move, either the submitter or the event manager.
For more information on Submissions & Labels, follow this link.
How do I manage the content on the Form Designer?
When a submission enters or leaves a stage you can:
Add and hide form sections from the users view
Lock and unlock answers the user has given
You can use this to progressively add more content to the form as the submitter progresses through your Submission Stages.
The default ‘Call For Papers’ flow adds all questions in the Draft Stage. It then locks all answers when the submission moves into the Submitted Stage. If you move the submission to Rework Requested the Stage has Automation to unlock all answers. They are then locked again when the submission moves back into the Submitted Stage.
How do I add labels automatically?
When a submission enters or leaves a stage you can:
For example you might want to add a ‘Needs Rework Review’ label to a submission when it moves out of the ‘Rework Requested’ Stage. You can then filter your Submitted submissions to see which have been reworked.
If you do want to separate out Submitted from Reworked submissions more clearly you can create a new ‘Reworked’ Stage by copying the ‘Submitted’ Stage and changing the ‘Confirm’ button on the ‘Rework Requested’ stage to move the submission to the new ‘Reworked’ Stage.
How do I add content to the agenda automatically?
When a submission enters or leaves a stage you can:
Create or update agenda items
This will create or update the content in the Agenda Planner automatically. You can choose whether to update Speakers and Sessions, just Speakers, or just Sessions.
If you are creating content in multiple events you can also choose which event the content should be added to. If you need to add content to multiple events then create multiple ‘Create / Update Agenda Items’ actions.
Note
It can take around 15 seconds for the updated content to appear.
What is ‘Agenda Appearance’?
When a session is created from a submission the agenda will track updates to the submission so you can ensure your agenda is up to date.
You can configure how the agenda responds to submissions in this stage. For example, if a stage represents declined or withdrawn submissions you can configure the agenda to show the session as having an error and to require the speakers to be removed from the agenda.
Still can’t find what you’re looking for? Email support@lineupninja.com and one of the team will get back to you as soon as possible.
Embedding the ‘Snöball Social Widget’ into your submission flows
Publish your agenda to Snöball, which you can learn about here
This page explains how to embed the Snöball Social Widget into your submission flows.
You do this by adding a Button to the page and configuring that button to open the Social Share Widget:
Before you start you will need a Project ID from Snöball. This will link the button to the correct campaign.
Add a group. If your stage already has a group you would like to add a button to you can skip this step.
Click ‘+ Add Group’
Hover over the newly added Group and click the pencil icon and make the following changes
Set the ‘Type’ to ‘Featured’
Set a appropriate ‘Title’
Set choose a color
Set the ‘Arrangement’ to ‘Items in a column’
Press ‘OK’
Hover over the group and click ‘+’ the ‘+ Add Text’
Add some text that will encourage the user to click the share button
Now hover over the ‘New Button’ (or add a new button if you are configuring an existing group) and click the edit icon
Edit the ‘Button’ and change the text to something appropriate
In the ‘When Pressed Perform these actions’ click the ‘+’ then then choose ‘Snöball Social Share Widget’ from the first column and input the project ID you have received from Snöball in the second column. Save the action with the green tick
Press ‘Ok’ to dismiss the content
Now test the button but creating a test submission and move it into the stage with the new button and give it a press.
Still can’t find what you’re looking for? Email support@lineupninja.com and one of the team will get back to you as soon as possible.
Form Designer
What is the Form Designer?
The Form Designer is the part of the Submission Flow Configuration Main View where you build your form:
It allows you to:
Add two types of form section: Speaker Details and Session Details (see below).
Add, remove, rename and reorder sections
Add, remove, edit and reorder questions
It also shows you which fields questions are mapped to.
What is the difference between the Speaker and Session Details sections?
Aside from the different data that each section will collect, the important difference is that you can configure the Speaker Details section to allow for multiple speakers. This will allow the submitter to repeat the Speaker Details section, once for each speaker.
You do not have to have both sections in your Form Designer. To delete, delete each question in the section then delete the entire section.
How do I add a question to a form?
Navigate to your Submission Flow’s Configuration page.
Hover over the area at the top of the section that you want to add a question to. In this example, the ‘Speaker Details’ section:
This will reveal the Add Question button. Click this button and you will see a pop-up with a list of standard questions for that section type (in this case Speaker questions):
Look through the list of standard questions to see if the question you want already exists on this list. If it does, choose it by clicking the blue ‘plus’ button. This will add it to your form.
Warning
IMPORTANT: You MUST use Standard questions for their intended purpose.
For example, if you want to capture the speaker’s biography, USE THE BIOGRAPHY QUESTION for it.
Why? Because these questions are mapped to corresponding fields in the database, and the answers to these questions will eventually be published on your event website.
If you use the ‘First Name’ question to ask for Dietary requirements, your event website will end up with speakers called things like “Vegan Johnson” and “Gluten-free Smith”.
You are not able to change this later.
You can also add Custom questions from this pop-up.
Warning
IMPORTANT: Only create a custom question if you are sure there isn’t already a standard question for the data that you want to capture.
For example, if you want to capture the speaker’s LinkedIn URL, USE THE LinkedIn QUESTION for it.
Why? Because these questions are mapped to corresponding fields in the database, and the answers to these questions will eventually be published on your event website, mobile app, signage etc.
If you use the ‘First Name’ question to ask for Dietary requirements, your event website will end up with speakers called things like “Vegan Johnson” and “Gluten-free Smith”.
You are not able to change this later.
Consider if yoru submitters’ answers to this question will be needed on the agenda. If so, we strongly recommend that you create a custom field or Label for it before continuing.
Scroll to the bottom of the pop-up, and you will see the “Add custom speaker details question” button:
Click on the ‘Add Custom Question’ button. This will add the new custom question to the form and open it for editing:
You can now choose which type of question this should be:
You can then edit the other settings, such as:
The question text,
Help text
Whether it is optional or mandatory,
Character limits
Question visibility in different Task Stages
Make any changes to the question that you want to make, and click the green ‘check’ button
to save your changes, and you’re done!
Question Types
Warning
You MUST use the correct question for the type of data you wish to collect.
Questions are mapped to fields in the underlying database, and Lineup Ninja expect the data to be in the right place.
For example, the default form’s Biography question in the Speaker Section is mapped to speakers’ Biography field. The data in this field will be published to your show website and mobile app.
If you use this question to ask for the speakers’ dietary requirements, their dietary requirements will end up on your website!
We give you loads of standard questions, but sometimes you’ll need to add your own.
When you do, you will be prompted to create a Custom Field or Label to store this data.
What types of questions can I ask?
The following data types are available:
Short Answer (One Line)
Paragraph (Multiple Lines)
Number
Multiple Values (Numbers or Text)
Choose Many - Allows the selection of one or more values from a list
Choose One - Allows the selection of a single value from a list
Lineup Ninja doesn’t have a native Likert Scale type of question. However, you can achieve the same effect by creating a series of ‘Choose One’ multiple choice questions.
How do I add an ‘other’ option on a multiple-choice question?
Add ‘Other’ as an option to that question:
Add a ‘Short Answer (One Line) question that asks for the details.
Add a Display Rule so that the ‘Other’ text qustion only shows when the submitter has chosen ‘Other’ in the multiple-choice question. You can also mark this as ‘Require if shown’
Can I create a numbered list type of question to ask submitters to list several learning outcomes?
We recommend that you use the ‘Multiple Values’ question for this. You can make each outcome required or not.
How do I ask for a speaker’s postal address?
You can either ask a ‘Paragraph (Multiple Lines)’ question to give the submitter space to type their address in which ever format suits them. If you need a more formal address form, we recommend that you use the ‘Multiple Vales (Numbers or Text)’ option and add an item for each part of the address.
How do I embed an image into a Form?
To embed an image into a Form, your image will need to be hosted online somewhere (e.g. Google Drive). To add the image, add a ‘Info text only (no question) ‘question’, select the image icon and input the image URL.
Can I add a formatted text question?
At the moment you can only use plain text. Users can, however, use ‘Markdown’ syntax to format text in any text questions. Here’s a simple guide to Markdown sytnax.
Can I add a file upload question?
Yes. You can either choose one of the available pre-mapped questions or add a custom file type question. For more information on how to do this, follow this link.
Note
When adding a custom file type question, you must map it to a ‘File Type’. This will enable you to map your responses to Agenda Planning and subsequent integrations.
Can I ask a submitter to upload a sponsor logo for a session?
Yes. Select the question ‘Ask the submitter to upload a sponsor logo for the session’. This will automatically map the sponsor logo to the session, and to onward integrations where enabled.
Do you check uploaded files for viruses?
Yes, all files are virus-checked when they are uploaded.
How do I make a question show (or not) depending on the answer to a previous question (display rules)?
Info
In Lineup Ninja, display rules are set on the question that will either be displayed (or not), depending on the answer to a previous question.
They are NOT set on the first question - i.e. the question whose answer determines which subsequent question gets asked.
This can be a bit counter-inuitive for some people!
In the question that you would like to be displayed (or not), set up a ‘Display Rule’.
This allows you to choose from the list of valid previous questions, then choose some qualifying condition (e.g. ‘is at least one of’), and then supply the answers that must be matched.
You can even add multiple rules together:
When you add multiple rules you can choose whether the question should show if all rules are met, or if any rules are met.
How do I delete or hide questions?
Before a Submission Flow is published, you can edit everything on the form. This includes deleting questions.
Once you publish a flow, you can still edit questions, but Lineup Ninja will NOT let you delete questions. This is because Lineup Ninja works takes the stance that it is theoretically possible that a submitter could have provided some data, so deleting a question would delete submitters’ answers to that question, which could result in unexpected data loss for you.
Instead, you can hide questions once a Submission Flow has been published.
If you Unpublish your submission flow, this will delete all the submissions. And because there are no submissions, Lineup Ninja will let you delete questions again.
The intention of the Unpublish tool is that you publish your draft Submission flow, test it (creating a bunch of test submissions in the process), and then you’ll want to tidy up your test subissions, make final changes to your form and then republish.
Warning
Use with caution: Unpublishing your call for papers will delete a LOT of data that you cannot retrieve!
Still can’t find what you’re looking for? Email support@lineupninja.com and one of the team will get back to you as soon as possible.
Subsections of Form Designer
ShoutOut
You can integrate ShoutOut with Lineup Ninja by asking ‘ShoutOut’ questions on your submission forms.
ShoutOut is aimed at anyone who wants to create video testimonials, event videos or social media videos. It simplifies the video creation process and enables your submitters to provide video content with very little fuss.
How to add a Shoutout question
To add a ShoutOut question to your form, you’ll first need to link your ShoutOut account to Lineup Ninja. It’s straightforward, but there are a few steps involved.
You’ll need your ShoutOut ‘Organisation’ and ‘Project’ Ids from ShoutOut, and to configure the ‘webhook’.
Follow this procedure:
Go to your ShoutOut dashboard
Click the profile icon on the top right and choose ‘Settings’
Click the integration tab
Scroll down to ‘Lineup Ninja’
Choose the project you want to integrate
Make a note of the Organisation and Project ids
Now click ‘My Projects’ in the top menu and choose your project
Click the settings icon in the ‘Build your template’ section
Scroll down to Webhooks and expand the section
Input https://api.lineup.ninja/shoutout/v1/event into the ‘Webhook URL’ field and then ‘Save and Exit’.
To add the question to a form, do the following:
Navigate to the Submission Flow’s Configuration page
Decide which section of the form you want to ask the question in.
Hover over that section and Click ‘Add question to <section name>’
Scroll to the bottom of the dialogue pop-up
Choose ‘Add a custom question’
For the Question Type choose ‘ShoutOut Video’ (you might need to scroll down the list to find it)
Input the Organisation and Project Ids you noted above
Edit the question and button text as required
Save the question
Please be sure to test a submission before publicising your flow to ensure it works as you expect it to.
Submitter Experience
On the submission form, the submitter will see a button to upload a video like this:
When they click the blue button, they will then see the ShoutOut video upload experience, which looks like this:
Once they’ve finished recording and editing their video, they can choose to download, view and share, or delete their video.
Note
The submitter can only delete the video if that question is in a Submission Stage where that question is editable.
For example, if you have set your submission flow to lock the question when the submitter submits their form, the user will no longer be able to delete the video.
If they choose ‘view and share’, they will be taken to a ShoutOut page that contains their video and gives them options to share their video via various social networks. It looks like this:
Reviewing Submitters’ ShoutOut Videos
You can view submitters’ videos in one of these ways:
In an individual submission
Click into the submission and scroll down to the ShoutOut question. There are buttons to either download the video, or go to the sharing page (see above).
In the list of submissions
You can add a column to the Submission List table. You’ll then be able to see the download and sharing buttons (see above) for each submission in the table that has had a video uploaded.
To add this column to the Submissions List table, click the settings wheel near the top-right of the screen, choose ‘Add A Field’, then choose ShoutOut question.
In submission reports
The ‘Download video’ and ‘Share video’ links each have their own column in Submission reports
Still can’t find what you’re looking for? Email support@lineupninja.com and one of the team will get back to you as soon as possible.
Submission Flow Email Templates
Submission flows use emails to communicate with submitters for a number of reasons, such as:
Sending reminders of upcoming deadlines
Acknowledging submissions
Requesting submissions be reworked
Notification of a submission being accepted, declined, wait listed
Acknowledgement that a submitter has withdrawn a submission
They can be configured to be:
Triggered by a submission moving into a new stage, e.g. sending a “Thanks for submitting” email when a submitter clicks ‘Submit’, causing their submission to move from the ‘Draft’ stage to the ‘Submitted’ stage.
Scheduled to be sent at a specific time, e.g. sending a deadline reminder a few days before the submission deadline.
By default, most Submission stages have email templates associated with them, and you can edit them, delete them, add your own etc.
Lineup Ninja provides default copy for the most commonly used emails. However, you will probably want to adapt this to match your event’s style, tone of voice etc.
How do I edit an email template?
Navigate to the template you want to edit:
Click
on the right hand side of the screen. This will bring up a pop up box that will enable you to edit the following details:
Send To
Subject
Body
How do I create a new email?
To create a new email, navigate to the section you would like to create an email within and click the blue ‘Add Email’ button on the right-hand side of the screen.
This will bring up a pop up box that will enable you to create a new triggered or scheduled email.
What is the difference between a ‘Triggered’ and ‘Scheduled’ email?
Triggered - Sends an email automatically when a submission moves into or out of a stage. When you move the submissions manually, you will be prompted to confirm whether you would like to send the email (or not)
Scheduled - Sends an email for all submissions in this stage at a specific time (e.g. to nudge all incomplete submissions)
How do I delete an email template?
To delete an email template, click
on the right-hand side of the email.
How do I add links to emails?
There are two ways to include a link in your email.
Just include the link. Text that looks like a link, e.g. https://example.com will be automatically turned into a clickable link.
Or to make some text clickable use this syntax [The text to display](https://example.com) which will result in this output: The text to display
How do I test send an email?
The easiest way to test your templates is to do a test-run through the Submission Flow process. This way, you can get an understanding for how the entire process works, ahead of using it with your submitters.
How do I edit automated emails before sending them, without changing the template?
Whenever an automated email is triggered (for example, you accept some submissions, which will trigger notification emails) you are presented with a screen to enable you to make any ‘one off’ changes required for that particular submitter.
How do I stop notification emails from Lineup Ninja going to the whole team?
Lineup Ninja creates various templates for notification emails that are sent to your team. These are to notify you of things like the fact that a new submission has been received.
By default, these emails are sent to everyone in your team. This can get annoying for team members who these emails are not relevant to.
Fortunately, it is quick and easy to change this.
Navigate to the relevant email template and open it for editing:
You will see that the default recipients for internal notification emails are “All Team Members”
Change this to “Specific e-mail addresses, and then enter the addresses of the team members who should receive these emails:
Still can’t find what you’re looking for? Email support@lineupninja.com and one of the team will get back to you as soon as possible.
Submissions and Labels
What can I do with Labels and Submission Flows?
Labels are a way to group, categorize, or tag, items in your event. Using them with Submission Flows enables you to perform this grouping automatically using the data submitters have provided, and can help you manage the workflow of your event.
There are two main categories of labels that relate to a submission:
Labels that are selected by the submitter, in response to a question you have asked them.
Labels that are added to the submission. Either by you, or automatically using your Submission Flows configuration.
These labels can then be used to automatically label the speakers and sessions on the agenda. Using this you can do things like:
Ask the submitter to choose ‘Talk’ or ‘Workshop’ labels, then configure the labels to ensure that talks are on stages, and workshops in conference rooms.
Ask the submitter to choose ‘Monday’ and ‘Tuesday’ labels, then configure the labels so sessions are scheduled on a day requested by the submitter.
Use automation to add ‘Content Requested’ and ‘Content Supplied’ labels to a session as the submission moves through the Submission Flow. Then applying filters to your agenda publishing to only publish sessions that are complete.
Ask the submitter to identify if any speakers will need assistance with their presentation, then easily filter the speakers list by this label.
Ask the submitter to choose whether they want a ‘Morning’ or ‘Afternoon’ slot, then configure the ‘Morning’ and ‘Afternoon’ labels to use Scheduling Windows.
And so on… the sky’s the limit!
How do I ask my Submitter a question that will add labels on the agenda?
In the Form Designer, you can add multiple ‘Labels’ questions.
If you add a labels question to the ‘Speaker Details’ section, the Speaker will be labeled with the submitters answers
If you add a labels question in any other section, the Session will be labeled with the submitters answers
To add a question to Speaker Details:
hover over the ‘Speaker Details’ section, and then
click the blue “Add Question in Speaker Details” button
.
You’ll see a pop-up with all the standard speaker questions.
Scroll down until you see the ’labels’ question, which looks like this:
To add a question to any other section:
hover over the relevant section, and then
click the blue “Add Question in <section name>” button
.
You’ll see a pop-up with all the standard speaker questions.
Scroll down until you see the ’labels’ question, which looks like this:
Once you’ve added the question you need to choose the labels you want to show to the Submitter. By default, none are selected.
Click on the eye icon to toggle the labels you want to show, in this example ‘Morning’ and Afternoon’ will be shown:
How can I add labels to a Submission?
There are three ways to add labels to a submission:
In bulk by browsing to the list of submissions, selecting the rows you want to label and then choosing ‘Add Labels’ from the ‘Actions’ drop-down menu
You can click through to an individual submission and edit the ‘Submission Labels’ value
You can use Submission Flows to automatically add and remove labels when a submission moves into or out of a stage. Add this in the ‘Automation’ section of the relevant submission stage
How can labels I add to the submission be added to the agenda?
By default labels added to a submission are not automatically added to the Agenda. This enables you to use labels to project manage aspects of submissions that don’t apply to the agenda.
For labels that should map onto the Agenda as well, you can choose whether the label should be added to the Speaker or the Session, or both.
To turn on the mapping:
Browse to
Event Settings
>
Labels
Click the name of the label
Turn on either ‘Copy label from submissions to speakers’ or ‘Copy label from submissions to sessions’ or both
Once you’ve toggled on these labels, new labels that are added to and removed from a submission will be automatically added and removed from their corresponding Sessions/Speakers in the agenda.
Note
If you turn off a toggle, labels applied to the agenda will not be removed. You can remove existing labels by browsing into the Speaker or Session lists, selecting all rows and choosing ‘Remove Labels’ from the Actions drop-down menu.
Still can’t find what you’re looking for? Email support@lineupninja.com and one of the team will get back to you as soon as possible.
Copy Submission Flow
How do I copy a Submission Flow within the same event?
Navigate to
Submission Flows
Click
button next to the Submission Flow you wish to copy:
A dialogue box will prompt you to name your new Submission Flow and click ‘Copy’
How do I copy Submission Flows from one event to another?
Navigate to
Event Settings
in the event you wish to copy to
Click ‘Copy Another Event’:
A dialogue box appears. Choose the event you wish to copy items from and select “Submissions Flows, Speaker and Session Tasks”:
Info
This will copy all Submissions Flows. You can delete the ones you do not need.
Want more information about copying data within Lineup Ninja? Follow this link.
Still can’t find what you’re looking for? Email support@lineupninja.com and one of the team will get back to you as soon as possible.
Delete Flow
Warning
Use with caution: this will delete a LOT of data that you cannot retrieve!
How do I delete a Submission Flow?
Navigate to
Submission Flows
Click on the name of the Submission Flow you want to delete.
Click “Configuration” in the left-hand menu.
Scroll down to the bottom of the page, where you will find the ‘Delete’ button:
Click “Delete Submissions and Configuration”
A confirmation dialogue box will pop up, explaining what will happen, and asking you to enter the name of the Submission Flow before you confirm that you want to delete the Submission Flow:
Review Stages
In Lineup Ninja, running a review process facilitates gathering feedback on submissions and can be done at any time during the Submission Flow. You may want to gather feedback from committee members, subject matter experts, or other members of your team.
Within the review process, you can customise the form to ask reviewers to score submissions, recommend which ones to accept/decline and give feedback to submitters.
You can run multiple rounds, or ‘stages’, of review (e.g. you may want to run an initial wide review, then follow up round where your team reviews the results of the first round).
Watch the short video below for an overview of the Review process.
A short video tutorial to share with your reviewers / judges
Still can’t find what you’re looking for? Email support@lineupninja.com and one of the team will get back to you as soon as possible.
Subsections of Review Stages
Create & Manage Reviews
What are reviews and review stages?
In Lineup Ninja, running a review process facilitates gathering feedback on submissions and can be done at any time during the Submission Flow. You may want to gather feedback from committee members, subject matter experts, or other members of your team.
Within the review process, you can customise the form to ask reviewers to score submissions, recommend which ones to accept/decline and give feedback to submitters.
You can run multiple rounds, or ‘stages’, of review (e.g. you may want to run an initial wide review, then follow up round where your team reviews the results of the first round).
How do I start a review process?
A Submission Flow starts life without a Review Stage. To start one, follow these steps:
Navigate to
Submission Flows
>Review Stages
Click
next to ‘Stages’
Fill out the Review Stage Name and optional deadline in the pop up. The deadline will be used in email templates and shows to the reviewers in their list of reviews (this can be edited at any time)
Tip
Once the review is created, you can edit the ‘Name shown to reviewer’ if you want a different name shown to the reviewer then the overall Stage Name.
What is ‘Answer Visibility’?
Answer Visibility allows you to decide which answers should be shown to the reviewer. This can be used to run a blind review or anonymising submissions by hiding the ‘Speaker’ answers.
Where do I configure review questions?
Navigate into the
Submission Flows
and click on the menu item
Review Stages
Click on the tab for the Review Stage you would like to update
Scroll down to the section called ‘Review Questions‘
What type of review questions can I ask my reviewers?
Lineup Ninja has five special types of review questions that are used in particular ways:
Score questions - you can use as many score questions as you like, and weight them differently if you wish
Recommendation questions - by default the recommendations are “accept”, “waitlist” or “decline”, but you can edit these
Feedback questions that are shown to submitters - these questions allow you to capture feedback from reviewers and pass it to the submitter (the reviewers names are anonymised in the feedback)
Upload image
Upload file
Info
On all questions, you can tick or untick ‘Use For Feedback - Submitters will see the answers given by the reviewers’ to decide whether you want to Submitters to be able to see the answers given by reviewers.
Apart from these special question types, like the Form Designer, you can create a custom questions. You should only create a custom question if you can’t use one of the above options.
Info
It is important to note here that you must select the correct question that matches the type of data you wish to collect. If you can’t see a question for the data you need to capture, consider creating a Custom Field or Label first, then adding a question that maps to it. Otherwise, if you create a custom question that doesn’t map to anything, the answers can’t be copied to your agenda and onto subsequent integrations.
How do I make a question show (or not) depending on the answer to a previous question?
Info
In Lineup Ninja, display rules are set on the displayed (or not) question.
In the question that you would like to be displayed (or not), set up a ‘Display Rule’.
This allows you to choose from the list of valid previous questions, then choose some qualifying condition (e.g. ‘is at least one of’), and then supply the answers that must be matched.
How do I add labels to reviews?
You can assign Labels to submissions to help group them. These labels can be optionally shared with your reviewers. To add labels, navigate to the Review Stage and scroll to ‘Label Visibility’.
How do I configure the emails that are sent to reviewers?
Navigate to the Review Stage you wish to configure
Scroll down to Emails
You can configure emails to be sent when one of three things happen
When Reviews Are Assigned
When Reviews Are Requested To Be Repeated
When Reviews Are Cancelled
By default, an email is sent to the reviewer, if you wish you can also add additional emails to send. These can be sent to your team or to specific e-mail addresses.
You can also schedule emails. This can be useful to nudge reviewers to complete their work.
How can I test my review stage?
The best approach would be to assign a test submission to yourself to review. This way you get to preview the whole reviewer experience process - email invitation, login flow etc.
Add yourself as a reviewer for the event
Assign a review for yourself
Complete the review
Browse to the the list of submissions and check the submission looks as you expect (i.e. correct score, recommendation etc)
Browse into the submission and check your test answers look as you expect
Browse to Review Stages, click the review stage and scroll to the bottom and click ‘Reset All Reviews’
How do I copy review stages from one event to another?
To copy review stages, you will need to copy the Submission Flow it exists under.
Navigate to
Event Settings
in the event you wish to copy data to
Click ‘Copy Another Event’
Choose the event you wish to copy items from and select ‘Submissions Flows’
Info
This will copy all Submissions Flows. You can delete the ones you do not need.
How do I copy review stages from within the same event?
To copy review stages, you will need to copy the Submission Flow it exists under.
Navigate to
Submission Flows
Click
next to the Submission Flow you wish to copy
Name your new Submission Flow and click ‘Copy’
Want more information about copying data within Lineup Ninja? Follow this link.
How do I delete a Review Stage?
To delete a Review Stage, scroll to the bottom of the stage and click ‘Delete Review Stage’. This will delete the stage and ALL assigned reviews.
Warning
Use with caution: Unpublishing your call for papers will delete a LOT of data that you cannot retrieve!
How do I show the reviewer answers given in one Review Stage in another Review Stage?
When configuring multiple stages the reviewer questions added in other stages become available in ‘Answers Given By Other Reviewers’. For example, if you are running a two Stage review process, in the second Stage you may wish to share the answers given in the first Stage. To do this browse to the second Stage and toggle the ‘Answers Given By Other Reviewers’ for the questions in the first Stage.
Still can’t find what you’re looking for? Email support@lineupninja.com and one of the team will get back to you as soon as possible.
Assign Reviews
How do I add Reviewers?
Navigate to the
Submission Flows
homepage where you will see a section for ‘Reviewers’ and ‘Reviewer Groups’.
To add a Reviewer or Reviewer Group, click
How do I assign submissions to individual reviewers or a group of reviewers?
In the ‘Submissions’ list, select the submissions you want to assign, then go to the Actions drop-down menu and click on ‘Assign Reviewers’
To assign the submissions to a single reviewer, choose them from the list, set a deadline if you wish, and click the Assign Reviewers button
To assign the reviews to everyone in a reviewer group, click on the ‘Reviewer Groups’ column heading to apply a filter to the list of reviewers. Select all currently filtered reviewers, set a deadline if you wish, and then click on the ‘Assign Reviewers’ button
How do I set or change the deadlines for my Review Stages?
Navigate to
Submission Flows
>
Publish Flow
Scroll to ‘Review Deadlines’
Click
to edit the deadlines for each stage of your Review process
How do I track a single reviewer’s activity or progress?
You can see how many reviews are assigned, in progress and completed for each reviewer in the reviewer list in Submission Stages.
How do I send reminders and nudge reviewers to finish their reviews?
Navigate to the Review Stage you wish to send a reminder/nudge reviewer in.
Scroll down to ‘Emails’
In ‘Scheduled Emails’, you can add emails that will be sent at a scheduled time. For example, you may wish to use this to send an email one week, and then again one day, before the deadline for your review process. For each scheduled email one email will be sent to each reviewer who has incomplete reviews.
Still can’t find what you’re looking for? Submit your question here and one of the team will get back to you as soon as possible.
Review Feedback
How do I view the review feedback?
Navigate to the
Submissions
. Click the Submission and scroll to ‘Reviews’ where you will see the reviews for each Review stage.
Can reviewers see the feedback given by other reviewers?
This depends on whether you have toggled on/off ‘Shown To Reviewers’. To check or edit, navigate to
Review Stages
and scroll to ‘Answers given by other reviewers’.
Info
Answers become visible to other reviewers when a reviewer saves their review.
Can I hide my reviewers’ feedback to submitters?
There is an option in the feedback question (called ‘Use For Feedback - Submitter will see the answers given by the reviewers’) that you can switch off. This will hide the reviewers’ comments from the submitters.
Still can’t find what you’re looking for? Email support@lineupninja.com and one of the team will get back to you as soon as possible.
Reviewers / Judges tutorial
Here’s a quick (2 minute) video tutorial that you can share with your reviewers / judges.
It explains how to login, and how to manage and perform their reviews.
Still can’t find what you’re looking for? Email support@lineupninja.com and one of the team will get back to you as soon as possible.
Publish Flow
By default, Submission Flows are published to the Content Portal.
How do I publish my Submission Flow into the Content Portal?
Submitters will view the Submission Form within the Speaker Portal. For this reason, we recommend ensuring you have set up the Branding so it looks and feels like your event!
Here you have two options: Publish Privately - This allows for members of your team to access it to test before making it available to the public Publish For All Submitters - This will publish the flow within the speaker portal so all submitters can access it.
You will also see a mock-up of the ‘View of Flow in Speaker Portal’. This will show you what your submitters will see.
How can I give my Submission Flow different branding to the main Content Portal?
Sometimes you want to publish a submission flow with different branding to the event’s main content portal.
A confirmation pop-up box will appear, asking you to enter some text before you confirm that you definitely want to delete the event
Click ‘Confirm’
Warning
NOTE: This will DELETE all submissions and reviews for this Submission Flow.
This cannot be undone!
Will my form’s website be encrypted?
Yes. We take care of encrypting your form and installing the SSL certificate etc.
Where is my submitters’ data stored, geographically?
Your submitters’ data is stored in Frankfurt, Germany.
Is the form GDPR compliant?
As the event organiser, you are the data controller, so it is your responsibility to ensure that you design your form in accordance with GDPR. We can advise you on how to achieve this.
Still can’t find what you’re looking for? Email support@lineupninja.com and one of the team will get back to you as soon as possible.
Subsections of Publish Flow
Submission Deadlines
How do I set or change the deadlines for my Submission Stages?
Navigate to
Submission Flows
>
Publish Flow
Scroll to ‘Submission Deadlines’
Click
to edit the deadlines for each stage of your Submission Flow
Info
On the first line of the table you can set a deadline for creating new draft submissions. Usually this will match the deadline for completing a draft, but you can set a later deadline for actually completing the draft if you want your submitters to be given a grace period.
What happens when a deadline has passed?
For each Submission Stage, you can configure what will happen once the deadline has passed:
Navigate to
Submission Flows
>
Submission Stages
Under each Submission Stage tab, scroll to ‘View of a Submission’, where you will see two tabs: ‘Before Deadline’ & ‘After Deadline’
Click ‘After Deadline’ to configure what the Submitter will see once the deadline has passed
By default, all stages show this message:
Still can’t find what you’re looking for? Email support@lineupninja.com and one of the team will get back to you as soon as possible.
Submission Reports
What are Submission Reports?
Submission Reports are where you can export the submission data you have in Lineup Ninja. You can use a report to do things like:
Analyze the data in a spreadsheet format
Access all of the files that have been uploaded
Create a spreadsheet that you can share with another team or external company
Export the data to be able to import it into another system
ZIP Report - A report that generates a Zip containing the files attached to the submissions.
JSON Report - A JSON report, suitable for sharing with a development team.
Still can’t find what you’re looking for? Email support@lineupninja.com and one of the team will get back to you as soon as possible.
Subsections of Submission Reports
Submission Spreadsheet Report
How do I create a spreadsheet report?
A spreadsheet report contains sheets for your Submissions. There are multiple sheets available in the spreadsheet export. You can configure which columns are shown in each sheet, or use the default configuration.
Combined Overview Sheet - This contains one row per submission and also includes all speaker and review data related to that submission on the same row.
Speakers Sheet - This contains one row per speaker
Sessions Sheet - This contains one row per session
Review Stage Sheets - For each review stage in your flow one sheet is available in the report
Table Sheet - This contains all answers to all tables questions in both submissions and reviews.
To create a spreadsheet report:
Navigate to
Submission Flows
>
Submission Reports
Click ‘Create Report’ on one of the spreadsheet formats. You can choose between ‘Excel’, ‘ODS’ (Open Document) or ‘CSV’.
You will see a pop-up to configure the report. You can:
For CSV exports, choose the sheet you want to include in the report. CSV does not support multiple sheets per file. You can create multiple reports, one for each sheet type if you need. The CSV report does not currently include the Review Stage and Table sheets, if you need those, use ‘Excel’ or ‘ODS’.
For each sheet you can choose whether the sheet should be included, excluded, or it can be included with a custom configuration.
If you choose ‘Custom’ you will be presented with a list of available columns in the report. You can configure the column with these icons:
When checked the column will be included in the report. When unchecked the column will be skipped
Use this to drag the columns into the order you want in the report
Some column have this icon. When enabled it means the cell will link to the relevant session, speaker or location in Lineup Ninja.
Some items in the list represent multiple columns in the export. For example in the below screenshot you can see that ‘Session Details’ and ‘Speaker Details’ both contain columns within them. These represent sections on your Form. To configure the columns click ‘View Columns’ and you can then configure the columns in that group to your requirements. You can choose to include/exclude the entire section by clicking the checkbox next to the section name.
You can optionally include links to uploaded files in the report. One column exists for each file type that you have configured. When you enable a file type column you will see additional options to choose the filename that will be used when the file is downloaded from the link in the report.
Once you are happy with the configuration press ‘Save’
To run the report click ‘Run’, the report will generated and will appear in a list titled ‘Generated Reports’. Click the ‘Download’ button to download the report.
Note
If you include links to uploaded files in a report then the created links are unique for that report, and are the same across each run of the report.
If you delete the report the links will stop working. This means you can revoke access to files that were previously shared be deleting the report.
Can you explain the ‘Combined Overview Sheet’ some more?
The ‘Combined Overview Sheet’ is fairly complex because it is indented to show all information regarding a particular submission on one row.
By default the columns are:
General Information about the Submission
The answers to the questions on your Form Designer
If you have not enabled ‘Allow Multiple Speakers Per Submission’ then the order of the sections matches the order in the Form Designer
If you have enabled ‘Allow Multiple Speakers Per Submission’ then the order of the section is the order of the ‘Submission’ sections in the Form Designer, followed by the ‘Speakers’ section. The Speaker columns are then repeated as many times as necessary to show all speakers associated with a submission. For example if you have a submission with 3 speakers then the columns will be repeated 3 times.
:Aggregated review scores for each review round. These include:
Counts of reviews that have given accept/maybe/decline recommendations
Count of pending review
Average scores given by all reviewers
Answers given for each for each review round. These columns are repeated as many times as necessary to show all reviewer answers associated with a submission. For example if you have a submission with 3 reviewers then the columns will be repeated 3 times.
The unique identifiers for the submission, the speakers and the reviews. These are useful if you are going import the data into another system, they are persistent identifiers, so you can use them to track changes.
The dates the submission most recently moved into each stage.
If a speaker is submitted by the same submitter multiple times, how does they show up in the report?
A submitter may offer the same speaker for multiple submissions. If they do then
The ‘Speakers’ sheet will only show the speaker once. The ‘Submission Titles’ column will contain a list of their Submission Titles separated with commas.
The ‘Combined Overview’ sheet will show show the speaker multiple times, once for every time they are associated with a submission.
How do I change the letters that appears before the submission number?
Please see this page to learn about submission numbering.
What does ‘Stage Transition Dates’ mean?
One of columns in the configuration for the ‘Combined Overview’ and ‘Submission Sheet’ sheets is ‘Stage Transition Dates’. This shows the most recent time the submission moved into each stage. There is one column per stage in the report.
Still can’t find what you’re looking for? Email support@lineupninja.com and one of the team will get back to you as soon as possible.
Submission ZIP Report
What is a Zip Report?
A ZIP report places the files attached to your submissions in a ZIP file. You can use it to download files in bulk.
Note
If you want to generate links to files, rather than a zip of the files themselves, you can use a Spreadsheet Report.
How do I create a Zip report?
Navigate to
Submission Flows
>
Submission Reports
Click ‘Create Report’ for the ‘ZIP’ option.
You will see a screen to configure the report. This is similar to the Spreadsheet Report.
By default all uploaded files will be included.
You can choose to customize the report and only include answers to particular questions.
You can optionally choose the path and filename for the files in the generated report, by default the following patterns will be used:
To choose a different directory structure choose ‘A custom filename’ and use the placeholders to specify your requirements
Once you are happy with the configuration press ‘Save’
To run the report click ‘Run’, the report will generated and will appear in a list titled ‘Generated Reports’. Click the ‘Download’ button to download the report.
Still can’t find what you’re looking for? Email support@lineupninja.com and one of the team will get back to you as soon as possible.
Submission JSON Report
What is a JSON Report?
A JSON report contains your submission data in a format that is designed to be read by a machine. It is a good format to use when sharing the data with a developer.
How do I create a JSON report?
Navigate to
Submission Flows
>
Submission Reports
Click ‘Create Report’ for the ‘JSON’ option.
You will see a pop-up to configure the report. As well as the name, you can choose whether to include or redact contact details (email and phone) — these are included by default. When redacted, submitter and reviewer email addresses are omitted and any answers to email or phone questions are blanked out. Click ‘Save’ to save the report.
To run the report click ‘Run’, the report will generated and will appear in a list titled ‘Generated Reports’. Click the ‘Download’ button to download the report.
Still can’t find what you’re looking for? Email support@lineupninja.com and one of the team will get back to you as soon as possible.
Mail Merging Reports to Create an Abstract Book
Export your data to an Excel spreadsheet report, and then pull the exported data into a formatted Word document. From there you can create a PDF.
This video takes you through the entire process:
Can I create an abstract book from my submissions?
1.1 We recommend that you include the “Combined Overview Sheet”, and choose “Include the sheet with a custom selection and order of columns” from the Sheet Status drop down menu.
1.2 Next, choose the fields that you want to be the columns in your spreadsheet (and ultimately the fields that appear in your abstract book).
Typically these fields will include (but may not be limited to):
Session (AKA abstract) detail fields:
Title (i.e. submission title)
Description (i.e. abstract text)
Speaker detail fields:
Author’s title
Author’s first name
Author’s second name
Author’s post-nominal letters
Company or Institution (you might know this as ‘affiliation’)
This screenshot shows these fields with their default names:
Depending on how you configured your submission flow, you may have other fields that you want to include. e.g. Keywords, References etc.
1.3 Once you’re happy with your choice of fields, we suggest that you exclude the other sheets. This is an optional step but it will keep your your data tidy.
1.4 Now save your report configuration, run the report and download it.
2. Review and cleanse the data
Once you’e downloaded the report. It’s a good idea to review the data. You may find that some authors have put data in the wrong fields, (for example, they’ve put their job title in the ’title’ field, instead of Dr, Professor etc).
3. Create a Word document and use the Mail Merge tools to pull the data from the spreadsheet
See the video above for instructions.
4. Export your data to a PDF
In Word, simply go to File -> Save As, and then open the File Format drop-down menu and choose ‘PDF’
Report Publications
Report Publications publish your submission data to a URL that your other systems can fetch. Unlike a Submission Report, which produces a file to download, a publication stays at a fixed URL so a developer or third-party system can pull the latest data whenever they need it.
Use a publication when you want to integrate your submission data with another system. Use a Submission Report when you just want to download the data.
Where do I find Report Publications?
Publications live behind a collapsed ‘Report Publications’ section at the bottom of the
Submission Flows
>
Submission Reports
screen, below the reports you can download. Click the ‘Report Publications’ heading to expand it and reveal your existing publications along with the options to create a new one. The section stays expanded once you open it.
What types of publication are available?
Spreadsheet Endpoint - Returns a spreadsheet (Excel, ODS or CSV) of your submission data.
JSON Endpoint - Returns your submission data as JSON, suitable for sharing with a development team.
Publish your submission data to a JSON Endpoint that your other systems can fetch.
Still can’t find what you’re looking for? Email support@lineupninja.com and one of the team will get back to you as soon as possible.
Subsections of Report Publications
Submission Spreadsheet Endpoint
Warning
The Spreadsheet Endpoint is for integrating with third-party systems. If you just want to download a spreadsheet, use a Submission Spreadsheet Report instead.
Lineup Ninja can publish your submission data to an endpoint that returns a spreadsheet. Your developer can fetch this endpoint to retrieve the submission data for your event and integrate it with your systems.
How do I create a Spreadsheet Endpoint?
Navigate to
Submission Flows
>
Submission Reports
and scroll down to ‘Report Publications’.
Click ‘Create’ under the spreadsheet format you want - either Excel, ODS or CSV. This creates a new publication.
A screen will pop up where you can configure the endpoint:
Enter a username and password to secure the endpoint. The endpoint is protected with HTTP Basic Auth, so a system can only fetch it with these credentials.
Optionally enter a Webhook URL to call after publishing. Leave this blank if you are not using a webhook.
Click ‘Publish’ to publish the data to the URL shown on the screen.
Copy the URL, username and password and give them to the developer or system that will fetch the endpoint.
What data is contained in the spreadsheet?
The spreadsheet contains sheets for your submissions, speakers and reviews. You can configure which columns are shown in each sheet, or use the default configuration. The columns work the same way as the Submission Spreadsheet Report - see that page for a full description of the available sheets and columns.
How do I secure the endpoint?
The endpoint is protected with HTTP Basic Auth using the username and password you set when you created it. Anyone fetching the URL must supply those credentials. You can change the username and password at any time from the configuration screen.
How can I publish automatically?
Warning
Consider your team’s workflow before enabling automatic publishing. When you enable automatic publishing there is a potential for data to be published before it is ready.
To schedule publishing scroll down to the ‘Scheduled Publishing’ part of the configuration.
You can then choose whether to publish once per hour, or once per day. If you choose to publish each day the publication will occur around 3am in the timezone of your event.
If you do not enable scheduled publishing, the endpoint is updated only when you click ‘Publish’. The endpoint always returns the data as it was at the most recent publication.
How does a consumer fetch the endpoint?
The system fetching the endpoint makes an HTTP GET request to the URL shown on the configuration screen, supplying the username and password as HTTP Basic Auth. The response is the spreadsheet file in the format you chose. The URL stays the same across publications, so a consumer can fetch it on a schedule to pick up your latest published data.
If you set a webhook URL, Lineup Ninja calls it each time the data is published, so the consumer can fetch the endpoint as soon as new data is available rather than polling.
Still can’t find what you’re looking for? Email support@lineupninja.com and one of the team will get back to you as soon as possible.
Submission JSON Endpoint
Warning
The JSON Endpoint is for integrating with third-party systems. If you just want to download your submission data, use a Submission JSON Report instead.
Lineup Ninja can publish your submission data to a JSON endpoint. The data is returned in a format designed to be read by a machine, so it is a good choice when sharing the data with a developer or integrating with another system.
How do I create a JSON Endpoint?
Navigate to
Submission Flows
>
Submission Reports
and scroll down to ‘Report Publications’.
Click ‘Create’ under ‘JSON’. This creates a new publication.
A screen will pop up where you can configure the endpoint:
Enter a username and password to secure the endpoint. The endpoint is protected with HTTP Basic Auth, so a system can only fetch it with these credentials.
Optionally enter a Webhook URL to call after publishing. Leave this blank if you are not using a webhook.
Choose whether to include or redact contact details (email and phone). These are included by default — see Contact details below.
Click ‘Publish’ to publish the data to the URL shown on the screen.
Copy the URL, username and password and give them to the developer or system that will fetch the endpoint.
How do I secure the endpoint?
The endpoint is protected with HTTP Basic Auth using the username and password you set when you created it. Anyone fetching the URL must supply those credentials. You can change the username and password at any time from the configuration screen.
How can I publish automatically?
Warning
Consider your team’s workflow before enabling automatic publishing. When you enable automatic publishing there is a potential for data to be published before it is ready.
To schedule publishing scroll down to the ‘Scheduled Publishing’ part of the configuration.
You can then choose whether to publish once per hour, or once per day. If you choose to publish each day the publication will occur around 3am in the timezone of your event.
If you do not enable scheduled publishing, the endpoint is updated only when you click ‘Publish’. The endpoint always returns the data as it was at the most recent publication.
How does a consumer fetch the endpoint?
The system fetching the endpoint makes an HTTP GET request to the URL shown on the configuration screen, supplying the username and password as HTTP Basic Auth. The response is the submission data as JSON. The URL stays the same across publications, so a consumer can fetch it on a schedule to pick up your latest published data.
If you set a webhook URL, Lineup Ninja calls it each time the data is published, so the consumer can fetch the endpoint as soon as new data is available rather than polling.
Contact details
By default the endpoint includes contact details — email and phone. If you would rather not share them, set ‘Contact details (email and phone)’ to ‘Redact contact details’ in the configuration before publishing.
When contact details are redacted, submitter and reviewer email addresses are omitted and any answers to email or phone questions are blanked out, wherever they appear in the data.
Where can a developer find the schema?
Direct your developer to the developer documentation, which describes how to request the data, the full schema, the webhook payload, and how to interpret answers and intents.
Still can’t find what you’re looking for? Email support@lineupninja.com and one of the team will get back to you as soon as possible.
Subsections of JSON Endpoint
Developer Documentation for Submission JSON Endpoint
Intro
The Submission JSON Endpoint makes all of an event’s Call for Papers (CFP) submission data available at a single endpoint. The data is returned in one document describing the whole submission form and every response to it.
In a hurry? Jump to Finding common data for the route to the submitter, the speakers and the session title.
To create an endpoint a new ‘JSON’ publication needs to be configured by an event manager, this will generate a unique URL for the event.
The document is self-describing. The top-level _meta object carries a schemaVersion (currently 1) and a documentationUrl pointing back to this page. See the Schema Reference for the full typed definitions.
Requesting the data
Warning
The endpoint is not for consumption directly by an end-user app, or other similar software. You must ingest the data into your system and use it from there.
To request the submission data perform a GET to the URL you have been provided by the event manager. This URL is unique for each publication. The endpoint may require credentials using HTTP Basic Auth depending on the settings in the configuration.
The endpoint always returns a 302 redirect to a temporary URL for the location of the data. The destination of this redirect changes for each request and will expire. You should always begin your request from the initial URL starting with http://api.lineup.ninja, and your client must follow redirects.
Refreshing the data
The event manager will make changes to their content over the course of time. To receive the changes you can either poll every 5 minutes, or integrate the webhook to receive an instant notification that new submission data is ready.
The endpoint serves the data as it was at the most recent publication, so the _meta.generatedAt timestamp changes only when the event manager (re)publishes, not on every request.
If you are polling the data be sure to schedule the removal of the polling after the event has completed.
When content is removed from an event, eg a submission is withdrawn, you will not receive an explicit notification. Instead, because the document contains the full set of data for the event, you should treat the absence of a previously existing object as a request to delete that object.
Files
The event manager can choose to include links to files uploaded against submissions — for example headshots, company logos, session slides, handouts and other uploads.
Files are off by default. To include them the event manager enables files in the publication configuration. They can choose to include all files, or only files of selected File Types.
File selection is by File Type, using the same type identifiers as the Agenda JSON Endpoint, so a file’s type correlates across both feeds. Each file in the feed carries its File Type (see type in the Schema Reference).
The included links are unique to each publication for the event. If the event manager deletes the publication the links will cease to operate.
Interpreting answers
The document has two halves that work together:
The form describes the whole submission form — its sections, questions and options — even questions that nobody has answered. Use it to render or map the form.
Each response carries the answers, referencing the form’s questions and options by id.
A response has a respondent — the person who submitted it — and one or more profiles. A profile is a speaker (a contributor on the submission); a single response can carry several profiles, for example a panel with multiple speakers. The respondent is often, but not always, also one of the speakers. A speaker’s details (name, email, bio, …) are not flat fields — they live in that profile’s answers, keyed by the question’s intent.
An answer is a discriminated union keyed by its type (the question type, eg text, number, table, checkbox, ugc-upload). Check the type before reading the variant-specific fields (value, options, files). Each answer’s value is typed to match its question type — a number answer’s value is a number, a table answer’s value is parsed JSON — rather than always a string. See the Schema Reference for every variant.
A submission’s state is its current phase (response.phase), which is always present — every submission is placed into a phase when it is created. Each response also carries an ordered phaseHistory of the transitions it has been through.
Interpreting intents
Many questions are model-linked — the event manager has tied them to a known field such as the submitter’s first name, the session title, or an evaluator’s score. Where a question is model-linked, the form question and the matching answer carry an intent string (eg firstName, title, score).
The intent set is open: new intents may be added over time, so your code must tolerate values it does not recognise. A question with no model link carries no intent. The Schema Reference lists the well-known intent values grouped by profile, session and evaluation.
Options on recommendation questions additionally carry a closed intent of RECOMMENDATION_YES, RECOMMENDATION_NO, RECOMMENDATION_MAYBE or null.
Finding common data
The most frequently needed values and where to read them. Remember a profile is a speaker, and a speaker’s details live in that profile’s answers keyed by the question’s intent — so a small helper to pull a value out by intent is handy:
By default the feed includes contact details (email and phone). The event manager can turn these off in the configuration of both the JSON publication and the one-off JSON report.
Redaction is driven by the question type, not by an intent: when contact details are off, the structured email fields on respondent / evaluator are omitted and every answer to a question of type email or phone has its value set to null (the answer is still present, so the question is still discoverable). Driving redaction off the question type closes the gap where an email value would otherwise survive in the answers array after the structured email field was dropped.
Webhook
If configured Lineup Ninja will call a webhook after a successful publish of the submission data. The webhook is called as a POST with this body:
{
/**
* The UUID of the event
*/eventId: string;
/**
* The name of the event
*/eventName: string;
/**
* The timestamp for the publication. You can use this to deduplicate calls to the webhook
* It is in epoch time with milliseconds (A javascript timestamp)
*/publicationTimestamp: number;
/**
* The UUID for the integration. The customer may wish to configure multiple integrations per event,
* for example to different staging and production events. This ID can uniquely identify them
*/integrationId: string;
/**
* Deprecated alias for integrationId. Prefer integrationId.
*/endpointId: string;
}
The webhook tells you that new data is ready; it does not contain the submission data itself. Fetch the endpoint to retrieve it.
To create the webhook ask the event manager to edit the configuration to set the value of ‘Webhook URL’ to your desired URL.
Still can’t find what you’re looking for? Email support@lineupninja.com and one of the team will get back to you as soon as possible.
Subsections of Developer
Submission JSON Endpoint - Schema Reference
Note
As our product develops we will add new fields to the schema without notice.
Where possible we will not deprecate or remove existing fields. If this becomes required we will notify active users of the integration.
The intent values are an open set — your code must tolerate values it does not recognise.
These are the TypeScript definitions for the document. All times are UTC.
Root document
{
/**
* Self-describing envelope for the feed
*/_meta: Meta;
/**
* High level details for the event
*/event: EventDetails;
/**
* The whole submission form: its sections, questions and options.
* Present even for questions that have no answers.
*/form: Form;
/**
* The submissions (responses) to the form
*/responses: Response[];
/**
* The title of the Call for Papers
*/title: string;
/**
* The UUID of the Call for Papers
*/id: string;
}
Meta
{
/**
* The schema version. Incremented on breaking changes. Currently 1.
*/schemaVersion: number;
/**
* When this feed was generated, ISO 8601 UTC.
* Changes only when the data is (re)published, not on every request.
* eg 2026-02-04T18:03:03.662Z
*/generatedAt: string;
/**
* A human/agent-readable description of the feed
*/description: string;
/**
* The URL of this schema reference's parent documentation
*/documentationUrl: string;
}
EventDetails
{
/**
* The UUID of the event
*/id: string;
/**
* The name of the event
*/name: string;
/**
* The timezone for the event.
* Potentially null for awards only events.
* Note that all times in this document are UTC.
*/timezone: string|null;
/**
* The dates for the event
*/dates: EventDate[];
/**
* If the event has a portal, the public url submitters use to access
* their content. Null otherwise.
*/portalURL: string|null;
}
EventDate
The start and end times for a day of the event. These are the times in which sessions can be scheduled, not necessarily the opening hours for the event. endDate may be more than 24 hours later than startDate.
{
/**
* The start of an event day in UTC, ISO 8601
* eg 2022-02-04T18:05:00.000Z
*/startDate: string|null;
/**
* The start of an event day in the event timezone, YYYY-MM-DD
*/localStartYYYYMMDD: string|null;
/**
* The start of an event day in the event timezone, HH:MM
*/localStartHHMM: string|null;
/**
* The end of an event day in UTC, ISO 8601
*/endDate: string|null;
/**
* The end of an event day in the event timezone, YYYY-MM-DD
*/localEndYYYYMMDD: string|null;
/**
* The end of an event day in the event timezone, HH:MM
*/localEndHHMM: string|null;
}
Form
The form describes the whole submission form. Answers in responses reference form questions and options by id.
{
/**
* The sections of the form, in form order. Each section owns its questions.
*/sections: FormSection[];
}
FormSection
{
/**
* The UUID of the section
*/id: string;
/**
* The name of the section. Null if unnamed.
*/name: string|null;
/**
* The position of the section within the form, for ordering
*/position: number;
/**
* Which part of the form this section belongs to:
* - 'profile' questions about the people submitting
* - 'main' questions about the submission itself (the session/proposal)
* - 'evaluation' questions answered by evaluators
*/group:'main'|'profile'|'evaluation';
/**
* The questions in this section, in form order
*/questions: FormQuestion[];
}
FormQuestion
{
/**
* The UUID of the question
*/id: string;
/**
* The label (text) of the question. Null if unset.
*/label: string|null;
/**
* The question type, eg 'text', 'textarea', 'number', 'checkbox', 'radio',
* 'dimension', 'table', 'email', 'phone', 'url', 'ugc-upload', 'image'.
*/type:string;
/**
* Which part of the form this question belongs to (see FormSection.group)
*/group:'main'|'profile'|'evaluation';
/**
* The question's model-link intent, eg 'firstName', 'title', 'score'.
* Open set — tolerate unknown values. Null if the question is not model-linked.
* See the Intent reference below.
*/intent: string|null;
/**
* The position of the question within the form, for ordering
*/position: number;
/**
* The UUID of the section this question belongs to.
*/sectionId: string;
/**
* The options for choice questions (checkbox, radio, dimension). Absent for
* question types that have no options.
*/options?: QuestionOption[];
}
QuestionOption
{
/**
* The UUID of the option. Stable; pairs with the option id on answers.
*/id: string;
/**
* The label of the option. Null if unset.
*/label: string|null;
/**
* The option's model-link intent. Closed set.
*/intent:'RECOMMENDATION_YES'|'RECOMMENDATION_NO'|'RECOMMENDATION_MAYBE'|null;
}
Two options sharing the same label are distinguishable by their id.
Response
A response is a single submission to the form.
{
/**
* The UUID of the response (submission)
*/id: string;
/**
* The display title of the response
*/title: string;
/**
* The current phase of the response.
*/phase: { id: string; name: string };
/**
* The ordered history of phase transitions, earliest first.
*/phaseHistory: PhaseHistoryEntry[];
/**
* The submitter of the response
*/respondent: User;
/**
* The speakers on this response. A profile is a speaker (contributor);
* a response may carry several.
*/profiles: Profile[];
/**
* When the response was created, ISO 8601 UTC. Null if unknown.
*/createdDate: string|null;
/**
* The answers to the 'main' (session / proposal) questions
*/sessionAnswers: Answer[];
/**
* The evaluations of this response
*/evaluations: Evaluation[];
/**
* If the response has been linked to an agenda session, its details.
* Absent otherwise.
*/session?: Session;
}
User
{
/**
* The UUID of the user
*/id: string;
/**
* The display name of the user
*/name: string;
/**
* The user's email.
* Absent when the publication has contact details turned off.
*/email?: string;
}
PhaseHistoryEntry
{
/**
* The phase transitioned to.
* id is null if the phase has since been deleted; name is retained.
*/phase: { name: string|null; id: string|null };
/**
* Who initiated the transition
*/initiator:'RESPONDENT'|'TEAM';
/**
* When the transition happened, ISO 8601 UTC
*/timestamp: string;
}
Profile
A profile is a speaker (a contributor on the submission). A speaker’s details — name, email, bio and so on — are carried as model-linked answers, keyed by intent (see the Intent reference), not as flat fields.
{
/**
* The UUID of the profile
*/id: string;
/**
* The answers to the 'profile' questions for this speaker
*/answers: Answer[];
/**
* If this profile is linked to an agenda contributor, its UUID. Null otherwise.
*/contributorId: string|null;
}
Session
{
/**
* The UUID of the agenda session
*/id: string;
/**
* The name of the agenda session
*/name: string;
}
Evaluation
{
/**
* The UUID of the evaluation
*/id: string;
/**
* The state of the evaluation, eg 'PENDING', 'COMPLETED'
*/state: string;
/**
* The per-question scores given by the evaluator. Null if none recorded.
*/scores: EvaluationScore[] |null;
/**
* The evaluator's summary. Null if unset.
*/summary: string|null;
/**
* When the evaluation was assigned, ISO 8601 UTC. Null if unset.
*/assignedDate: string|null;
/**
* When the evaluation is due, ISO 8601 UTC. Null if unset.
*/dueDate: string|null;
/**
* The evaluator
*/evaluator: User;
/**
* The answers to the 'evaluation' questions
*/answers: Answer[];
/**
* The phase the evaluation belongs to, if any. Absent otherwise.
*/phase?: { id: string; name: string };
}
EvaluationScore
Scores are per-question — an evaluation may carry several.
{
/**
* The UUID of the question this score is for. Resolves against the form.
*/questionId: string;
/**
* The numeric score
*/score: number;
}
{
/**
* The UUID of the answer
*/id: string;
/**
* The UUID of the question. Resolves against the form.
*/questionId: string;
/**
* The label of the question. Null if unset.
*/question: string|null;
/**
* The question's model-link intent (see Intent reference).
* Open set. Absent if the question is not model-linked.
*/intent?: string;
}
StandardAnswer (discriminant type)
| {
type:'number';
/**
* The numeric value. Null if empty or not a number.
*/value: number|null;
}
| {
type:'option'|'text'|'textarea'|'url'|'email'|'phone';
/**
* The text value. Null if unanswered.
*
* For 'email' and 'phone', `value` is also `null` when the publication
* (or report) has contact details turned off — the answer is still
* present, but the contact detail is redacted.
*/value: string|null;
}
| {
type:'table';
/**
* The parsed table data. Any JSON value (object, array, string, number,
* boolean or null).
*/value: JSONValue;
}
When the publication has contact details turned off, answers to questions of type email and phone are redacted: the answer is still present with the common fields, but its value is null.
The common fields plus selected — whether this option is selected.
{
/**
* The UUID of the option. Resolves against the form.
*/id: string;
/**
* The label of the option. Null if unset.
*/label: string|null;
/**
* The option's model-link intent. Closed set.
*/intent:'RECOMMENDATION_YES'|'RECOMMENDATION_NO'|'RECOMMENDATION_MAYBE'|null;
/**
* Whether this option is selected.
*/selected: boolean;
}
DimensionAnswer (discriminant type)
A dimension answer carries a human-readable summary value and a
machine-readable options array — one entry per visible option, in display
order, carrying the option id (resolves against the form), label, model-link
intent, and that option’s value.
{
type:'dimension';
/**
* Human-readable summary of the answer, eg 'Knowledge: 5, Relevance: 3'.
*/value: string;
/**
* Per-option values. One entry per visible option, in display order.
*/options: {
/**
* The UUID of the option. Resolves against the form.
*/id: string;
/**
* The option's label. Null if unset.
*/label: string|null;
intent:'RECOMMENDATION_YES'|'RECOMMENDATION_NO'|'RECOMMENDATION_MAYBE'|null;
/**
* The value for this option. Number for numeric dimensions, string for
* text dimensions, or null when unset.
*/value: string|number|null;
}[];
}
ShoutoutAnswer (discriminant type)
{
type:'shoutout';
/**
* The video links once processed. Null until the video is ready.
*/value: null| { sharableLink: string; downloadLink: string };
}
FileAnswer (discriminant type)
File and image answers carry a list of files. Files are off by default — see Files. When files are off, or none match the selected File Types, files is empty.
{
type:'ugc-upload'|'image';
files: File[];
}
File
{
/**
* The UUID of the file
*/id: string;
/**
* The name of the file
*/fileName: string;
/**
* The File Type of the file (see below)
*/type:FileType;
/**
* The size of the file in bytes
*/size: number;
/**
* The mime type of the file, eg 'image/png'
*/mimeType: string;
/**
* The URL to retrieve the file. Unique to this publication; revoked when
* the publication is deleted.
*/url: string;
/**
* For image answers, the scaled variants of the image. Empty for files.
*/variants: FileVariant[];
}
FileType (discriminant isPredefined)
The File Type identifiers match the Agenda JSON Endpoint, so files correlate across both feeds.
| {
/**
* A custom File Type created for this event
*/isPredefined: false;
/**
* The name of the File Type, eg 'Slides'
*/name: string;
/**
* The UUID of the custom File Type
*/id: string;
}
| {
/**
* A predefined File Type
*/isPredefined: true;
/**
* The name of the predefined type, eg 'Speaker Profile Image'
*/name: string;
/**
* The predefined type id. Additional types may be added over time.
*/id:|'generic'|'contributorHeadshot'|'contributorLogo'|'locationLogo'|'locationSponsorLogo'|'sessionHandouts'|'sessionSlides'|'sessionSponsorLogo'|'trackLogo';
}
FileVariant
Image files have variants — the image scaled to fit within a size. A variant has the same fields as a File plus a scale.
File& {
/**
* The size the image was scaled to fit within
* THUMB = 128x128
* SMALL = 256x256
* MEDIUM = 512x512
* LARGE = 1024x1024
* FULL = the same resolution as the originally uploaded image
*/scale:'THUMB'|'SMALL'|'MEDIUM'|'LARGE'|'FULL';
}
Intent reference
Model-linked questions carry an intent. The well-known values are grouped below by the part of the form they belong to (the form group). The intent values for the main group are listed here under Session.
Note
This set is open. New intents may be added at any time, and event managers may build forms whose questions carry intents not listed here. Your code must tolerate unknown intent values and fall back gracefully.
Profile (group profile)
Intent
Typical question type
honorific
text
firstName
text
lastName
text
postNominal
text
position
text
company
text
bio
textarea
email
email
phone
phone
country
select-system
headshot
image
logo
image
profile-image
image
profile-ugc-upload
ugc-upload
linkedIn
url
twitter
url
youtube
url
instagram
url
facebook
url
github
url
website
url
timeframes
checkbox
role
radio
profile-labels
checkbox
custom-field
varies
Session (group main)
Intent
Typical question type
title
text
description
textarea
tracks
radio
resources
checkbox
locations
radio
labels
checkbox
duration
number
image
image
sessionSponsorLogo
image
sessionSlides
ugc-upload
sessionHandouts
ugc-upload
ugc-upload
ugc-upload
award-title
text
award-image
image
award-ugc-upload
ugc-upload
Evaluation (group evaluation)
Intent
Typical question type
score
number
recommendation
radio
feedback
textarea
evaluation-image
image
evaluation-ugc-upload
ugc-upload
Webhook
If configured Lineup Ninja will call a webhook after a successful publish. See the developer index for the webhook payload.
Still can’t find what you’re looking for? Email support@lineupninja.com and one of the team will get back to you as soon as possible.
Content Portal Migration Guide
If you have copied a Submission Flow from an event that did not have our Content Portal feature please read this guide because there are a couple of important changes you need to be aware of.
Agenda changes now update the submission
The typical flow for a submission, is that a submitter completes their submission and then you add the speakers and session to the agenda. This copies the data from the submission onto the corresponding fields on the agenda.
Before Content Portal when you made a change on the agenda the change you made was not copied back to the original submission. This resulted in the situation where you could accidentally revert the change you made in the agenda by overwriting it with the older data in the submission.
To simplify this situation, and to reduce anxiety around choosing the wrong option, we have made a change for Content Portal events so that changes in the agenda will now update the corresponding answer in the submission. For example changes to speaker names, and headshots, session titles and descriptions will update the original submission with the new value you have set on the agenda.
The original answer given by the submitter can still be accessed. To do this navigate to the submission and scroll down to the question. You will see
next to the question. If you click that you can see all previous versions of the answer and if you wish revert the answer back to a previous version.
Please note that adding and removing speakers from a session does not update the submission. If you remove a speaker from a session you will see a warning on the agenda advising you to choose the option to ignore the speaker on the submission.
Visibility of questions needs your review
We have simplified how you choose which questions are visible in each stage. The previous automation actions of to Add, Lock, Unlock and Hide Form Sections have been replaced with an explicit option for each question in each stage.
We have attempted to migrate your configuration from your old flow to the new one, however it needs your review as we cannot guarantee what we have done matches your requirements. To review your flow please perform the following actions.
Navigate to
Submission Flows
Click the new of the flow
Choose
Configuration
Now perform these actions for each stage in your flow
Click the
icon next to the stage name
Expand out the ‘Question Visibility in this Stage’ section
You will see the questions on your form. Each question can be set to Editable, Locked or Hidden. Review the current options and update if necessary.
Save the stage
Changes to these options no longer require you to move a submission out of, and back into, a stage. The change will take place immediately.
‘Create / Update Agenda’ automation is simplified
If you previously used the ‘Create / Update Agenda’ automation action, the behavior has been simplified.
The automation action has been replaced with a new ‘Should the agenda be updated for submissions in this stage?’ option in the configuration for each stage. The option has been set as per the configuration in your old flow.
Navigate to
Submission Flows
Click the new of the flow
Choose
Configuration
Click the
icon next to the stage name
Previously the agenda would only update when a submission moved from one stage to another. Now the agenda will update in these circumstances:
A submission moves into a stage where this option is turned on.
A submitter saves a change to their submission while the submission is in a stage where this option is turned on.
An event manager changes the answer on a submission wile the submission is in a stage where this option is turned on.
Agenda Planning
The Agenda Planning portion of Lineup Ninja is where you create your speakers, sessions, locations and tracks (or themes), schedule your sessions and breaks, and then integrate onwards into the world!
Features of Agenda Planning include:
Smart scheduling to align with availability set by speakers and the structure of your programme
Speaker confirmation to ensure your speakers know where and when their session is scheduled
Tracks to thematically group sessions and to ensure sessions take place in the correct locations
Resource management to help deliver sessions
Publication of your agenda to the Lineup Ninja Agenda Website app and digital signage
Still can’t find what you’re looking for? Submit your question here and one of the team will get back to you as soon as possible.
Subsections of Agenda Planning
Agenda Planning Board
What is the Agenda Planning Board?
Your Agenda Planning Board is where you will schedule your sessions and breaks. There are many features to assist with planning your schedule and the board view can be configured for easy viewing.
How do I set up an empty planning board?
Once you have configured your Event Date(s) and Locations for your event, an Agenda Planning Board will appear. From here you can edit the Locations’ availability by clicking the Location name, and, when you have sessions, schedule them to times and locations.
How do I set the default session duration?
Navigate to
Agenda Planning
>
Sessions
Scroll to the bottom of the list view
Edit ‘Default Duration’ to set a default session duration
All sessions that are created will have this duration unless they are configured otherwise (for example, if you asked submitters to specify the session duration in the Submission Flow).
How do I set the default session changeover time in between sessions?
Navigate to
Agenda Planning
>
Sessions
Scroll to the bottom of the list view
Edit ‘Default Changeover Time’ to set the default amount of time in between sessions
How do I add breaks to the agenda?
Navigate to
Agenda Planning
>
Locations
Select all of the locations that you want to add a break to using the tick box on the left hand side
Scroll to the ‘Actions’ drop-down menu at the bottom on the page and choose ‘Make unavailable (add breaks)’
Choose the date(s) to update and the start/end time of the break
Click ‘Make Unavailable (add a break)’
Repeat for all subsequent breaks
Planning Board View
How can I view more data in the Agenda Planning Board view?
There are multiple ways that you can use to view more data on the Agenda Planning Board.
1. You can use the ‘hide’ controls to hide various elements of the Agenda Planning view:
This will give you more screen space to see your agenda. The show/hide controls are minimized, but they’re still available.
2. Click on
in the top right-hand corner of the Agenda Planning Board view to open the ‘View Options’ pop-up. Here, you can show/hide the Session and Speaker fields that are visible on the session cards on the board.
3. Click on
in the top right-hand corner of the Agenda Planning Board view to open the ‘View Options’ pop-up. Adjust the ‘Zoom the agenda vertically’ slider to allow more/less room per session. This is particularly useful when you have many shorter sessions per hour.
What is the difference between the Fixed Time vs Fit Content mode toggle?
The mode toggle allows you to change the view of your Agenda Planning Board depending on whether you want to have fixed time spaces or if you want to expand/contract the time to fit the content.
Fixed Time = Fixed Time is the default Agenda Planning Board setting. This is where the gaps in which you can schedule content remains the same size, regardless of the content that has been configured to appear in there. You will see a scroll bar on the right hand side of each session that allows you to view the content by scrolling.
Fit Content = Fit Content expands the scheduled session to fit the content that you have configured to appear there. This means you will always be able to view exactly the data you need to, without clicking into the session.
To change between these views, navigate to your Agenda Planning Board and toggle Fixed Time / Fit Content in the top right hand corner of the screen.
How can I tidy up the view of my Agenda Planning board?
There are several ways that you can reduce the amount of information that appears on the session blocks, all of which are configured by clicking on the settings wheel:
Remove pin/info icons - Under ‘Fields showing in session cards’, you can show/hide the pin and if icon by clicking on the eye
Remove field icons on sessions - Toggle on/off ‘Show icons on sessions’
Can I make my locations narrower, so that I can fit more of them on the screen?
To adjust the width of a Location, use the drag handles next to the Location name to make it wider or narrower.
You can reset the widths in the Agenda Planning Board settings.
How do I search in the Agenda Planning Board view?
In the Agenda Planning Board view, there is a search tool in the top-right corner of the screen. You can search all displayed text within the Agenda Planning Board, including Speaker and Session data, Custom Fields, Labels, Resources and Tracks.
When you enter a search term, two things happen:
Scheduled sessions that match the search term remain unchanged; sessions that do NOT match are greyed out
Unscheduled sessions that do match the search term remain unchanged, unscheduled sessions that do NOT match the search term are hidden from the list
To clear the search, either delete the text in the search box or click on
at the right-hand side of the search box.
Is there a way to reorder the Locations as they appear on the Agenda Planning Board?
In the Agenda Planning Board view, click on
in the top right-hand corner.
This will bring up a ‘View Options’ pop-up, in which you can use the
to reorder the list
Click ‘Ok’
How do I hide certain Locations in the Planning Board view while I’m not working on them?
In the Agenda Planning Board, click on
in the top right-hand corner.
This will bring up a ‘View Options’ pop-up, in which you use the eye icon to show/hide certain Locations
Click ‘Ok’
How do I print my Agenda?
For more information on printing you Agenda, please follow this link.
Stripes
What do the coloured stripes mean down the side of my planned sessions?
The colored stripe down the side of planned sessions indicates the session’s status:
Green: The session has been scheduled for a time and location and all of its planning constraints have been met. Everything is OK!
Red: The session has been planned but at least one of its planning constraints has not been met. The session needs some attention
Amber: The session has been scheduled for a time and location and all of its planning constraints have been met. However, the speaker has not confirmed that they can present at the scheduled time and location yet
Info
Depending on which version of Lineup Ninja you are using, Speaker Confirmation will live in one of two places. For more information, please follow this link.
If your Speaker Confirmation is disabled, planned sessions will only be displayed as green and red.
How do I see what the problem is with sessions that have a red stripe down the side?
Hover over the Info Icon in the red session in question
This will bring up an information pop-up, giving details about the session.
Planning constraints that are not met will be displayed with a red info icon. In the below example, the Location does not have the Track associated with that Session.
Why do some times/Locations become greyed out when I drag a Session over them?
As you pick up a Session to drag and drop it onto the board, Lineup Ninja evaluates that Session’s planning constraints. It greys out times and Locations that are not valid for that session.
If you hold the Session over an invalid time, it will display the reason(s) why that session cannot be allocated to that time.
Agenda Planning Board Menu Bar
What does the pin/thumbtack icon on planned sessions do?
The
on planned sessions allows you to pin sessions to the board so that they can’t be picked up, dragged and dropped.
Tip
Pinning sessions is useful if you are absolutely sure a session will take place in that location and at that time, and don’t want it to be changed easily (or accidentally). Examples of when you would use session pinning include: opening welcome address and closing plenary or sponsored sessions where sponsors have paid for a specific time slot in a particular location.
What does ‘Pin All’ mean?
‘Pin All’ pins all the currently scheduled sessions to the board, so they can’t be easily or accidentally changed to different times/locations.
Tip
This is uesful when you’re happy with your agenda and don’t want someone else in the team to come along and start messing with it!
What does ‘Unpin All’ mean?
‘Unpin All’ unpins all of the currently scheduled sessions, so they can be easily moved around.
What does the ‘Remove Invalid Unpinned’ button do?
The ‘Remove Invalid Unpinned’ button moves all sessions that are unpinned AND invalid (i.e. they have a red stripe down the left-hand side) from the planning board and onto the Unscheduled Sessions list.
This moves all sessions that are unpinned AND invalid (i.e. they have a red stripe down the left-hand side) from the planning board onto the Unscheduled Sessions list.
What does the ‘Remove All Unpinned’ button do?
This moves all sessions (valid and invalid, or green, amber and red) that are unpinned from the planning board onto the Unscheduled Sessions list.
What does the ‘Auto Schedule’ button do?
Auto Schedule will go through the list of Unscheduled Sessions and try to find valid times and locations for each one.
Tip
Auto scheduling your entire agenda is quick, but you might want to review the results before publishing it! We recommend using it with session pinning to build your agenda iteratively.
What can I use Labels for in the Agenda Planning Board?
Labels are a way to group, categorize, or tag, items in your event. You can apply Labels to all your event data, such as speakers, sessions, locations etc. You can also use Labels to unlock extra scheduling power and workflow management in Lineup Ninja. Check out the Labels documentation for details.
Still can’t find what you’re looking for? Submit your question here and one of the team will get back to you as soon as possible.
Subsections of Agenda Planning Board
Scheduling
What is Scheduling in Lineup Ninja?
Lineup Ninja focuses on making scheduling easier through our smart Agenda Planning Board. Rule-based scheduling allows you to match sessions to Locations based on topic, anticipated audience size, AV requirements, session running order rules and more. It also monitors speaker availability and alerts you to scheduling issues and clashes.
There are so many possibilities and configurations to help you schedule your agenda with ease and keep track of all of the conditions and constraints of your speakers, sessions and locations.
To get started, we recommend watching this tutorial video to get orientated, then read on through this page to learn how to manage some common scheduling needs with Lineup Ninja.
Additionally, we have listed some additional documentation questions from other sections that we think may help!
Submission Flows - If you have asked an availability question in the Submission Flow, Lineup Ninja will use this data to ensure you can only schedule the session on a day/time when they are available.
Speaker Portal - If a speaker is added via the Speaker Portal, the speaker will be made available for the entire event.
Manually adding a speaker - If you have manually added a speaker in the Speaker section of the Agenda Planning, the speaker will be made available for the entire event.
When you link a Speaker to more than one session, Lineup Ninja will alert you if you have double-booked the speaker.
How do I prevent clashes for my attendees?
When thinking about scheduling your event content is it important to consider what your attendees are looking for. If you’re running a conference on a diverse range of topics in a field, then it’s possible that attendees will largely be interested in only one or two different topics. If you schedule multiple talks on the same topic at the same time then an attendee won’t be able to see everything for their interest.
Lineup Ninja can help you here with a configuration called ‘Concurrency’. The dictionary definition of ‘Concurrent’ is ‘existing, happening, or done at the same time’, using the ‘Concurrency’ settings you can limit the number of things that are happening at the same time.
You can apply this limit to Tracks, Resources or Labels to best fit your needs.
Tracks
If you would like to limit the number of sessions running in the same Track then navigate to
Tracks
and select the name of the track. Then edit the ‘Concurrency’ setting to set the maximum number of sessions in this track that can run that the same time.
Resources
You can also limit the number of sessions requiring a particular Resource that run at the same time. Navigate to
Resources
and select the name of the resource. Then edit the ‘Concurrency’ setting to set the maximum number of sessions needing this resource that can run that the same time.
Labels
If you wish to put a limit on different criteria than Tracks and Resources, you can use Labels. Navigate to
Labels
and select the name of the label, or create a new one. Then edit the ‘Concurrency’ setting to set the maximum number of sessions with this label that can run at the same time. Then apply the label to the sessions you want to limit in this way.
How do I ensure sessions take place on a specific day or days?
If you have a group of sessions that needs to take place on a specific day or days then you can manage this with labels. A Label can be used to enforce scheduling to specific dates, you then apply that Label to the sessions you need to ensure are scheduled on that date.
To create a new Label, follow these steps:
Navigate to
Event Settings
>
Labels
Click
to add a new label and name it whatever makes sense for your event
Click into the label and click
on the ‘Dates’ row to edit the dates
Choose the dates you want to restrict the sessions to and click save
You will see a toggle button underneath the dates you just configured. Toggle this on to make these dates a scheduling requirement
To add this Label to a session:
Navigate to
Agenda Planning
>
Sessions
Select the sessions you wish to add this label to using the tick box
on the left-hand side
Scroll to the bottom of the page to the ‘Actions’ drop-down and choose ‘Add Labels’
Select the relevant label(s) and click save
The sessions will now be required to be scheduled on the selected dates!
How do I use Scheduling Windows to allow my submitters to request a particular time of day?
How do I configure the running order of a group of sessions?
If you have a group of sessions that you need to ensure run in the right order then you can use Scheduling Rules to configure this. This can be useful when, say, you have a workshop that follows an introductory presentation.
Browse to one of the sessions and in the ‘Scheduling Rules’ section, click
. You can then choose the relationship to another session. For example, if this session needs to run before another one then choose ‘Before’ and the name of the other session and click
You can also set rules to ensure that sessions start after another one, at the same time as, or run immediately before or after another session.
Info
Scheduling Rules are especially beneficial when there are multiple people working on an Agenda to ensure that a session does not get accidentally moved to an incorrect slot.
Scheduling & Locations
How do I ensure a session takes place in a specific Location or Locations?
Sometimes you want to ensure that a session takes place in a specific Location such as a stage, or group of Locations, such as online conference rooms.
There are two ways to configure this in Lineup Ninja, depending on whether you want to configure this for just one or two sessions, or for a larger number of sessions.
I have a large number of sessions I want to ensure take place in a Location
If you have a group of sessions that needs to take place on in a specific Location or group of Locations, this can be managed with Labels. A Label can be used to enforce scheduling to specific locations, you then apply that label to the sessions you need to ensure are scheduled on that date.
To create a new Label, follow these steps:
Navigate to
Event Settings
>
Labels
Click
to add a new label and name it whatever makes sense for your event
Click into the label and click
on the ‘Locations’ row to edit the dates
Choose the dates you want to restrict the sessions to and click save
You will see a toggle button underneath the dates you just configured. Toggle this on to make these dates a scheduling requirement
To add this Label to a session:
Navigate to
Agenda Planning
>
Sessions
Select the sessions you wish to add this label to using the tick box on the left-hand side
Scroll to the bottom of the page to the ‘Actions’ drop-down and choose ‘Add Labels’
Select the relevant label and click save
The sessions will now be required to be scheduled in the selected locations!
I have just one or two sessions that I want to ensure take place in a Location
To ensure a session takes place in a Location set a ‘Scheduling Rule’ for that session.
Navigate into the session
Click
in the ‘Scheduling Rules’ section
Choose ‘In Location’, name the location and click save
Tip
If you have multiple locations that the session can run in then you can add multiple rules.
How do I ensure a session does NOT take place in a Location?
To ensure a session does not take place in a Location set a ‘Scheduling Rule’ for that session.
Navigate into the session
Click
in the ‘Scheduling Rules’ section
Choose ‘Not In Location’, name the location and click save
How do I ensure that sessions take place in the same Location as each other?
Sometimes you want to ensure that two or more sessions take place in the same Location as each other, but you’re not actually concerned about which specific Location that is, only that the end up in the same one.
Navigate into the session
Click
in the ‘Scheduling Rules’ section
Choose ‘Location With’, name the other session(s) and click save
How do I keep sessions on the same track/theme in the same Location or group of Locations?
You may want to keep sessions on the same theme in the same Location. This can make it easier for attendees who are interested in a particular topic as they won’t have to move around from one session to the next.
Lineup Ninja calls themes or topics, Tracks. When you assign a Track to a session it will then need to be scheduled in a Location that has the same Track assigned to it. If you plan a session in a Location that does not have the Track of the session assigned to it, you will see a scheduling error. You can fix this by either adding the track to the location, moving the session to a different location, or editing that session to change or remove the Track.
How do I ensure the Location is large enough for the session?
Ensuring a Location is large enough is a combination of two things:
If the Location has a larger, or equal, capacity compared to the session then the session will be planned successfully. If it is smaller then you will see a scheduling error.
How do I ensure the Location has the right Resources to deliver a session?
For a successful session to be delivered the right equipment must be available for the presenter. Lineup Ninja uses Resource to track these requirements. When you assign a resource to a session then it can only be scheduled in a location that has the same resource assigned to it. If you plan a session in a location that does not have a resource that a session requires then you will see a scheduling error. You can fix this by either making the resource available in the location, moving the session to a different location, or editing that session to remove the resource from the session.
Still can’t find what you’re looking for? Submit your question here and one of the team will get back to you as soon as possible.
Scheduling Windows
What are Scheduling Windows?
Scheduling Windows are a way to specify that a session, or group of sessions, must take place within a particular set of times.
When you plan your agenda our algorithm checks that sessions have been planned into a valid Window, and can use your Windows to auto-schedule your event.
Here are some of the ways that out clients have used Scheduling Windows to help plan their programmes:
Requiring sponsored sessions take place in the early afternoon
Allowing submitters to request a morning, lunchtime, or afternoon session when they submit their content
Ensuring that a particular session takes place at noon, but on any day and in any location
Keeping workshops scheduled in the breakout room, and only after lunch
Preventing ‘sales pitch’ sessions from being scheduled during the peak morning and afternoon periods
What can Scheduling Windows be applied to?
Scheduling Windows can be applied to either a specific Session, a Label or a Track.
For example, for these Scheduling Windows:
Monday 09:00 > 10:00 in ‘Main Hall’
Tuesday 11:00 > 12:00 in any location
How do I create a Scheduling Window?
Navigate into the Label or Session you wish to add a Scheduling Window to
Scroll to ‘Scheduling Windows’ and click
Complete the following details:
Date - Choose the date you want the Window to appear in. Windows cannot span multiple dates
Start Time - Choose what time the window start
End Time - This is an optional field. If you choose a value, it restricts the size of the Window to the time you have requested. If you leave it blank the Window will automatically fit the length of the session. For example, if the Window starts at 09:00 and has no end time, then any session can be scheduled at 09:00 regardless of how long it is, but no later than 09:00.
Location - You can restrict a Window to a particular Location, or leave it open for the Scheduling Window to apply to all Locations.
Require sessions with this label to be scheduled in one of these slots
Block sessions without this label from being scheduled in one of these slots
Can a Scheduling Window span multiple locations?
If you don’t specify a Location for a Window then it will automatically span all Locations. If you want a Scheduling Window that spans a few Locations then add multiple Windows, one for each Location. The session will then be scheduled in one of those Windows.
How do I use Scheduling Windows to reserve ‘VIP’ or ‘Premium’ slots?
Add a Scheduling Window that describes your best slots
Toggle on the option to ‘Require sessions with this label to be scheduled in one of these slots’ and toggle on the option to ‘Block sessions without this label from being scheduled in one of these slots’
Add the Label to the relevant sessions and the agenda planner will ensure these sessions are scheduled in your best times
How do I use Scheduling Windows to allow my submitters to request a particular time of day?
Scheduling Windows can be useful for submitters to indicate their best availability for the session.
Create a Label for each time period you want to offer. For example, you could create an ‘Early’ Label with the Scheduling Window of 09:00 - 11:00 on each day of the event. If you want speakers to be able to choose the entire day, then also create a label that represents the entire day
Toggle on the option to ‘Require sessions with this label to be scheduled in one of these slots’ and toggle on the option to ‘Block sessions without this label from being scheduled in one of these slots’ when creating the Scheduling Rule for the Label
Add the ‘Labels’ question to a ‘Session Details’ section of your Submission Flow
Set it to ‘Choose One’ and toggle the visibility of the labels to show your time period labels
The sessions will now automatically have the labels assigned to them when you create the sessions from the submissions and the label will ensure the session gets scheduled in a time that suits the speaker
Note
It is important to select ‘Choose One’ because a session with multiple Labels is required to fit a Window for each Label. If you have a ‘Morning’ and ‘Afternoon’ label there may be no overlap between the two.
Still can’t find what you’re looking for? Submit your question here and one of the team will get back to you as soon as possible.
Locations
What are Locations?
In Lineup Ninja, Locations are the places where sessions take place. These are otherwise known as stages, rooms, theatres, conference halls, areas, venues and virtual spaces.
For more information about Locations & Scheduling, please follow this link.
How do I create and manage Locations?
Navigate to
Agenda Planning
>
Locations
to bring up the Locations list view
To create a new location, click
on the right-hand side of the screen
Enter a name for the location
You can optionally add a capacity to the Location at this time
If you have configured
Tracks
,
Resources
or
Labels
, you can associate them with the Location now, by choosing them from a drop-down list in the relevant column
Click
to save the Location
Once you have created your location, you can navigate into the Location by clicking the name to configure additional settings and upload various files associated with the Location (including sponsor images that you may need in the Agenda App or Digital Signage)
How do I change Locations’ availability?
When Locations are created, they take their availability from the event’s opening times. You can edit this in a couple of ways.
To change a single location’s availability:
Navigate to
Agenda Planning
>
Locations
to bring up the Locations list view
Click into the Location you wish to edit
Scroll to ‘Location’s Timeline’ where there is a blue stripe that represents the availability of the Location
You can adjust the availability of the location by using
to drag the ends of the blue stripe up and down
To change multiple locations’ availability at the same time:
Navigate to
Agenda Planning
>
Locations
to bring up the Locations list view
Select the relevant locations using the tick boxes on the left-hand side and scroll to the ‘Actions’ drop-down at the bottom of the list
Select ‘Make locations available’
A pop-up will appear asking you to choose the date and times you wish to make the Locations available
How do I add a break to a location?
Navigate to
Agenda Planning
>
Locations
to bring up the Locations list view
Click into the Location you wish to edit
Scroll to ‘Location’s Timeline’ where there is a blue stripe that represents the availability of the Location
Click
to add a second blue availability window and adjust to the available times of the location. They grey area indicates the break
Tip
To delete, merge one stripe with another blue stipe.
How do I set/change a Location’s capacity?
Navigate to
Agenda Planning
>
Locations
to bring up the Locations list view
Click
next to the Location you wish to change
Enter the Location’s capacity in the capacity column
How do I make Resources available in a Location?
You can manage the Resources that a Location has in two ways.
From the list of Locations:
Navigate to
Agenda Planning
>
Locations
to bring up the Locations list view
Click into the Location you wish to edit
Click
next to ‘Resources’ and add the Resources associated with that Location
From the list of Resources:
Navigate to
Agenda Planning
>
Resources
to bring up the Locations list view
Click into the Resources you wish add Locations to
Click
next to ‘Locations’ and add the Locations associated with that Resource
How do I add Locations to Labels, Tracks and Resources in bulk?
Navigate to Agenda Planning and to the type of item you wish to add the Location to. This will bring us the respective list view
Tick the items you wish to add the Location to
Scroll to the bottom of the list, open the drop-down Action menu and click ‘Add Locations’
How do I set which tracks are running in a location?
You can manage the Tracks that are associated with a Location in two ways.
From the list of Locations:
Navigate to
Agenda Planning
>
Locations
to bring up the Locations list view
Click into the Location you wish to edit
Click
next to ‘Tracks’ and add the Tracks associated with that Location
From the list of Tracks:
Navigate to
Agenda Planning
>
Tracks
to bring up the Locations list view
Click into the Tracks you wish to add Locations to
Click
next to ‘Locations’ and add the Locations associated with that Track
Still can’t find what you’re looking for? Email support@lineupninja.com and one of the team will get back to you as soon as possible.
Speakers
What are Speakers?
In Lineup Ninja, we use the term ‘speaker’ to mean anyone delivering a session. This can includes presenters, chairs, panelists, moderators, keynote speakers, emcees etc.
For an overview of Speakers in Lineup Ninja, we recommend watching the short video below.
Where do my Speakers’ details come from?
Depending on how you configured your content collection, your speakers’ details can come from one of several places
How do I add Speakers to my agenda from Submission Flows?
For any speaker data collected via Submission Flows, you will need to update speaker/session from the Submission Flow portion of LN.
Individually:
Navigate into the relevant
Submission Flows
and into
Submissions
list
Click into the submission you wish to create/update
You will see a blue button labeled ‘Create Session / Speakers’ if the speaker/session has not already been created or ‘Update Session / Speakers’ if it has already been created
In bulk:
Navigate into the relevant
Submission Flows
and into
Submissions
list
Select the submissions you wish to create/update using the tick-box on the left hand side
Scroll to the ‘Actions’ drop down menu
Select either ‘Create Session / Speakers’ if the speaker/session has not already been created or ‘Update Session / Speakers’ if it has already been created
Tip
Creating/ updating Speakers/Sessions can be automated within the Submission Flow. This is useful if you do not need to review the submitted details (for example, additional speaker details). For more information, follow this link.
How do I add Speakers to my agenda from the Speaker Portal?
For more information on inviting Speakers via Speaker Portal, please follow this link.
How do I manually add Speakers?
Navigate into
Agenda Planning
>
Speakers
To create a new Speaker, click
on the bottom right-hand side of the screen/list
Enter the Speaker’s first & last name. You can optionally add their email address and company
If you have configured the Sessions, you can optionally associate the speaker with them
Note
We recommend that you add speakers’ email addresses as you may need to send them automated confirmation emails later.
How do I change a Speaker’s availability?
Navigate into
Agenda Planning
>
Speakers
Click into the Speaker you wish to edit
Scroll to ‘Speaker’s Timeline’ where you will see a blue stripe that represents the availability of the Speaker
You can adjust the availability of the Speaker by using
to drag the ends of the blue stripe up and down
If you have asked an availability question on a Submission Flow, the blue stripe will vary depending on the answer
Here you can also see all sessions that the Speaker is taking part in
How do I ensure that a Speaker doesn’t get scheduled in two places at once?
Lineup Ninja takes care of this for you!
Can I change what details I see in the list view for Speakers?
Yes! Click
in the top right-hand corner of the list view.
How do I keep notes for internal use about a Speaker?
Navigate into
Agenda Planning
>
Speakers
Click on the Speaker’s name
In the Speaker Details view there is a ‘Notes’ field
How do I copy Speakers?
For more information about copying Speakers, follow this link.
How can I print or save a PDF of an individual Speaker’s timetable/schedule?
For more information about saving a PDF/ printing a Speaker’s individual timetable/schedule, please follow this link.
Still can’t find what you’re looking for? Email support@lineupninja.com and one of the team will get back to you as soon as possible.
Subsections of Speakers
Speaker Roles
What are Speaker Roles?
Speakers may have different roles in sessions. For example you might have panel sessions consisting of a Chair and some Panelists, plus a Moderator to run the Question & Answer process. You may also have sessions with a solo Presenter.
Speakers may be involved in multiple sessions, and have different roles in those sessions. For example a speaker may be a Chair in one session, a Panelist in another, and a Presenter in a third.
Lineup Ninja allows you to define your own speaker roles, as well as the order in which those roles are listed in sessions.
Tip
For scientific conferences, you can use Speaker Roles to indicate Author, Co-author etc.
Note
There isn’t a standard view of speaker roles between event tech vendors.
If you plan to integrate Lineup Ninja with a mobile app or website provider, (and want to publish speaker roles), it’s worth checking which roles they support, and perhaps whether they support custom speaker roles.
How do I create Speaker Roles?
Navigate to
Agenda Planning
>
Speakers
Scroll to the ‘Speaker Roles’ section at the bottom of the page
Click
to add a new role
You can then reorder the roles which will change the order the speakers are show in your Agenda
How do I assign speaker roles?
Navigate to
Agenda Planning
>
Speakers
Click
next to the Speaker you wish to assign a role to
In the Session column, use the drop-down menu under the relevant session to choose a Role
Tip
You can also do this by editing the Session in the Session List view.
How do I filter all speakers by role?
Navigate to
Speakers
Click the ‘Session’
and select the roles you want to filter by
Note
If there are no speakers with a specific role, the role will not show in the filter.
How do Roles affect Speaker Ordering?
You can choose the order the roles will be shown. For example, you may wish to show ‘Chair’ before the ‘Panelists’.
Navigate to
Speakers
and scroll down to ‘Speaker Roles’ at the bottom of the page. You can drag Speaker Roles up and down to change the order.
For more information about Speaker Ordering, please follow this link.
How do I indicate some roles will not be involved in the presentation of sessions?
By default, all speakers associated with a session are required to be available for the session to be marked green on the agenda planning board.
This means that:
The speaker is not also speaking on another session at the same time (including the ‘Changeover time’ for both sessions). This ensures they are not doubled booked
The speaker is available to be at the event as that time
You may have roles where you don’t require this check. For example you might have a role where the speaker is not actually involved in the presentation, such as a co-author, or nominator.
To turn off the availability check navigate to
Agenda Planning
>
Speakers
and scroll to ‘Roles’.
You will then see this column, and can toggle the option on/off for each role.
How do I exclude some roles from requiring the Speaker to confirm?
If Speaker Confirmation is enabled, then by default, speakers with all roles will need to be confirmed in order for the session to turn green on the agenda planner.
However, you might have some roles that will not be presenting, or don’t need to be confirmed for every session. For example, roles like ‘Co-Author’. In such cases, you can configure the role to not require confirmation.
Navigate to
Agenda Planning
>
Speakers
and scroll to ‘Roles’.
You will then see this column, and can toggle the option on/off for each role.
Speaker Roles will only be shown in the Lineup Ninja Agenda App. They are not currently available in any of the integrations.
Speaker Roles & Submission Flows
How do I ask for Speaker Roles in my Submission Flows?
Once you have created a Submission Flow, navigate to
Form Designer
Add this question:
If, for example, you want your Submitters to create at least one Chair and two Panelists, you can enforce this by configuring the question. You can also hide roles from the submitter, in this example the ‘Moderator’ role is hidden.
Can I ask additional questions for specific roles?
Yes, you can do this with display rules. For example, when the submitter is adding their Chair you can ask them what prior experience they have of chairing sessions. To show that question to the Chair and not the Panelist’s you can add a ‘Display Rule’ like so:
Still can’t find what you’re looking for? Email support@lineupninja.com and one of the team will get back to you as soon as possible.
Speaker Tasks
Lineup Ninja allows you to create tasks for speakers to complete.
Lineup Ninja gives you both “Speaker Tasks” and “Session Tasks”. The difference between them is subtle, but important.
Speaker Tasks are used for gathering information about speakers - e.g. speaker profiles (headshots, biographies etc), speaker agreements, travel and hotel booking info etc.
Session Tasks are used for gathering information about sessions, such as slide decks and handouts.
It might be tempting to think “I need to ask the speakers for their slides, so I’ll create a Speaker Task for it”.
However, if any of your speakers are delivering two or more sessions, and need to provide different slides for each session, you’ll run into problems if you use a Speaker Task, because they’ll only be able to upload one slide deck, and those slides will not be linked to the session.
Note
You can also use fully-blown Submission Flows to collect this kind of data.
However, Speaker tasks (and Session Tasks) are quicker and simpler to set up, and they provide different tracking tools that allow you to see their status from within the Agenda half of Lineup Ninja.
You might choose to use a Submission Flow if you want submitters to provide speaker details AND session details on a single form.
How do I ask speakers to provide their profile information?
You can collect speakers’ information in several ways:
Using the ‘Speaker Details’ Task template. This is recommended for B2B and producer-led conferences where you just want speakers’ details - and not session details.
As part of a ‘Submission Flow’. Recommended if you’re running a call for sessions/abstracts/papers and you want to collect speakers’ (or authors’) details at the same time as their session/abstract/paper submissions.
Manually adding the information yourself via the admin interface. It is common for producers to do this for VIP speakers who you don’t expect to interact with the platform directly.
Via the My Profile Section on the Home Page of the Content Portal. This is a ‘quick and dirty method’. We recommend that you only use this to let speakers double-check their profile info after it’s been added via one of the above methods.
How do I ask speakers to complete a Speaker Agreement?
You have a couple of options here.
Recommended: Use the Speaker Agreement Task template. This is designed specifically for this purpose. You can adapt the template to your specific needs. Using a speaker task for this allows you to track the speakers’ progress with this task from within the Speaker list.
Alternative: Use the Speaker Confirmation tool. This way, you can advise speakers of the times of their sessions and ask them to confirm:
that they have seen their session times, AND
that they accept the speaker agreement
…at the same time.
How do I ask speakers to provide their hotel requirements?
We recommend that you use Lineup Ninja’s Hotel Requirements Speaker Task template for this.
How do I edit a question in a Speaker Task?
To edit an existing question in a Speaker Task, hover over the question, and then click on the blue pencil button. This will open the question for editing:
When you’ve made your changes, click the green ‘check’ button
to save your changes, or the ‘circular arrow’ button to cancel your changes.
Warning
IMPORTANT: You MUST use Standard questions for their intended purpose.
Questions on the form are mapped to specific fields in the database.
You can edit the question text, but DO NOT use them to store fields other than the one it is mapped to.
Why?
Lineup Ninja expects each field to have the relevant data in the right place. For example, the speaker’s first name should be stored in the first name field, their job title should be in the job title field etc.
When you publish your agenda to your Agenda app, 3rd party show websites, mobile apps, digital signage, marketing platforms etc. Lineup Ninja will send the values in these fields to the corresponding fields in the other systems.
If you edited the ‘First Name’ question to say “Dietary requirements”, you’d end up with speakers on your website called “Vegan Johnson” or “Gluten-free Smith” etc.
DO NOT CHANGE THE QUESTIONs TO SOMETHING OTHER THAN THEIR INTENDED PURPOSES.
If you need to ask a question for a field that is not on the form, add a Custom Question and map it to a new Custom Field.
How do I add a Standard Question to a Speaker Task?
In this example, we’ll use the Speaker Details Task template, but the principle works for any speaker task:
Navigate to your Speaker Task’s Configuration: Agenda Planning / Speakers / Speaker Tasks / Speaker Details / Configuration
Hover your mouse over the form to show the “Add Questions” button:
Click the “Add Questions” button. This will bring up the list of standard questions:
Warning
IMPORTANT: You MUST use Standard questions for their intended purpose.
For example, if you want to capture the speaker’s biography, USE THE BIOGRAPHY QUESTION for it.
Why? Because these questions are mapped to corresponding fields in the database, and the answers to these questions will eventually be published on your event website.
If you use the ‘First Name’ question to ask for Dietary requirements, your event website will end up with speakers called things like “Vegan Johnson” and “Gluten-free Smith”.
You are not able to change this later.
You’ve been warned!
Find the question you want to add, and click the blue ‘plus’ button. This will add that question to the bottom of your Task’s form, and open that question for editing.
Here, we’ve chosen to add the Phone Number question to our Speaker Details task:
Make any changes to the question that you want to make, and click the green ‘check’ button
to save your changes, and you’re done!
How do I add a Custom Question to a Speaker Task?
In this example, we’ll use the Speaker Details Task template, but the principle works for any speaker task:
Navigate to your Speaker Task’s Configuration: Agenda Planning / Speakers / Speaker Tasks / Speaker Details / Configuration
Hover your mouse over the form to show the “Add Questions” button:
Click the “Add Questions” button. This will bring up the list of standard questions:
Scroll down to the bottom of this list, and you will find the “Add Custom Question” button.
Warning
IMPORTANT: Only create a custom question if you are sure there isn’t already a standard question for the data that you want to capture.
For example, if you want to capture the speaker’s LinkedIn URL, USE THE LinkedIn QUESTION for it.
Why? Because these questions are mapped to corresponding fields in the database, and the answers to these questions will eventually be published on your event website, mobile app, signage etc.
If you use the ‘First Name’ question to ask for Dietary requirements, your event website will end up with speakers called things like “Vegan Johnson” and “Gluten-free Smith”.
You are not able to change this later.
You’ve been warned!
Click on the ‘Add Custom Question’ button. This will add the new custom question to the form and open it for editing:
You can now choose which type of question this should be:
Once you’ve chosen a question type, you will need to map this to an existing Custom Field, or create a new one to store the answers:
Once you have mapped (or created) a Custom Field to store your new question’s answers, you can edit the other settings, such as:
The question text,
Help text
Whether it is optional or mandatory,
Character limits
Question visibility in different Task Stages
Make any changes to the question that you want to make, and click the green ‘check’ button
to save your changes, and you’re done!
How do I delete a question from a Speaker Task?
Open the question you want to delete for editing (like this).
In the bottom-right corner of the question you will find the delete button, which has a ’trash can’ icon:
You will be prompted to confirm that you want to delete the question:
How do I edit the buttons at the bottom of the form in a Speaker Task?
Editing buttons can happen in two ways: basic editing and advanced editing.
1. To edit a button in basic editing mode:
Go to the Speaker Task’s Configuration page and scroll down to the bottom of the form.
Hover your mouse over a button to reveal the edit button
,
Click the edit button. This will bring up the basic button editing popup:
Click the pencil icon. This will allow you to edit the wording on the button and the button’s color.
Make your changes and click the green ‘check’ button
to save your changes, or the circular arrow button to discard your changes.
Now click the ‘OK’ button to close the popup:
2. To edit a button in advanced editing mode:
Go to the Speaker Task’s Configuration page and scroll down to the bottom of the form.
Switch on the “Show advanced editing options” toggle on:
Hover your mouse over a button to reveal the edit button
:
Click the edit button. This will bring up the advanced button editing popup:
Here you have various options:
Like the basic editing mode, you can change the button text and color.
You can also toggle whether the form should have valid answers in order for the user to click the button. This is useful if you want to make sure speakers have completed all mandatory fields before they can press the button.
You can change what happens when the button is pressed:
Make your changes and click the ‘OK’ button to save your changes.
How do I add a button to the bottom of the form in a Speaker Task?
Go to the Speaker Task’s Configuration page and scroll down to the bottom of the form.
Switch on the “Show advanced editing options” toggle on:
Now hover your mouse over the area around the buttons at the bottom of the form. This will reveal the Reposition, Delete, Add New Element and Edit buttons:
Click the blue plus button
, and you’ll be given the option to add either a new button, or some text:
Click on “+ button”. This will create a new button, which you can edit in the usual way:
How do I add a confirmation popup to the buttons at the bottom of the form in a speaker task?
ANSWER COMING SOON!
How do I edit email templates for a Speaker Task?
Go to the Speaker Task’s Configuration page and scroll down to the bottom of the page. Here you will find the email templates for the task:
Note
Each Task Stage has its own email templates, because you will want to send Task Owners different messages at different stages of the process.
To edit the existing template, click the pencil icon at the end of the row:
How do I add email templates for a Speaker Task?
Go to the Speaker Task’s Configuration page and scroll down to the bottom of the page. Here you will find the email templates for the task:
Note
Each Task Stage has its own email templates, because you will want to send Task Owners different messages at different stages of the process.
To add a new template, click the pencil icon at the end of the row:
How do I create deadline reminder emails for my Speaker Tasks?
ANSWER COMING SOON!
How do I copy a Speaker Task?
Go to Agenda Planning / Speakers / Speaker Tasks
Here you will see a table with a list of your existing Speaker Tasks.
At the end of each Task’s row is a ‘copy’ icon
:
Click this icon. It will bring up a dialogue box asking for the name of your new Task:
Give the new task a name and click the Green “Copy” button. You will now have a copy of the original Speaker Task.
How do I delete a Speaker Task?
Go to the Speaker Task’s Configuration page and scroll down to the very bottom of the page. Here you will find the “Delete Tasks and Configuration” button:
Warning
This will delete the task configuration and all the data associated with it.
If you’ve assigned the task to Task Owners and they’ve submitted responses, all of those responses will be deleted as well.
You will be prompted to confirm that you DEFINITELY want to delete the task by typing its name in a form and clicking another delete button:
How do I assign Speaker Tasks?
You can assign Speaker Tasks to Task Owners (usually the speaker themselves, but they can be other people) in a couple of ways:
Individually
In bulk (i.e. several at the same time)
Go to / Agenda Planning / Speakers
Here you’ll see the list of your speakers, and (once you’ve set up some tasks) a column for each task.
In each task’s column is a ‘status button’ which shows you the status of that task for each speaker.
If you hover over the ‘Needs assigning’ button, it reveals an information popup. This popup tells you why the task needs to be performed for this speaker, and who the task will be assigned to (i.e. who will be the Task Owner) when you click the button.
To assign a task to an individual speaker, click the orange ‘Needs assigning’ button in that speaker’s row.
To assign a task in bulk (i.e. to assign the task to several speakers at the same time):
select all of the speakers who you want to assign the task to.
Scroll down to the ‘Actions’ drop-down menu at the bottom of the page
Click on ‘Assign Task For <Task Name>’:
Next you will see the email template that is associated with the Task’s “Requested” stage. If you like, you can edit it for this instance of sending:
Click ‘Send to Task Owner’ to send them the email.
You can also opt to NOT send the email to Task Owners if you wish, by clicking ‘Skip sending’.**
**In both cases, the task will be created and assigned to the Task Owner, which will make it visible to them in the ‘My Tasks’ section of the content portal.
Once the task has been assigned, the button in the Task’s colum in the speaker list will change to say ‘Requested’. If you hover over the button, you will see who the Task has been assigned to. In this example, it is simply the speaker themselves:
How do I manage/track Speaker Tasks?
You can track the status of speaker tasks and manage them in a couple of places: the Speaker list and the Task’s page.
The speaker list shows the list of all speakers, with a column for each task. This gives you a good overview of every speaker’s tasks’ status. You can also click these buttons to either assign the tasks or, once the task has been assigned, see the details of that task:
You can see more detail of a specific task by navigating to that task’s home page at: /agenda Planning / Speakers / Speaker Tasks / <task name>
Here you can filter tasks by stage, search for speakers, Task Owners, sort by Updated time, and perform a wide range of actions on tasks.
ZIP Reports - export any attached files to zip archives
JSON report - export your data in a machine-readable format
Subsections of Speaker Tasks
Speaker Details Task
How do I Use the Speaker Details Task to Collect Speakers’ Profile Information?
Here’s a step-by-step guide to creating and configuring the Speaker Details Speaker Task:
Go to your event, and then: Agenda Planning / Speakers / Speaker Tasks
Click the “Create Speaker Details Task” button:
Accept or edit the task name, and optionally, provide a deadline for it:
Choose which fields you want to capture from your speakers:
Next you will be asked if you want to review the content before adding it to the Speaker’s record on the agenda.
Answering “Yes, I want to run a review process and then choose which content to add to the speaker record.” will NOT automatically update the speaker’s record on the agenda with their answers. Instead, you will be able to manually update Speaker’s records from the Task data when you’ve reviewed it and are happy with it.
Answering “No, I’m not running a review process and want the content to be added to the speaker record automatically.” will mean that when speakers fill the form in, their Speaker record on the agenda will be updated automatically and immediately.
Warning
If you answer ‘No’ to this question, speakers can directly update their Speaker Record on the agenda - i.e. you are effectively allowing them to edit data that will be published to the show website, mobile app, signage etc.
If you have ‘Scheduled Publishing’ enabled on any of your publications (website, mobile app etc), it is possible that speakers’ changes will be automatically published without anyone from the content team reviewing this content.
If you choose ‘Yes, I want to run a review process…’ to the question in step 5, you will see this question:
This allows you to choose whether to add another Stage to your Speaker Details Task to capture the final version of speakers’ details - or not.
And if you DO choose to add a ‘Final Version Requested’ stage to your task, you can choose whether that final version of their details should automatically update the Speaker’s Record on the agenda, or not.
Tip
This can be useful in a couple of situations:
1. If you want speakers to provide a draft - or limited - version of their speaker profile (e.g. name, job title, and headshot) early in your process so you can use it to promote the content at your show, and then collect more details (e.g. full biography) closer to the show.
2. If you want to review speakers’ profiles and ask them to make changes based on your feedback, like “Your headshot is blurry and you biography reads like War and Peace. Please change it!”
How do you want the form to behave when speakers submit their details?
Would you like to:
lock the form (useful if you’re keen to maintain some editorial control) or
leave it open (useful if you want to allow speakers to make last minute changes in the run-up to the event?
Make your choice and click ‘Save’ to create the task.
You will now be taken to the Speaker Details Tasks Configuration Page, which will have the Task Configuration Dialogue pop-up already open:
The Task Configuration Dialogue pop-up allows you to check (and change) some of the settings you’ve just chosen, and is where you can make some other important configuration choices.
Two important settings that you should review here are:
Which speakers need this task? This allows you to filter which speakers need this task to be performed.
Tip
This is useful if you have different sets of speakers, and you want to collect different details about them.
For example, let’s say you have four speaker roles: - ‘Chair’ - ‘Panelist’ - ‘Speaker’ - ‘VIP Keynote’
You want to collect speaker details for your Chairs, Panelists and Speakers, but you’ll get the details from the VIP Keynotes’ personal assistants and add them to the system manually.
You can do this by choosing “Chair, Panelist and Speaker” from the drop-down menu for the field “Roles: Only include speakers with these roles”.
Then when you assign the task, it won’t create tasks for your VIP Keynote speakers.
Who should perform this task? This allows you to decide who the Task Owners will be. You can set rules to automatically assign this task to the relevant people.
Tip
Often the task owner will simply be the speaker, but sometimes it may be someone else, eg. a panel chair might supply the details of all of their panelists.
You can also create fallback rules, for what should happen in the event that the first rule won’t work
Finally, you can add deadlines to each stage, and even reorder the stages in your task in the Task Configuration Dialogue pop-up if you need to:
Once you’ve reviewed these settings, click the blue ‘Save’ button. This will close the Task Configuration Dialogue pop-up.
You will now see the Speaker Details Task Configuration ‘Main View’.
This view has various other elements that you can preview and configure:
The task’s stages
The task’s behaviour before and after its deadline
“Your Task” i.e. the form that the task owner will fill in. Note that the form has the questions that correspond to the choices you made in Step 4, above - “Choose which fields you want to capture from your speakers”:
If you hover over the form ‘section’ (i.e. where it says ‘Speaker Details’), it will reveal various action buttons which allow you to:
Add questions,
Edit the section name
Delete the section entirely
Hovering over a question reveals options to edit and reposition it:
Details
NOTE: Speaker Tasks can only have one section.
Now you’ve set up the task, see the Speaker Tasks page for details of how to:
How do I use the Speaker Agreement Task to ask speaker to accept the Speaker Agreement?
Here’s a step-by-step guide to setting up the Speaker Agreement Task.
Go to your event, and then: Agenda Planning / Speakers / Speaker Tasks
Click the “Create Speaker Agreement Task” button:
Accept or edit the task name and, optionally, provide a deadline for it:
Provide a link to your speaker agreement document:
Info
The Speaker Agreement Task expects your speaker agreement to be a document that is stored on some shared space like Sharepoint, Google Drive, Dropbox etc.
The new Speaker Agreement Task wizard is asking for the link to that shared file.
This link will be embedded in the form that is created for the task, so speakers can click the link, download and read the document, and then check a box on the form to accept the agreement.
It is possible to approach this differently. See the FAQ: “I don’t want to use a separate Speaker Agreement Document. I just want to write the agreement text on a form and ask them to accept it. What should I do?” further down this page.
Click the green ‘Save’ button to create the task.
You will now be taken to the Speaker Agreement Tasks Configuration Page, which will have the Task Configuration Dialogue pop-up already open:
The Task Configuration Dialogue pop-up allows you to check (and change) some of the settings you’ve just chosen, and is where you can make some other important configuration choices.
Two important settings that you should review here are:
Which speakers need this task? This allows you to filter which speakers need this task to be performed.
Who should perform this task? This allows you to decide who the Task Owners will be. You can set rules to automatically assign this task to the relevant people.
Tip
Normally this should be the speaker themselves, as they are usually the only person who is legally authorised to accept an agreement.
In some situations it may not be practical to get the speaker to complete the task: e.g. with VIPs, in which case the task owner may be their personal assistant.
Also in the Task Configuration Dialogue pop-up, you can add deadlines to each stage, and even reorder them if you need to (unlikely for a task with only two stages!):
Once you’ve reviewed these settings, click the blue ‘Save’ button. This will close the Task Configuration Dialogue pop-up.
You will now see the Speaker Details Task Configuration ‘Main View’.
This view has various other elements that you can preview and configure:
The task’s stages
The task’s behaviour before and after its deadline
Why is it asking me: “What is the link to your Speaker Agreement?”
The Speaker Agreement Task expects the actual speaker agreement that you will ask your speakers to read and agree to, to be a document that is stored on some shared space like Sharepoint, Google Drive, Dropbox etc.
The new Speaker Agreement Wizard is asking for the link to that shared file. This link will be embedded in the form that is created for the task. You can edit link - and the text above the form - once the task has been created.
I don’t have a Speaker Agreement Document. What should I do?
Create one! Here’s a post on our blog to help you get started. It includes links to various templates that you can download and adapt for your own events.
I don’t want to use a separate Speaker Agreement Document. I just want to write the agreement text on the form and ask them to accept it. What should I do?
When you set up the task, just put any old link in. You can delete the link later and edit the text to include all of your Speaker Agreement text.
Hotel Requirements Task
How do I use the Hotel Requirements Task to ask speakers to provide their accommodation requirements?
Lineup Ninja provides a Speaker Task template for this. Here’s a step-by-step guide to setting it up.
Go to your event, and then: Agenda Planning / Speakers / Speaker Tasks
Click the “Hotel Requirements Task” button:
Accept or edit the task name, and optionally, provide a deadline for it:
Next you will be asked if you want to review speakers’ answers before adding them to the Speakers’ records on the agenda:
Answering “Yes, I want to run a review process and then choose which content to add to the speaker record.” will NOT automatically update the speaker’s record on the agenda with their answers. Instead, you will be able to manually update Speaker’s records from the Task data when you’ve reviewed it and are happy with it.
Answering “No, I’m not running a review process and want the content to be added to the speaker record automatically.” will mean that when speakers fill the form in, their Speaker record on the agenda will be updated automatically and immediately.
If you choose ‘Yes, I want to run a review process…’ to the question in step 4, you will see this question:
This allows you to choose whether to add another Stage to your Speaker Details Task to capture updated hotel requirements - or not.
And if you DO choose to add a ‘Final Version Requested’ stage to your task, you can choose whether that final version of their details should automatically update the Speaker’s Record on the agenda, or not.
If you chose ‘Yes’ in step 4, and again in step 5, how do you want the form to behave when speakers submit their updated hotel requirements?
Would you like to:
lock the form (useful if you’re keen to maintain some control over the process) or
leave it open (useful if you want to allow speakers to make last minute changes in the run-up to the event)?
Make your choice and click ‘Save’ to create the task.
You will now be taken to the Hotel Requirements Task’s Configuration Page, which will have the Task Configuration Dialogue pop-up already open:
The Task Configuration Dialogue pop-up allows you to check (and change) some of the settings you’ve just chosen, and is where you can make some other important configuration choices.
Two important settings that you should review here are:
Which speakers need this task? This allows you to filter which speakers need this task to be performed.
Tip
This is useful if you have different sets of speakers, and you are only offering hotel accommodation to some of them.
For example, let’s say you have four speaker roles: - ‘Chair’ - ‘Panelist’ - ‘Speaker’ - ‘VIP Keynote’
And you’re only offering hotel accommodation for your VIP keynote speakers.
You can do this by choosing “VIP Speaker” from the drop-down menu for the field “Roles: Only include speakers with these roles”.
Then when you assign the task, it will only create tasks for your VIP Keynote speakers, and nobody else.
Who should perform this task? This allows you to decide who the Task Owners will be. You can set rules to automatically assign this task to the relevant people. You can also create fallback rules, for what should happen in the event that the first rule won’t work:
Finally, you can add deadlines to each stage, and even reorder the stages in your task in the Task Configuration Dialogue pop-up if you need to:
Once you’ve reviewed these settings, click the blue ‘Save’ button. This will close the Task Configuration Dialogue pop-up.
You will now see the Speaker Details Task Configuration ‘Main View’.
This view has various other elements that you can preview and configure:
The task’s stages
The task’s behaviour before and after its deadline
“Your Task” i.e. the form that the task owner will fill in. Note that the form has the default Hotel Requirements questions. These are set by the Task’s template, but you can change them:
If you hover over the form ‘section’ (i.e. where it says ‘Speaker Details’), it will reveal various action buttons which allow you to:
Add questions,
Edit the section name
Delete the section entirely
Hovering over a question reveals options to edit and reposition it:
Now you’ve set up the task, see the Speaker Tasks page for details of how to:
Lineup Ninja provides a wizard to help you set up and configure your own custom tasks.
Go to your event, and then: Agenda Planning / Speakers / Speaker Tasks
Click the “Create Custom Speaker Task” button:
Give your task a name and, optionally, a deadline, and then click the green ‘Create Task’ button:
Next you will be asked if you want to review the content before adding it to the Speaker’s record on the agenda.
Answering “Yes, I want to run a review process and then choose which content to add to the speaker record.” will NOT automatically update the speaker’s record on the agenda with their answers. Instead, you will be able to manually update Speaker’s records from the Task data when you’ve reviewed it and are happy with it.
Answering “No, I’m not running a review process and want the content to be added to the speaker record automatically.” will mean that when speakers fill the form in, their Speaker record on the agenda will be updated automatically and immediately.
Warning
If you answer ‘No’ to this question, speakers can directly update their Speaker Record on the agenda. If you are asking them to provide data that will ultimately be published on your website with this task, you are effectively allowing them to edit the data that will be published to the show website, mobile app, signage etc.
If you have ‘Scheduled Publishing’ enabled on any of your publications (website, mobile app etc), it is possible that speakers’ changes will be automatically published without anyone from the content team reviewing this content.
If you choose ‘Yes, I want to run a review process…’ to the question in step 4, you will see this question:
This allows you to choose whether to add another Stage to your Custom Speaker Task to capture the final version of the content - or not.
And if you DO choose to add a ‘Final Version Requested’ stage to your task, you can choose whether that final version of their details should automatically update the Speaker’s Record on the agenda, or not.
How do you want the form to behave when speakers submit their details?
Would you like to:
lock the form (useful if you’re keen to maintain some editorial control) or
leave it open (useful if you want to allow speakers to make last minute changes in the run-up to the event?
Make your choice and click ‘Save’ to create the task.
You will now be taken to the Custom Speaker Task’s Configuration Page, which will have the Task Configuration Dialogue pop-up already open:
The Task Configuration Dialogue pop-up allows you to check (and change) some of the settings you’ve just chosen, and is where you can make some other important configuration choices.
Two important settings that you should review here are:
Which speakers need this task? This allows you to filter which speakers need this task to be performed.
Who should perform this task? This allows you to decide who the Task Owners will be. You can set rules to automatically assign this task to the relevant people.
Finally, you can add deadlines to each stage, and even reorder the stages in your task in the Task Configuration Dialogue pop-up if you need to:
Once you’ve reviewed these settings, click the blue ‘Save’ button. This will close the Task Configuration Dialogue pop-up.
You will now see the Custom Speaker Task’s Configuration ‘Main View’.
This view has various other elements that you can preview and configure:
The task’s stages
The task’s behaviour before and after its deadline
A speaker can be duplicated on the agenda if the same speaker is submitter by two different submitters.
For example if these two submissions are received:
Submitter: ‘Abi’
Title: ‘Solo Session’
Speakers: ‘Abi’
and:
Submitter: ‘Joe’
Title: ‘Panel Discussion’
Speakers:
Chair: ‘Joe’
Panel Member: ‘Abi’
Panel Member: ‘Nick’
Panel Member: ‘Rachel’
When you create sessions on the agenda there will be two ‘Abi’ speakers on the agenda list.
This happens because the submissions are received from different submitters and we cannot expose personal information given by one submitter to another, as such they are not automatically linked. If one submitter makes multiple submissions with the same speaker then there will be no duplication.
How do I resolve duplicate speakers?
To resolve this issue you can mark a speaker as a duplicate of another speaker. What happens when you do this is:
The speaker you choose replaces the duplicate speaker for all their sessions
The duplicate speaker is removed
For the example above, if ‘Abi’ from the first submission was chosen to be the preferred speaker then de-duplication will:
Assign ‘Abi’ to be a Panel Member on the ‘Panel Discussion’ session
Delete the duplicate ‘Abi’ speaker from the agenda
To do this, navigate to
Agenda Planning
>
Speakers
and click on the name of the speaker you want to retain. Then click this button:
You will then be presented with a popup where you can choose the speakers you want to mark as a duplicate.
What happens if a submission is updated after the duplicate speaker is removed?
When a speaker has been marked as a duplicate the submission answers for the retained and duplicate speaker will be locked. This prevents the potential for one submitter to make changes to a speaker without realizing that they are potentially changing the answers for a speaker given by a different submitter.
If the speaker section of the form is otherwise unlocked, i.e. the submitter can make changes to other speakers, then they can remove the duplicate speaker but not make other changes. The submitter will see this message:
Can I undo a duplicate speaker?
To restore the duplicated speaker that was removed:
Navigate to the Submission Flow and Submission that the speaker was created from
Scroll down to the Speakers answers
Click the ‘Undo’ icon next to the text
This clears the duplicate marker. You can then choose to either add the speaker to the agenda, or ignore them.
Is the Speaker Confirmation status retained when de-duplicating?
Yes, the Speaker Confirmation status for the speaker will be retained. I.e. if they are already marked confirmed, they will still be marked confirmed after you de-duplicate the speaker.
Still can’t find what you’re looking for? Email support@lineupninja.com and one of the team will get back to you as soon as possible.
Speaker Confirmation
Info
Speaker Confirmation can not currently be used in the same event as Sub Sessions.
If you require to use both features in the same event please contact support.
You can use Speaker Confirmation to tell your speakers where and when their sessions will happen, and ask them to confirm that they’ve seen this notification.
What is Speaker Confirmation?
Speaker Confirmation is Lineup Ninja’s tool that ensures your speakers know where and when their session is scheduled, and lets you know that they know!
At a high level the process is straightforward:
Once a speaker’s session has been scheduled, you can send them an email with:
Their session title, time and location.
A link to a simple form
By default, the form has three buttons for speakers to choose from:
Accept / acknowledge the session time.
Request a different time
Withdraw from the event
The status of speakers’ confirmations are shown on the Agenda Planning Board:
Each session starts off amber, before you request confirmation from speakers
While you’re waiting for speakers to confirm, the session will stay amber
Once all the speakers for a given session have confirmed, the session will turn green.
Tip
You can manually change speakers’ confirmation status yourself.
For example, if you discuss the time with the speaker verbally, you can set that speaker’s confirmation status to ‘Confirmed’ without needing to send them an email etc.
How do I get started with Speaker Confirmation?
Speaker Confirmation is an optional feature. To enable it:
Navigate to
Agenda Planning
>
Speakers
>
Confirmation
Click the blue ‘Add Speaker Confirmation’ button
Tip
You can experiment with the feature and if you decide it’s not for your event you can disable it again.
Once you have added Speaker Confirmation, you’ll see a preview of a web page with three buttons on it. This is the page that speakers see when they click the link in the ‘Confirmation Requested’ email:
The speaker is presented with 3 options. They can confirm the current time, ask for a new time or withdraw entirely. You can disable these buttons if you wish (eg. you might not want to allow your speakers the option of requesting a new time!)
Finally, configure the Email Templates that will be sent to the Speaker when you ask them to confirm. You will be able to amend these when actually sending the confirmation email if you need to add anything specific to a session.
Tip
When the speaker confirms their time, they will be sent a Calendar Appointment for their diary. You can configure the text in the appointment to suit your event.
How do I ask Speakers to confirm?
You can Request Confirmation from the Sessions List or the Speakers List:
Select the sessions or speakers that you wish to Request Confirmation for
Scroll down to the bottom of the Session or Speaker list table.
Open the Actions drop-down menu.
Choose ‘Request Confirmation’
This will pull up the ‘Request Confirmation’ email template, which you can edit before sending if you wish.
Info
Requesting confirmation from the Sessions list will ask all Speakers associated with the selected Session(s) to confirm.
Requesting confirmation from the Speakers list will ask the selected Speakers to confirm all of the Sessions that they are associated with.
How do I ask all the Speakers in a given Session to confirm?
Navigate to
Agenda Planning
>
Sessions
Select the Speakers/Sessions you wish to confirm using the tick box on the left-hand side
Scroll to the ‘Actions’ drop down and select ‘Request Confirmation’
You will then see a pop-up giving you the opportunity to tweak the wording of the email before you send it
Info
If any speakers associated with the session don’t have email addresses (so can’t be sent a confirmation request), the system will warn you and ask you to add email addresses for them.
How do I ask a given Speaker(s) to confirm all of their sessions?
Navigate to
Agenda Planning
>
Speakers
Select the Speakers you wish to confirm using the tick box on the left-hand side
Scroll to the ‘Actions’ drop down and select ‘Request Confirmation’
You will then see a pop-up giving you the opportunity to tweak the wording of the email before you send it
Info
If you Request Confirmation from the Speaker List, and a speaker has more than one session, they will receive a separate Confirmation Request email for each of their sessions.
How do I track the status of the confirmations?
When you enable Speaker Confirmation a new ‘amber’ status will appear on the Agenda Planner Calendar. This means that the Speaker Confirmation has either not been sent, or it is awaiting the speaker to respond. For example, when you first enable the feature you will see this:
As speakers respond to your email you will see the Agenda update. The status will then update to either green or red as Speakers confirm. For example:
You can also filter the list of Sessions and Speakers by clicking on
. Use the ‘speakers’ filter on the list of sessions, and the ‘sessions’ filter when looking at the list of speakers. For example:
How do I nudge my speakers to confirm?
Inevitably, some speakers will not action your request to confirm their session times immediately, and you will want to nudge them to remind them to do it.
To do this, set up one or more scheduled reminder emails that will be sent to all speakers who are still in the “Confirmation Requested” stage for one or more of their sessions.
Note
This is the same approach as creating deadline reminders for Submission Flows and Speaker and Session Tasks.
Here’s how:
Navigate to the Speaker Confirmation configuration page: Agenda Planning / Speakers / Confirmation
Choose the Confirmation Requested tab near the top of the page.
Scroll to the bottom of this page to the Emails section:
Click the blue ‘Add Email’ button. This will bring up a window where you can choose the type of email to create. Choose ‘Scheduled’
You will now see the Email Template Editor. This allows you to compose and save your email template.
Schedule the time to send your reminder email.
Tip
If you want to send your reminder email immediately, you can choose a time in the past.
Tip
You might want to add several of these reminder emails, and schedule them with increasing frequency, and increasingly urgent messages as your event approaches.
Because the emails are associated with the Confirmation Requested stage, they will only be sent to speakers who have not yet confirmed all of their sessions. i.e. they won’t be sent to speakers whose sessions are in the Confirmed stage.
How do I choose which roles require confirmation?
By default all Speaker Roles require confirmation. If you have roles that will not be presenting, for example ‘Co-Authors’ or ‘Mentor’ you can configure the role to not require confirmation. See the Roles Documentation for more info.
Still can’t find what you’re looking for? Email support@lineupninja.com and one of the team will get back to you as soon as possible.
Speaker Ordering
How are Speakers ordered?
When a Session has multiple Speakers, Lineup Ninja gives you a few options for how to order them.
Firstly, if you are not using Speaker Roles, and just want your speakers to be sorted by First Name, then you can stop reading here: this is the default!
There are a few things to consider when thinking about the Speaker Ordering:
The order of the Speakers in the submission (if they were all created in the same submission)
The order of the Speakers as they are displayed in Agenda Planning
How you will publish your agenda: either to the Lineup Ninja Agenda App or via an integration
How do Roles affect Speaker Ordering?
When you create a Speaker Role (e.g. Chair, Panelist), you can choose the order the roles will be shown. For example, you may wish to show ‘Chair’ before the ‘Panelists’.
To set this order, navigate to
Speakers
and scroll to ‘Speaker Roles’. You can drag Speaker Roles up and down to change the order.
How are speakers ordered when I publish my agenda?
The ability to control the order of speakers varies by the publication or integration you are using.
The full set of available options are:
First Name
Last Name
Role, then First Name
Role, then Last Name
Role, then Speaker Order, then First Name (only shown if you have toggled on the option on the list Speakers page)
Role, then Speaker Order, then Last Name (only shown if you have toggled on the option on the list Speakers page)
For Blendr.id, Eventscase, Snöball, Sector Global please contact them directly.
Still can’t find what you’re looking for? Email support@lineupninja.com and one of the team will get back to you as soon as possible.
Sessions
What is a Session?
In Lineup Ninja, a Session is a block of time that gets scheduled in a specific location and time slot. It can have a variety of data associated to it:
Speaker(s) profile data
Session title
Description
Track (theme)
A duration
A required capacity (i.e. minimum capacity for the room or stage where the session will be scheduled)
A list of physical resources required to deliver it
Scheduling rules that can govern when it may or may not be scheduled (very handy)
Labels (useful for distinguishing between oral presentations and round-table sessions, or the language the session will be conducted in)
Once a Session has been scheduled, it will also have:
Location
Date, time
Information about whether there are any scheduling problems (clashes/double booking etc)
Information about whether the speaker(s) has been notified of the proposed time, and has confirmed that they’ve seen this
How do I create and manage Sessions?
To manually create a Session:
Navigate to
Agenda Planning
>
Sessions
Click
to add a new session
You can also create a session via Submissions Flows:
Invite people to propose sessions via a Call for Papers Submission Flow
Review and choose the submissions you wish to accept
Create a Session from the Submission by navigating into the submission name and click ‘Create Session/Speakers’. Alternatively, you can do this in bulk by selecting the submission using the tick box on the left-hand side, scrolling to the ‘Actions’ drop down and selecting ‘Create Session/Speakers’.
How do I invite a speaker to deliver a session?
Create a session
Click on the session name to navigate into the Session Detail view
Scroll down and click on ‘Invite Submission’
Follow the on-screen instructions
How do I schedule a Session in my agenda?
Navigate to
Agenda Planning
The right-hand column shows any unscheduled Sessions
Drag and drop a Session from this list onto the Agenda Planning board
Locations and times that are valid scheduling options for the session will appear white. Invalid options will be greyed out
For a detailed introduction to scheduling Sessions, check out the Scheduling guide.
How do I edit the default session duration and changeover time?
Navigate to
Agenda Planning
>
Sessions
Scroll to ‘Settings’ at the bottom of the Sessions list
Click
next to Default Duration/Default Changeover Time to edit
How do I change a Session’s duration?
To update an individual Session:
Navigate to
Agenda Planning
>
Sessions
Click on
next to the session you wish to change
Edit the duration
To update Session lengths in bulk:
Navigate to
Sessions
Filter the table to show the Sessions you want to update
Select the Sessions using the tick box in the heading or on the left-hand side
Scroll to the ‘Actions’ drop down and select ‘Update Session Durations’
How do I keep notes for internal use about a session?
Navigate to
Agenda Planning
>
Sessions
and click on the Session’s title
In the Session Detail view there is a ‘Notes’ field for internal notes
How do I set the expected number of attendees for a Session? / How do I set the minimum venue capacity required for a given Session?
Navigate to
Agenda Planning
>
Sessions
Click into the Session you want to change
Edit the ‘Required Capacity’ field by clicking
How do I manage Session booking?
Lineup Ninja doesn’t currently manage Session bookings. If you require this, we can offer this via integrations with our partners, such as Eventscase or Guidebook.
How do I copy Sessions within the same event?
For more information on how to copy Sessions, follow this link.
How do I delete Sessions?
Navigate to
Agenda Planning
>
Sessions
Click
at the end of the Session row and then click
To bulk delete sessions, select the session using the tick box on the left-hand side, scroll to the ‘Actions’ drop down and select ‘Delete Sessions’
Warning
Use with caution: This cannot be undone!
Still can’t find what you’re looking for? Email support@lineupninja.com and one of the team will get back to you as soon as possible.
Subsections of Sessions
Session Tasks
Session tasks are tasks that need to be completed per-session, as opposed to per-speaker (see the tip below for why this is important).
Examples include:
Asking a speaker, session lead or panel chair for the session title and description
Collecting the slides for a session
Asking panel chairs to convene a pre-show meeting of panelists
Info
Session Tasks vs Speaker Tasks
Lineup Ninja gives you both “Session Tasks” and “Speaker Tasks”. The difference between them is subtle, but important.
Speaker Tasks are used for gathering information about speakers - e.g. speaker profiles (headshots, biographies etc), speaker agreements, travel and hotel booking info etc.
Session Tasks are used for gathering information about sessions, such as slide decks and handouts.
It might be tempting to think “I need to ask the speakers for their slides, so I’ll create a Speaker Task for it”.
However, if any of your speakers are delivering two or more sessions, and need to provide different slides for each session, you’ll run into problems if you use a Speaker Task, because they’ll only be able to upload one slide deck, and those slides will not be linked to the session.
Note
You can also use fully-blown Submission Flows to collect this kind of data.
However, Session and Speaker tasks are quicker and simpler to set up, and they provide different tracking tools that allow you to see their status from within the Agenda half of Lineup Ninja.
How do I ask a someone to provide session details?
Using the Session Details’ Task template. This is recommended for B2B and producer-led conferences where you want to invite someone to submit details for a specific session, and without also collecting speaker details at the same time.
As part of a Submission Flow. Recommended if you’re running an open call for sessions/abstracts/papers and you want session leaders to pitch sessions to you, also useful if you want to collect speakers’ (or authors’) details at the same time as their session/abstract/paper submissions.
Manually adding the information yourself via the admin interface. It is common for producers to do this for VIP speakers who you don’t expect to interact with the platform directly.
How do I ask someone to provide the slides for a session?
To edit an existing question in a Session Task, hover over the question, and then click on the blue pencil button. This will open the question for editing:
When you’ve made your changes, click the green ‘check’ button
to save your changes, or the ‘circular arrow’ button to cancel your changes.
Warning
IMPORTANT: Questions on the form are mapped to specific fields in the database.
You can edit the question text, but DO NOT use them to store fields other than the one it is mapped to.
Why?
Lineup Ninja expects each field to have the relevant data in the right place. For example, the session title should be stored in the Session Title field, the session description should be in the Session Description field etc.
When you publish your agenda to your Agenda app, 3rd party show websites, mobile apps, digital signage, marketing platforms etc. Lineup Ninja will send the values in these fields to the corresponding fields in the other systems.
If you edited the ‘Session Title’ question to say “Intended Audience”, you’d end up with sessions on your website called things like “Senior Decision Makers” or “Curious newbies” etc.
DO NOT CHANGE THE QUESTIONS TO SOMETHING OTHER THAN THEIR INTENDED PURPOSES.
If you need to ask a question for a field that is not on the form, add a Custom Question and map it to a new Custom Field.
How do I add a standard question to a Session Task?
In this example, we’ll use the Session Details Task template, but the principle works for any Session Task:
Navigate to your Task’s Configuration: Agenda Planning / Sessions / Session Tasks / Session Details / Configuration
Hover your mouse over the form to show the “Add Questions” button:
Click the “Add Questions” button. This will bring up the list of standard questions:
Warning
IMPORTANT: You MUST use Standard questions for their intended purpose.
For example, if you want to capture the session’s track, USE THE TRACK QUESTION for it.
Why?
Lineup Ninja expects each field to have the relevant data in the right place. For example, the session title should be stored in the Session Title field, the session description should be in the Session Description field etc.
When you publish your agenda to your Agenda app, 3rd party show websites, mobile apps, digital signage, marketing platforms etc. Lineup Ninja will send the values in these fields to the corresponding fields in the other systems.
If you edited the ‘Session Title’ question to say “Intended Audience”, you’d end up with sessions on your website called things like “Senior Decision Makers” or “Curious newbies” etc.
Find the question you want to add, and click the blue ‘plus’ button. This will add that question to the bottom of your Task’s form, and open that question for editing.
Here, we’ve chosen to add the Phone Number question to our Speaker Details task:
Make any changes to the question that you want to make, and click the green ‘check’ button
to save your changes, and you’re done!
How do I add a Custom Field question to a Session Task?
In this example, we’ll use the Session Details Task template, but the principle works for any Session Task:
Navigate to your Task’s Configuration: Agenda Planning / Sessions / Session Tasks / Session Details / Configuration
Hover your mouse over the form to show the “Add Questions” button:
Click the “Add Questions” button. This will bring up the list of standard questions:
Warning
IMPORTANT: Only create a custom question if you are sure there isn’t already a standard question for the data that you want to capture.
For example, if you want to capture the session’s sponsor logo, USE EXISTING THE SPONSOR LOGO QUESTION.
Why?
Because these questions are mapped to corresponding fields in the database, and the answers to these questions will eventually be published on your event website, mobile app, signage etc.<br><br>If you use the 'First Name' question to ask for Dietary requirements, your event website will end up with speakers called things like "Vegan Johnson" and "Gluten-free Smith".<br><br>**You are not able to change this later.**<br><br>You've been warned!
Scroll down to the bottom of this list, and you will find the “Add Custom Question” button.
Warning
IMPORTANT: Only create a custom question if you are sure there isn’t already a standard question for the data that you want to capture.
For example, if you want to capture the speaker’s LinkedIn URL, USE THE LinkedIn QUESTION for it.
Why? Because these questions are mapped to corresponding fields in the database, and the answers to these questions will eventually be published on your event website, mobile app, signage etc.
If you use the ‘First Name’ question to ask for Dietary requirements, your event website will end up with speakers called things like “Vegan Johnson” and “Gluten-free Smith”.
You are not able to change this later.
You’ve been warned!
Click on the ‘Add Custom Question’ button. This will add the new custom question to the form and open it for editing:
You can now choose which type of question this should be:
Once you’ve chosen a question type, you will need to map this to an existing Custom Field, or create a new one to store the answers:
Once you have mapped (or created) a Custom Field to store your new question’s answers, you can edit the other settings, such as:
The question text,
Help text
Whether it is optional or mandatory,
Character limits
Question visibility in different Task Stages
Make any changes to the question that you want to make, and click the green ‘check’ button
to save your changes, and you’re done!
ZIP Reports - export any attached files to zip archives
JSON report - export your data in a machine-readable format
Subsections of Session Tasks
Session Details Task
How do I use the Session Details Task to collect information about a Session?
Here’s a step-by-step guide to creating and configuring the Session Details Task:
Go to your event, and then: Agenda Planning / Sessions / Session Tasks.
Click the “Create Speaker Details Task” button:
Accept or edit the task name, and optionally, provide a deadline for the task:
Choose which fields you want to capture for your sessions:
The choices you make here will populate the task’s form with the relevant questions.
Tip
You have the option to collect Slides and Handouts as part of this task.
However, it is typical to collect session details early in the content management process, and to gather slides and handouts much closer to the event.
For this reason, Lineup Ninja also has a Session Task template just for slides and handouts.
Next you will be asked if you want to review the content before adding it to the Session record on the agenda.
Answering “Yes, I want to run a review process and then choose which content to add to the session.” will NOT automatically update the session on the agenda. Instead, you will be able to manually update session from the Task data when you’ve reviewed it and are happy with it.
Answering “No, I’m not running a review process and want the content to be added to the session automatically.” will mean that when Task Owners fill the form in, the session record on the agenda will be updated automatically and immediately.
Warning
If you answer ‘No’ to this question, Task Owners can directly update the Session’s record on the agenda - i.e. you are effectively allowing them to edit data that will be published to the show website, mobile app, signage etc.
If you have ‘Scheduled Publishing’ enabled on any of your publications (website, mobile app etc), it is possible that these changes will be automatically published without anyone from the content team reviewing this content.
If you choose ‘Yes, I want to run a review process…’ to the question in step 5, you will see this question:
This allows you to choose whether to add another Stage to your Session Details Task to capture a final version of the session details - or not.
And if you DO choose to add a ‘Final Version Requested’ stage to your task, you can choose whether that final version of their details should automatically update the Session on the agenda, or not.
Tip
This can be useful in a couple of situations:
1. If you want task owners to provide a draft - or limited - version of the session (e.g. a working title and draft session description) early in your process so you can use it to promote the content at your show, and then collect a final version closer to the show.
2. If you want to review session details and ask the task owners to make changes based on your feedback.
How do you want the form to behave when Task Owners submit their details?
Would you like to:
lock the form (useful if you’re keen to maintain some editorial control) or
leave it open (useful if you want to allow Task Owners to make last minute changes in the run-up to the event?
Make your choice and click ‘Save’ to create the task.
You will now be taken to the Session Details Tasks Configuration Page, which will have the Task Configuration Dialogue pop-up already open:
The Task Configuration Dialogue pop-up allows you to check (and change) some of the settings you’ve just chosen, and is where you can make some other important configuration choices.
Two important settings that you should review here are:
Which sessions need this task? This allows you to filter which sessions need this task to be performed.
Tip
This is useful if you have different sets of sessions, and the process for collecting their details is different.
For example, let’s say you have two types of sessions: - Curated Sessions, for which the conference producer writes the session titles and descriptions. - Sponsored Sessions, for which sponsors provide the session titles and descriptions.
In this case, you only need to collect session details for the sponsored sessions.
You can do this by: 1. Creating [labels](/event/labels/ “Labels”) for the sessions called: - Curated sessions - Sponsored sessions
2. Assigning those labels to the relevant sessions. <br>
3. When you create the Session Details task you can choose “Sponsored sessions” in the field: “Labels: Only include sessions with at least one of these labels”.
4. Then when you assign the task, it will only create this task for sessions with the ‘Sponsored session’ label.
Who should perform this task? This allows you to decide who the Task Owners will be. You can set rules to automatically assign this task to the relevant people.
Finally, you can add deadlines to each stage, and even reorder the stages in your task in the Task Configuration Dialogue pop-up if you need to:
Once you’ve reviewed these settings, click the blue ‘Save’ button. This will close the Task Configuration Dialogue pop-up.
You will now see the Session Details Task Configuration ‘Main View’.
This view has various other elements that you can preview and configure:
The task’s stages
The task’s behaviour before and after its deadline
“Your Task” i.e. the form that the Task Owner will fill in. Note that the form has the questions that correspond to the choices you made in Step 4, above - “Which details do you want to gather”:
If you hover over the form, it will reveal the option to add another form section:
If you hover over the form ‘section’ (i.e. where it says ‘Session Details’), it will reveal various action buttons which allow you to:
Add questions,
Edit the section name
Delete the section
Details
NOTE: Session Tasks’ forms can have as many sections as you like
If you hover over a question, it will reveal which field the question is mapped to, as well as the question edit button and drag handle which allows you to reposition the question within the form section.
Now you’ve set up the task, see the Session Tasks page for details of how to:
How can I use the Slide Collection Task to gather slides and/or handouts for a session?
Here’s a step-by-step guide to creating and configuring the Slide Collection Task:
Go to your event, and then: Agenda Planning / Sessions / Session Tasks.
Click the “Create Slide Collection Task” button:
Accept or edit the task name, and optionally, provide a deadline for the task:
Choose which types of files you want to gather:
Tip
If you want to gather both Slides AND Handouts, you can collect them both via one task, or create separate tasks for each.
If you choose ‘Slides Only’ or ‘Slides and Handouts’, you will be asked if you want Task Owners to be able to upload additional supporting files to be embedded in the slides, such as fonts and video files:
If you choose ‘Yes’ it will add another question to the form to capture these files.
Next you will be asked if you want to review the Slides/handouts before attaching them to the Session:
Answering “Yes, I want to run a review process and then choose which content to add to the session.” will NOT automatically update the session on the agenda. Instead, you will be able to manually attach the files to the sessions when you’ve reviewed them and are happy with them.
Answering “No, I’m not running a review process and want the content to be added to the session automatically.” will mean that when Task Owners fill the form in, the files will be attached to the sessions automatically and immediately.
Warning
If you answer ‘No’ to this question, you are allowing Task Owners to directly attach files to Sessions on the agenda - i.e. that may be published to the show website, mobile app, signage etc.
If you are publishing attached files with your agenda - and especially if you have ’Scheduled Publishing’ enabled on any of your publications (website, mobile app etc) - it is possible that their files will be automatically published without any editorial review.
If you choose ‘Yes, I want to run a review process…’ to the question in step 5, you will see this question:
This allows you to choose whether to add another Stage to your Slide Collection Task to capture a final version of the slides - or not.
And if you DO choose to add a ‘Final Version Requested’ stage to your task, you can choose whether that final version of their details should automatically update the Session on the agenda, or not.
Tip
This can be useful if you want task owners to provide a draft version of their slides/handouts early in your process so you can review them and - if necessary - give feedback on them, and then collect a final version of the slides/handouts closer to the show.
How do you want the form to behave when Task Owners submit their details?
Would you like to:
lock the form (useful if you’re keen to maintain some editorial control) or
leave it open (useful if you want to allow Task Owners to make last minute changes in the run-up to the event?
Make your choice and click ‘Save’ to create the task.
You will now be taken to the Slide Collection Task’s Configuration Page, which will have the Task Configuration Dialogue pop-up already open:
The Task Configuration Dialogue pop-up allows you to check (and change) some of the settings you’ve just chosen, and is where you can make some other important configuration choices.
Two important settings that you should review here are:
Which sessions need this task? This allows you to filter which sessions need this task to be performed.
Tip
This is useful if you have different types of sessions, and some will have slides and other won’t.
For example, let’s say you have three types of sessions: - Presentations sessions - Panel sessions - Fireside chat sessions
…and you will only need to collect slides for Presentation sessions.
You can do this by: 1. Creating [labels](/event/labels/ “Labels”) for the sessions called: - Presentation session - Panel session - Fireside chat session
2. Assigning those labels to the relevant sessions.
3. When you create the Slide Collection task you can choose “Presentation sessions” in the field: “Labels: Only include sessions with at least one of these labels”.
4. Then when you assign the task, it will only create this task for sessions with the ‘Presentation session’ label.
Who should perform this task? This allows you to decide who the Task Owners will be. You can set rules to automatically assign this task to the relevant people.
Finally, you can add deadlines to each stage, and even reorder the stages in your task in the Task Configuration Dialogue pop-up if you need to:
Once you’ve reviewed these settings, click the blue ‘Save’ button. This will close the Task Configuration Dialogue pop-up.
You will now see the Slide Collection Task Configuration ‘Main View’.
This view has various other elements that you can preview and configure:
The task’s stages
The task’s behaviour before and after its deadline
“Your Task” i.e. the form that the Task Owner will fill in. Note that the form has the questions that correspond to the choices you made in Step 4, above - “What Content Are You Requesting for the Session”:
If you hover over the form, it will reveal the option to add another form section:
If you hover over the form ‘section’ (i.e. where it says ‘Slides’), it will reveal various action buttons which allow you to:
Add questions,
Edit the section name
Delete the section
Details
NOTE: Session Tasks’ forms can have as many sections as you like
If you hover over a question, it will reveal which field the question is mapped to, as well as the question edit button and drag handle which allows you to reposition the question within the form section.
Now you’ve set up the task, see the Session Tasks page for details of how to:
Lineup Ninja provides a wizard to help you set up and configure your own custom tasks.
Go to your event, and then: Agenda Planning / Sessions / Session Tasks
Click the “Create Custom Session Task” button:
Give your task a name and, optionally, a deadline, and then click the green ‘Create Task’ button:
Next you will be asked if you want to review the content before adding it to the Session’s record on the agenda.
Answering “Yes, I want to run a review process and then choose which content to add to the session.” will NOT automatically update the session’s record on the agenda. Instead, you will be able to manually update sessions from the task data when you’ve reviewed it and are happy with it.
Answering “No, I’m not running a review process and want the content to be added to the session automatically.” will mean that when Task Owners fill the form in, the session record on the agenda will be updated automatically and immediately.
Warning
If you answer ‘No’ to this question, Task Owners can directly update the Session’s record on the agenda - i.e. you are effectively allowing them to edit data that will be published to the show website, mobile app, signage etc.
If you have ‘Scheduled Publishing’ enabled on any of your publications (website, mobile app etc), it is possible that these changes will be automatically published without anyone from the content team reviewing this content.
If you choose ‘Yes, I want to run a review process…’ to the question in step 4, you will see this question:
This allows you to choose whether to add another Stage to your Custom Session Task to capture the final version of the content - or not.
And if you DO choose to add a ‘Final Version Requested’ stage to your task, you can choose whether that final version of their details should automatically update the session on the agenda, or not.
How do you want the form to behave when Task Owners submit their content?
Would you like to:
lock the form (useful if you’re keen to maintain some editorial control) or
leave it open (useful if you want to allow Task Owners to make last minute changes in the run-up to the event?
Make your choice and click ‘Save’ to create the task.
You will now be taken to the Custom Session Task’s Configuration Page, which will have the Task Configuration Dialogue pop-up already open:
The Task Configuration Dialogue pop-up allows you to check (and change) some of the settings you’ve just chosen, and is where you can make some other important configuration choices.
Two important settings that you should review here are:
Which sessions need this task? This allows you to filter which speakers need this task to be performed.
Who should perform this task? This allows you to decide who the Task Owners will be. You can set rules to automatically assign this task to the relevant people.
Finally, you can add deadlines to each stage, and even reorder the stages in your task in the Task Configuration Dialogue pop-up if you need to:
Once you’ve reviewed these settings, click the blue ‘Save’ button. This will close the Task Configuration Dialogue pop-up.
You will now see the Custom Session Task’s Configuration ‘Main View’.
This view has various other elements that you can preview and configure:
The task’s stages
The task’s behaviour before and after its deadline
“Your Task” i.e. the form that the task owner will fill in. NOTE: at this point, your custom task has no questions, as you haven’t set them up yet.
If you hover over the form, it will reveal the option to add another section to the form:
If you hover over the form ‘section’ (i.e. where it says ‘Custom Session Task’ in the image below), it will reveal various action buttons which allow you to:
Add questions,
Edit the section name
Delete the section
Now you’ve set up the task, see the Session Tasks page for details of how to:
Labels (useful for distinguishing between oral presentations and round-table sessions, or the language the session will be conducted in)
Once a Session has been scheduled, it will also have:
Location
Date, time
Information about whether there are any scheduling problems (clashes/double booking etc)
How do I make Sub Sessions?
There are two components to making a Sub Session. You need a Session to become the Parent Session (aka Container Session) and another session to become the Sub Session. You create them in the same way as a regular Session. Either on the list of sessions or via a Submission Flow.
For the Parent session click the Session name in the list of Sessions and scroll down to ‘Sub Sessions’ and then click this button:
You will now see the Agenda Planner for planning the Sub Sessions. It works in the same was as the main Agenda Planning board, but now you are scheduling sessions within the Parent Session. If you do not see the planner then you need to schedule the Parent session.
You can now schedule sessions from the Unplanned Sessions list. When you schedule the session into the Parent Session it will automatically become a Sub Session.
How do I view Sub Sessions on the Agenda Planning board?
To show Sub Sessions on the main Agenda Planning board click the settings icon at the top right then use the eye icon to toggle the Sub Sessions on and off.
To show all the Sub Sessions for each session without scroll bars change the ‘Scale’ toggle to ‘Fit Content’. You can find this toggle just under the settings wheel.
What happens to Sub Sessions if I reschedule the Parent Session?
Sub Sessions will retain their start time relative to the start time of the Parent Session. For example if a Parent Session is due to start at 10:00 and a Sub Session starts at 10:05 and you move the Parent to 11:00 the Sub Session will be automatically moved to 11:05.
What duration will a Sub Session be?
The default duration for a Sub Session is 5 minutes. You can change this by setting the ‘Default Sub Session Duration’ option at the bottom of the list of sessions.
The default is applied the first time you schedule a Session as a Sub Session.
Do Sub Sessions have a Changeover Time?
No, Sub Sessions do not have a Changeover Time. As they take place during the same Parent Session there is no time reserved between one Sub Session and the next.
How do Tracks, Labels and Resources work with Sub Sessions?
Tracks, Labels and Resources can be added to Sub Sessions in the same was as regular Sessions. When publishing your event the tracks from the Sub Sessions will automatically be merged with those on the Parent Session during publishing
What do Sub Sessions look like in the Content Portal?
Sub Sessions appear within their Parent session in the Content Portal. If the ‘Show other speakers presenting the sessions’ option is enabled then speakers’ details will be shown to the speakers in ALL Sub Sessions of the same Parent Session
How do Sub Sessions work with Agenda Publishing?
The details for Sub Sessions are appended to the standard session description. You can what data is displayed in the ‘Sub Session Template’ part of your integration configuration.
More placeholders are available on request.
Speakers are merged into the parent session.
Do Sub Sessions work with Speaker Confirmation
Speaker Confirmation is not yet compatible with Sub Sessions. An event can use either Sub Sessions or Speaker Confirmation. Confirmation will be implemented before Sub Sessions become generally available.
Still can’t find what you’re looking for? Email support@lineupninja.com and one of the team will get back to you as soon as possible.
Tracks
What are Tracks?
Track is the term used for themes, topics, categories, genres etc. - thematic groupings of sessions.
They are used to help you ensure that your scheduled sessions take place in locations that host the required theme. For example, if a session has a track of Top Tech then the session can only be scheduled in a location that has the Top Tech track associated with it.
Info
Lineup Ninja supports multiple tracks per session, however some third parties, namely Eventscase and Grip, only support one track per session. If you are going to integrate with one of these parties then you should edit the ‘Maximum Tracks Per Session’ and set the value to 1. Lineup Ninja will then warn you if you have assigned more than one track to a session.
How do I create and manage Tracks?
Navigate to
Agenda Planning
>
Tracks
To create a new track, click
on the right hand side
Enter a name for the track
You can optionally add a color to the track at this time
If you have configured locations, you can associate tracks with locations here too
Tip
To view full details about a Track, click on the name.
How do I add Sessions to Tracks?
Navigate to
Agenda Planning
>
Tracks
Click on
next to the Track you want to add Sessions to
In the Sessions column, choose the Session(s) that you want to add to the track from the drop-down list
Can I use multiple Tracks per Session?
Lineup Ninja supports multiple Tracks per Session. If your event was created after 4th June 2021 this will be available automatically, if you created your event prior to this time please contact support to enable multiple tracks.
Some third parties that we integrate with do not support multiple tracks, namely Eventscase, Grip and Swoogo. If you are going to integrate with one of these parties then you should edit the ‘Maximum Tracks Per Session’ on the at the bottom of the Tracks page and set the value to 1. Lineup Ninja will then warn you if you have assigned more than one track to a session.
How do I add Tracks to Locations?
Navigate to
Agenda Planning
>
Tracks
Click
next to the Track you want to add Sessions to
In the Locations column, choose the Location that you want to add the track to from the drop-down list
How do I add Tracks to Sessions, Labels and Locations in bulk?
Navigate to Agenda Planning and to the type of item you wish to add the Track to. This will bring us the respective list view
Tick the items you wish to add the Track to
Scroll to the bottom of the list, open the drop-down Action menu and click ‘Add Tracks’
Do Tracks have to be linked to Locations?
If you have a Tracks that can be scheduled in any Location then:
Either: Edit the Track and switch the option Schedule sessions needing this resource in these locations off. This will remove the scheduling requirement for the track.
Or: Add the track to every location. Do this by editing the ‘Locations’ for the track and clicking ‘Select All’
How do I limit the number of Sessions running in a Track?
You might want to limit the number of Sessions in a particular Track to ensure you have a diversity of Sessions across your Tracks. To set this limit do the following:
Navigate to
Agenda Planning
>
Tracks
Find the Track that you want to edit and click on its name
Edit the value for ‘Max Sessions’. As you schedule your event Lineup Ninja will be checking to ensure that not more than this number of this sessions in this track.
How do I limit the number of Sessions running in a Track at the same time?
You might want to limit the number of Sessions running in a Track to one or two, so that your attendees that are interested in a particular Track can attend as many sessions as possible.
Navigate to
Agenda Planning
>
Tracks
Find the Track that you want to edit and click on its name
Edit the value for ‘Concurrency’. As you schedule your event Lineup Ninja will be checking to ensure that not more than this number of this sessions with this track are scheduled at the same time.
What is Track Scheduling Mode?
If a Session has multiple Tracks associated with it then there are a few ways you might want Tracks to be used to choose a Location for the Session.
You might want:
To ensure the location has all of the same tracks as the session
To ensure the location has at least one of the same tracks at the session
Or you might want to just ignore the tracks and schedule it in any location
To configure this, navigate to
Agenda Planning
>
Tracks
and scroll to ‘Settings’ at the bottom of the page. Here, you can set the Scheduling Mode by clicking
How do I ask a Submitter to select a Track in the Form Designer?
Navigate to into the relevant Submission Flow and go to
Form Designer
In the ‘Session Details’ section, click
and add select the following question
Still can’t find what you’re looking for? Email support@lineupninja.com and one of the team will get back to you as soon as possible.
Resources
What are Resources?
Resources usually represent physical resources that are required by a Speaker to deliver their Session. They may include things like a laptop, Wi-Fi, tables, chairs, whiteboard etc.
They are used to help you ensure that your scheduled Sessions take place in Locations that have the required Resource. For example, if a session needs a lapel mic then the Session can only be scheduled in a Location that also has a lapel mic Resource.
How do I create and manage Resources?
Navigate to
Agenda Planning
>
Resources
To create a new resource, click
on the right hand side of the screen
Enter a name for the Resource
If you have created
Sessions
,
Labels
or
Locations
, you can associate them with the new Resources here too
To manage this Resource, navigate into the Resource by clicking on the name
How do I add Resources to Sessions?
Navigate to
Agenda Planning
>
Resources
Click
next to the Resource you want to add a Session to
In the Session column, you can search and choose the Session you want to add the Resource too
How do I add Resources to Locations?
Navigate to
Agenda Planning
>
Resources
Click
next to the Resource you want to add a Location to
In the Location column, you can search and choose the Location you want to add the Resource too
How do I add Resources to Sessions, Labels and Locations in bulk?
Navigate to Agenda Planning and to the type of item you wish to add the Resource to. This will bring us the respective list view
Tick the items you wish to add the Resource to
Scroll to the bottom of the list, open the drop-down Action menu and click ‘Add Resources’
Do Resources have to be linked to Locations?
If you have a Resource that is available everywhere (for example, Wi-Fi) you have two options:
Either: Edit the Resource and switch the option Schedule sessions needing this resource in these locations off. This will remove the scheduling requirement for the resource.
Or: Add the resource to every location. Do this by editing the ‘Locations’ for the resource and clicking ‘Select All’
How do I limit the number of Sessions using a Resource?
You might want to limit the number of Sessions that require a particular Resource. This is particularly useful if the resource is consumable, say a license for service such as a production company. To set this limit do the following:
Navigate to
Agenda Planning
>
Resources
Click on the name of the Resource you want to edit
Edit the value for ‘Max Sessions’
As you schedule your event, Lineup Ninja will be checking to ensure that not more than this number of this Sessions are using this resource.
How do I limit the number of Sessions using a Resource at the same time?
You may have limits on how many times a resource can run at the same time. For example, you might only be able to provide 2 laptops at any one time.
Navigate to
Agenda Planning
>
Resources
Click on the name of the Resource you want to edit
Edit the value for ‘Concurrency’.
As you schedule your event Lineup Ninja will be checking to ensure that not more than this number of this resource are in use at the same time.
The idea behind being about to configure different versions depending on the user is so that you can show/hide different information depending on the level of detail the user requires.
Still can’t find what you’re looking for? Email support@lineupninja.com and one of the team will get back to you as soon as possible.
Subsections of Agenda App & Website
Agenda App & Website: Configure
How do I create an Agenda App publication?
Navigate to
Agenda Planning
>
Publish Agenda
Select ‘Publish your agenda on events.lineup.ninja’
How do I set up the general configuration for the Agenda App?
When you create a new Agenda App publication, a pop up box will open to configure. The first section is the General Configuration where you can set:
Name - The name for this specific publication
Subdomain - This is required to publish your Agenda App
Description - A description of the event (optional)
Which time zone should sessions be shown in
Which file types do you want to share with attendees
When showing a session, sort the speakers by
Tracks - The tracks to be published
Resources - The resources to be published
Labels - The labels to be published
Speaker Roles to show - The Speaker Roles to be published
Navigation Items - These will appear at the top as a kind of ‘menu’
Agenda Search
How can the attendee save the sessions they are interested in
Time Indicator
Limit Session Height - If you have sessions with many speakers, you may want to limit the height so attendees can see more sessions at the same time
Session Code
Note
These can be changed at any time (apart from the subdomain once published!)
How do I configure the Agenda App Branding?
In the Branding section of the agenda app configuration. You will see three sections, Header and Logo Image, Font and Colors.
Header and Navigation Images
You can optionally add a header image and a navigation logo.
The Header, or banner, image will be displayed across the top of the agenda. The navigation logo is shown to the left of the navigation.
If you are uploading images, you should upload one both for desktop and mobile users.
Font
You can choose to use a Custom Font. Either a Google Web Font or you can upload your own.
If you choose to use a Google Web Font, input the name of the font.
If you choose to use your own font, you must upload a font for the following styles:
Regular
Bold
Italic
Bold Italic
You can upload a font in either TrueType (.ttf) or OpenType (.otf) formats.
You must also have an appropriate license to use the font you are uploading. We ask you to confirm you have the appropriate license by confirming in the ‘License Confirmation’ option. Contact your font provider for their licensing terms.
In this section you can also choose whether you want links to be underlined, and also to set a font size for the session titles.
Colors
You can set the colors for the text and background colors used in the app.
What are Language / Translations / Dates?
Language/Translations enable you to insert your own terms for:
Locations
Speakers
Sessions
Tracks
Resources
Labels
Agenda
Timetable
Favorites
Up Next
On Now
Search…
Type at least 3 characters to search
You can also choose whether you want dates to be formatted in the international standard, or to force US style dates.
What is the Timetable Page?
For more information on the Timetable Page view, please follow this link.
Can I show Custom Fields in the Agenda App?
For Sessions you can share the ‘Short Answer’ Custom Field type in the Agenda App. To enable this
Navigate to
Agenda Planning
>
Publish Agenda
Open your Agenda App configuration and scroll to ‘Session Custom Fields’
For each field choose where you want the field to display. These are the options:
Agenda List
Timetable Grid
Session Popup
What is the Speaker List Page?
The Speaker List Page is the page where the speakers are listed. When configuring the Agenda App, you can choose to include/exclude the speaker company logo and whether you want to highlight certain speakers (using Labels).
Can I choose the content in the Speaker and Session popups?
Yes you can choose which content is shown and in which order. You can use this to share Notes with the users of the app, and make other changes to suit your needs.
Navigate to
Agenda Planning
>
Publish Agenda
Open your Agenda App configuration and scroll to ‘Speaker and Session Popups’
Change the option from ‘Show Default Content’ to ‘Choose Custom Content’
Rearrange the options into the required order, and disable any options you want to hide.
How can my attendees share interesting Sessions on social media?
If you wish you can allow your attendees to easily share their sessions on social media channels.
To enable the feature, navigate into your Agenda App configuration and scroll to the ‘Sharing’ section.
When enabled the attendee will see these options when viewing a session:
The first option enables or disables the feature.
When the attendee chooses to share by Twitter or e-mail, the text will be pre-populated using the template on the second option. For example, it will look like this for Twitter:
When the attendee chooses to share by Facebook or LinkedIn, the title of the page is used. You can configure this using the template in the third option. For example, it will look like this for Facebook:
Note
Note that when the attendee chooses to share via Facebook or LinkedIn they will be presented with the standard LinkedIn or Facebook share button after they click the link on the session page. This is to prevent these services from potentially tracking attendees who may not wish to interact with these services.
How can my attendees save their Sessions?
Navigate into your Agenda App General Configuration and edit the below setting.
When enabled the attendee will see these options when viewing a session.
If you enable favorites the attendee can favorite sessions and they will show up in a list like this.
Note
If you are integrating another app for your attendee experience you may wish to leave favorites disabled as they will not appear in the 3rd party application. They only show in the browser the attendee used to favorite the session.
How can I gather analytics on my Agenda App traffic?
If you want to get stats on your Agenda App traffic:
Navigate into your Agenda App configuration and scroll to the ‘Analytics’ section
Input your Google Analytics 4 Google Tag
How can I filter the published content?
You can filter which Speakers and Sessions will be published based on a number of criteria. Some common use cases for filters are:
Preventing ‘Placeholder’ sessions from being published
Holding back a Speaker who is not yet ready to be announced
Excluding sessions scheduled during the ‘build up’ day for the event
Only publishing speakers who have confirmed their slot
Removing a particular location, or track from the published schedule
Anything you can think of using labels!
For Speakers you can filter in 3 ways
Choose which speakers are to be published based on their relationship to sessions
(If Speaker Confirmation is enabled): Publish speakers that have a confirmed session that is published and not filtered out.
Publish speakers that are speaking on any session that is published and not filtered out.
Publish all speakers
Publish no speakers
Apply more granular filters with labels
Only publish speakers with a particular label. For example you might want to use a ‘Content Reviewed’ label to flag speakers that have had their content reviewed.
Exclude speakers with a particular label. For example you might want to exclude a ‘Do not publish’ label to prevent publishing of speakers who are not yet ready to be published.
For Sessions you can filter in numerous ways
Choose which sessions are to be published based on their relationship to speakers
Publish All Scheduled Sessions. Publishes sessions regardless of whether they have confirmed speakers or not.
(If Speaker Confirmation is enabled): Publish sessions that have one confirmed speaker.
(If Speaker Confirmation is enabled): Publish sessions that have all their speakers confirmed.
Publish All Sessions (available on Lineup Ninja Agenda App only)
Apply filters with labels
Only publish sessions with a particular label. For example you might want to use a ‘Content Reviewed’ label to flag sessions that have had their content reviewed.
Exclude session with a particular label. For example you might want to exclude a ‘Placeholder’ label to prevent publishing of sessions which are not yet populated.
Filter by location
Only publish sessions in a particular location, or locations. This can be useful if you are publishing an agenda for just one or two locations.
Exclude sessions in a particular location, or locations. This can be useful if you have scheduled sessions in your Green Room or similar back stage location.
Filter by resource
Only publish sessions needing a particular resource. This could be useful if you are producing an agenda for a particular team that manages some resources.
Exclude sessions needing a particular resource.
Filter by Date
Only publish sessions in a date or dates. Useful if you are producing an agenda for a particular day.
You can exclude a date or dates from your publication. Useful if you have dates for build up and tear down in your agenda.
Filter by Track
Only publish sessions in a particular track or tracks. Useful if you are producing separate agenda for separate parts of your event
Exclude sessions on a particular track. Can be useful to block presenting of a track until a product launch has happened.
To configure filters:
Click ‘Publish Agenda’
Click on the name for your existing publication
Click ‘Configure’
Expand either the ‘Speaker Configuration’ or ‘Session Configuration’ section
Expand the corresponding ‘Filter Speakers’ or ‘Filter Sessions’ sections and configure the filters you need
Save and republish
This video uses the example of an event with sessions in multiple languages to show how to create labels, apply them to speakers and sessions, and use them to publish different content to different publications in different languages:
How are Titles and Post Nominals Handled?
To manage this, navigate into your Agenda App configuration and scroll to the ‘Titles and Post Nominals’ section. For both, you can choose to:
Stop publishing either Titles or Post Nominals
Filter out common Titles or Post Nominals. For example, you may wish to filter our Mr, Mrs, Miss and keep titles such as Dr and Prof.
How can I merge locations, tracks and roles when publishing?
When publishing you can merge content together. This enables you to publish a simpler agenda for your attendees than the one you are using to plan your event.
You can choose to merge these types of data:
Locations. Merging location A into location B will show all sessions in location A as taking place in location B. This can be useful if you have multiple locations configured for scheduling purposes that will be experienced by the attendee as a single location.
Tracks. Merging track A into track B will show all sessions in track A as being in track B. This can be useful if you have some tracks with only a small number of sessions and wish to present this sessions as being in a more populous track.
Roles. Merging role A into role B will show speakers with role A has having role B. This can be useful if you have a lot of roles internally that are not intended to be shown to attendees. You can merge them into a role with a name appropriate for your attendees.
When merging the location, track, or role that you are merging into does not have to have any sessions itself. So you can use this to show a different name to attendees than you are using internally. For example you could create a ‘Main Hall’ location, and merge ‘Building B - Hall A’ into that location so attendees see ‘Main Hall’ in their agenda.
How can I embargo content that is not yet ready for the public?
You can choose to embargo session titles and descriptions if you have content that should only be shown to the public after being announced in the event.
An embargo is applied by using labels to identify the sessions that should have an embargoed session title or description.
For example if you have a label ‘New Product Launch’, you can configure an embargo to hide the session title and description from sessions with that label. Following the launch of the product you can remove the embargo and republish the agenda.
If you embargo a session or description you can replace the original text with something to indicate that the session will be published later, for example ‘Super Secret Session’.
The speakers for a session will still be shown when it is embargo’ed. To exclude a session, including it’s speakers from being published then use ‘Session Filters’ rather than an ‘Embargo Content’.
To configure an embargo:
Click ‘Publish Agenda’
Click on the name for your existing publication
Click ‘Configure’
Expand the ‘Session Configuration’ section
Expand the ‘Embargo Content’ sections and configure the embargo that you need
Save and republish
How can I add my own content to the Agenda App?
You can add a ‘Custom Page’ which you can use to show any additional content you would like to share, for example, you might want to include links to the code of conduct policy, or the menu for lunch.
To configure this:
Navigate into your Agenda App configuration and scroll to the ‘Custom Page’ section
Change the Custom Page to ‘Enabled’
Choose an icon and a name for the page. If you need additional icons please ask support
Add the content you want to show on the page
Save and publish the agenda
Can I integrate my ExpoFP floor plan?
Yes. To learn more about how to configure this, please follow this link.
You can also push Lineup Ninja sessions into an ExpoFP floor plan via the Expo FP Integration.
How do I share files such as slides and handouts with my attendees?
You can share files attached to Speakers and Sessions with your attendees by using File Types and then choosing to include selected File Types in the app.
Note
‘Image’ and ‘Generic File’ types cannot be shared with attendees. If you require this please contact support.
Still can’t find what you’re looking for? Email support@lineupninja.com and one of the team will get back to you as soon as possible.
Agenda App & Website: Timetable Page
How do I present my Agenda as a timetable?
The Agenda App gives you a few options for presenting your agenda:
Agenda: a list of sessions in chronological order
Timetable: a grid showing sessions arranged by time and location
Sessions: a list of sessions in alphabetical order
To enable timetable page in the agenda app do the following
Navigate into the Agenda App publication configuration
In General Configuration, scroll to ‘Timetable Page’
Choose whether you want the columns to show Tracks or Locations. You can also choose the order the items are shown, and hide any tracks/locations you don’t want to show.
Note
If you choose ‘Tracks’ then also ensure the Tracks you want to publish are included in the ‘Tracks’ section of ‘General Configuration’.
Save and publish your publication
Which timetable orientations are available and how do I configure them?
You can choose which orientation the timetable should be arranged in:
Vertical: each Location (or Track) is a column, and time runs down the side
Horizontal: each Location (or Track) is a row, and time runs from left to right
Timetable view in vertical mode
Timetable view in vertical mode: good for displaying several locations at the same time, but there’s a limit to how many locations can be displayed without having to scroll.
Timetable view in horizontal mode
Timetable view in horizontal mode: good for when you have a lot of locations and they won’t all fit on screen in vertical mode.
To choose between the orientations, open up the Agenda App configuration dialogue box and scroll down to the ‘Timetable Page’ section. The first option allows you to choose the orientation:
Tip
When the timetable is in Horizontal mode AND you choose to display speaker details, they will start to take up quite a bit of space! You can use the ‘How many speakers should be shown per row’ setting to adjust the speaker layout.
There will be (at least) one row for each Speaker Role that is included in each session.
For example, you set the number of speakers per row to 3.
One session is a panel with one chair and three panelists. You will have 2 rows: Row 1: shows 1 x chair Row 2: shows 3 x panelists
Another session is a panel with one chair and five panelists. Row 1: shows 1 x chair Row 2: shows 3 x panelists Row 3: shows 2 x panelists
How do I show/hide a locations on the timetable view? AKA “Help! I added a theatre and it isn’t pulling through to the timetable view”
Navigate to the Agenda App’s configuration (Agenda Planning / Publish Agenda / [Specific Agenda App] / Configure).
Scroll down the configuration dialogue pop-up to the ‘Timetable Page’ section.
In the ‘Locations’ section, you’ll see a list of locations.
Each location has a check box that allows you to show or hide the location from the timetable view.
How do I change the order of locations in the timetable view?
Navigate to the Agenda App’s configuration (Agenda Planning / Publish Agenda / [Specific Agenda App] / Configure).
Scroll down the configuration dialogue pop-up to the ‘Timetable Page’ section.
In the ‘Locations’ section, you’ll see a list of locations.
The ‘=’ sign is a ‘drag handle’ - you can use it to drag a given location up and down the list to reorder it:
How do I show multiple sessions taking place in the same location at the same time?
Navigate to
Agenda Planning
>
Locations
Create an additional Location for the extra session(s)
Expand the Timetable Page section, scroll to Locations and untick the checkbox to hide the new Location
Scroll to Merge Locations and merge the new Location into the original Location
What colours are used for the Sessions?
By default, the Track colors are used for the background colour of the sessions.
You can choose to show the Location colour instead: navigate to your Agenda App configuration, scroll to ‘Timetable Page’ and change the below question:
If a session has multiple Tracks then the colours will be applied depending on whether you are showing Tracks or Locations in the grid:
If you are showing Tracks then the background color will be the color of that Track only
If you are showing Locations then the track colors will be shown in the left hand border, and the background of the session will be grey
How do I show Speakers on the timetable grid?
You can choose to show Speaker Names in the timetable grid:
Navigate to your Agenda App configuration and scroll to ‘Timetable Page’
Change the below question:
Note
If you are choosing to show Speaker Roles, these will also be shown.
How do I add logos to the columns?
The columns in the timetable represent either Tracks or Locations. To help your user navigate the agenda you can add logos to the columns:
Navigate to
Agenda Planning
>
Locations
/
Tracks
Click the name of the item you wish to set a logo for
Scroll down to ‘Files’
From the ‘Type of Image or File’, choose ‘Location Logo’ or ‘Track Logo’
Upload the logo
Repeat for other Tracks or Locations
Navigate to ‘Publish Agenda’
Click ‘Publish’ for your Agenda App to publish the new logos
What are the recommendations for logos?
We make the following recommendations:
Use the same height and width for all logos, this will ensure a consistent presentation
Upload a high resolution image, we will automatically scale it appropriately
Avoid logos with a high level of detail as they may look unclear when scaled down to fit on the timetable
How do I add sponsor logos to the sessions?
To manually add sponsor logos to sessions:
Navigate to
Agenda Planning
>
Sessions
and open the relevant session details
Scroll to ‘Upload a new image or file’ and open drop down for ‘Type of Image or File’
Select ‘Session Sponsor Logo’ and upload the image
Note
You can also request submitters to upload a Session Sponsor Logo in the Form Designer of your Submission Flow. For more information on how to do this, please follow this link.
To enable sponsor logos to appear in Agenda App:
Navigate to
Agenda Planning
>
Publish Agenda
Open your Agenda App configuration and scroll to ‘Timetable Page’
Edit ‘Should sponsor logos be shown’ drop down and select either ‘Show logos before speakers (if shown)’ or ‘Show logos after speakers (if shown)’
If you make changes to your agenda after publishing it, you will see a notification icon next to
Publish Agenda
. This is to remind you that you have un-published changes
You can re-publish your publication at any time
Will updates I make in the Agenda Planner go live immediately?
No, think of the Agenda Planner as your workspace. You can make any changes you need without impacting your published data. When you are ready to publish navigate into
Publish Agenda
and click on ‘Publish’ for the relevant publication.
When I publish updates, will they appear in real-time?
Published changes will appear instantly for most users. For some users, it may take up to 2 minutes.
How do I publish different versions of the agenda for attendees and event staff?
Simply follow the steps for How do I publish my agenda app? to create multiple publications, and give each one a different name. You can configure them differently too, so for example, the Agenda App for your event staff could include speaker or sessions notes like ‘Needs a wheelchair ramp at the stage 10 minutes before session starts’.
Consider your team’s workflow as a team before enabling automatic publishing.
When you enable automatic publishing there is a potential for the agenda to be published when you have content that is not ready for publication.
To schedule publishing scroll down to the ‘Scheduled Publishing’ part of the configuration.
You can then choose whether to publish once per hour, or once per day. If you choose to publish each day the publication will occur around 3am in the timezone of your event.
Still can’t find what you’re looking for? Email support@lineupninja.com and one of the team will get back to you as soon as possible.
Agenda App & Website: Embedding
How can I embed the Agenda App in my website?
You can embed the Agenda App into your website using an iFrame.
There are two approaches to how the Agenda is scrolled. Most simply it can be scrolled within the iFrame, or the content can be displayed so it is scrolled with the page.
Scrolling within iFrame
Use this code replacing the ‘src’ element with the published address for the Agenda App. It will style the Agenda App so it presents at the same height as the users viewport.
If you have a banner with a fixed height above the iFrame you can adjust the height style to remove the height of the banner. This will scale the height of the agenda iFrame to take up the remaining space under the banner. Replace 100px in this example with the height of the banner.
The agenda can be presented at full height, without it’s own scroll bars, however this will result in the navigation scrolling off the top of the screen as the user scrolls the page. You also need to add an additional script to the page which will enable your site and the Agenda App to communicate to share scroll positions. If you would like to keep the navigation visible as the user scrolls then use the ‘Scrolling within iFrame’ above.
In the Agenda App configuration scroll to the bottom and choose Advanced and pick Whole Agenda is Displayed Without Scrolling for iFrame Scroll Mode.
Save and Publish the Agenda.
Add this iFrame code to your page, taking note of the id property and updating the src to your published app url.
Add this javascript to your page after the iFrame (or configure the initialize to fire after the iFrame is inserted). Making these changes
Replace the hostname in the URL with the hostname of your Agenda App.
Set iFrameSelector to match the id of the iFrame.
If the page is being scrolled then leave elementToScrollSelector as null, if the iFrame is placed within a different scrollable element then provide a query selector for that element.
If the page scrolls under a header then provide the selector for that header as headerSelector.
I use a Content Security Policy. What is required?
If the page you are including the iFrame on uses a Content Security Policy (CSP) you need to add two URLs to the policy, either in child-src or frame-src.
Firstly include the url for your published agenda app eg
https://my-event.events.lineup.ninja
If you are using the Outlook and Mac Calendar appointments then also add
Still can’t find what you’re looking for? Email support@lineupninja.com and one of the team will get back to you as soon as possible.
Agenda App & Website: ExpoFP
ExpoFP provides floor plan management software for Exhibitions, Expos and Trade Shows. Create your floor plan with a 3D map, interactive exhibitor list, built-in analytics, search by booth, category, company name, and more.
You can integrate ExpoFP with the Lineup Ninja Agenda App to share your floor plan and list of exhibitors along side your agenda.
What does it look like?
The floor plan viewed on a desktop:
The floor plan viewed on a mobile:
The exhibitor list viewed on a desktop:
How do I configure it?
If you have not yet created an Agenda App please check out the Agenda App Docs to learn how to create one.
To add ExpoFP to your Agenda App follow these steps:
Navigate to
Publish Agenda
and click the name of your existing Agenda App
Click ‘Configure’, scroll Down the ‘Expo FP’ section then click to expand it
Still can’t find what you’re looking for? Email support@lineupninja.com and one of the team will get back to you as soon as possible.
Digital Signage
Using Lineup Ninja for Digital Signage, you can publish your Agenda to the Digital Signage at your event. It gives attendees an ‘at a glance’ view of what is happening, helping them navigate and ensuring they are where they need to be.
It creates unique Agenda for each Location, Room, or Stage, showing the Session currently taking place and a list of upcoming Sessions, and updates automatically as the event progresses. Whenever you publish a change to the agenda, (e.g. during your event), the signage updates immediately and automatically.
This can save you countless hours designing signage for each Location, distributing them to your signage supplier, and then manually updating them when you need to make a last-minute change.
What does it look like?
Here are a couple of pictures of the signage in action.
Showing an agenda for an exhibition hall:
Showing an agenda for a single room:
The signage can also be displayed in a landscape orientation:
How does it work?
Lineup Ninja for Digital Signage works by providing a web page for each Location in your event, showing the agenda for that specific Location.
Your AV team can then configure the signage to display the unique web page for each Location. The content will automatically update throughout the day, and whenever you publish a new agenda.
What are the minimum technical requirements?
The playback device must meet:
Chrome 66 or newer, or a recent version of Firefox, Safari or Edge
Javascript must be enabled
Internet access must be available
If you are using the landscape presentation you must provide a Sponsor Logo for each location,
What screen sizes are supported?
The screen must be in a 16:9 or a 6:19 aspect ratio. I.e. a standard TV screen in either portrait or landscape orientation.
Both 1080p and 4k screens are supported.
When creating the publication you can choose between a portrait or landscape presentation. If you choose a portrait presentation the page will automatically detect the appropriate browser orientation.
Still can’t find what you’re looking for? Email support@lineupninja.com and one of the team will get back to you as soon as possible.
Subsections of Digital Signage
Configure
How do I create a Digital Signage publication?
Navigate to
Agenda Planning
>
Publish Agenda
Click on the ‘Publish’ button for the Digital Signage:
Follow the on-screen instructions to configure your event, including the URL your digital signage links will be published to
Click ‘Save’
Click
(you can re-publish at any time by clicking this button)
Tip
If you make changes to your Agenda after publishing it, you will see a red notification icon next to the ‘Publish Agenda’ menu item. This is to remind you that you have un-published changes.
The number is telling you how many agendas are now out of date.
How do I add branding?
You can choose the color for the main banner and footer for the signage. You can also set the text you would like to appear in the footer.
Navigate to
Publish Agenda
and click on the name for your existing publication
Click ‘Configure’
Expand the ‘Branding’ section and set the values
Save and republish
Can I use different colors for each location?
Yes you can use the location’s color for the heading and footer. To do this
Navigate to
Locations
and set a color for each location.
Navigate to
Publish Agenda
and click on the name for your existing publication
Click ‘Configure’
Expand the ‘Branding’ section and choose the ‘Use a different color for each location’ option.
Save and republish.
What content is displayed after the end of each day?
When there is no more content to show for a particular day you can configure ‘Intermission Content’, it will be shown after the end of the last session of the day until midnight.
You can say things like “Looking forward to seeing you tomorrow!” or “See you next year!” or whatever suits your needs.
Navigate to
Publish Agenda
and click on the name for your existing publication
Click ‘Configure’
Expand the ‘Intermission Content’ section and add the content
Save and republish
Can I show content from more than one Location on a screen?
If you want to display content from more than one Location on the same screen you can Merge Locations together.
Navigate to
Publish Agenda
and click on the name for your existing publication
Click ‘Configure’
Expand the ‘Merge Locations’ section and configure the merges you require
Save and republish
Here’s a worked example with a step-by-step guide:
For more information about merging content, please follow this link.
Info
If a location is merged into another one, it will no longer appear on its own in the publication.
If you need to display both merged and un-merged content, create two separate signage publications.
How do I add a sponsor logo to a Location?
You can add a sponsor logo for each Location. This is required for presentation in landscape, but optional for portrait.
To add sponsor logos to Locations:
Navigate to
Agenda Planning
>
Locations
Click into the relevant Location
Scroll to ‘Files’ and upload a ‘Sponsor Logo’
Re-publish your signage
Landscape Presentation
There are two options to display the Sponsor Logo for the horizontal presentation. You can either provide an image the will fill the entire space, or provide a logo that the signage will center.
If you choose ‘Center the logo with margins’ the logo will be placed like this:
If you choose ‘Do not apply margins’ the logo will be placed like this:
The size of the image to provide depends on other configuration options and the resolution of your screen. Use this table to determine the appropriate size.
Margins
Options Configured
1080p Screen
4k Screen
With Margins
Any
462 x 320
924 x 640
No Margins
Footer and ‘Agenda By Lineup Ninja’
840 x 563
1680 x 1126
No Margins
Footer only
840 x 664
1680 x 1328
No Margins
‘Agenda by Lineup Ninja’ only
840 x 691
1680 x 1382
No Margins
Neither
840 x 792
1680 X 1584
Portrait Presentation
There are two options to display the Sponsor Logo for the portrait presentation. You can either provide an image the will fill the entire width of the page, or provide a logo that the signage will scale and place to the left of the screen.
If you choose ‘Automatic Margins’ the logo will be placed like this:
If you choose ‘Do not apply margins’ the logo will be placed like this:
The size of the image to provide depends on the resolution of your screen
Margins
1080p Screen
4k Screen
With Margins
320 x any height
640 x any height
No Margins
1080 x any height
2160 x any height
Can I show multiple sponsor logos for a location?
To show multiple sponsor logos for a location create one image that contains all the logos you need. Then upload this image as the ‘Sponsor Logo’ for the location.
Can I help to promote Lineup Ninja?
We would love it if you would consider helping to promote Lineup Ninja by adding a small ‘Agenda By Lineup Ninja’ logo to the bottom of your signage. You can enable / disable this when you configure your signage.
How do I test my signage?
To ensure you have everything ready for the opening of your event you can run the signage in ‘Test Mode’ this will cause the signage to loop through the content for your event over and over.
You can turn the test mode on and off at any time by re-configuring and republishing your agenda: you do not need to involve the AV team.
To configure:
Navigate to
Publish Agenda
and click on the name for your existing publication
Click ‘Configure’
Expand the ‘Signage Testing’ section and choose one of the options
Save and republish
Warning
Don’t forget to change the option back to ‘Off’ before your event starts!
Will the URL for a location change?
If you rename a Location, the URL for that location will change. However, the old URL will continue to work so the AV team will not need to update their configuration.
If you delete and recreate a Location, the URL will change and your AV team will need to update the signage configuration.
Will updates I make in the Agenda Planner go live immediately?
No, think of the Agenda Planner as your workspace, you can make any changes you need without impacting your published data.
When you are ready to publish navigate to
Publish Agenda
and click on ‘Publish’ for the relevant publication.
When I publish updates, will they appear in real-time?
In most circumstances changes will publish immediately, on some networks and signage hardware it may take up to 2 minutes.
How can I publish automatically?
Warning
Consider your teams workflow as a team before enabling automatic publishing. When you enable automatic publishing there is a potential for the agenda to be published when you have content that is not ready for publication.
To schedule publishing scroll down to the ‘Scheduled Publishing’ part of the configuration.
You can then choose whether to publish once per hour, or once per day. If you choose to publish each day the publication will occur around 3am in the timezone of your event.
Can I use the signage without a network connection?
The signage is primarily designed to be used on a networked screen, and will continue to work even if network access is interrupted after the initial setup. However if you have a location that is out of network range, or would like an offline backup, then you can export the signage as a PDF and then display that via an alternative system.
You can generate one PDF per location, that PDF will contain one page per session showing that session and the subsequent sessions during the same day. You can rotate through the pages as best suits your event.
To download the PDF following these steps
Browse to
Publish Agenda
Either click the name of your existing publication or choose ‘Publish to your Digital Signage’ from ‘Create a New Publication’
If necessary configure and publish the signage.
Click the link for ‘Published at’
In the ‘PDF Export’ section you will find a download link for each location.
By default each page will show ‘NOW’ and ‘NEXT’ next to the current sessions, if you want to produce a PDF without these then set the “Do you want to show ‘NOW’ and ‘NEXT’ next to the session names?” option in the configuration to “Do not show” and publish the signage.
If you want your live signage to include ‘NOW’ and ‘NEXT’ but your PDF signage to exclude these then create two signage applications.
How can I filter the published content?
You can filter which Speakers and Sessions will be published based on a number of criteria. Some common use cases for filters are:
Preventing ‘Placeholder’ sessions from being published
Holding back a Speaker who is not yet ready to be announced
Excluding sessions scheduled during the ‘build up’ day for the event
Only publishing speakers who have confirmed their slot
Removing a particular location, or track from the published schedule
Anything you can think of using labels!
For Speakers you can filter in 3 ways
Choose which speakers are to be published based on their relationship to sessions
(If Speaker Confirmation is enabled): Publish speakers that have a confirmed session that is published and not filtered out.
Publish speakers that are speaking on any session that is published and not filtered out.
Publish all speakers
Publish no speakers
Apply more granular filters with labels
Only publish speakers with a particular label. For example you might want to use a ‘Content Reviewed’ label to flag speakers that have had their content reviewed.
Exclude speakers with a particular label. For example you might want to exclude a ‘Do not publish’ label to prevent publishing of speakers who are not yet ready to be published.
For Sessions you can filter in numerous ways
Choose which sessions are to be published based on their relationship to speakers
Publish All Scheduled Sessions. Publishes sessions regardless of whether they have confirmed speakers or not.
(If Speaker Confirmation is enabled): Publish sessions that have one confirmed speaker.
(If Speaker Confirmation is enabled): Publish sessions that have all their speakers confirmed.
Publish All Sessions (available on Lineup Ninja Agenda App only)
Apply filters with labels
Only publish sessions with a particular label. For example you might want to use a ‘Content Reviewed’ label to flag sessions that have had their content reviewed.
Exclude session with a particular label. For example you might want to exclude a ‘Placeholder’ label to prevent publishing of sessions which are not yet populated.
Filter by location
Only publish sessions in a particular location, or locations. This can be useful if you are publishing an agenda for just one or two locations.
Exclude sessions in a particular location, or locations. This can be useful if you have scheduled sessions in your Green Room or similar back stage location.
Filter by resource
Only publish sessions needing a particular resource. This could be useful if you are producing an agenda for a particular team that manages some resources.
Exclude sessions needing a particular resource.
Filter by Date
Only publish sessions in a date or dates. Useful if you are producing an agenda for a particular day.
You can exclude a date or dates from your publication. Useful if you have dates for build up and tear down in your agenda.
Filter by Track
Only publish sessions in a particular track or tracks. Useful if you are producing separate agenda for separate parts of your event
Exclude sessions on a particular track. Can be useful to block presenting of a track until a product launch has happened.
To configure filters:
Click ‘Publish Agenda’
Click on the name for your existing publication
Click ‘Configure’
Expand either the ‘Speaker Configuration’ or ‘Session Configuration’ section
Expand the corresponding ‘Filter Speakers’ or ‘Filter Sessions’ sections and configure the filters you need
Save and republish
How can I embargo content that is not yet ready for the public?
You can choose to embargo session titles and descriptions if you have content that should only be shown to the public after being announced in the event.
An embargo is applied by using labels to identify the sessions that should have an embargoed session title or description.
For example if you have a label ‘New Product Launch’, you can configure an embargo to hide the session title and description from sessions with that label. Following the launch of the product you can remove the embargo and republish the agenda.
If you embargo a session or description you can replace the original text with something to indicate that the session will be published later, for example ‘Super Secret Session’.
The speakers for a session will still be shown when it is embargo’ed. To exclude a session, including it’s speakers from being published then use ‘Session Filters’ rather than an ‘Embargo Content’.
To configure an embargo:
Click ‘Publish Agenda’
Click on the name for your existing publication
Click ‘Configure’
Expand the ‘Session Configuration’ section
Expand the ‘Embargo Content’ sections and configure the embargo that you need
Save and republish
How can I merge locations, tracks and roles when publishing?
When publishing you can merge content together. This enables you to publish a simpler agenda for your attendees than the one you are using to plan your event.
You can choose to merge these types of data:
Locations. Merging location A into location B will show all sessions in location A as taking place in location B. This can be useful if you have multiple locations configured for scheduling purposes that will be experienced by the attendee as a single location.
Tracks. Merging track A into track B will show all sessions in track A as being in track B. This can be useful if you have some tracks with only a small number of sessions and wish to present this sessions as being in a more populous track.
Roles. Merging role A into role B will show speakers with role A has having role B. This can be useful if you have a lot of roles internally that are not intended to be shown to attendees. You can merge them into a role with a name appropriate for your attendees.
When merging the location, track, or role that you are merging into does not have to have any sessions itself. So you can use this to show a different name to attendees than you are using internally. For example you could create a ‘Main Hall’ location, and merge ‘Building B - Hall A’ into that location so attendees see ‘Main Hall’ in their agenda.
Here is a step-by-step
Still can’t find what you’re looking for? Email support@lineupninja.com and one of the team will get back to you as soon as possible.
JSON Endpoint
Lineup Ninja can publish to a JSON endpoint. Your developer can use this endpoint to retrieve the agenda data for your event and integrate it with your systems.
If you have integrated the JSON feed and would like to become an integration partner read this guide
Still can’t find what you’re looking for? Email support@lineupninja.com and one of the team will get back to you as soon as possible.
Subsections of JSON Endpoint
Configuration Guide for JSON Endpoint
Create the integration
Follow these steps to get the integration initially configured.
In your Lineup Ninja event, navigate to
Publish Agenda
and then click the ‘Publish’ button under ‘JSON’. This will create a new publication.
A screen will pop up where you can enter a username and password to secure the endpoint. For the ‘Webhook URL to call after publishing’ and ‘How should related items be referenced’ questions ask your developer to review the developer documentation. You can leave these options as default and update them later if you have not yet spoken with them.
See the documentation further down this page for details on the other options you can set.
Now click ‘Publish’ to publish the agenda to the URL shown on the screen.
Now direct your developer to this page and give them the URL and the username and password you chose.
Files
The integration can be configured to include links to files attached to speakers, sessions, labels, locations, resources and tracks. You can choose to include all files, or just files of a particular type. Please inform your developer that you will be including the files.
How can I filter the published content?
You can filter which Speakers and Sessions will be published based on a number of criteria. Some common use cases for filters are:
Preventing ‘Placeholder’ sessions from being published
Holding back a Speaker who is not yet ready to be announced
Excluding sessions scheduled during the ‘build up’ day for the event
Only publishing speakers who have confirmed their slot
Removing a particular location, or track from the published schedule
Anything you can think of using labels!
For Speakers you can filter in 3 ways
Choose which speakers are to be published based on their relationship to sessions
(If Speaker Confirmation is enabled): Publish speakers that have a confirmed session that is published and not filtered out.
Publish speakers that are speaking on any session that is published and not filtered out.
Publish all speakers
Publish no speakers
Apply more granular filters with labels
Only publish speakers with a particular label. For example you might want to use a ‘Content Reviewed’ label to flag speakers that have had their content reviewed.
Exclude speakers with a particular label. For example you might want to exclude a ‘Do not publish’ label to prevent publishing of speakers who are not yet ready to be published.
For Sessions you can filter in numerous ways
Choose which sessions are to be published based on their relationship to speakers
Publish All Scheduled Sessions. Publishes sessions regardless of whether they have confirmed speakers or not.
(If Speaker Confirmation is enabled): Publish sessions that have one confirmed speaker.
(If Speaker Confirmation is enabled): Publish sessions that have all their speakers confirmed.
Publish All Sessions (available on Lineup Ninja Agenda App only)
Apply filters with labels
Only publish sessions with a particular label. For example you might want to use a ‘Content Reviewed’ label to flag sessions that have had their content reviewed.
Exclude session with a particular label. For example you might want to exclude a ‘Placeholder’ label to prevent publishing of sessions which are not yet populated.
Filter by location
Only publish sessions in a particular location, or locations. This can be useful if you are publishing an agenda for just one or two locations.
Exclude sessions in a particular location, or locations. This can be useful if you have scheduled sessions in your Green Room or similar back stage location.
Filter by resource
Only publish sessions needing a particular resource. This could be useful if you are producing an agenda for a particular team that manages some resources.
Exclude sessions needing a particular resource.
Filter by Date
Only publish sessions in a date or dates. Useful if you are producing an agenda for a particular day.
You can exclude a date or dates from your publication. Useful if you have dates for build up and tear down in your agenda.
Filter by Track
Only publish sessions in a particular track or tracks. Useful if you are producing separate agenda for separate parts of your event
Exclude sessions on a particular track. Can be useful to block presenting of a track until a product launch has happened.
To configure filters:
Click ‘Publish Agenda’
Click on the name for your existing publication
Click ‘Configure’
Expand either the ‘Speaker Configuration’ or ‘Session Configuration’ section
Expand the corresponding ‘Filter Speakers’ or ‘Filter Sessions’ sections and configure the filters you need
Save and republish
How can I merge locations, tracks and roles when publishing?
When publishing you can merge content together. This enables you to publish a simpler agenda for your attendees than the one you are using to plan your event.
You can choose to merge these types of data:
Locations. Merging location A into location B will show all sessions in location A as taking place in location B. This can be useful if you have multiple locations configured for scheduling purposes that will be experienced by the attendee as a single location.
Tracks. Merging track A into track B will show all sessions in track A as being in track B. This can be useful if you have some tracks with only a small number of sessions and wish to present this sessions as being in a more populous track.
Roles. Merging role A into role B will show speakers with role A has having role B. This can be useful if you have a lot of roles internally that are not intended to be shown to attendees. You can merge them into a role with a name appropriate for your attendees.
When merging the location, track, or role that you are merging into does not have to have any sessions itself. So you can use this to show a different name to attendees than you are using internally. For example you could create a ‘Main Hall’ location, and merge ‘Building B - Hall A’ into that location so attendees see ‘Main Hall’ in their agenda.
How can I embargo content that is not yet ready for the public?
You can choose to embargo session titles and descriptions if you have content that should only be shown to the public after being announced in the event.
An embargo is applied by using labels to identify the sessions that should have an embargoed session title or description.
For example if you have a label ‘New Product Launch’, you can configure an embargo to hide the session title and description from sessions with that label. Following the launch of the product you can remove the embargo and republish the agenda.
If you embargo a session or description you can replace the original text with something to indicate that the session will be published later, for example ‘Super Secret Session’.
The speakers for a session will still be shown when it is embargo’ed. To exclude a session, including it’s speakers from being published then use ‘Session Filters’ rather than an ‘Embargo Content’.
To configure an embargo:
Click ‘Publish Agenda’
Click on the name for your existing publication
Click ‘Configure’
Expand the ‘Session Configuration’ section
Expand the ‘Embargo Content’ sections and configure the embargo that you need
Save and republish
How can I publish automatically?
Warning
Consider your teams workflow as a team before enabling automatic publishing. When you enable automatic publishing there is a potential for the agenda to be published when you have content that is not ready for publication.
To schedule publishing scroll down to the ‘Scheduled Publishing’ part of the configuration.
You can then choose whether to publish once per hour, or once per day. If you choose to publish each day the publication will occur around 3am in the timezone of your event.
Still can’t find what you’re looking for? Email support@lineupninja.com and one of the team will get back to you as soon as possible.
Developer Documentation for JSON Endpoint
Intro
The JSON Endpoint makes all agenda data available at a single endpoint. The data is returned in one document, rather than different endpoints for different data types.
To create an endpoint a new ‘JSON’ publication needs to be configured by an event manager, this will generate a unique URL for the event.
If the event manager has asked you for answers to the ‘Webhook’ and ‘How should related items be referenced’ then review the ‘Webhook’ and ‘Schema Choice’ documentation below.
Requesting the data
Warning
The endpoint is not for consumption directly by an attendee app, or other similar software. You must ingest the data into your system and publish it to attendees and other users yourself.
To request the event data perform a GET to the URL you have been provided by the event manager. This URL is unique for each publication. The endpoint may require credentials using HTTP Basic Auth depending on the settings in the configuration.
Depending on your event you will either receive a 200 with the full event data, or a 302 redirect with a temporary url for the location of the data. Note that the destination of this 302 will change for each request and will expire. You should begin your request with the initial url starting with http://api.lineup.ninja each time.
Refreshing the data
The event manager will make changes to their content over the course of time. To receive the changes you can either poll every 5 minutes, or integrate the webhook to receive an instant notification that new event data is ready.
If you are polling the event data be sure to schedule the removal of the polling after the event has completed.
When content is removed from an event, eg a speaker pulls out, you will not receive an explicit notification. Instead, because the document contains the full set of data for the event, you should treat that absence of a previously existing object as a request to delete that object.
Profile Photos / Company Logos
Profile Photos (aka headshots) and Company Logos are included at these sizes
128x128
256x256
512x512
1024x1024
Company Logos are included with the original aspect ratio and scaled to fit the same sizes as the headshots.
Files
The event manager can choose to include additional links to files attached to speakers, sessions, labels, locations, resources and tracks.
The included links are unique to each publication for the event, if the event manager deletes the publication the links will cease to operate.
Note that speaker profile photos and company logos do not appear as ‘files’, they have their own property of ‘headshot’ and ’logo’. They are always included if the event has the data.
Schema Choice
The JSON feed is available two different structures. They differ by how related data is referenced.
For example with an event with two speakers, Alice and Bob, and one session Keynote. The feed can be presented in one of these two ways.
References By ID
If you choose ‘References By ID’ then related objects are referenced by their id only. For example:
To switch between these two modes ask the event manager to edit the configuration and set the value of ‘How should related items be referenced’ to either ‘References By ID’ or ‘Embedded References’.
Webhook
If configured Lineup Ninja will call a webhook after a successful publish of the event. The webhook is called as a POST with this body:
{
/**
* The UUID of the event
*/eventId: string;
/**
* The name of the event
*/eventName: string;
/**
* The timestamp for the publication. You can use this to deduplicate calls to the webhook
* It is in epoch time with milliseconds (A javascript timestamp)
*/publicationTimestamp: number;
/**
* The UUID for the integration. The customer may wish to configure multiple integrations per event,
* for example to different staging and production events. this ID can uniquely identify them
*/integrationId: string;
}
To create the webhook ask the event manager to edit the configuration to set the value of ‘Webhook URL to call after publishing’ to your desired URL.
Still can’t find what you’re looking for? Email support@lineupninja.com and one of the team will get back to you as soon as possible.
Subsections of Developer
JSON Endpoint - References By ID Schema
Info
This page defines the schema when you choose the ‘References By ID’ option. Please see this page for available schema.
Note
As our product develops we will add new fields to the schema without notice.
Where possible we will not deprecate or remove existing fields, if this becomes required we will notify active users of the integration.
These are the typescript definitions for the document.
Note that ‘speakers’ are called ‘contributors’ in the document.
{
/**
* Event contains high level details for the event
*/event: Event;
/**
* Contributors are the speakers for the event
*/contributors: Contributor[];
/**
* Labels, aka tags, can be assigned to contributors, sessions, tracks, resources and locations
*/labels: Label[];
/**
* Locations are where sessions take place
*/locations: Location[];
/**
* Resources are things that sessions need. Locations can have resources assigned to them.
* Sessions are then required to be scheduled in a location with matching resources.
*/resources: Resource[];
/**
* Roles model the relationship between contributors and sessions, eg Chair, Panel Member etc...
*/roles: Role[];
/**
* Sessions are sessions....
**/sessions: Session[];
/**
* A session can take place in one or many tracks.
*/tracks: Track[];
}
Event
{
/**
* A uuid for the event
*/id: string;
/**
* The name of the event
*/name: string;
/**
* The timezone for the event.
* Potentially null for awards only events
* Note that all times in this document are UTC
*/timezone: string|null;
/**
* The dates for the event
* Note that these are the times in which sessions can be scheduled
* they are not necessarily the opening hours for the event
*
* endDate may be more than 24 hours later than startDate
*/dates: DateAndTime[];
/**
* If the event has a portal the public url
* that speakers and submitters can use to access their content
*/portalURL: string|null;
};
Contributor (aka Speaker)
{
/**
* The UUID for the speaker
*/id: string;
/**
* The speaker's title eg Mr, Mrs, Mx...
*/honorific: string|null;
/**
* The speaker's first name
*/firstName: string|null;
/**
* The speaker's last name
*/lastName: string|null;
/**
* Any letters after the speaker's name, eg 'Esq', 'OBE' etc...
*/postNominal: string|null;
/**
* The speaker's email. Note that some speakers may not have an email address, it is also not guaranteed to be unique.
*/email: string|null;
/**
* The speaker's company
*/company: string|null;
/**
* The speaker's job title at their company
*/position: string|null;
/**
* The speaker's phone number
*/phone: string|null;
/**
* The speakers country code, eg 'gb'
* The data is sourced from https://www.iso.org/obp/ui/#search/code/
* Our current dataset can be found here https://app.lineup.ninja/countries.json
*/countryCode: string|null;
/**
* The speakers country name, eg 'United Kingdom'
* The data is sourced from https://www.iso.org/obp/ui/#search/code/
* Some names are tweaked to improve presentation eg 'United Kingdom', rather than 'United Kingdom of Great Britain and Northern Ireland (the)'
* Our current dataset can be found here https://app.lineup.ninja/countries.json
*/countryName: string|null;
/**
* The URL for the speaker's Twitter feed
*/twitter: string|null;
/**
* The URL for the speaker's Facebook page
*/facebook: string|null;
/**
* THe URL for the speaker's LinkedIn page
*/linkedin: string|null;
/**
* The URL for the speaker's Instagram page
*/instagram: string|null;
/**
* The URL for the speaker's Youtube channel
*/youtube: string|null;
/**
* The URL for the speaker's GitHub Profile
*/github: string|null;
/**
* The URL for the speaker's Website
*/website: string|null;
/**
* The speakers bio formatted in Markdown
*/bio: string|null;
/**
* The speakers bio formatted in HTML
*/bio_HTML: string;
/**
* A URL to the speakers headshot, 128x128px
*/headshotURL: string|null;
/**
* A URL for the speakers headshot at 256x256px
*/headshot2xURL: string|null;
/**
* A URL for the speakers headshot at 512x512px
*/headshot4xURL: string|null;
/**
* A URL for the speakers headshot at 1024x1024px
*/headshot8xURL: string|null;
/**
* A URL to the speakers company logo, to fit within 128x128px
*/logoURL: string|null;
/**
* A URL to the speakers company logo, to fit within 256x256px
*/logo2xURL: string|null;
/**
* A URL to the speakers company logo, to fit within 512x512px
*/logo4xURL: string|null;
/**
* A URL to the speakers company logo, to fit within 1024x1024px
*/logo8xURL: string|null;
/**
* The speakers availability
*/availability: DateAndTime[];
/**
* The UUIDs of labels assigned to the speaker
*/labels: string[];
/**
* The UUIDs of sessions assigned to the speaker
*/sessions: string[];
/**
* A list of sessions and the role id for each session assigned to the speaker
*/sessionJoins: ContributorSessionJoin[];
/**
* Any notes for the speaker. These are generally intended to be kept private.
*/notes: string|null;
/**
* When the speaker was last modified in UTC.
* eg 2022-02-04T18:03:03.662Z
*/lastModified: Date;
/**
* Any Data Sources referenced for this speaker
*/references?: SourceReferences|undefined;
/**
* Any data for Custom Fields for this speaker
*/customFieldData: CustomFieldData[];
/**
* Files attached to the speaker
*
* Note that files are not included by default. You can configure this per publication as required.
*
* For headshot and logo it is probably easier to use the headshot and logo properties above
*/files: File[];
/**
* If the speaker was created from a submission this will include the details for the submission
* If a speaker was submitted to multiple submissions then there will be multiple origins
*
* This data exists for contributors created/updated after 16 June 2023
*/origins: ContentOrigin[]
}
Labels
{
/**
* The UUID for the label
*/id: string;
/**
* The name of the label
*/name: string;
/**
* A description of the label formatted in Markdown
*/description: string|null;
/**
* A description of the label formatted in HTML
*/description_HTML: string;
/**
* The UUIDs of contributors (speakers) assigned to this label
*/contributors: string[];
/**
* The UUIDs of locations assigned to this label
*/locations: string[];
/**
* The UUIDs of resources assigned to this label
*/resources: string[];
/**
* The UUIDs of sessions assigned to this label
*/sessions: string[];
/**
* The UUIDs of tracks assigned to this label
*/tracks: string[];
/**
* When the label was last modified in UTC
* eg 2022-02-04T18:03:03.662Z
*/lastModified: Date;
/**
* Any Data Sources referenced for this label
*/references?: SourceReferences|undefined;
/**
* Any data for Custom Fields for this label
*/customFieldData: CustomFieldData[];
/**
* Files attached to the label
*
* Note that files are not included by default. You can configure this per publication as required.
*/files: File[];
}
Locations
{
/**
* The UUID for the location
*/id: string;
/**
* The name of the location
*/name: string;
/**
* A description of the location formatted in Markdown
*/description: string|null;
/**
* A description of the location formatted in HTML
*/description_HTML: string;
/**
* The color of the location formatted in HEX
* eg #FF00B1
*/color: string|null;
/**
* The availability of the location
*/availability: DateAndTime[];
/**
* The UUIDs of labels assigned to this location
*/labels: string[];
/**
* The UUIDs of resources assigned to this location
*/resources: string[];
/**
* The UUIDs of sessions taking place in this location
*/sessions: string[];
/**
* The UUIDs of tracks taking place in this location
*/tracks: string[];
/**
* When the location was last modified in UTC
* eg 2022-02-04T18:03:03.662Z
*/lastModified: Date;
/**
* Any Data Sources referenced for this location
*/references?: SourceReferences|undefined;
/**
* Any data for Custom Fields for this location
*/customFieldData: CustomFieldData[];
/**
* Files attached to the location
*
* Note that files are not included by default. You can configure this per publication as required.
*/files: File[];
}
Resources
{
/**
* The UUID for the resource
*/id: string;
/**
* The name of the resource
*/name: string;
/**
* A description of the resource formatted in Markdown
*/description: string|null;
/**
* A description of the resource formatted in HTML
*/description_HTML: string;
/**
* The UUIDs of labels assigned to this resource
*/labels: string[];
/**
* The UUIDs of locations with this resource
*/locations: string[];
/**
* The UUIDs of sessions needing this resource
*/sessions: string[];
/**
* When the resource was last modified in UTC
* eg 2022-02-04T18:03:03.662Z
*/lastModified: Date;
/**
* Any Data Sources referenced for this resource
*/references?: SourceReferences|undefined;
/**
* Any data for Custom Fields for this resource
*/customFieldData: CustomFieldData[];
/**
* Files attached to the resource
*
* Note that files are not included by default. You can configure this per publication as required.
*/files: File[];
}
Roles
Roles model the relationship between contributors and sessions, eg Chair, Panel Member etc…
{
/**
* The UUID for the role
*/id: string;
/**
* The name of the role
*/name: string;
}
Sessions
{
/**
* The UUID for the session
*/id: string;
/**
* The name of the session
*/name: string;
/**
* A code for the session. This is created by the Event Manager, eg TECH101.
*/code: string|null;
/**
* A description of the session formatted in Markdown
*/description: string|null;
/**
* A description of the session formatted in HTML
*/description_HTML: string;
/**
* If the session is scheduled, the start date of the session in UTC
* in ISO 8601 format
* eg 2022-02-04T18:05:00.000Z
*/startDate: Date|null;
/**
* If the session is scheduled, the start date of the session in the timezone of the event
* in YYYY-MM-DD format
* eg 2022-02-04
*/localStartYYYYMMDD: string|null;
/**
* If the session is scheduled, the start time of the session in the timezone of the event
* in HH:MM format
* eg 17:05
*/localStartHHMM: string|null;
/**
* If the session is scheduled, the end date of the session in UTC
* in ISO 8601 format
* eg 2022-02-04T18:30:00.000Z
*/endDate: Date|null;
/**
* If the session is scheduled, the end date of the session in the timezone of the event
* in YYYY-MM-DD format
* eg 2022-02-04
*/localEndYYYYMMDD: string|null;
/**
* If the session is scheduled, the end time of the session in the timezone of the event
* in HH:MM format
* eg 17:05
*/localEndHHMM: string|null;
/**
* The duration of the session in milliseconds
*/duration: number|null;
/**
* If the session is scheduled, the UUID of the location it is scheduled in
*/location: string|null;
/**
* Any notes for the location. These are generally intended to be kept private.
*/notes: string|null;
/**
* A URL to a session image, to fit within 128x128px
* The event manager can choose to share the Session Sponsor Logo, or an alternative image type
*/imageURL: string|null;
/**
* A URL to a session image, to fit within 256x256px
* The event manager can choose to share the Session Sponsor Logo, or an alternative image type
*/image2xURL: string|null;
/**
* A URL to a session image, to fit within 512x512px
* The event manager can choose to share the Session Sponsor Logo, or an alternative image type
*/image4xURL: string|null;
/**
* A URL to a session image, to fit within 1024x1024px
* The event manager can choose to share the Session Sponsor Logo, or an alternative image type
*/image8xURL: string|null;
/**
* The UUIDs of contributors (speakers) for this session
*/contributors: string[];
/**
* A list of contributors and the role id for each contributor assigned to the speaker
*/contributorJoins: SessionContributorJoin[];
/**
* The UUIDs of labels assigned to this session
*/labels: string[];
/**
* The UUIDs of resources assigned to this session
*/resources: string[];
/**
* The UUIDs of tracks assigned to this session
*/tracks: string[];
/**
* When the session was last modified in UTC
* eg 2022-02-04T18:03:03.662Z
*/lastModified: Date;
/**
* Any Data Sources referenced for this session
*/references?: SourceReferences|undefined;
/**
* Any data for Custom Fields for this session
*/customFieldData: CustomFieldData[];
/**
* Files attached to the session
*
* Note that files are not included by default. You can configure this per publication as required.
*/files: File[];
/**
* If the session was created from a submission this will include the details for the submission
* A session may have multiple origins if multiple submissions were linked to it
*
* This data exists for sessions created/updated after 16 June 2023
*/origins: ContentOrigin[]
}
Note that a session may not yet be scheduled by the Event Manager. In this case it will not have a start or end time, nor a location.
Tracks
{
/**
* The UUID for the track
*/id: string;
/**
* The name of the track
*/name: string;
/**
* The description of the track formatted in Markdown
*/description: string|null;
/**
* The description of the track formatted in HTML
*/description_HTML: string;
/**
* The color of the track formatted in HEX
* eg #FF00B1
*/color: string|null;
/**
* The UUIDs of labels in this track
*/labels: string[];
/**
* The UUIDs of sessions in this track
*/sessions: string[];
/**
* When the track was last modified in UTC
* eg 2022-02-04T18:03:03.662Z
*/lastModified: Date;
/**
* Any Data Sources referenced for this track
*/references?: SourceReferences|undefined;
/**
* Any data for Custom Fields for this track
*/customFieldData: CustomFieldData[];
/**
* Files attached to the track
*
* Note that files are not included by default. You can configure this per publication as required.
*/files: File[];
}
SessionContributorJoin
A session may have multiple contributors with different roles, eg chair or panel member.
{
/**
* The UUID of the contributor
*/contributor: string;
/**
* If the contributor has a specific role in this session then the UUID of their role. Null otherwise
*/role: string|null;
}
ContributorSessionJoin
A contributor may have different roles across different sessions, eg they may be a chair for one session and a panel member in another.
{
/**
* The UUID of the session
*/session: string;
/**
* If the contributor has a specific role in this session then the UUID of their role. Null otherwise
*/role: string|null;
/**
* If 'Speaker Ordering' is enabled for the event, the position, or order, for this speaker in the session. Null otherwise
*/position: number|null;
}
Custom Field Data
An event may have Custom Fields. If data has been set for that item then the values will be returned in customFieldData
{
/**
* The UUID for this data
*/id: string;
/**
* The value for this data
*/value: string;
/**
* The UUID for this field
*/fieldId: string;
/**
* The type of field
*/fieldType:'text'|'textarea'|'number'|'checkbox'|'radio'|'email'|'url'|'date';
/**
* The name of the field
*/fieldName: string;
}
File
Files are attached to items on the agenda, they can be images, or regular files. For images cropped variants of the image may be available depending on the event configuration.
Note that files are not included by default. To add files browse to the configuration for the publication and set the ‘Do you want to include attached files in the feed’ option.
{
/**
* A unique ID for the file
*/id: string;
/**
* The name of the file
*/fileName: string;
/**
* The type of the file
*/type: {
/**
* This file type was created for this event
*/isPredefined: false;
/**
* The name of the file type eg 'Slides'
*/name: string;
/**
* A uuid for this file type
*/id: string;
} | {
/**
* This is a predefined file type
*/isPredefined: true;
/**
* The name of the file type eg 'Speaker Profile Image'
*/name: string;
/**
* The type of predefined file
* Additional types may be added from time to time
*/id:'generic'||'contributorHeadshot'|'contributorLogo'|'locationLogo'|'locationSponsorLogo'|'sessionHandouts'|'sessionSlides'|'sessionSponsorLogo'|'trackLogo' }
/**
* The size, in bytes, of the file
*/size: number;
/**
* The mimeType of the file
*/mimeType: string;
/**
* The URL to retrieve the file
*/url: string;
/**
* The variants of this file
* For images these are the different sizes of image available
*/variants: FileVariant[];
}
FileVariant
Image files have ‘variants’ which are the image scaled to fit within
The properties are the same as a regular File with an additional scale attribute
File& {
/**
* The size the image was scaled to fit within
* THUMB = 128x128
* SMALL = 256x256
* MEDIUM = 512x512
* LARGE = 1024x1024
* FULL = The same resolution as the originally uploaded image
*/scale:'THUMB'|'SMALL'|'MEDIUM'|'LARGE'|'FULL';
}
DateAndTime
Event dates, speaker and location availability use this structure
{
/**
* The start of the period in UTC
* in ISO 8601 format
* eg 2022-02-04T18:30:00.000Z
*/startDate: string;
/**
* The start date of the period in the timezone of the event
* in YYYY-MM-DD format
* eg 2022-02-04
*/localStartYYYYMMDD: string;
/**
* The start time of the period in the timezone of the event
* in HH:MM format
* eg 17:05
*/localStartHHMM: string;
/**
* The end of the period in UTC
* in ISO 8601 format
* eg 2022-02-04T18:30:00.000Z
*/endDate: Date;
/**
* Thee end date of the period in the timezone of the event
* in YYYY-MM-DD format
* eg 2022-02-04
*/localEndYYYYMMDD: string;
/**
* The end time of the period in the timezone of the event
* in HH:MM format
* eg 17:05
*/localEndHHMM: string;
}
ContentOrigin
Both Contributor and Session have origins property, which is any array containing the detail of which submissions this Contributor of Session was created from.
At present ‘submission’ is the only ContentOrigin type. More types may be added in the future, with different shapes, so do be sure to check that type === 'submission' when processing these.
Once a Contributor or Session has been created the original source of the object may become deleted. In which case deleted will be true in the respective entry below.
{
type:'submission';
/**
* The owner of the Submission. I.e. the Submitter
*/owner: {
id: string;
name: string;
email: string;
deleted: boolean;
};
/**
* The name and id of the Submission from which this object was created
*/submission: {
id: string;
name: string;
deleted: boolean;
};
/**
* The event in which the submission exists
*/event: {
id: string;
name: string;
deleted: boolean;
};
/**
* The current stage of the submission, eg 'Submitted'
*/stage: {
id: string;
name: string;
deleted: boolean;
};
/**
* Any labels attached to the submission
* This includes labels in the same event as the JSON publication and also labels in other events
* So be sure to filter by event.id if you are only interested in fields in a particular event
*/labels: {
id: string;
event: {
id: string;
name: string;
deleted: boolean;
};
name: string;
deleted: boolean;
}[];
}
Source References
If the event is using ‘Data Sources’ then a mapping between the URI of the source, and the ID’s of the objects at the source.
{ [sourceService: string]:string[] };
Webhook
If configured Lineup Ninja will call a webhook after a successful publish of the event. The webhook is called as a POST with this body:
{
/**
* The UUID of the event
*/eventId: string;
/**
* The name of the event
*/eventName: string;
/**
* The timestamp for the publication. You can use this to deduplicate calls to the webhook
* It is in epoch time with milliseconds (A javascript timestamp)
*/publicationTimestamp: number;
/**
* The UUID for the integration. The customer may wish to configure multiple integrations per event,
* for example to different staging and production events. this ID can uniquely identify them
*/integrationId: string;
}
Still can’t find what you’re looking for? Email support@lineupninja.com and one of the team will get back to you as soon as possible.
JSON Endpoint - Embedded References Schema
Info
This page defines the schema when you choose the ‘Embed Referenced’ option. Please see this page for available schema.
Note
As our product develops we will add new fields to the schema without notice.
Where possible we will not deprecate or remove existing fields, if this becomes required we will notify active users of the integration.
Note
When using Embedded References the initial response to the GET will return a 302 with a temporary url for the entire document.
These are the typescript definitions for the document.
Note that ‘speakers’ are called ‘contributors’ in the document.
References are embedded one level deep, for example a session will contain all contributors but those contributors will not in turn include their sessions. To access all sessions for a contributor, access the contributor from the top level contributors object.
{
/**
* Event contains high level details for the event
*/event: Event;
/**
* Contributors are the speakers for the event
*/contributors: Contributor[];
/**
* Labels, aka tags, can be assigned to contributors, sessions, tracks, resources and locations
*/labels: Label[];
/**
* Locations are where sessions take place
*/locations: Location[];
/**
* Resources are things that sessions need. Locations can have resources assigned to them.
* Sessions are then required to be scheduled in a location with matching resources.
*/resources: Resource[];
/**
* Roles model the relationship between contributors and sessions, eg Chair, Panel Member etc...
*/roles: Role[];
/**
* Sessions are sessions....
**/sessions: Session[];
/**
* A session can take place in one or many tracks.
*/tracks: Track[];
}
Event
{
/**
* A uuid for the event
*/id: string;
/**
* The name of the event
*/name: string;
/**
* The timezone for the event.
* Potentially null for awards only events
* Note that all times in this document are UTC
*/timezone: string|null;
/**
* The dates for the event
* Note that these are the times in which sessions can be scheduled
* they are not necessarily the opening hours for the event
*
* endDate may be more than 24 hours later than startDate
*/dates: DateAndTime[];
/**
* If the event has a portal the public url
* that speakers and submitters can use to access their content
*/portalURL: string|null;
};
Contributor (aka Speaker)
{
/**
* The UUID for the speaker
*/id: string;
/**
* The speaker's title eg Mr, Mrs, Mx...
*/honorific: string|null;
/**
* The speaker's first name
*/firstName: string|null;
/**
* The speaker's last name
*/lastName: string|null;
/**
* Any letters after the speaker's name, eg 'Esq', 'OBE' etc...
*/postNominal: string|null;
/**
* The speaker's email. Note that some speakers may not have an email address, it is also not guaranteed to be unique.
*/email: string|null;
/**
* The speaker's company
*/company: string|null;
/**
* The speaker's job title at their company
*/position: string|null;
/**
* The speaker's phone number
*/phone: string|null;
/**
* The speakers country code, eg 'gb'
* The data is sourced from https://www.iso.org/obp/ui/#search/code/
* Our current dataset can be found here https://app.lineup.ninja/countries.json
*/countryCode: string|null;
/**
* The speakers country name, eg 'United Kingdom'
* The data is sourced from https://www.iso.org/obp/ui/#search/code/
* Some names are tweaked to improve presentation eg 'United Kingdom', rather than 'United Kingdom of Great Britain and Northern Ireland (the)'
* Our current dataset can be found here https://app.lineup.ninja/countries.json
*/countryName: string|null;
/**
* The URL for the speaker's X feed
*/twitter: string|null;
/**
* The URL for the speaker's Facebook page
*/facebook: string|null;
/**
* THe URL for the speaker's LinkedIn page
*/linkedin: string|null;
/**
* The URL for the speaker's Instagram page
*/instagram: string|null;
/**
* The URL for the speaker's Youtube channel
*/youtube: string|null;
/**
* The URL for the speaker's GitHub Profile
*/github: string|null;
/**
* The URL for the speaker's Website
*/website: string|null;
/**
* The speakers bio formatted in Markdown
*/bio: string|null;
/**
* The speakers bio formatted in HTML
*/bio_HTML: string;
/**
* A URL to the speakers headshot, 128x128px
*/headshotURL: string|null;
/**
* A URL for the speakers headshot at 256x256px
*/headshot2xURL: string|null;
/**
* A URL for the speakers headshot at 512x512px
*/headshot4xURL: string|null;
/**
* A URL for the speakers headshot at 1024x1024px
*/headshot8xURL: string|null;
/**
* A URL to the speakers company logo, to fit within 128x128px
*/logoURL: string|null;
/**
* A URL to the speakers company logo, to fit within 256x256px
*/logo2xURL: string|null;
/**
* A URL to the speakers company logo, to fit within 512x512px
*/logo4xURL: string|null;
/**
* A URL to the speakers company logo, to fit within 1024x1024px
*/logo8xURL: string|null;
/**
* The speakers availability
*/availability: DateAndTime[];
/**
* The labels assigned to the speaker
*/labels: Label[];
/**
* The sessions assigned to the speaker
*/sessions: {
Session& {
/**
* The name of the role of the speaker. If any
*/roleName: string:null;
}
}[];
/**
* Any notes for the speaker. These are generally intended to be kept private.
*/notes: string|null;
/**
* When the speaker was last modified in UTC.
* eg 2022-02-04T18:03:03.662Z
*/lastModified: Date;
/**
* Any Data Sources referenced for this speaker
*/references?: SourceReferences|undefined;
/**
* Any data for Custom Fields for this speaker
*/customFieldData: CustomFieldData[];
/**
* Files attached to the speaker
*
* Note that files are not included by default. You can configure this per publication as required.
*
* For headshot and logo it is probably easier to use the headshot and logo properties above
*/files: File[];
/**
* If the speaker was created from a submission this will include the details for the submission
* If a speaker was submitted to multiple submissions then there will be multiple origins
*
* This data exists for contributors created/updated after 16 June 2023
*/origins: ContentOrigin[]
}
Labels
{
/**
* The UUID for the label
*/id: string;
/**
* The name of the label
*/name: string;
/**
* A description of the label formatted in Markdown
*/description: string|null;
/**
* A description of the label formatted in HTML
*/description_HTML: string;
/**
* The UUIDs of contributors (speakers) assigned to this label
*/contributors: Contributor[];
/**
* The locations assigned to this label
*/locations: Location[];
/**
* The resources assigned to this label
*/resources: Resource[];
/**
* The sessions assigned to this label
*/sessions: Session[];
/**
* The tracks assigned to this label
*/tracks: Track[];
/**
* When the label was last modified in UTC
* eg 2022-02-04T18:03:03.662Z
*/lastModified: Date;
/**
* Any Data Sources referenced for this label
*/references?: SourceReferences|undefined;
/**
* Any data for Custom Fields for this label
*/customFieldData: CustomFieldData[];
/**
* Files attached to the label
*
* Note that files are not included by default. You can configure this per publication as required.
*/files: File[];
}
Locations
{
/**
* The UUID for the location
*/id: string;
/**
* The name of the location
*/name: string;
/**
* A description of the location formatted in Markdown
*/description: string|null;
/**
* A description of the location formatted in HTML
*/description_HTML: string;
/**
* The color of the location formatted in HEX
* eg #FF00B1
*/color: string|null;
/**
* The availability of the location
*/availability: DateAndTime[];
/**
* The labels assigned to this location
*/labels: Label[];
/**
* The resources assigned to this location
*/resources: Resource[];
/**
* The sessions taking place in this location
*/sessions: Session[];
/**
* The tracks taking place in this location
*/tracks: Track[];
/**
* When the location was last modified in UTC
* eg 2022-02-04T18:03:03.662Z
*/lastModified: Date;
/**
* Any Data Sources referenced for this location
*/references?: SourceReferences|undefined;
/**
* Any data for Custom Fields for this location
*/customFieldData: CustomFieldData[];
/**
* Files attached to the location
*
* Note that files are not included by default. You can configure this per publication as required.
*/files: File[];
}
Resources
{
/**
* The UUID for the resource
*/id: string;
/**
* The name of the resource
*/name: string;
/**
* A description of the resource formatted in Markdown
*/description: string|null;
/**
* A description of the resource formatted in HTML
*/description_HTML: string;
/**
* The labels assigned to this resource
*/labels: Label[];
/**
* The locations with this resource
*/locations: Location[];
/**
* The sessions needing this resource
*/sessions: Session[];
/**
* When the resource was last modified in UTC
* eg 2022-02-04T18:03:03.662Z
*/lastModified: Date;
/**
* Any Data Sources referenced for this resource
*/references?: SourceReferences|undefined;
/**
* Any data for Custom Fields for this resource
*/customFieldData: CustomFieldData[];
/**
* Files attached to the resource
*
* Note that files are not included by default. You can configure this per publication as required.
*/files: File[];
}
Roles
Roles model the relationship between contributors and sessions, eg Chair, Panel Member etc…
{
/**
* The UUID for the role
*/id: string;
/**
* The name of the role
*/name: string;
}
Sessions
{
/**
* The UUID for the session
*/id: string;
/**
* The name of the session
*/name: string;
/**
* A code for the session. This is created by the Event Manager, eg TECH101.
*/code: string|null;
/**
* A description of the session formatted in Markdown
*/description: string|null;
/**
* A description of the session formatted in HTML
*/description_HTML: string;
/**
* If the session is scheduled, the start date of the session in UTC
* in ISO 8601 format
* eg 2022-02-04T18:05:00.000Z
*/startDate: Date|null;
/**
* The the session is scheduled, the start date of the session in the timezone of the event
* in YYYY-MM-DD format
* eg 2022-02-04
*/localStartYYYYMMDD: string|null;
/**
* If the session is scheduled, the start time of the session in the timezone of the event
* in HH:MM format
* eg 17:05
*/localStartHHMM: string|null;
/**
* If the session is scheduled, the end date of the session in UTC
* in ISO 8601 format
* eg 2022-02-04T18:30:00.000Z
*/endDate: Date|null;
/**
* The the session is scheduled, the end date of the session in the timezone of the event
* in YYYY-MM-DD format
* eg 2022-02-04
*/localEndYYYYMMDD: string|null;
/**
* If the session is scheduled, the end time of the session in the timezone of the event
* in HH:MM format
* eg 17:05
*/localEndHHMM: string|null;
/**
* The duration of the session in milliseconds
*/duration: number|null;
/**
* If the session is scheduled, the location it is scheduled in
*/location: Location|null;
/**
* Any notes for the location. These are generally intended to be kept private.
*/notes: string|null;
/**
* A URL to a session image, to fit within 128x128px
* The event manager can choose to share the Session Sponsor Logo, or an alternative image type
*/imageURL: string|null;
/**
* A URL to a session image, to fit within 256x256px
* The event manager can choose to share the Session Sponsor Logo, or an alternative image type
*/image2xURL: string|null;
/**
* A URL to a session image, to fit within 512x512px
* The event manager can choose to share the Session Sponsor Logo, or an alternative image type
*/image4xURL: string|null;
/**
* A URL to a session image, to fit within 1024x1024px
* The event manager can choose to share the Session Sponsor Logo, or an alternative image type
*/image8xURL: string|null;
/**
* The contributors (speakers) for this session
*/contributors: {
Contributor& {
/**
* The name of the role of the speaker. If any
*/roleName: string:null;
}
}[];
/**
* The labels assigned to this session
*/labels: Label[];
/**
* The resources assigned to this session
*/resources: Resource[];
/**
* The tracks assigned to this session
*/tracks: Track[];
/**
* When the session was last modified in UTC
* eg 2022-02-04T18:03:03.662Z
*/lastModified: Date;
/**
* Any Data Sources referenced for this session
*/references?: SourceReferences|undefined;
/**
* Any data for Custom Fields for this session
*/customFieldData: CustomFieldData[];
/**
* Files attached to the session
*
* Note that files are not included by default. You can configure this per publication as required.
*/files: File[];
/**
* If the session was created from a submission this will include the details for the submission
* A session may have multiple origins if multiple submissions were linked to it
*
* This data exists for sessions created/updated after 16 June 2023
*/origins: ContentOrigin[]
}
Note that a session may not yet be scheduled by the Event Manager. In this case it will not have a start or end time, nor a location.
Tracks
{
/**
* The UUID for the track
*/id: string;
/**
* The name of the track
*/name: string;
/**
* The description of the track formatted in Markdown
*/description: string|null;
/**
* The description of the track formatted in HTML
*/description_HTML: string;
/**
* The color of the track formatted in HEX
* eg #FF00B1
*/color: string|null;
/**
* The labels in this track
*/labels: Label[];
/**
* The sessions in this track
*/sessions: Session[];
/**
* When the track was last modified in UTC
* eg 2022-02-04T18:03:03.662Z
*/lastModified: Date;
/**
* Any Data Sources referenced for this track
*/references?: SourceReferences|undefined;
/**
* Any data for Custom Fields for this track
*/customFieldData: CustomFieldData[];
/**
* Files attached to the track
*
* Note that files are not included by default. You can configure this per publication as required.
*/files: File[];
}
Custom Field Data
An event may have Custom Fields. If data has been set for that item then the values will be returned in customFieldData
{
/**
* The UUID for this data
*/id: string;
/**
* The value for this data
*/value: string;
/**
* The UUID for this field
*/fieldId: string;
/**
* The type of field
*/fieldType:'text'|'textarea'|'number'|'checkbox'|'radio'|'email'|'url'|'date';
/**
* The name of the field
*/fieldName: string;
}
File
Files are attached to items on the agenda, they can be images, or regular files. For images cropped variants of the image may be available depending on the event configuration.
Note that files are not included by default. To add files browse to the configuration for the publication and set the ‘Do you want to include attached files in the feed’ option.
{
/**
* A unique ID for the file
*/id: string;
/**
* The name of the file
*/fileName: string;
/**
* The type of the file
*/type: {
/**
* This file type was created for this event
*/isPredefined: false;
/**
* The name of the file type eg 'Slides'
*/name: string;
/**
* A uuid for this file type
*/id: string;
} | {
/**
* This is a predefined file type
*/isPredefined: true;
/**
* The name of the file type eg 'Speaker Profile Image'
*/name: string;
/**
* The type of predefined file
* Additional types may be added from time to time
*/id:'generic'||'contributorHeadshot'|'contributorLogo'|'locationLogo'|'locationSponsorLogo'|'sessionHandouts'|'sessionSlides'|'sessionSponsorLogo'|'trackLogo' }
/**
* The size, in bytes, of the file
*/size: number;
/**
* The mimeType of the file
*/mimeType: string;
/**
* The URL to retrieve the file
*/url: string;
/**
* The variants of this file
* For images these are the different sizes of image available
*/variants: FileVariant[];
}
FileVariant
Image files have ‘variants’ which are the image scaled to fit within
The properties are the same as a regular File with an additional scale attribute
File& {
/**
* The size the image was scaled to fit within
* THUMB = 128x128
* SMALL = 256x256
* MEDIUM = 512x512
* LARGE = 1024x1024
* FULL = The same resolution as the originally uploaded image
*/scale:'THUMB'|'SMALL'|'MEDIUM'|'LARGE'|'FULL';
}
DateAndTime
Event dates, speaker and location availability use this structure
{
/**
* The start of the period in UTC
* in ISO 8601 format
* eg 2022-02-04T18:30:00.000Z
*/startDate: string;
/**
* The start date of the period in the timezone of the event
* in YYYY-MM-DD format
* eg 2022-02-04
*/localStartYYYYMMDD: string;
/**
* The start time of the period in the timezone of the event
* in HH:MM format
* eg 17:05
*/localStartHHMM: string;
/**
* The end of the period in UTC
* in ISO 8601 format
* eg 2022-02-04T18:30:00.000Z
*/endDate: Date;
/**
* Thee end date of the period in the timezone of the event
* in YYYY-MM-DD format
* eg 2022-02-04
*/localEndYYYYMMDD: string;
/**
* The end time of the period in the timezone of the event
* in HH:MM format
* eg 17:05
*/localEndHHMM: string;
}
ContentOrigin
Both Contributor and Session have origins property, which is any array containing the detail of which submissions this Contributor of Session was created from.
At present ‘submission’ is the only ContentOrigin type. More types may be added in the future, with different shapes, so do be sure to check that type === 'submission' when processing these.
Once a Contributor or Session has been created the original source of the object may become deleted. In which case deleted will be true in the respective entry below.
{
type:'submission';
/**
* The owner of the Submission. I.e. the Submitter
*/owner: {
id: string;
name: string;
email: string;
deleted: boolean;
};
/**
* The name and id of the Submission from which this object was created
*/submission: {
id: string;
name: string;
deleted: boolean;
};
/**
* The event in which the submission exists
*/event: {
id: string;
name: string;
deleted: boolean;
};
/**
* The current stage of the submission, eg 'Submitted'
*/stage: {
id: string;
name: string;
deleted: boolean;
};
/**
* Any labels attached to the submission
* This includes labels in the same event as the JSON publication and also labels in other events
* So be sure to filter by event.id if you are only interested in fields in a particular event
*/labels: {
id: string;
event: {
id: string;
name: string;
deleted: boolean;
};
name: string;
deleted: boolean;
}[];
}
Source References
If the event is using ‘Data Sources’ then a mapping between the URI of the source, and the ID’s of the objects at the source.
{ [sourceService: string]:string[] };
Still can’t find what you’re looking for? Email support@lineupninja.com and one of the team will get back to you as soon as possible.
Integration Partner Guide
If you are vendor considering integrating our JSON Feed for a client project, we would love to maximite the value of your work by offering you the opportunity becoming an official Integration Partner.
Inclusion in the integration listings on our website.
If desired, shared marketing to announce the integration.
Providing a dedicated integration tile on our integrations page has two main benefits:
It highlights the integration exists to our existing clients.
The integration can be tweaked to make usage simpler.
There are a couple of existing options we have to for a dedicated integration, and we are open to discuss further tweaks as required.
Integration Types
We have a two options which can reduce the number of steps required by the Event Manager.
Firstly if we look at how the unbranded JSON Feed works. It asks the user to provide the following
A username
A password
An optional webhook URL
Whether the ’embedded’ or ‘references by id’ schema is preferred.
It then generates a url where the feed can be requested. The Event Manager then needs to pass these details to your side so you can make appropriate configuration.
On your side the feed can their either be polled every few minutes or, preferably, you can provide a webhook that we will notify each time the agenda is published. The publication happens either when the Event Manager chooses to publish their latest updates, or on an hourly or daily schedule.
Webhook Only Integration
This is our preferred method because it minimizes the work the Event Manger needs to do, and ensures fastest publishing. It extends our standard webhook to include all the details required to pull the feed.
This method works like this:
You generate a webhook for the client, this is usually one per event for simplicity, but you can share one across multiple events if you are able to connect the data on your side.
The user creates the integration for their event and has only this option to complete:
When the event is published we POST the following JSON to the webhook, this includes the username, password, url for the feed and the unique id of the event. Note that the comments are not included, it is regular JSON.
{
// This is the unique ID of the event
"eventId": "c0ffeeaa-72d7-4f4c-89da-1e36165bcf5f",
// The name of the event
"eventName": "Portal With Matching Email",
// A Unix Time with milliseconds of when the event was published
"publicationTimestamp": 1750674017249,
// A unique id for this particular integration. In the unlikely event the
// event manager configures multiple integration per event this will be different
// so you can identify them
"integrationId": "c0ffeeaa-74b2-4917-a45a-3eb5e427c711",
// The username to use when requesting the feed - HTTP Basic Auth
"username": "integration-partner",
// The password to use when requesting the feed - HTTP Basic Auth
"password": "c0ffeeaa-d4bd-410b-9737-178ba99341a6",
// The URL to use to request the feed
"url": "https://api.lineup.ninja/json/v1/publish/team/c0ffeeaa-a38a-467c-8496-df18ec39d00a/target/c0ffeeaa-74b2-4917-a45a-3eb5e427c711"}
You listen for this webhook, and handle as appropriate. If you are using the same webhook url for multiple events then use the eventId and eventName to distinguish them.
Password and optional Webhook Integration
Our alternative method is simpler to integrate, and is the way to go if you are not providing a webhook, or it is optional.
This method works like this
The client creates in the integration on our side. If you are providing a webhook they can input the URL when creating the integration.
We generate a username, password and URL for the feed. The Event Manager can then copy these details to your side.
The Event Manager uses these details to configure the integration on your side
How to proceed
Tiles on our integration page look like this:
We will need to following to add your tile:
The logo you would like to use. Ideally a SVG with a transparent background. Alternatively any small web appropriate image with, preferably, a transparent background.
The text you would like displayed on the integration tile.
Whether you want the ‘Embedded References’ or ‘References by ID’ schema
Which of the ‘Webhook Only’ or ‘Password and Optional Webhook’ methods you want from the options above. If you are using the ‘Password’ mode, please specify if you will be providing a Webhook or not.
If you are not already in contact with us please send an email to hello@lineupninja.com, otherwise please send the details to your contact.
We look forward to working with you!
Spreadsheet Endpoint
Warning
The Spreadsheet endpoint is for use for integrating with 3rd party systems. To produce a spreadsheet for download use an Agenda Report
Lineup Ninja can publish to an endpoint that returns a spreadsheet. Your developer can use this endpoint to retrieve the agenda data for your event and integrate it with your systems.
If you want to download a spreadsheet use an Agenda Report
A developer guide to working with the Spreadsheet Endpoint
Still can’t find what you’re looking for? Email support@lineupninja.com and one of the team will get back to you as soon as possible.
Subsections of Spreadsheet Endpoint
Configuration Guide for Spreadsheet Endpoint
Warning
The Spreadsheet endpoint is for use for integrating with 3rd party systems. To produce a spreadsheet for download use an Agenda Report
Create the integration
Follow these steps to get the integration initially configured.
In your Lineup Ninja event, navigate to
Publish Agenda
and scroll down to ‘Additional Publications’ at the bottom of the page then click the ‘Create Endpoint’ button under the spreadsheet type you want. Either Excel, ODS, or CSV. This will create a new publication.
A screen will pop up where you can enter a username and password to secure the endpoint. For the ‘Webhook URL to call after publishing’ and ‘How should related items be referenced’ questions ask your developer to review the developer documentation. You can leave these options as default and update them later if you have not yet spoken with them.
See the documentation further down this page for details on the other options you can set.
Now click ‘Publish’ to publish the agenda to the URL shown on the screen.
Now direct your developer to this page and give them the URL and the username and password you chose.
What data is contained in the Spreadsheet?
There are four sheets available in the spreadsheet endpoint. You can configure which columns are shown in each sheet, or use the default configuration.
Sessions Sheet - This contains one row per session
Speakers Sheet - This contains one row per speaker
Combined Sessions and Speakers Sheet - One row per combination of Speaker and Session - This contains one row per combination of session and speaker. For example if a session has 3 speakers, then there will be 3 rows in the sheet. One containing the session and the first speaker, one containing the session and the second speaker, and one containing the session and the third speaker
Combined Sheet - One row per session - This contains one row per session, then repeats the speaker columns as many times as necessary to include all the speakers for a session on the same row. For example a session with 3 speakers will have ‘First Name - 1’, ‘First Name - 2’ and ‘First Name - 3’ columns. This sheet it intended for use in a mail merge into Microsoft Word or similar.
How can I filter the published content?
You can filter which Speakers and Sessions will be published based on a number of criteria. Some common use cases for filters are:
Preventing ‘Placeholder’ sessions from being published
Holding back a Speaker who is not yet ready to be announced
Excluding sessions scheduled during the ‘build up’ day for the event
Only publishing speakers who have confirmed their slot
Removing a particular location, or track from the published schedule
Anything you can think of using labels!
For Speakers you can filter in 3 ways
Choose which speakers are to be published based on their relationship to sessions
(If Speaker Confirmation is enabled): Publish speakers that have a confirmed session that is published and not filtered out.
Publish speakers that are speaking on any session that is published and not filtered out.
Publish all speakers
Publish no speakers
Apply more granular filters with labels
Only publish speakers with a particular label. For example you might want to use a ‘Content Reviewed’ label to flag speakers that have had their content reviewed.
Exclude speakers with a particular label. For example you might want to exclude a ‘Do not publish’ label to prevent publishing of speakers who are not yet ready to be published.
For Sessions you can filter in numerous ways
Choose which sessions are to be published based on their relationship to speakers
Publish All Scheduled Sessions. Publishes sessions regardless of whether they have confirmed speakers or not.
(If Speaker Confirmation is enabled): Publish sessions that have one confirmed speaker.
(If Speaker Confirmation is enabled): Publish sessions that have all their speakers confirmed.
Publish All Sessions (available on Lineup Ninja Agenda App only)
Apply filters with labels
Only publish sessions with a particular label. For example you might want to use a ‘Content Reviewed’ label to flag sessions that have had their content reviewed.
Exclude session with a particular label. For example you might want to exclude a ‘Placeholder’ label to prevent publishing of sessions which are not yet populated.
Filter by location
Only publish sessions in a particular location, or locations. This can be useful if you are publishing an agenda for just one or two locations.
Exclude sessions in a particular location, or locations. This can be useful if you have scheduled sessions in your Green Room or similar back stage location.
Filter by resource
Only publish sessions needing a particular resource. This could be useful if you are producing an agenda for a particular team that manages some resources.
Exclude sessions needing a particular resource.
Filter by Date
Only publish sessions in a date or dates. Useful if you are producing an agenda for a particular day.
You can exclude a date or dates from your publication. Useful if you have dates for build up and tear down in your agenda.
Filter by Track
Only publish sessions in a particular track or tracks. Useful if you are producing separate agenda for separate parts of your event
Exclude sessions on a particular track. Can be useful to block presenting of a track until a product launch has happened.
To configure filters:
Click ‘Publish Agenda’
Click on the name for your existing publication
Click ‘Configure’
Expand either the ‘Speaker Configuration’ or ‘Session Configuration’ section
Expand the corresponding ‘Filter Speakers’ or ‘Filter Sessions’ sections and configure the filters you need
Save and republish
How can I merge locations, tracks and roles when publishing?
When publishing you can merge content together. This enables you to publish a simpler agenda for your attendees than the one you are using to plan your event.
You can choose to merge these types of data:
Locations. Merging location A into location B will show all sessions in location A as taking place in location B. This can be useful if you have multiple locations configured for scheduling purposes that will be experienced by the attendee as a single location.
Tracks. Merging track A into track B will show all sessions in track A as being in track B. This can be useful if you have some tracks with only a small number of sessions and wish to present this sessions as being in a more populous track.
Roles. Merging role A into role B will show speakers with role A has having role B. This can be useful if you have a lot of roles internally that are not intended to be shown to attendees. You can merge them into a role with a name appropriate for your attendees.
When merging the location, track, or role that you are merging into does not have to have any sessions itself. So you can use this to show a different name to attendees than you are using internally. For example you could create a ‘Main Hall’ location, and merge ‘Building B - Hall A’ into that location so attendees see ‘Main Hall’ in their agenda.
How can I embargo content that is not yet ready for the public?
You can choose to embargo session titles and descriptions if you have content that should only be shown to the public after being announced in the event.
An embargo is applied by using labels to identify the sessions that should have an embargoed session title or description.
For example if you have a label ‘New Product Launch’, you can configure an embargo to hide the session title and description from sessions with that label. Following the launch of the product you can remove the embargo and republish the agenda.
If you embargo a session or description you can replace the original text with something to indicate that the session will be published later, for example ‘Super Secret Session’.
The speakers for a session will still be shown when it is embargo’ed. To exclude a session, including it’s speakers from being published then use ‘Session Filters’ rather than an ‘Embargo Content’.
To configure an embargo:
Click ‘Publish Agenda’
Click on the name for your existing publication
Click ‘Configure’
Expand the ‘Session Configuration’ section
Expand the ‘Embargo Content’ sections and configure the embargo that you need
Save and republish
How can I publish automatically?
Warning
Consider your teams workflow as a team before enabling automatic publishing. When you enable automatic publishing there is a potential for the agenda to be published when you have content that is not ready for publication.
To schedule publishing scroll down to the ‘Scheduled Publishing’ part of the configuration.
You can then choose whether to publish once per hour, or once per day. If you choose to publish each day the publication will occur around 3am in the timezone of your event.
Still can’t find what you’re looking for? Email support@lineupninja.com and one of the team will get back to you as soon as possible.
Developer Documentation for Spreadsheet Endpoint
Warning
The Spreadsheet endpoint is for use for integrating with 3rd party systems. To produce a spreadsheet for download use an Agenda Report
Intro
The Spreadsheet Endpoint makes agenda data available as an Excel, Open Document or CSV file at an endpoint.
To create an endpoint a new Spreadsheet publication needs to be configured by an event manager, this will generate a unique URL for the event.
If the event manager has asked you for answers to the ‘Webhook’ then review the ‘Webhook’ documentation below.
Requesting the data
Warning
The endpoint is not for consumption directly by an attendee app, or other similar software. You must ingest the data into your system and publish it to attendees and other users yourself.
To request the event data perform a GET to the URL you have been provided by the event manager. This URL is unique for each publication. The endpoint may require credentials using HTTP Basic Auth depending on the settings in the configuration.
You will receive 302 redirect with a temporary url for the location of the data. Note that the destination of this 302 will change for each request and will expire. You should begin your request with the initial url starting with http://api.lineup.ninja each time.
Refreshing the data
The event manager will make changes to their content over the course of time. To receive the changes you can either poll every 5 minutes, or integrate the webhook to receive an instant notification that new event data is ready.
If you are polling the event data be sure to schedule the removal of the polling after the event has completed.
When content is removed from an event, eg a speaker pulls out, you will not receive an explicit notification. Instead, because the document contains the full set of data for the event, you should treat that absence of a previously existing object as a request to delete that object.
Profile Photos / Company Logos
Profile Photos (aka headshots) and Company Logos are not included by default by can be added by the event manager.
They are available at these sizes.
128x128
256x256
512x512
1024x1024
To add the size that you want to the sheet perform the following actions
Navigate to
Publish Agenda
, click the name of the publication in the table at the top of the page.
Click ‘Configure’.
Expand out the sheet you want to modify
Scroll down to the Speaker Profile Picture, and Speaker Company Logo options and toggle on the ones you want to include.
Company Logos are included with the original aspect ratio and scaled to fit the same sizes as the headshots.
Files
The event manager can choose to include additional links to files attached to speakers and sessions. To configure this
Navigate to
Publish Agenda
, click the name of the publication in the table at the top of the page.
Click ‘Configure’.
Expand out the sheet you want to modify
Scroll down to the file type you wish to include and toggle it on.
The included links are unique to each publication for the event, if the event manager deletes the publication the links will cease to operate.
Webhook
If configured Lineup Ninja will call a webhook after a successful publish of the event. The webhook is called as a POST with this body:
{
/**
* The UUID of the event
*/eventId: string;
/**
* The name of the event
*/eventName: string;
/**
* The timestamp for the publication. You can use this to deduplicate calls to the webhook
* It is in epoch time with milliseconds (A javascript timestamp)
*/publicationTimestamp: number;
/**
* The UUID for the integration. The customer may wish to configure multiple integrations per event,
* for example to different staging and production events. this ID can uniquely identify them
*/integrationId: string;
}
To create the webhook ask the event manager to edit the configuration to set the value of ‘Webhook URL to call after publishing’ to your desired URL.
Still can’t find what you’re looking for? Email support@lineupninja.com and one of the team will get back to you as soon as possible.
Integrate Agenda
Lineup Ninja integrates to many other event tech platforms to ensure your event runs smoothly, with the correct event data reflecting across your platforms.
Still can’t find what you’re looking for? Email support@lineupninja.com and one of the team will get back to you as soon as possible.
Subsections of Integrate Agenda
All In The Loop
Lineup Ninja can publish your agenda in an All In The Loop mobile app. You can push your agenda with an initial set of content, then refresh as your agenda evolves.
Create the integration
Follow these steps to get the integration initially configured.
Ask All In The Loop for a ‘Webhook URL’ for your event.
In Lineup Ninja, navigate to
Agenda Planning
>
Publish Agenda
and click the ‘Integrate’ button under ‘All In The Loop’. This will create a new integration.
A screen will pop up where you can input the ‘Webhook URL’ you have been given by All In The Loop. You can also configure the integration to only include a subset of your agenda content if you wish. Save the configuration when complete.
Click ‘Publish’ to publish your agenda. This will make the agenda available for All In The Loop to import.
Publishing your schedule
To update the speakers and sessions in All In The Loop the schedule needs to be published. This will update the data in All In The Loop providing the ‘webhook’ has been configured.
To publish your schedule just click the ‘Publish’ button!
How are Titles and Post Nominals Handled?
You can configure how Titles and Post Nominals are handled in the ‘Speaker Configuration’ / ‘Titles and Post Nominals’ section of the configuration.
Titles
Titles can either be published into All In the Loop as either an Honorific or merged into the First Name. By default the titles is published as the Honorific but it is not used in a lot of places so you might want to merge into the First Name to enable it to show in more places.
You can also choose to filter out some common titles such as Mr, Mrs, Ms etc… or you can choose to skip publishing Titles entirely.
Post Nominals
Post nominals are published into a Designation field in All In the Loop.
You can also choose to filter out unwanted Post Nominals, or you can choose to skip publishing Post Nominals entirely.
How can I filter the published content?
You can filter which Speakers and Sessions will be published based on a number of criteria. Some common use cases for filters are:
Preventing ‘Placeholder’ sessions from being published
Holding back a Speaker who is not yet ready to be announced
Excluding sessions scheduled during the ‘build up’ day for the event
Only publishing speakers who have confirmed their slot
Removing a particular location, or track from the published schedule
Anything you can think of using labels!
For Speakers you can filter in 3 ways
Choose which speakers are to be published based on their relationship to sessions
(If Speaker Confirmation is enabled): Publish speakers that have a confirmed session that is published and not filtered out.
Publish speakers that are speaking on any session that is published and not filtered out.
Publish all speakers
Publish no speakers
Apply more granular filters with labels
Only publish speakers with a particular label. For example you might want to use a ‘Content Reviewed’ label to flag speakers that have had their content reviewed.
Exclude speakers with a particular label. For example you might want to exclude a ‘Do not publish’ label to prevent publishing of speakers who are not yet ready to be published.
For Sessions you can filter in numerous ways
Choose which sessions are to be published based on their relationship to speakers
Publish All Scheduled Sessions. Publishes sessions regardless of whether they have confirmed speakers or not.
(If Speaker Confirmation is enabled): Publish sessions that have one confirmed speaker.
(If Speaker Confirmation is enabled): Publish sessions that have all their speakers confirmed.
Publish All Sessions (available on Lineup Ninja Agenda App only)
Apply filters with labels
Only publish sessions with a particular label. For example you might want to use a ‘Content Reviewed’ label to flag sessions that have had their content reviewed.
Exclude session with a particular label. For example you might want to exclude a ‘Placeholder’ label to prevent publishing of sessions which are not yet populated.
Filter by location
Only publish sessions in a particular location, or locations. This can be useful if you are publishing an agenda for just one or two locations.
Exclude sessions in a particular location, or locations. This can be useful if you have scheduled sessions in your Green Room or similar back stage location.
Filter by resource
Only publish sessions needing a particular resource. This could be useful if you are producing an agenda for a particular team that manages some resources.
Exclude sessions needing a particular resource.
Filter by Date
Only publish sessions in a date or dates. Useful if you are producing an agenda for a particular day.
You can exclude a date or dates from your publication. Useful if you have dates for build up and tear down in your agenda.
Filter by Track
Only publish sessions in a particular track or tracks. Useful if you are producing separate agenda for separate parts of your event
Exclude sessions on a particular track. Can be useful to block presenting of a track until a product launch has happened.
To configure filters:
Click ‘Publish Agenda’
Click on the name for your existing publication
Click ‘Configure’
Expand either the ‘Speaker Configuration’ or ‘Session Configuration’ section
Expand the corresponding ‘Filter Speakers’ or ‘Filter Sessions’ sections and configure the filters you need
Save and republish
How can I merge locations and tracks when publishing?
When publishing you can merge content together. This enables you to publish a simpler agenda for your attendees than the one you are using to plan your event.
You can choose to merge these types of data:
Locations. Merging location A into location B will show all sessions in location A as taking place in location B. This can be useful if you have multiple locations configured for scheduling purposes that will be experienced by the attendee as a single location.
Tracks. Merging track A into track B will show all sessions in track A as being in track B. This can be useful if you have some tracks with only a small number of sessions and wish to present this sessions as being in a more populous track.
When merging the location, or track that you are merging into does not have to have any sessions itself. So you can use this to show a different name to attendees than you are using internally. For example you could create a ‘Main Hall’ location, and merge ‘Building B - Hall A’ into that location so attendees see ‘Main Hall’ in their agenda.
How can I embargo content that is not yet ready for the public?
You can choose to embargo session titles and descriptions if you have content that should only be shown to the public after being announced in the event.
An embargo is applied by using labels to identify the sessions that should have an embargoed session title or description.
For example if you have a label ‘New Product Launch’, you can configure an embargo to hide the session title and description from sessions with that label. Following the launch of the product you can remove the embargo and republish the agenda.
If you embargo a session or description you can replace the original text with something to indicate that the session will be published later, for example ‘Super Secret Session’.
The speakers for a session will still be shown when it is embargo’ed. To exclude a session, including it’s speakers from being published then use ‘Session Filters’ rather than an ‘Embargo Content’.
To configure an embargo:
Click ‘Publish Agenda’
Click on the name for your existing publication
Click ‘Configure’
Expand the ‘Session Configuration’ section
Expand the ‘Embargo Content’ sections and configure the embargo that you need
Save and republish
How are Sub Sessions handled?
If you are using Sub Sessions the following will happen:
Speakers on the Sub Sessions will be merged into the parent.
You can optionally choose to include the titles and timings of the Sub Sessions in the description of the parent session.
You can find the configuration in the ‘Session Configuration’ / ‘Sub Session Configuration’ section of the integration configuration.
An example template is provided for including the timings of the Sub Sessions. If you require additional placeholder fields please get in touch.
You can choose between 24hr and 12hr time for the times for the Sub Sessions. Times will be shown in the timezone of the event.
Tracks on Sub Sessions are merged into the parent session.
How can I publish automatically?
Warning
Consider your teams workflow as a team before enabling automatic publishing. When you enable automatic publishing there is a potential for the agenda to be published when you have content that is not ready for publication.
To schedule publishing scroll down to the ‘Scheduled Publishing’ part of the configuration.
You can then choose whether to publish once per hour, or once per day. If you choose to publish each day the publication will occur around 3am in the timezone of your event.
Still can’t find what you’re looking for? Email support@lineupninja.com and one of the team will get back to you as soon as possible.
ASP
Lineup Ninja can publish your schedule into an ASP website. You can perform an initial import of your schedule then publish it again whenever you have new changes ready to go.
A couple of things to note before you start:
If you delete a speaker, session or track in Lineup Ninja it will be marked as ‘inactive’ in ASP.
After publishing it may take up to 15 minutes for the change to be shown in all places in the ASP site.
The times for your sessions in Lineup Ninja will be published in the time zone you have configured for the event.
Only scheduled sessions will be published. You can optionally choose to only include confirmed sessions if you wish.
If you unschedule a session you have previously published in ASP it will be marked ‘inactive’ until you schedule it again.
Lineup Ninja can either create a new Seminar, using the name of your event, or you can provide an existing Seminar ID.
Create the integration
In your Lineup Ninja event, navigate to
Agenda Planning
>
Publish Agenda
and click the ‘Integrate’ button under ‘ASP’. This will create a new integration.
Fill in the form with the required details. These will be given to you by ASP. Specifically you will need
An API Key
A Secret
A Site ID
Optionally A Seminar ID. If you do not provide one it will be created automatically.
Track and Location Descriptions
By default Lineup Ninja will use the Track and Location descriptions you have set in Lineup Ninja to set the corresponding fields in ASP. If you want to configure the fields independently then choose ‘Do not publish from Lineup Ninja’ in the corresponding configuration option.
Location Area
Lineup Ninja can optionally set the Area for a Location in ASP. To do this perform the following.
Navigate to
Custom Fields
and create a new custom field for a Location. The field may be of any type.
For each location set a value for this custom field. If you have many locations this will be easiest to do if you add the field to the list table using the settings wheel.
In the configuration for the ASP integration choose the name of the Custom Field for the ‘Which field represents the ‘Area’ for a Location’ option.
Session Types
Lineup Ninja can optionally set the type of a Session in ASP. To do this perform the following.
Navigate to
Custom Fields
and create a new custom field for a Session. The field may be of any type, but Choose One is preferred. Then add each different type of session as an option for the ‘Choose One’.
For each session that needs a type other than ‘Session’ set a value for this custom field.
In the configuration for the ASP integration choose the name of the Custom Field for the ‘Which field represents the ‘Type’ for a Session’ option.
Adding Speaker Categories
The integration can be configured so that Labels assigned to Speakers map though to Categories on ASP.
To map to a category in ASP it must be a child category.
To add a mapping to a Label you add a special tag into the notes field for the label.
Start by navigating to the Label you would like to map and then edit the notes field.
The code you need to add indicates either the name of the parent and child category, the code of the category, or both.
For example, if you have a parent category of ‘Speaker Type’ and a child category of ‘Speaker’, and you know the code for the category is 123 then use this value somewhere within the notes:
ASP_CATEGORY(Speaker Type/Speaker:123)
If you do not know the code, then you can leave that out like so
ASP_CATEGORY(Speaker Type/Speaker)
If you think you may rename the category in ASP then you can map to the code only, for example
ASP_CATEGORY(:123)
Can I add tags to an ASP session?
Yes you can map selected Lineup Ninja tags to ASP sessions. To do this choose the labels you would like to map in the ‘Session Configuration’ / ‘Session Tags’ field.
Note that labels with spaces in their names will generate multiple tags. For example ‘Keynote Talk’ will create labels of ‘Keynote’ and ‘Talk’. This helps the tags work effectively when the user searches for content in ASP.
Can I set the Abstract for an ASP session?
Yes, this is achieved using a Custom Field in Lineup Ninja. Follow these steps.
Navigate to ‘Event Settings’, ‘Custom Fields’
Create a new Session Custom Field as either ‘Short Answer’ or ‘Paragraph’
Add the data you need for your sessions
In the configuration for the ASP integration choose the Custom Field you created for the ‘Optional: Which field represents the ‘Abstract’ for a session’ option
How do Speaker Roles map to ASP?
Lineup Ninja Roles map to Speaker Lists in an ASP Seminar. To find the identifier for a Speaker List navigate into your Seminar in Showoff, then click the ‘More’ menu on the top right and choose ‘Custom Fields’.
For each Speaker List in ASP make a note of the value in the 3rd column.
To add a new Speaker List click ‘Create Custom Field’ and choose a ‘Field Type’ of ‘Speakers’ and set the ‘Label’ to the name for the role. Then save the column.
In the Lineup Ninja configuration expand the ‘Speaker Role Mappings’ section in ‘Speaker Configuration’ and you’ll see a list of all your Lineup Ninja roles. Input the value you noted from Showoff into the field for the role you want to map.
The save and publish.
How do I map session custom fields to ASP?
If you event has additional Session fields available in ASP then you can add a mapping from a Lineup Ninja Session Custom Field.
To add a Session Custom Field mapping do this:
Ask ASP for the name of this field as it appears in their API.
Create a custom field for the Session in Lineup Ninja in
Custom Fields
.
Set the the value on the Sessions you need to have this value.
In the configuration for the ASP integration expand the ‘Session Configuration’ then the ‘Session Custom Fields’ section and expand it.
Enter the id of the field that ASP gave you into the Session Custom Field you want to map.
Save and publish.
Publishing your schedule
To update the schedule in ASP the schedule needs to be published. This will update the data in ASP.
To publish your schedule just click the ‘Publish’ button!
How can I filter the published content?
You can filter which Speakers and Sessions will be published based on a number of criteria. Some common use cases for filters are:
Preventing ‘Placeholder’ sessions from being published
Holding back a Speaker who is not yet ready to be announced
Excluding sessions scheduled during the ‘build up’ day for the event
Only publishing speakers who have confirmed their slot
Removing a particular location, or track from the published schedule
Anything you can think of using labels!
For Speakers you can filter in 3 ways
Choose which speakers are to be published based on their relationship to sessions
(If Speaker Confirmation is enabled): Publish speakers that have a confirmed session that is published and not filtered out.
Publish speakers that are speaking on any session that is published and not filtered out.
Publish all speakers
Publish no speakers
Apply more granular filters with labels
Only publish speakers with a particular label. For example you might want to use a ‘Content Reviewed’ label to flag speakers that have had their content reviewed.
Exclude speakers with a particular label. For example you might want to exclude a ‘Do not publish’ label to prevent publishing of speakers who are not yet ready to be published.
For Sessions you can filter in numerous ways
Choose which sessions are to be published based on their relationship to speakers
Publish All Scheduled Sessions. Publishes sessions regardless of whether they have confirmed speakers or not.
(If Speaker Confirmation is enabled): Publish sessions that have one confirmed speaker.
(If Speaker Confirmation is enabled): Publish sessions that have all their speakers confirmed.
Publish All Sessions (available on Lineup Ninja Agenda App only)
Apply filters with labels
Only publish sessions with a particular label. For example you might want to use a ‘Content Reviewed’ label to flag sessions that have had their content reviewed.
Exclude session with a particular label. For example you might want to exclude a ‘Placeholder’ label to prevent publishing of sessions which are not yet populated.
Filter by location
Only publish sessions in a particular location, or locations. This can be useful if you are publishing an agenda for just one or two locations.
Exclude sessions in a particular location, or locations. This can be useful if you have scheduled sessions in your Green Room or similar back stage location.
Filter by resource
Only publish sessions needing a particular resource. This could be useful if you are producing an agenda for a particular team that manages some resources.
Exclude sessions needing a particular resource.
Filter by Date
Only publish sessions in a date or dates. Useful if you are producing an agenda for a particular day.
You can exclude a date or dates from your publication. Useful if you have dates for build up and tear down in your agenda.
Filter by Track
Only publish sessions in a particular track or tracks. Useful if you are producing separate agenda for separate parts of your event
Exclude sessions on a particular track. Can be useful to block presenting of a track until a product launch has happened.
To configure filters:
Click ‘Publish Agenda’
Click on the name for your existing publication
Click ‘Configure’
Expand either the ‘Speaker Configuration’ or ‘Session Configuration’ section
Expand the corresponding ‘Filter Speakers’ or ‘Filter Sessions’ sections and configure the filters you need
Save and republish
How are Titles and Post Nominals Handled?
ASP supports Titles but not Post Nominals. By default Lineup Ninja will publish Titles and ignore Post Nominals.
In the ‘Speaker Configuration’ / ‘Titles and Post Nominals’ section of the ASP configuration you can, for both Titles and Post Nominals, choose to:
Merge Post Nominals into Last Name
Stop publishing either Titles or Post Nominals
Filter out common Titles or Post Nominals, for example you may wish to filter our Mr,Mrs,Miss and keep titles such as Dr and Prof.
Can I publish multiple Lineup Ninja events into the same ASP site?
Yes this will work for ASP integrations created after 10th August 2023.
Can I publish one Lineup Ninja event into multiple seminars in the same event?
Yes. Follow this process:
Create two (or more) seminars in ASP. Note the ‘ID’ for each seminar. You can find this on the list of seminars just under the seminar name.
Then create the ASP integration in Lineup Ninja and in the ‘Seminar IDs’ field input the IDs separating each with a comma. For example if your Seminar IDs are 1234, and 9876 then you should put `1234,9876` in the Seminar IDs field.
Publish your event. The speakers will be added once to the Speakers section and the sessions will be created in both Seminars.
Note that it important that you do not create multiple ASP integrations from one Lineup Ninja event into one ASP site, otherwise the speakers will be duplicated. Instead create just one integration and list all the required seminars as shown here.
How can I merge locations, tracks or roles when publishing?
When publishing you can merge content together. This enables you to publish a simpler agenda for your attendees than the one you are using to plan your event.
You can choose to merge these types of data:
Locations. Merging location A into location B will show all sessions in location A as taking place in location B. This can be useful if you have multiple locations configured for scheduling purposes that will be experienced by the attendee as a single location.
Tracks. Merging track A into track B will show all sessions in track A as being in track B. This can be useful if you have some tracks with only a small number of sessions and wish to present this sessions as being in a more populous track.
Roles. Merging role A into role B will show speakers with role A has having role B. This can be useful if you have a lot of roles internally that are not intended to be shown to attendees. You can merge them into a role with a name appropriate for your attendees.
When merging the location, track, or role that you are merging into does not have to have any sessions itself. So you can use this to show a different name to attendees than you are using internally. For example you could create a ‘Main Hall’ location, and merge ‘Building B - Hall A’ into that location so attendees see ‘Main Hall’ in their agenda.
How are Sub Sessions handled?
If you are using Sub Sessions the following will happen:
Speakers on the Sub Sessions will be merged into the parent.
You can optionally choose to include the titles and timings of the Sub Sessions in the description of the parent session.
You can find the configuration in the ‘Session Configuration’ / ‘Sub Session Configuration’ section of the integration configuration.
An example template is provided for including the timings of the Sub Sessions. If you require additional placeholder fields please get in touch.
You can choose between 24hr and 12hr time for the times for the Sub Sessions. Times will be shown in the timezone of the event.
Tracks on Sub Sessions are merged into the parent session.
How can I publish automatically?
Warning
Consider your teams workflow as a team before enabling automatic publishing. When you enable automatic publishing there is a potential for the agenda to be published when you have content that is not ready for publication.
To schedule publishing scroll down to the ‘Scheduled Publishing’ part of the configuration.
You can then choose whether to publish once per hour, or once per day. If you choose to publish each day the publication will occur around 3am in the timezone of your event.
Still can’t find what you’re looking for? Email support@lineupninja.com and one of the team will get back to you as soon as possible.
In you Lineup Ninja event, navigate to
Agenda Planning
>
Publish Agenda
and then click the ‘Integrate’ button under ‘Entegy’. This will create a new integration.
A dialog will be displayed, compete the requested fields:
Project ID
In the Entegy interface
Navigate into your event
Click ‘Project Settings’
Click ‘API Keys’
Copy the ‘Project ID’ into this field in Lineup Ninja
API Key
On the same page as the Project ID
Click the plus button to create an API key
Ensure ‘Add/Update Content’ and ‘View Content’ are ticked
Create the API key and note the key and secret
API Secret
Input the secret generated in the previous step
Entegy Region
Choose the region where your Entegy service has been configured.
Publishing your schedule
To publish your schedule just click the ‘Publish’ button!
Please note that the first publication may take a long time, potentially upwards of an hour if your event is very large. Please be patient.
Future updates will be much faster.
How are Room and Streams handled?
Lineup Ninja Locations map to Entegy Rooms. The integration will automatically create the Rooms in Entegy.
Similarly Lineup Ninja Tracks map to Entegy Streams. The integration will automatically create the Streams in Entegy.
Entegy only supports one Stream per Session. If you have sessions with multiple Tracks, the integration will choose the first Track alphabetically.
Can I add Categories to Sessions?
Yes, you can map Lineup Ninja Labels to Categories in Entegy.
To do this create a Label in Lineup Ninja with exactly the same name as a Sub Category in Entegy. Then add this Label to the Sessions you wish to receive the Sub Category.
Then in the configuration navigate to ‘Session Configuration’ and choose ‘Yes’ for ‘Should Entegy Session Categories be managed by Lineup Ninja?’
Then select the Labels you want to map over to Sub Categories.
How do Speaker Roles map to Entegy?
You can map Lineup Ninja Speaker Roles to Entegy Speaker Roles. To do this you need to set up the mapping.
In Entegy navigate to Schedule / Schedule Configuration / Speaker Roles.
Then note the position of each Speaker Role. The first item in the list is position 1, and so on. For example:
Then on the Lineup Ninja side navigate to the configuration and expand ‘Speaker Configuration’ and then fill in the positions in Entegy.
For example
Warning
If you change the order of the Speaker Roles in Entegy you MUST update this configuration in Lineup Ninja otherwise your mappings will be wrong.
How can I filter the published content?
You can filter which Speakers and Sessions will be published based on a number of criteria. Some common use cases for filters are:
Preventing ‘Placeholder’ sessions from being published
Holding back a Speaker who is not yet ready to be announced
Excluding sessions scheduled during the ‘build up’ day for the event
Only publishing speakers who have confirmed their slot
Removing a particular location, or track from the published schedule
Anything you can think of using labels!
For Speakers you can filter in 3 ways
Choose which speakers are to be published based on their relationship to sessions
(If Speaker Confirmation is enabled): Publish speakers that have a confirmed session that is published and not filtered out.
Publish speakers that are speaking on any session that is published and not filtered out.
Publish all speakers
Publish no speakers
Apply more granular filters with labels
Only publish speakers with a particular label. For example you might want to use a ‘Content Reviewed’ label to flag speakers that have had their content reviewed.
Exclude speakers with a particular label. For example you might want to exclude a ‘Do not publish’ label to prevent publishing of speakers who are not yet ready to be published.
For Sessions you can filter in numerous ways
Choose which sessions are to be published based on their relationship to speakers
Publish All Scheduled Sessions. Publishes sessions regardless of whether they have confirmed speakers or not.
(If Speaker Confirmation is enabled): Publish sessions that have one confirmed speaker.
(If Speaker Confirmation is enabled): Publish sessions that have all their speakers confirmed.
Publish All Sessions (available on Lineup Ninja Agenda App only)
Apply filters with labels
Only publish sessions with a particular label. For example you might want to use a ‘Content Reviewed’ label to flag sessions that have had their content reviewed.
Exclude session with a particular label. For example you might want to exclude a ‘Placeholder’ label to prevent publishing of sessions which are not yet populated.
Filter by location
Only publish sessions in a particular location, or locations. This can be useful if you are publishing an agenda for just one or two locations.
Exclude sessions in a particular location, or locations. This can be useful if you have scheduled sessions in your Green Room or similar back stage location.
Filter by resource
Only publish sessions needing a particular resource. This could be useful if you are producing an agenda for a particular team that manages some resources.
Exclude sessions needing a particular resource.
Filter by Date
Only publish sessions in a date or dates. Useful if you are producing an agenda for a particular day.
You can exclude a date or dates from your publication. Useful if you have dates for build up and tear down in your agenda.
Filter by Track
Only publish sessions in a particular track or tracks. Useful if you are producing separate agenda for separate parts of your event
Exclude sessions on a particular track. Can be useful to block presenting of a track until a product launch has happened.
To configure filters:
Click ‘Publish Agenda’
Click on the name for your existing publication
Click ‘Configure’
Expand either the ‘Speaker Configuration’ or ‘Session Configuration’ section
Expand the corresponding ‘Filter Speakers’ or ‘Filter Sessions’ sections and configure the filters you need
Save and republish
How can I embargo content that is not yet ready for the public?
You can choose to embargo session titles and descriptions if you have content that should only be shown to the public after being announced in the event.
An embargo is applied by using labels to identify the sessions that should have an embargoed session title or description.
For example if you have a label ‘New Product Launch’, you can configure an embargo to hide the session title and description from sessions with that label. Following the launch of the product you can remove the embargo and republish the agenda.
If you embargo a session or description you can replace the original text with something to indicate that the session will be published later, for example ‘Super Secret Session’.
The speakers for a session will still be shown when it is embargo’ed. To exclude a session, including it’s speakers from being published then use ‘Session Filters’ rather than an ‘Embargo Content’.
To configure an embargo:
Click ‘Publish Agenda’
Click on the name for your existing publication
Click ‘Configure’
Expand the ‘Session Configuration’ section
Expand the ‘Embargo Content’ sections and configure the embargo that you need
Save and republish
How can I merge locations when publishing?
When publishing you can merge content together. This enables you to publish a simpler agenda for your attendees than the one you are using to plan your event.
You can choose to merge these types of data:
Locations. Merging location A into location B will show all sessions in location A as taking place in location B. This can be useful if you have multiple locations configured for scheduling purposes that will be experienced by the attendee as a single location.
When merging the location that you are merging into does not have to have any sessions itself. So you can use this to show a different name to attendees than you are using internally. For example you could create a ‘Main Hall’ location, and merge ‘Building B - Hall A’ into that location so attendees see ‘Main Hall’ in their agenda.
How are Titles and Post Nominals handled?
By default titles and post nominals are merged into the name of the speaker in Entegy. If you do not want to publish them you can configure this in ‘Titles, Post Nominals, Position and Company’
How are Sub Sessions handled?
If you are using Sub Sessions the following will happen:
Speakers on the Sub Sessions will be merged into the parent.
You can optionally choose to include the titles and timings of the Sub Sessions in the description of the parent session.
You can find the configuration in the ‘Session Configuration’ / ‘Sub Session Configuration’ section of the integration configuration.
An example template is provided for including the timings of the Sub Sessions. If you require additional placeholder fields please get in touch.
You can choose between 24hr and 12hr time for the times for the Sub Sessions. Times will be shown in the timezone of the event.
Tracks assigned to Sub Sessions are ignored for this integration because it only supports one track per session.
How can I publish automatically?
Warning
Consider your teams workflow as a team before enabling automatic publishing. When you enable automatic publishing there is a potential for the agenda to be published when you have content that is not ready for publication.
To schedule publishing scroll down to the ‘Scheduled Publishing’ part of the configuration.
You can then choose whether to publish once per hour, or once per day. If you choose to publish each day the publication will occur around 3am in the timezone of your event.
Still can’t find what you’re looking for? Email support@lineupninja.com and one of the team will get back to you as soon as possible.
Erleah
Lineup Ninja can integrate your agenda the Erleah AI event assistant. You can perform an initial import of your agenda then publish it again whenever you have new changes ready to go.
Create the integration
Follow these steps to get the integration initially configured.
In Lineup Ninja, navigate to
Agenda Planning
>
Publish Agenda
and click the ‘Integrate’ button under ‘Erleah’. This will create a new integration.
A screen will pop up where you can configure the integration to choose which sessions and speakers you want to share with Erleah.
Click ‘Publish’ to publish your agenda.
You will see a message like this. Hover over it and click, this will copy the details to your clipboard.
Send the details to your contact at Erleah.
How can I filter the published content?
You can filter which Speakers and Sessions will be published based on a number of criteria. Some common use cases for filters are:
Preventing ‘Placeholder’ sessions from being published
Holding back a Speaker who is not yet ready to be announced
Excluding sessions scheduled during the ‘build up’ day for the event
Only publishing speakers who have confirmed their slot
Removing a particular location, or track from the published schedule
Anything you can think of using labels!
For Speakers you can filter in 3 ways
Choose which speakers are to be published based on their relationship to sessions
(If Speaker Confirmation is enabled): Publish speakers that have a confirmed session that is published and not filtered out.
Publish speakers that are speaking on any session that is published and not filtered out.
Publish all speakers
Publish no speakers
Apply more granular filters with labels
Only publish speakers with a particular label. For example you might want to use a ‘Content Reviewed’ label to flag speakers that have had their content reviewed.
Exclude speakers with a particular label. For example you might want to exclude a ‘Do not publish’ label to prevent publishing of speakers who are not yet ready to be published.
For Sessions you can filter in numerous ways
Choose which sessions are to be published based on their relationship to speakers
Publish All Scheduled Sessions. Publishes sessions regardless of whether they have confirmed speakers or not.
(If Speaker Confirmation is enabled): Publish sessions that have one confirmed speaker.
(If Speaker Confirmation is enabled): Publish sessions that have all their speakers confirmed.
Publish All Sessions (available on Lineup Ninja Agenda App only)
Apply filters with labels
Only publish sessions with a particular label. For example you might want to use a ‘Content Reviewed’ label to flag sessions that have had their content reviewed.
Exclude session with a particular label. For example you might want to exclude a ‘Placeholder’ label to prevent publishing of sessions which are not yet populated.
Filter by location
Only publish sessions in a particular location, or locations. This can be useful if you are publishing an agenda for just one or two locations.
Exclude sessions in a particular location, or locations. This can be useful if you have scheduled sessions in your Green Room or similar back stage location.
Filter by resource
Only publish sessions needing a particular resource. This could be useful if you are producing an agenda for a particular team that manages some resources.
Exclude sessions needing a particular resource.
Filter by Date
Only publish sessions in a date or dates. Useful if you are producing an agenda for a particular day.
You can exclude a date or dates from your publication. Useful if you have dates for build up and tear down in your agenda.
Filter by Track
Only publish sessions in a particular track or tracks. Useful if you are producing separate agenda for separate parts of your event
Exclude sessions on a particular track. Can be useful to block presenting of a track until a product launch has happened.
To configure filters:
Click ‘Publish Agenda’
Click on the name for your existing publication
Click ‘Configure’
Expand either the ‘Speaker Configuration’ or ‘Session Configuration’ section
Expand the corresponding ‘Filter Speakers’ or ‘Filter Sessions’ sections and configure the filters you need
Save and republish
How can I merge locations and tracks when publishing?
When publishing you can merge content together. This enables you to publish a simpler agenda for your attendees than the one you are using to plan your event.
You can choose to merge these types of data:
Locations. Merging location A into location B will show all sessions in location A as taking place in location B. This can be useful if you have multiple locations configured for scheduling purposes that will be experienced by the attendee as a single location.
Tracks. Merging track A into track B will show all sessions in track A as being in track B. This can be useful if you have some tracks with only a small number of sessions and wish to present this sessions as being in a more populous track.
When merging the location, or track that you are merging into does not have to have any sessions itself. So you can use this to show a different name to attendees than you are using internally. For example you could create a ‘Main Hall’ location, and merge ‘Building B - Hall A’ into that location so attendees see ‘Main Hall’ in their agenda.
How can I embargo content that is not yet ready for the public?
You can choose to embargo session titles and descriptions if you have content that should only be shown to the public after being announced in the event.
An embargo is applied by using labels to identify the sessions that should have an embargoed session title or description.
For example if you have a label ‘New Product Launch’, you can configure an embargo to hide the session title and description from sessions with that label. Following the launch of the product you can remove the embargo and republish the agenda.
If you embargo a session or description you can replace the original text with something to indicate that the session will be published later, for example ‘Super Secret Session’.
The speakers for a session will still be shown when it is embargo’ed. To exclude a session, including it’s speakers from being published then use ‘Session Filters’ rather than an ‘Embargo Content’.
To configure an embargo:
Click ‘Publish Agenda’
Click on the name for your existing publication
Click ‘Configure’
Expand the ‘Session Configuration’ section
Expand the ‘Embargo Content’ sections and configure the embargo that you need
Save and republish
How are Sub Sessions handled?
If you are using Sub Sessions the following will happen:
Speakers on the Sub Sessions will be merged into the parent.
You can optionally choose to include the titles and timings of the Sub Sessions in the description of the parent session.
You can find the configuration in the ‘Session Configuration’ / ‘Sub Session Configuration’ section of the integration configuration.
An example template is provided for including the timings of the Sub Sessions. If you require additional placeholder fields please get in touch.
You can choose between 24hr and 12hr time for the times for the Sub Sessions. Times will be shown in the timezone of the event.
Tracks on Sub Sessions are merged into the parent session.
How can I publish automatically?
Warning
Consider your teams workflow as a team before enabling automatic publishing. When you enable automatic publishing there is a potential for the agenda to be published when you have content that is not ready for publication.
To schedule publishing scroll down to the ‘Scheduled Publishing’ part of the configuration.
You can then choose whether to publish once per hour, or once per day. If you choose to publish each day the publication will occur around 3am in the timezone of your event.
Still can’t find what you’re looking for? Email support@lineupninja.com and one of the team will get back to you as soon as possible.
EventIgnite
Lineup Ninja can publish your agenda into EventIgnite’s Digital Signage software. You can perform an initial import of your agenda then publish it again whenever you have new changes ready to go.
Create the integration
Follow these steps to get the integration initially configured.
Ask EventIgnite for a ‘Webhook URL’ for your event.
In Lineup Ninja, navigate to
Agenda Planning
>
Publish Agenda
and click the ‘Integrate’ button under ‘EventIgnite’. This will create a new integration.
A screen will pop up where you can input the ‘Webhook URL’ you have been given by EventIgnite. You can also configure the integration to only include a subset of your agenda content if you wish. Save the configuration when complete.
Click ‘Publish’ to publish your agenda. This will make the agenda available for EventIgnite to import.
You will see a message like this. Hover over it and click, this will copy the details to your clipboard. Now give those details to EventIgnite so they can configure their side of the integration.
Publishing your schedule
To update the speakers and sessions in EventIgnite the schedule needs to be published. This will update the data in EventIgnite providing the ‘webhook’ has been configured.
To publish your schedule just click the ‘Publish’ button!
How can I filter the published content?
You can filter which Speakers and Sessions will be published based on a number of criteria. Some common use cases for filters are:
Preventing ‘Placeholder’ sessions from being published
Holding back a Speaker who is not yet ready to be announced
Excluding sessions scheduled during the ‘build up’ day for the event
Only publishing speakers who have confirmed their slot
Removing a particular location, or track from the published schedule
Anything you can think of using labels!
For Speakers you can filter in 3 ways
Choose which speakers are to be published based on their relationship to sessions
(If Speaker Confirmation is enabled): Publish speakers that have a confirmed session that is published and not filtered out.
Publish speakers that are speaking on any session that is published and not filtered out.
Publish all speakers
Publish no speakers
Apply more granular filters with labels
Only publish speakers with a particular label. For example you might want to use a ‘Content Reviewed’ label to flag speakers that have had their content reviewed.
Exclude speakers with a particular label. For example you might want to exclude a ‘Do not publish’ label to prevent publishing of speakers who are not yet ready to be published.
For Sessions you can filter in numerous ways
Choose which sessions are to be published based on their relationship to speakers
Publish All Scheduled Sessions. Publishes sessions regardless of whether they have confirmed speakers or not.
(If Speaker Confirmation is enabled): Publish sessions that have one confirmed speaker.
(If Speaker Confirmation is enabled): Publish sessions that have all their speakers confirmed.
Publish All Sessions (available on Lineup Ninja Agenda App only)
Apply filters with labels
Only publish sessions with a particular label. For example you might want to use a ‘Content Reviewed’ label to flag sessions that have had their content reviewed.
Exclude session with a particular label. For example you might want to exclude a ‘Placeholder’ label to prevent publishing of sessions which are not yet populated.
Filter by location
Only publish sessions in a particular location, or locations. This can be useful if you are publishing an agenda for just one or two locations.
Exclude sessions in a particular location, or locations. This can be useful if you have scheduled sessions in your Green Room or similar back stage location.
Filter by resource
Only publish sessions needing a particular resource. This could be useful if you are producing an agenda for a particular team that manages some resources.
Exclude sessions needing a particular resource.
Filter by Date
Only publish sessions in a date or dates. Useful if you are producing an agenda for a particular day.
You can exclude a date or dates from your publication. Useful if you have dates for build up and tear down in your agenda.
Filter by Track
Only publish sessions in a particular track or tracks. Useful if you are producing separate agenda for separate parts of your event
Exclude sessions on a particular track. Can be useful to block presenting of a track until a product launch has happened.
To configure filters:
Click ‘Publish Agenda’
Click on the name for your existing publication
Click ‘Configure’
Expand either the ‘Speaker Configuration’ or ‘Session Configuration’ section
Expand the corresponding ‘Filter Speakers’ or ‘Filter Sessions’ sections and configure the filters you need
Save and republish
How can I merge locations and tracks when publishing?
When publishing you can merge content together. This enables you to publish a simpler agenda for your attendees than the one you are using to plan your event.
You can choose to merge these types of data:
Locations. Merging location A into location B will show all sessions in location A as taking place in location B. This can be useful if you have multiple locations configured for scheduling purposes that will be experienced by the attendee as a single location.
Tracks. Merging track A into track B will show all sessions in track A as being in track B. This can be useful if you have some tracks with only a small number of sessions and wish to present this sessions as being in a more populous track.
When merging the location, or track that you are merging into does not have to have any sessions itself. So you can use this to show a different name to attendees than you are using internally. For example you could create a ‘Main Hall’ location, and merge ‘Building B - Hall A’ into that location so attendees see ‘Main Hall’ in their agenda.
How can I embargo content that is not yet ready for the public?
You can choose to embargo session titles and descriptions if you have content that should only be shown to the public after being announced in the event.
An embargo is applied by using labels to identify the sessions that should have an embargoed session title or description.
For example if you have a label ‘New Product Launch’, you can configure an embargo to hide the session title and description from sessions with that label. Following the launch of the product you can remove the embargo and republish the agenda.
If you embargo a session or description you can replace the original text with something to indicate that the session will be published later, for example ‘Super Secret Session’.
The speakers for a session will still be shown when it is embargo’ed. To exclude a session, including it’s speakers from being published then use ‘Session Filters’ rather than an ‘Embargo Content’.
To configure an embargo:
Click ‘Publish Agenda’
Click on the name for your existing publication
Click ‘Configure’
Expand the ‘Session Configuration’ section
Expand the ‘Embargo Content’ sections and configure the embargo that you need
Save and republish
How are Sub Sessions handled?
If you are using Sub Sessions the following will happen:
Speakers on the Sub Sessions will be merged into the parent.
You can optionally choose to include the titles and timings of the Sub Sessions in the description of the parent session.
You can find the configuration in the ‘Session Configuration’ / ‘Sub Session Configuration’ section of the integration configuration.
An example template is provided for including the timings of the Sub Sessions. If you require additional placeholder fields please get in touch.
You can choose between 24hr and 12hr time for the times for the Sub Sessions. Times will be shown in the timezone of the event.
Tracks on Sub Sessions are merged into the parent session.
How can I publish automatically?
Warning
Consider your teams workflow as a team before enabling automatic publishing. When you enable automatic publishing there is a potential for the agenda to be published when you have content that is not ready for publication.
To schedule publishing scroll down to the ‘Scheduled Publishing’ part of the configuration.
You can then choose whether to publish once per hour, or once per day. If you choose to publish each day the publication will occur around 3am in the timezone of your event.
Still can’t find what you’re looking for? Email support@lineupninja.com and one of the team will get back to you as soon as possible.
Eventscase
Lineup Ninja can publish your schedule into an Eventscase. You can perform an initial import of your schedule then publish it again whenever you have new changes ready to go.
These directions should be all you need to configure the integration yourself. If you’d prefer, Lineup Ninja support can configure it for you for a small fee (see ‘Configure Standard Integration’ on the pricing page of our website for details).
A couple of things to note before you start:
The dates and timezone for your event in Lineup Ninja should match those configured in Eventscase.
Only scheduled sessions will be published
Speakers can be ordered in Eventscase. To set the ordering of speakers publish the data from Lineup Ninja into Eventscase and then configure it there. The ordering will be preserved if you publish again.
Avoid having multiple locations with the same name.
If you delete a speaker, session or track in Lineup Ninja it will also be deleted from Eventscase next time you publish.
Speakers, sessions or streams that have been manually created in Eventscase will not be modified by this integration.
Create the integration
In Lineup Ninja:
In Lineup Ninja, navigate to
Agenda Planning
>
Publish Agenda
Under ‘Eventscase’, click the ‘Integrate’ button. This will create a new integration.
Fill in the form with the following details. You will need to ask your Eventscase account manager for these:
The domain for your team, e.g. my-team.lineup.ninja
The id of the event
Your client id
Your client secret
Your refresh token
Your signature
Publishing your schedule
To publish your schedule just click the ‘Publish’ button in the Eventscase integration in Lineup Ninja, this will publish your data in Eventscase.
To publish updates to your agenda, again just click ‘Publish’.
How are Sub Sessions handled?
If you are using Sub Sessions the following will happen:
Speakers on the Sub Sessions will be merged into the parent.
You can optionally choose to include the titles and timings of the Sub Sessions in the description of the parent session.
You can find the configuration in the ‘Session Configuration’ / ‘Sub Session Configuration’ section of the integration configuration.
An example template is provided for including the timings of the Sub Sessions. If you require additional placeholder fields please get in touch.
You can choose between 24hr and 12hr time for the times for the Sub Sessions. Times will be shown in the timezone of the event.
Tracks assigned to Sub Sessions are ignored for this integration because it only supports one track per session.
How can I publish automatically?
Warning
Consider your teams workflow as a team before enabling automatic publishing. When you enable automatic publishing there is a potential for the agenda to be published when you have content that is not ready for publication.
To schedule publishing scroll down to the ‘Scheduled Publishing’ part of the configuration.
You can then choose whether to publish once per hour, or once per day. If you choose to publish each day the publication will occur around 3am in the timezone of your event.
Still can’t find what you’re looking for? Email support@lineupninja.com and one of the team will get back to you as soon as possible.
ExpoFP
Lineup Ninja can integrate your agenda with ExpoFP’s Interactive Floor Plan software. You can perform an initial import of your agenda then publish it again whenever you have new changes ready to go.
A couple of things to note before you start:
To show sessions in an ExpoFP booth they must take place in a Lineup Ninja location that has the same name as the booth in ExpoFP.
After publishing, you must run the sync button in ExpoFP so the data is updated on their side.
Create the integration
Follow these steps to get the integration initially configured.
In Lineup Ninja, navigate to
Agenda Planning
>
Publish Agenda
and click the ‘Integrate’ button under ‘ExpoFP’. This will create a new integration.
A screen will pop up where you can configure the integration to choose which sessions and speakers you want to share with ExpoFP.
Click ‘Publish’ to publish your agenda.
You will see a message like this. Hover over it and click, this will copy the details to your clipboard. Now follow ExpoFP’s documentation to configure their side of the integration.
How can I filter the published content?
You can filter which Speakers and Sessions will be published based on a number of criteria. Some common use cases for filters are:
Preventing ‘Placeholder’ sessions from being published
Holding back a Speaker who is not yet ready to be announced
Excluding sessions scheduled during the ‘build up’ day for the event
Only publishing speakers who have confirmed their slot
Removing a particular location, or track from the published schedule
Anything you can think of using labels!
For Speakers you can filter in 3 ways
Choose which speakers are to be published based on their relationship to sessions
(If Speaker Confirmation is enabled): Publish speakers that have a confirmed session that is published and not filtered out.
Publish speakers that are speaking on any session that is published and not filtered out.
Publish all speakers
Publish no speakers
Apply more granular filters with labels
Only publish speakers with a particular label. For example you might want to use a ‘Content Reviewed’ label to flag speakers that have had their content reviewed.
Exclude speakers with a particular label. For example you might want to exclude a ‘Do not publish’ label to prevent publishing of speakers who are not yet ready to be published.
For Sessions you can filter in numerous ways
Choose which sessions are to be published based on their relationship to speakers
Publish All Scheduled Sessions. Publishes sessions regardless of whether they have confirmed speakers or not.
(If Speaker Confirmation is enabled): Publish sessions that have one confirmed speaker.
(If Speaker Confirmation is enabled): Publish sessions that have all their speakers confirmed.
Publish All Sessions (available on Lineup Ninja Agenda App only)
Apply filters with labels
Only publish sessions with a particular label. For example you might want to use a ‘Content Reviewed’ label to flag sessions that have had their content reviewed.
Exclude session with a particular label. For example you might want to exclude a ‘Placeholder’ label to prevent publishing of sessions which are not yet populated.
Filter by location
Only publish sessions in a particular location, or locations. This can be useful if you are publishing an agenda for just one or two locations.
Exclude sessions in a particular location, or locations. This can be useful if you have scheduled sessions in your Green Room or similar back stage location.
Filter by resource
Only publish sessions needing a particular resource. This could be useful if you are producing an agenda for a particular team that manages some resources.
Exclude sessions needing a particular resource.
Filter by Date
Only publish sessions in a date or dates. Useful if you are producing an agenda for a particular day.
You can exclude a date or dates from your publication. Useful if you have dates for build up and tear down in your agenda.
Filter by Track
Only publish sessions in a particular track or tracks. Useful if you are producing separate agenda for separate parts of your event
Exclude sessions on a particular track. Can be useful to block presenting of a track until a product launch has happened.
To configure filters:
Click ‘Publish Agenda’
Click on the name for your existing publication
Click ‘Configure’
Expand either the ‘Speaker Configuration’ or ‘Session Configuration’ section
Expand the corresponding ‘Filter Speakers’ or ‘Filter Sessions’ sections and configure the filters you need
Save and republish
How can I merge locations and tracks when publishing?
When publishing you can merge content together. This enables you to publish a simpler agenda for your attendees than the one you are using to plan your event.
You can choose to merge these types of data:
Locations. Merging location A into location B will show all sessions in location A as taking place in location B. This can be useful if you have multiple locations configured for scheduling purposes that will be experienced by the attendee as a single location.
Tracks. Merging track A into track B will show all sessions in track A as being in track B. This can be useful if you have some tracks with only a small number of sessions and wish to present this sessions as being in a more populous track.
When merging the location, or track that you are merging into does not have to have any sessions itself. So you can use this to show a different name to attendees than you are using internally. For example you could create a ‘Main Hall’ location, and merge ‘Building B - Hall A’ into that location so attendees see ‘Main Hall’ in their agenda.
How can I embargo content that is not yet ready for the public?
You can choose to embargo session titles and descriptions if you have content that should only be shown to the public after being announced in the event.
An embargo is applied by using labels to identify the sessions that should have an embargoed session title or description.
For example if you have a label ‘New Product Launch’, you can configure an embargo to hide the session title and description from sessions with that label. Following the launch of the product you can remove the embargo and republish the agenda.
If you embargo a session or description you can replace the original text with something to indicate that the session will be published later, for example ‘Super Secret Session’.
The speakers for a session will still be shown when it is embargo’ed. To exclude a session, including it’s speakers from being published then use ‘Session Filters’ rather than an ‘Embargo Content’.
To configure an embargo:
Click ‘Publish Agenda’
Click on the name for your existing publication
Click ‘Configure’
Expand the ‘Session Configuration’ section
Expand the ‘Embargo Content’ sections and configure the embargo that you need
Save and republish
How are Sub Sessions handled?
If you are using Sub Sessions the following will happen:
Speakers on the Sub Sessions will be merged into the parent.
You can optionally choose to include the titles and timings of the Sub Sessions in the description of the parent session.
You can find the configuration in the ‘Session Configuration’ / ‘Sub Session Configuration’ section of the integration configuration.
An example template is provided for including the timings of the Sub Sessions. If you require additional placeholder fields please get in touch.
You can choose between 24hr and 12hr time for the times for the Sub Sessions. Times will be shown in the timezone of the event.
Tracks on Sub Sessions are merged into the parent session.
How can I publish automatically?
Warning
Consider your teams workflow as a team before enabling automatic publishing. When you enable automatic publishing there is a potential for the agenda to be published when you have content that is not ready for publication.
To schedule publishing scroll down to the ‘Scheduled Publishing’ part of the configuration.
You can then choose whether to publish once per hour, or once per day. If you choose to publish each day the publication will occur around 3am in the timezone of your event.
Still can’t find what you’re looking for? Email support@lineupninja.com and one of the team will get back to you as soon as possible.
ExpoPlatform
Lineup Ninja can publish your agenda in ExpoPlatform. An All-in-one event platform which makes it easy to design a custom experience for your audience, in-person, virtual or hybrid.
Speakers and Registrations
Please note that Speakers are published into ExpoPlatform as ‘dummy’ registrations for use on the agenda. They will have fake email address and are designed to avoid conflict with your standard registration process.
The integration will automatically create a Participant Category of ‘Lineup Ninja Speaker’ and all the Speakers will be assigned to this category.
If you would like the integration to create real registrations please talk to support.
Create the integration
In your Lineup Ninja event, navigate to
Agenda Planning
>
Publish Agenda
and then click the ‘Integrate’ button under ‘ExpoPlatform’. This will create a new integration.
A dialog will be displayed asking for authorization to connect to your ExpoPlatform event. Your ExpoPlatform account manager can give you these details. Specifically
API Key
Client
Event Id
Once the fields are completed press ‘Authorize’. This will authenticate your access and perform some initial set up.
The configuration will now reappear with the remaining configuration options.
Moderator Role
ExpoPlatform supports ‘Speaker’ and ‘Moderator’ roles. By default all Lineup Ninja roles will map to the Speaker Role.
If you want to map roles to the ‘Moderator’ role choose them in the ‘Speaker Configuration’ / ‘Which roles should map to ‘Moderator’ in ExpoPlatform’ option.
Session Types
All sessions in ExpoPlatform require a Type. Eg Panel or Workshop.
In Lineup Ninja you can use Labels to represent Session Types. For example you could create a ‘Panel’ label and a ‘Workshop’ label and then add one of these labels to each session.
The integration will automatically create Session Types in ExpoPlatform with names that match the label you select.
Choose which labels you want to map to Session Types with the ‘Session Configuration’ / ‘Session Type Labels’ option.
Then also choose one label to use for default. This label will then be automatically used if none of the other selected Session Type labels are linked to the session.
Session Tags
Sessions can have Tags added to them in ExpoPlatform. These are optional.
In Lineup Ninja you can use Labels to represent Session Tags. Eg ‘Keynote’. Then add the labels to the sessions you want to tag.
The integration will automatically create Session Tags with names that match the label you select.
Choose which labels you want to map to the Session Tags with the ‘Session Configuration’ / ‘Session Tag Labels’ option.
Tracks
Sessions require exactly one Track in ExpoPlatform. Publishing will be blocked if a session does not a track. If a session has multiple tracks the first track alphabetically will be used.
The integration will automatically create Tracks in ExpoPlatform. ExpoPlatform requires track colors but there is a limited selection of available colors. The integration will choose the nearest available match.
Session Images
If you want to map a session image from Lineup Ninja to ExpoPlatform choose the type of image to map over in the ‘Session Configuration’ / ‘Which file type do you want to use for Session Logo images’ option.
Session Capacity Mode
The integration can set the capacity of the session in ExpoPlatform by setting the ‘Max ticket q-ty’ for the session.
You can either set the capacity as the capacity of the location in which the session is scheduled, or alternatively use the ‘Session Configuration’ / ‘Required Capacity’ of the session itself.
Location -> Stand Mapping
Lineup Ninja Locations map to ExpoPlatform Stands. A Stand has a ‘Hall’ and a ‘Stand’.
When you first authorize the integration Lineup Ninja will retrieve the available stands in ExpoPlatform so you can map the Locations to the Stands.
In the ‘Location to Stand Mapping’ section of the configuration you will see one item for each Lineup Ninja Location. Choose the ExpoPlatform stand to map to.
You can map multiple Locations to the same Stand if you wish.
If you have updated the stands in ExpoPlatform save the configuration and then edit it again, it will refresh the available stands you can choose from.
Publishing your schedule
To publish your schedule just click the ‘Publish’ button!
How can I filter the published content?
You can filter which Speakers and Sessions will be published based on a number of criteria. Some common use cases for filters are:
Preventing ‘Placeholder’ sessions from being published
Holding back a Speaker who is not yet ready to be announced
Excluding sessions scheduled during the ‘build up’ day for the event
Only publishing speakers who have confirmed their slot
Removing a particular location, or track from the published schedule
Anything you can think of using labels!
For Speakers you can filter in 3 ways
Choose which speakers are to be published based on their relationship to sessions
(If Speaker Confirmation is enabled): Publish speakers that have a confirmed session that is published and not filtered out.
Publish speakers that are speaking on any session that is published and not filtered out.
Publish all speakers
Publish no speakers
Apply more granular filters with labels
Only publish speakers with a particular label. For example you might want to use a ‘Content Reviewed’ label to flag speakers that have had their content reviewed.
Exclude speakers with a particular label. For example you might want to exclude a ‘Do not publish’ label to prevent publishing of speakers who are not yet ready to be published.
For Sessions you can filter in numerous ways
Choose which sessions are to be published based on their relationship to speakers
Publish All Scheduled Sessions. Publishes sessions regardless of whether they have confirmed speakers or not.
(If Speaker Confirmation is enabled): Publish sessions that have one confirmed speaker.
(If Speaker Confirmation is enabled): Publish sessions that have all their speakers confirmed.
Publish All Sessions (available on Lineup Ninja Agenda App only)
Apply filters with labels
Only publish sessions with a particular label. For example you might want to use a ‘Content Reviewed’ label to flag sessions that have had their content reviewed.
Exclude session with a particular label. For example you might want to exclude a ‘Placeholder’ label to prevent publishing of sessions which are not yet populated.
Filter by location
Only publish sessions in a particular location, or locations. This can be useful if you are publishing an agenda for just one or two locations.
Exclude sessions in a particular location, or locations. This can be useful if you have scheduled sessions in your Green Room or similar back stage location.
Filter by resource
Only publish sessions needing a particular resource. This could be useful if you are producing an agenda for a particular team that manages some resources.
Exclude sessions needing a particular resource.
Filter by Date
Only publish sessions in a date or dates. Useful if you are producing an agenda for a particular day.
You can exclude a date or dates from your publication. Useful if you have dates for build up and tear down in your agenda.
Filter by Track
Only publish sessions in a particular track or tracks. Useful if you are producing separate agenda for separate parts of your event
Exclude sessions on a particular track. Can be useful to block presenting of a track until a product launch has happened.
To configure filters:
Click ‘Publish Agenda’
Click on the name for your existing publication
Click ‘Configure’
Expand either the ‘Speaker Configuration’ or ‘Session Configuration’ section
Expand the corresponding ‘Filter Speakers’ or ‘Filter Sessions’ sections and configure the filters you need
Save and republish
How are Titles and Post Nominals handled?
To publish Tiles and Post Nominals into ExpoPlatform you must create custom fields in the Registration pipeline. Follow these steps:
Navigate to the pipeline
Then drag the “Text Field” to the desired spot.
Once added, click Edit on the field,
There you’ll find the “name” of the field (text-input-xxxxxxxxxxxxx), which is the value you will need to use for the integration configuration. Make a note of this because you cannot access it later.
Then in the integration configuration expand out the ‘Speaker Configuration’ / ‘Speaker Titles and Post Nominals’ section and input the ’name’ of the field as the ‘Speaker Title field name’ or the ‘Speaker Post Nominal field name’
You can optionally choose to filter out common Titles and Post Nominals.
How can I merge locations or tracks when publishing?
When publishing you can merge content together. This enables you to publish a simpler agenda for your attendees than the one you are using to plan your event.
You can choose to merge these types of data:
Locations. Merging location A into location B will show all sessions in location A as taking place in location B. This can be useful if you have multiple locations configured for scheduling purposes that will be experienced by the attendee as a single location.
Tracks. Merging track A into track B will show all sessions in track A as being in track B. This can be useful if you have some tracks with only a small number of sessions and wish to present this sessions as being in a more populous track.
When merging the location, or track that you are merging into does not have to have any sessions itself. So you can use this to show a different name to attendees than you are using internally. For example you could create a ‘Main Hall’ location, and merge ‘Building B - Hall A’ into that location so attendees see ‘Main Hall’ in their agenda.
How can I embargo content that is not yet ready for the public?
You can choose to embargo session titles and descriptions if you have content that should only be shown to the public after being announced in the event.
An embargo is applied by using labels to identify the sessions that should have an embargoed session title or description.
For example if you have a label ‘New Product Launch’, you can configure an embargo to hide the session title and description from sessions with that label. Following the launch of the product you can remove the embargo and republish the agenda.
If you embargo a session or description you can replace the original text with something to indicate that the session will be published later, for example ‘Super Secret Session’.
The speakers for a session will still be shown when it is embargo’ed. To exclude a session, including it’s speakers from being published then use ‘Session Filters’ rather than an ‘Embargo Content’.
To configure an embargo:
Click ‘Publish Agenda’
Click on the name for your existing publication
Click ‘Configure’
Expand the ‘Session Configuration’ section
Expand the ‘Embargo Content’ sections and configure the embargo that you need
Save and republish
How are Sub Sessions handled?
If you are using Sub Sessions the following will happen:
Speakers on the Sub Sessions will be merged into the parent.
You can optionally choose to include the titles and timings of the Sub Sessions in the description of the parent session.
You can find the configuration in the ‘Session Configuration’ / ‘Sub Session Configuration’ section of the integration configuration.
An example template is provided for including the timings of the Sub Sessions. If you require additional placeholder fields please get in touch.
You can choose between 24hr and 12hr time for the times for the Sub Sessions. Times will be shown in the timezone of the event.
Tracks assigned to Sub Sessions are ignored for this integration because it only supports one track per session.
How can I publish automatically?
Warning
Consider your teams workflow as a team before enabling automatic publishing. When you enable automatic publishing there is a potential for the agenda to be published when you have content that is not ready for publication.
To schedule publishing scroll down to the ‘Scheduled Publishing’ part of the configuration.
You can then choose whether to publish once per hour, or once per day. If you choose to publish each day the publication will occur around 3am in the timezone of your event.
Still can’t find what you’re looking for? Email support@lineupninja.com and one of the team will get back to you as soon as possible.
First Sight Media
Lineup Ninja can publish integrate your agenda with First Sight Media’s Digital Signage platform. You can perform an initial import of your agenda then publish it again whenever you have new changes ready to go.
What can it look like?
Here’s an example of the First Sight Media signage being used for NHS Confederation Expo 2024.
Nick Westerman, head of strategic partner events at NHS Confederation, described the signage as “An absolutely essential component for our event, with excellent feedback from our attendees.”
Create the integration
Follow these steps to get the integration initially configured.
In Lineup Ninja, navigate to
Agenda Planning
>
Publish Agenda
and click the ‘Integrate’ button under ‘First Sight Media’. This will create a new integration.
A screen will pop up where you can configure the integration to choose which sessions and speakers you want to share with First Sight MEdia.
Click ‘Publish’ to publish your agenda.
You will see a message like this. Hover over it and click, this will copy the details to your clipboard. Now give those details to First Sight Media so they can configure their side of the integration.
How can I filter the published content?
You can filter which Speakers and Sessions will be published based on a number of criteria. Some common use cases for filters are:
Preventing ‘Placeholder’ sessions from being published
Holding back a Speaker who is not yet ready to be announced
Excluding sessions scheduled during the ‘build up’ day for the event
Only publishing speakers who have confirmed their slot
Removing a particular location, or track from the published schedule
Anything you can think of using labels!
For Speakers you can filter in 3 ways
Choose which speakers are to be published based on their relationship to sessions
(If Speaker Confirmation is enabled): Publish speakers that have a confirmed session that is published and not filtered out.
Publish speakers that are speaking on any session that is published and not filtered out.
Publish all speakers
Publish no speakers
Apply more granular filters with labels
Only publish speakers with a particular label. For example you might want to use a ‘Content Reviewed’ label to flag speakers that have had their content reviewed.
Exclude speakers with a particular label. For example you might want to exclude a ‘Do not publish’ label to prevent publishing of speakers who are not yet ready to be published.
For Sessions you can filter in numerous ways
Choose which sessions are to be published based on their relationship to speakers
Publish All Scheduled Sessions. Publishes sessions regardless of whether they have confirmed speakers or not.
(If Speaker Confirmation is enabled): Publish sessions that have one confirmed speaker.
(If Speaker Confirmation is enabled): Publish sessions that have all their speakers confirmed.
Publish All Sessions (available on Lineup Ninja Agenda App only)
Apply filters with labels
Only publish sessions with a particular label. For example you might want to use a ‘Content Reviewed’ label to flag sessions that have had their content reviewed.
Exclude session with a particular label. For example you might want to exclude a ‘Placeholder’ label to prevent publishing of sessions which are not yet populated.
Filter by location
Only publish sessions in a particular location, or locations. This can be useful if you are publishing an agenda for just one or two locations.
Exclude sessions in a particular location, or locations. This can be useful if you have scheduled sessions in your Green Room or similar back stage location.
Filter by resource
Only publish sessions needing a particular resource. This could be useful if you are producing an agenda for a particular team that manages some resources.
Exclude sessions needing a particular resource.
Filter by Date
Only publish sessions in a date or dates. Useful if you are producing an agenda for a particular day.
You can exclude a date or dates from your publication. Useful if you have dates for build up and tear down in your agenda.
Filter by Track
Only publish sessions in a particular track or tracks. Useful if you are producing separate agenda for separate parts of your event
Exclude sessions on a particular track. Can be useful to block presenting of a track until a product launch has happened.
To configure filters:
Click ‘Publish Agenda’
Click on the name for your existing publication
Click ‘Configure’
Expand either the ‘Speaker Configuration’ or ‘Session Configuration’ section
Expand the corresponding ‘Filter Speakers’ or ‘Filter Sessions’ sections and configure the filters you need
Save and republish
How can I merge locations and tracks when publishing?
When publishing you can merge content together. This enables you to publish a simpler agenda for your attendees than the one you are using to plan your event.
You can choose to merge these types of data:
Locations. Merging location A into location B will show all sessions in location A as taking place in location B. This can be useful if you have multiple locations configured for scheduling purposes that will be experienced by the attendee as a single location.
Tracks. Merging track A into track B will show all sessions in track A as being in track B. This can be useful if you have some tracks with only a small number of sessions and wish to present this sessions as being in a more populous track.
When merging the location, or track that you are merging into does not have to have any sessions itself. So you can use this to show a different name to attendees than you are using internally. For example you could create a ‘Main Hall’ location, and merge ‘Building B - Hall A’ into that location so attendees see ‘Main Hall’ in their agenda.
How can I embargo content that is not yet ready for the public?
You can choose to embargo session titles and descriptions if you have content that should only be shown to the public after being announced in the event.
An embargo is applied by using labels to identify the sessions that should have an embargoed session title or description.
For example if you have a label ‘New Product Launch’, you can configure an embargo to hide the session title and description from sessions with that label. Following the launch of the product you can remove the embargo and republish the agenda.
If you embargo a session or description you can replace the original text with something to indicate that the session will be published later, for example ‘Super Secret Session’.
The speakers for a session will still be shown when it is embargo’ed. To exclude a session, including it’s speakers from being published then use ‘Session Filters’ rather than an ‘Embargo Content’.
To configure an embargo:
Click ‘Publish Agenda’
Click on the name for your existing publication
Click ‘Configure’
Expand the ‘Session Configuration’ section
Expand the ‘Embargo Content’ sections and configure the embargo that you need
Save and republish
How are Sub Sessions handled?
If you are using Sub Sessions the following will happen:
Speakers on the Sub Sessions will be merged into the parent.
You can optionally choose to include the titles and timings of the Sub Sessions in the description of the parent session.
You can find the configuration in the ‘Session Configuration’ / ‘Sub Session Configuration’ section of the integration configuration.
An example template is provided for including the timings of the Sub Sessions. If you require additional placeholder fields please get in touch.
You can choose between 24hr and 12hr time for the times for the Sub Sessions. Times will be shown in the timezone of the event.
Tracks on Sub Sessions are merged into the parent session.
How can I publish automatically?
Warning
Consider your teams workflow as a team before enabling automatic publishing. When you enable automatic publishing there is a potential for the agenda to be published when you have content that is not ready for publication.
To schedule publishing scroll down to the ‘Scheduled Publishing’ part of the configuration.
You can then choose whether to publish once per hour, or once per day. If you choose to publish each day the publication will occur around 3am in the timezone of your event.
Still can’t find what you’re looking for? Email support@lineupninja.com and one of the team will get back to you as soon as possible.
Gleanin
Lineup Ninja can integrate your agenda data with Gleanin. Their powerful speaker advocacy tools drive ticket sales for your events.
Create the integration
In Lineup Ninja, navigate to
Agenda Planning
>
Publish Agenda
and click the ‘Integrate’ button under ‘Gleanin’. This will create a new integration.
A dialog will be displayed, compete the requested fields:
Event Id
You can find the ID of your event on the ‘My Events’ page on your admin dashboard in Gleanin.
API Token
To generate an API Token go to the Gleanin admin interface, click your name in the top left and choose ‘My Profile’. You can then generate a key in the ‘API Tokens’ section.
Schedule Format
You can configure the format of the dates for your session to match your preferred style. Either choose one of the existing formats in the ‘Session Configuration’ / ‘Schedule Format’ drop down or choose ‘Custom Format’ to enter your own.
To specify a custom format you need to provide a template that describes the format. A session has a start time and an end time, you can format the display of both times.
This is best explained with an example. For a session starting at 09:15 and ending 10:35 on the 21st July in Eastern time and using
{{start:HH:mm}}-{{end:HH:mm dddd D MMMM}}
Will result im a displayed date of:
09:15-10:35 Wednesday 21 July
Using
{{start:D MMMM YYYY | hh:mm zz}}
Will result in
21 July 2021 | 09:15 EDT
The full set of options are
Token
Output
Month
M
1 2 ... 11 12
Mo
1st 2nd ... 11th 12th
MM
01 02 ... 11 12
MMM
Jan Feb ... Nov Dec
MMMM
January February ... November December
Quarter
Q
1 2 3 4
Qo
1st 2nd 3rd 4th
D
1 2 ... 30 31
Day of Month
Do
1st 2nd ... 30th 31st
DD
01 02 ... 30 31
DDD
1 2 ... 364 365
DDDo
1st 2nd ... 364th 365th
DDDD
001 002 ... 364 365
Day of Week
d
0 1 ... 5 6
do
0th 1st ... 5th 6th
dd
Su Mo ... Fr Sa
ddd
Sun Mon ... Fri Sat
dddd
Sunday Monday ... Friday Saturday
Week of Year
w
1 2 ... 52 53
wo
1st 2nd ... 52nd 53rd
ww
01 02 ... 52 53
Wo
1st 2nd ... 52nd 53rd
WW
01 02 ... 52 53
Year
YY
70 71 ... 29 30
YYYY
1970 1971 ... 2029 2030
Y
1970 1971 ... 9999 +10000 +10001
AM/PM
A
AM PM
a
am pm
Hour
H
0 1 ... 22 23
HH
00 01 ... 22 23
h
1 2 ... 11 12
hh
01 02 ... 11 12
k
1 2 ... 23 24
kk
01 02 ... 23 24
Minute
m
0 1 ... 58 59
mm
00 01 ... 58 59
Second
s
0 1 ... 58 59
ss
00 01 ... 58 59
Time Zone
z or zz
EST CST ... MST PST
Z
-07:00 -06:00 ... +06:00 +07:00
ZZ
-0700 -0600 ... +0600 +0700
How do I share Gleanin campaign links with speakers?
When publishing Gleanin the integration will request campaign links from Gleanin so that you can include these in emails you send to your speakers.
The integration will automatically create Custom Fields with the name ‘Gleain Campaign’ followed by the name of the campaign.
For example:
You can then reference these links in your emails sent to speakers. For example:
One thing to be aware of. In Gleanin it is possible for speakers to not have a campaign link for a particular campaign. For example if you target a campaign to a particular track / stream, then only speakers in that track / stream will have a campaign link.
When this happens, you will see a message like this where the link would be expected:
You can still email your speakers in bulk without worrying about the missing data. For example you can.
Select all speakers, including those that might not have a campaign link.
Compose your email and include the placeholder for the campaign
Press send.
The system will then ask you how you want to handle speakers without a Gleanin link and you can choose to either skip them, or send the email anyway. For example:
Tidying Up Data
There are four options you can configure to automatically tidy up data in Gleanin when a session becomes unscheduled or deleted, or a speakers sessions are unscheduled or the speaker is deleted. If you need assistance with configuring these please ask.
Publishing your schedule
To update the speakers and sessions in Gleanin the schedule needs to be published. This will update the data in Gleanin.
To publish your schedule just click the ‘Publish’ button!
How can I filter the published content?
You can filter which Speakers and Sessions will be published based on a number of criteria. Some common use cases for filters are:
Preventing ‘Placeholder’ sessions from being published
Holding back a Speaker who is not yet ready to be announced
Excluding sessions scheduled during the ‘build up’ day for the event
Only publishing speakers who have confirmed their slot
Removing a particular location, or track from the published schedule
Anything you can think of using labels!
For Speakers you can filter in 3 ways
Choose which speakers are to be published based on their relationship to sessions
(If Speaker Confirmation is enabled): Publish speakers that have a confirmed session that is published and not filtered out.
Publish speakers that are speaking on any session that is published and not filtered out.
Publish all speakers
Publish no speakers
Apply more granular filters with labels
Only publish speakers with a particular label. For example you might want to use a ‘Content Reviewed’ label to flag speakers that have had their content reviewed.
Exclude speakers with a particular label. For example you might want to exclude a ‘Do not publish’ label to prevent publishing of speakers who are not yet ready to be published.
For Sessions you can filter in numerous ways
Choose which sessions are to be published based on their relationship to speakers
Publish All Scheduled Sessions. Publishes sessions regardless of whether they have confirmed speakers or not.
(If Speaker Confirmation is enabled): Publish sessions that have one confirmed speaker.
(If Speaker Confirmation is enabled): Publish sessions that have all their speakers confirmed.
Publish All Sessions (available on Lineup Ninja Agenda App only)
Apply filters with labels
Only publish sessions with a particular label. For example you might want to use a ‘Content Reviewed’ label to flag sessions that have had their content reviewed.
Exclude session with a particular label. For example you might want to exclude a ‘Placeholder’ label to prevent publishing of sessions which are not yet populated.
Filter by location
Only publish sessions in a particular location, or locations. This can be useful if you are publishing an agenda for just one or two locations.
Exclude sessions in a particular location, or locations. This can be useful if you have scheduled sessions in your Green Room or similar back stage location.
Filter by resource
Only publish sessions needing a particular resource. This could be useful if you are producing an agenda for a particular team that manages some resources.
Exclude sessions needing a particular resource.
Filter by Date
Only publish sessions in a date or dates. Useful if you are producing an agenda for a particular day.
You can exclude a date or dates from your publication. Useful if you have dates for build up and tear down in your agenda.
Filter by Track
Only publish sessions in a particular track or tracks. Useful if you are producing separate agenda for separate parts of your event
Exclude sessions on a particular track. Can be useful to block presenting of a track until a product launch has happened.
To configure filters:
Click ‘Publish Agenda’
Click on the name for your existing publication
Click ‘Configure’
Expand either the ‘Speaker Configuration’ or ‘Session Configuration’ section
Expand the corresponding ‘Filter Speakers’ or ‘Filter Sessions’ sections and configure the filters you need
Save and republish
How are Sub Sessions handled?
If you are using Sub Sessions the speaker will be shown as speaking on the parent session, rather than the sub session.
How can I publish automatically?
Warning
Consider your teams workflow as a team before enabling automatic publishing. When you enable automatic publishing there is a potential for the agenda to be published when you have content that is not ready for publication.
To schedule publishing scroll down to the ‘Scheduled Publishing’ part of the configuration.
You can then choose whether to publish once per hour, or once per day. If you choose to publish each day the publication will occur around 3am in the timezone of your event.
Still can’t find what you’re looking for? Email support@lineupninja.com and one of the team will get back to you as soon as possible.
Grip
Lineup Ninja can publish your schedule into an Grip application. You can perform an initial import of your schedule then publish it again whenever you have new changes ready to go.
The Lineup Ninja / Grip integration has some sophisticated features to enable you to easily map your Lineup Ninja session and speaker content to Grip users, exhibitors and sponsors.
It is strongly recommended you engage Lineup Ninja support to configure this integration, we can then work with Grip to ensure the integration will run smoothy and that you know how to make the most out of it.
Importing Grip Data
The Grip integration can link your agenda content to two different types of things in Grip. Companies and Profiles.
Mapping Speakers
Lineup Ninja can match the data you have in your agenda with the registration data in Grip. This means that speaker bio’s and headshots will be updated and their will be linked to their sessions automatically.
For this to work Lineup Ninja needs to import the registration data from Grip and then match it to the agenda data in Lineup Ninja. Please see the Sources documentation for configuration.
Lineup Ninja will set these fields for a Speaker in Grip if they are missing values. By default we will not overwrite existing speaker data in Grip.
Company
Job Title
Headshot
Bio
If you want to overwrite existing data in Grip for these values you can configure this with the ‘Speaker Configuration’ / ‘Optional: Overwrite Speaker Data in Grip for these fields’.
Warning
If you choose to overwrite speaker biographical data in Grip you will overwrite any updates the speaker is making themselves. This may confuse the speaker if they see changes they are making in Grip reverting back to the original value.
We recommend turning this option off when near to your event to prevent this potential confusion.
You can optionally choose to have Lineup Ninja create temporary ‘info only’ speakers in Grip for speakers that have not yet registered. These will be replaced with the actual speaker registration when they complete your registration process.
Managing Speaker Permissions
You probably want to give your speakers different permissions to other users in your Grip application. There are two ways to do this, either by changing the Type of Speakers to a different Type ID, or by adding the Speakers to a Group, or both. Use the ‘Update Speakers to New Type Ids’ and ‘Add Speakers to Grip Groups’ options in the ‘Speaker Configuration’’ to achieve this.
Mapping Sponsors
In Grip sessions can be sponsored by a Company. This could be a sponsor for a seminar or the exhibitor delivering the session etc.
Similarly to mapping speakers Lineup Ninja can import the sponsor data from Grip and then attempt to automatically match the sponsors to sessions based on the company name of the speakers. Please see the Sources documentation for configuration.
Tracks
In Grip sessions must have one and only one track. If a session has multiple tracks the alphabetically first track wil be used.
If desired you can choose some tracks as your ‘primary’ track, then map other tracks to a Session Custom Field in Grip. See below
Locations
Locations will be created in Grip automatically if required.
Create the integration
In Lineup Ninja, navigate to
Agenda Planning
>
Publish Agenda
and click the ‘Integrate’ button under ‘Grip’. This will create a new integration.
Event Configuration
Event Id
You can find this on the ‘Event Home’ page.
API Token
In the Grip interface navigate to ‘App Settings’ / ‘API Tokens’. You should use the ‘Application Administrator’ token.
Speaker Configuration
Which Data Source represents Grip Speakers?
Choose the Data source you configured to import the Grip speakers.
Create temporary ‘info only’ Grip Speakers for speakers who have not yet registered?
For a speaker to have a full profile in Grip they need to register with your registration system, this will create their Grip profile and then it is matched in the Data Source you have configured above.
If you are promoting your agenda before your registration process is complete, or you have speakers that are late registering, you can choose to create temporary ‘info only’ registrations in Grip. These temporary registrations are used to show the speaker’s details on the agenda and are removed when the speaker registers.
If you choose to use this option it is strongly recommended that your turn on Scheduled Publishing and set it to ‘Once per Hour’. This will ensure that the Speaker’s temporary registration is replaced with their real registration as soon as possible.
When enabling this option provide the Type Id to use for the temporary registrations. This should be your ‘Speaker’ type id.
If you enable temporary registrations you will see an additional ‘Speaker Titles and Post Nominals’ section in the configuration. By default the integration will merge the speaker’s title and post nominals into their ‘Full Name’ in Grip. You can use this section to change this behavior.
Update Speakers to New Type Ids
If you want your Speakers to have a different type ID from a regular visitor or exhibitor representative. You can configure this by setting pairs of type id’s to switch between.
For example if you have these type ID’s in Grip
Exhibitor Representative - 1111
Exhibitor Representative Speaker - 2222
Visitor - 3333
Visitor Speaker - 4444
Then you can configure the field ‘Update Speakers to New Type Ids’ like so
1111:2222,3333:4444
I.e pairs of ‘initial type id’:’new id’, then separated by commas.
Add Speakers to Grip Groups
If you want your Speakers to be added to a Grip Custom Group then add the ID of the group, or groups in the ‘Add Speakers to Grip Groups’ field. If you are adding them to multiple groups then add a comma to separate the group ids.
Speaker Roles
You can map Lineup Ninja speaker roles to Grip speaker roles. To do this perform the following steps:
In Grip.
Navigate to Event Agenda / Session Roles
Create the Speaker Roles you want to use in Grip
Note the ‘id’ for each role. It will looks something like this ‘664b81472c950295a68a2a29’
In Lineup Ninja
Navigate to the configuration for the Grip integration.
Expand the ‘Speaker Role Mapping Configuration’ part of the config.
For each Lineup Ninja role, input the id of the Grip role you want to map to.
Session Configuration
Tracks
The What should happen with sessions with more than one track? option has two options:
‘Only one track per session’ - With this option a session with multiple tracks will use the track which is alphabetically first.
‘One track per session with additional tracks in Grip Session Custom Field’ - With this option you can connect some tracks to a Session Custom Field in Grip, rather than a track.
If you choose the second option, tracks will either be used for the main track for the session, OR they will be added as a custom field. To get this set up start by creating a Custom Field in Grip like this:
In Grip navigate to ‘Event Details’, ‘Custom Fields’, ‘Session Custom Fields’.
Then click ‘Create Session Custom Field’.
Choose to create a field for a single or multiple events as preferred
Choose ‘No’ for PII
Choose ‘Allow pre-defined values on;y’ for ‘Input Type’
Enter the label you would like to use, eg ‘Topics’.
Select ‘Can pick many’ for ‘How many answers can be selected’
Ask Grip for their recommendation for ‘Use for matchmaking engine on’
Click ‘Create Custom Field’
Click the settings icon for the new custom field
Take a note of the ‘Field System Name’.
Now in Lineup Ninja create a label that will identify the tracks that will map to a Custom Field, you can call this whatever you like, perhaps ‘Grip Topic’. Link the label to the tracks that will be used for the custom field.
Then do the following in the integration configuration
Choose ‘One track per session with additional tracks in Grip Session Custom Field’
Input the Field System Name where prompted
Choose the label you created to identify the tracks that should map to Custom Fields.
Note that all sessions will still require one track that does not map to a Custom Field.
Tracks to Ignore
You can choose to merge different tracks together in the ‘Merge Tracks’ part of the configuration, or if you want to ignore particular tracks entirely you can choose them here.
Session Tags
Grip ‘Tags’ are equivalent to ‘Labels’ in Lineup Ninja. To tag a session in Grip, add a label to the session with the name you want to use for the Tag.
Then for ‘Session Tags’ choose the labels you want to map over to Grip.
Speed Networking, Round Tables and Webinars?
To configure one of these types of sessions:
Speed Networking
Round Tables
Webinar
Do the following:
Create a Label that will represent sessions of this type
Add this label to all sessions of the type
In the integration configuration set the label in the “Sessions with this label are [type] sessions”
You must do this BEFORE the sessions are initially created in Grip. If the sessions have been created already you may need to delete them in Grip and re-run the integration to recreate them.
Timeslot Blocking
Controls whether Lineup Ninja sets Grip’s timeslot blocking on the sessions it publishes. Blocking affects the speakers joined to a session and any attendees who have bookmarked it, preventing them from joining another session in an overlapping timeslot.
There are three options:
‘Blocking’ - Lineup Ninja turns timeslot blocking on for every session it publishes for this integration.
‘Not blocking’ - Lineup Ninja turns timeslot blocking off for every session it publishes for this integration.
‘Not managed’ (default) - Lineup Ninja does not touch the setting, leaving any blocking you have configured directly in Grip untouched.
The setting applies on every publish, so switching between ‘Blocking’ and ‘Not blocking’ takes effect on the next push. Choosing ‘Not managed’ only stops Lineup Ninja from sending the setting; it does not change sessions already set in Grip.
How do I map session custom fields to Grip?
If you event has Session Custom Fields in Grp then you can add a mapping from a Lineup Ninja Session Custom Field.
To add a Session Custom Field mapping do this:
In Grip navigate to ‘Event Details’, ‘Custom Fields’, ‘Session Custom Fields’ and click the settings icon
Note the ‘Field System Name’
Create a custom field for the Session in Lineup Ninja in
Custom Fields
.
Set the the value on the Sessions you need to have this value.
In the configuration for the Grip integration expand the ‘Session Configuration’ then the ‘Session Custom Fields’ section and expand it.
Enter the ‘Field System Name’ of the field into the Session Custom Field you want to map.
Save and publish.
How do I limit the session capacity in Grip
Grip has two ways to limit the number of attendees for a session:
Set a limit on the capacity of a location / stage. All sessions placed in this location will automatically be limited to the capacity of the location.
Set an explicit limit on the capacity of a session. This overrides any limit to set on the location.
In Lineup Ninja if you set a ‘capacity’ on a location the integration will set the ‘capacity’ on the stage.
If you also want to set capacity for individual sessions, you can use the ‘Required Capacity’ field for a session in Lineup Ninja, and then you need to enable the ‘Set ‘Max Participants’ for sessions in Grip?’ option in the Grip integration configuration to enable the use of this field to set the capacity.
Speaker Roles
You can map Lineup Ninja speaker roles to Grip speaker roles. To do this perform the following steps:
In Grip.
Navigate to Event Agenda / Session Roles
Create the Speaker Roles you want to use in Grip
Note the ‘id’ for each role. It will looks something like this ‘664b81472c950295a68a2a29’
In Lineup Ninja
Navigate to the configuration for the Grip integration.
Expand the ‘Speaker Configuration’ / ‘Speaker Role Mapping Configuration’ part of the config.
For each Lineup Ninja role, input the id of the Grip role you want to map to.
How can I filter the published content?
You can filter which Speakers and Sessions will be published based on a number of criteria. Some common use cases for filters are:
Preventing ‘Placeholder’ sessions from being published
Holding back a Speaker who is not yet ready to be announced
Excluding sessions scheduled during the ‘build up’ day for the event
Only publishing speakers who have confirmed their slot
Removing a particular location, or track from the published schedule
Anything you can think of using labels!
For Speakers you can filter in 3 ways
Choose which speakers are to be published based on their relationship to sessions
(If Speaker Confirmation is enabled): Publish speakers that have a confirmed session that is published and not filtered out.
Publish speakers that are speaking on any session that is published and not filtered out.
Publish all speakers
Publish no speakers
Apply more granular filters with labels
Only publish speakers with a particular label. For example you might want to use a ‘Content Reviewed’ label to flag speakers that have had their content reviewed.
Exclude speakers with a particular label. For example you might want to exclude a ‘Do not publish’ label to prevent publishing of speakers who are not yet ready to be published.
For Sessions you can filter in numerous ways
Choose which sessions are to be published based on their relationship to speakers
Publish All Scheduled Sessions. Publishes sessions regardless of whether they have confirmed speakers or not.
(If Speaker Confirmation is enabled): Publish sessions that have one confirmed speaker.
(If Speaker Confirmation is enabled): Publish sessions that have all their speakers confirmed.
Publish All Sessions (available on Lineup Ninja Agenda App only)
Apply filters with labels
Only publish sessions with a particular label. For example you might want to use a ‘Content Reviewed’ label to flag sessions that have had their content reviewed.
Exclude session with a particular label. For example you might want to exclude a ‘Placeholder’ label to prevent publishing of sessions which are not yet populated.
Filter by location
Only publish sessions in a particular location, or locations. This can be useful if you are publishing an agenda for just one or two locations.
Exclude sessions in a particular location, or locations. This can be useful if you have scheduled sessions in your Green Room or similar back stage location.
Filter by resource
Only publish sessions needing a particular resource. This could be useful if you are producing an agenda for a particular team that manages some resources.
Exclude sessions needing a particular resource.
Filter by Date
Only publish sessions in a date or dates. Useful if you are producing an agenda for a particular day.
You can exclude a date or dates from your publication. Useful if you have dates for build up and tear down in your agenda.
Filter by Track
Only publish sessions in a particular track or tracks. Useful if you are producing separate agenda for separate parts of your event
Exclude sessions on a particular track. Can be useful to block presenting of a track until a product launch has happened.
To configure filters:
Click ‘Publish Agenda’
Click on the name for your existing publication
Click ‘Configure’
Expand either the ‘Speaker Configuration’ or ‘Session Configuration’ section
Expand the corresponding ‘Filter Speakers’ or ‘Filter Sessions’ sections and configure the filters you need
Save and republish
How can I embargo content that is not yet ready for the public?
You can choose to embargo session titles and descriptions if you have content that should only be shown to the public after being announced in the event.
An embargo is applied by using labels to identify the sessions that should have an embargoed session title or description.
For example if you have a label ‘New Product Launch’, you can configure an embargo to hide the session title and description from sessions with that label. Following the launch of the product you can remove the embargo and republish the agenda.
If you embargo a session or description you can replace the original text with something to indicate that the session will be published later, for example ‘Super Secret Session’.
The speakers for a session will still be shown when it is embargo’ed. To exclude a session, including it’s speakers from being published then use ‘Session Filters’ rather than an ‘Embargo Content’.
To configure an embargo:
Click ‘Publish Agenda’
Click on the name for your existing publication
Click ‘Configure’
Expand the ‘Session Configuration’ section
Expand the ‘Embargo Content’ sections and configure the embargo that you need
Save and republish
How can I merge locations and tracks when publishing?
When publishing you can merge content together. This enables you to publish a simpler agenda for your attendees than the one you are using to plan your event.
You can choose to merge these types of data:
Locations. Merging location A into location B will show all sessions in location A as taking place in location B. This can be useful if you have multiple locations configured for scheduling purposes that will be experienced by the attendee as a single location.
Tracks. Merging track A into track B will show all sessions in track A as being in track B. This can be useful if you have some tracks with only a small number of sessions and wish to present this sessions as being in a more populous track.
When merging the location, or track that you are merging into does not have to have any sessions itself. So you can use this to show a different name to attendees than you are using internally. For example you could create a ‘Main Hall’ location, and merge ‘Building B - Hall A’ into that location so attendees see ‘Main Hall’ in their agenda.
Publishing your schedule
To update the schedule in Grip the schedule needs to be published.
To publish your schedule just click the ‘Publish’ button!
Can I publish multiple Lineup Ninja events into one Grip event?
Yes you can do this. There are a couple of things to be aware of:
If a location or track exists in both Lineup Ninja events with the same name they will be merged into the same location or track in Grip.
You will need to map speakers using the Grip Data Source in both Lineup Ninja events. It is ok if a speaker is speaking in both events.
How are Sub Sessions handled?
If you are using Sub Sessions the following will happen:
Speakers on the Sub Sessions will be merged into the parent.
You can optionally choose to include the titles and timings of the Sub Sessions in the description of the parent session.
You can find the configuration in the ‘Session Configuration’ / ‘Sub Session Configuration’ section of the integration configuration.
An example template is provided for including the timings of the Sub Sessions. If you require additional placeholder fields please get in touch.
You can choose between 24hr and 12hr time for the times for the Sub Sessions. Times will be shown in the timezone of the event.
Tracks assigned to Sub Sessions are ignored for this integration because it only supports one track per session.
How can I publish automatically?
Warning
Consider your teams workflow as a team before enabling automatic publishing. When you enable automatic publishing there is a potential for the agenda to be published when you have content that is not ready for publication.
To schedule publishing scroll down to the ‘Scheduled Publishing’ part of the configuration.
You can then choose whether to publish once per hour, or once per day. If you choose to publish each day the publication will occur around 3am in the timezone of your event.
Still can’t find what you’re looking for? Email support@lineupninja.com and one of the team will get back to you as soon as possible.
Guidebook
Lineup Ninja can publish your schedule into an Guidebook mobile application. You can perform an initial import of your schedule then publish it again whenever you have new changes ready to go.
Configure Guidebook
Firstly you need to create a mobile application in Guidebook and then request an API key. Go to the API Key Management Page and request a new API key, then click ‘Show Token’ and take a copy of it. You will need to paste this into Lineup Ninja to secure the connection.
You must set the timezone of your event in Guidebook to match the timezone you have configured in Lineup Ninja.
Create the integration
In Lineup Ninja, navigate to
Agenda Planning
>
Publish Agenda
and click the ‘Integrate’ button under ‘GuideBook’. This will create a new integration.
A dialog will be displayed, complete the requested fields:
Lists of Speakers in Guidebook are called ‘Custom Lists’, by default a new guide is created with one list called ‘Speakers’.
You can choose to either publish all your speakers to a single list, in which case also input the name of the list to publish to, or if you prefer you can create on list per Speaker Role. This can be useful if you have, say, one role for ‘Speaker’ and another for ‘Company’.
Allow Rating?
Choose whether attendees should be able to rate Speakers and Sessions within the Guidebook app.
Allow Add To Schedule?
Should attendees be able to add the published sessions to their schedule?
Should tracks be published?
Simple choose whether you want tracks to be published or not. If you want to filter content by track you can configure that in the ‘Filter Sessions’ options below.
Publishing your schedule
Once configuration is complete you publish your schedule by clicking the ‘Publish’ button. Couldn’t be simpler!
Please note that the first time you publish it may take a number of minutes because all the speaker images must be uploaded into Guidebook. Future publications will be quicker. We have found that ~250 sessions and ~800 speakers take about 2 minutes to publish following the initial publication.
How can I filter the published content?
You can filter which Speakers and Sessions will be published based on a number of criteria. Some common use cases for filters are:
Preventing ‘Placeholder’ sessions from being published
Holding back a Speaker who is not yet ready to be announced
Excluding sessions scheduled during the ‘build up’ day for the event
Only publishing speakers who have confirmed their slot
Removing a particular location, or track from the published schedule
Anything you can think of using labels!
For Speakers you can filter in 3 ways
Choose which speakers are to be published based on their relationship to sessions
(If Speaker Confirmation is enabled): Publish speakers that have a confirmed session that is published and not filtered out.
Publish speakers that are speaking on any session that is published and not filtered out.
Publish all speakers
Publish no speakers
Apply more granular filters with labels
Only publish speakers with a particular label. For example you might want to use a ‘Content Reviewed’ label to flag speakers that have had their content reviewed.
Exclude speakers with a particular label. For example you might want to exclude a ‘Do not publish’ label to prevent publishing of speakers who are not yet ready to be published.
For Sessions you can filter in numerous ways
Choose which sessions are to be published based on their relationship to speakers
Publish All Scheduled Sessions. Publishes sessions regardless of whether they have confirmed speakers or not.
(If Speaker Confirmation is enabled): Publish sessions that have one confirmed speaker.
(If Speaker Confirmation is enabled): Publish sessions that have all their speakers confirmed.
Publish All Sessions (available on Lineup Ninja Agenda App only)
Apply filters with labels
Only publish sessions with a particular label. For example you might want to use a ‘Content Reviewed’ label to flag sessions that have had their content reviewed.
Exclude session with a particular label. For example you might want to exclude a ‘Placeholder’ label to prevent publishing of sessions which are not yet populated.
Filter by location
Only publish sessions in a particular location, or locations. This can be useful if you are publishing an agenda for just one or two locations.
Exclude sessions in a particular location, or locations. This can be useful if you have scheduled sessions in your Green Room or similar back stage location.
Filter by resource
Only publish sessions needing a particular resource. This could be useful if you are producing an agenda for a particular team that manages some resources.
Exclude sessions needing a particular resource.
Filter by Date
Only publish sessions in a date or dates. Useful if you are producing an agenda for a particular day.
You can exclude a date or dates from your publication. Useful if you have dates for build up and tear down in your agenda.
Filter by Track
Only publish sessions in a particular track or tracks. Useful if you are producing separate agenda for separate parts of your event
Exclude sessions on a particular track. Can be useful to block presenting of a track until a product launch has happened.
To configure filters:
Click ‘Publish Agenda’
Click on the name for your existing publication
Click ‘Configure’
Expand either the ‘Speaker Configuration’ or ‘Session Configuration’ section
Expand the corresponding ‘Filter Speakers’ or ‘Filter Sessions’ sections and configure the filters you need
Save and republish
How are Titles and Post Nominals Handled?
Guidebook does not natively support Titles and Post Nominals so by default Lineup Ninja will merge Titles into First Name, and Post Nominals into Last Name.
In the ‘Titles and Post Nominals’ section of the Guidebook configuration you can, for both Titles and Post Nominals, choose to:
Keep merging them into First / Last name
Stop publishing either Titles or Post Nominals
Filter out common Titles or Post Nominals, for example you may wish to filter our Mr,Mrs,Miss and keep titles such as Dr and Prof.
How are Sub Sessions handled?
If you are using Sub Sessions the following will happen:
Speakers on the Sub Sessions will be merged into the parent.
You can optionally choose to include the titles and timings of the Sub Sessions in the description of the parent session.
You can find the configuration in the ‘Session Configuration’ / ‘Sub Session Configuration’ section of the integration configuration.
An example template is provided for including the timings of the Sub Sessions. If you require additional placeholder fields please get in touch.
You can choose between 24hr and 12hr time for the times for the Sub Sessions. Times will be shown in the timezone of the event.
Tracks on Sub Sessions are merged into the parent session.
How can I publish automatically?
Warning
Consider your teams workflow as a team before enabling automatic publishing. When you enable automatic publishing there is a potential for the agenda to be published when you have content that is not ready for publication.
To schedule publishing scroll down to the ‘Scheduled Publishing’ part of the configuration.
You can then choose whether to publish once per hour, or once per day. If you choose to publish each day the publication will occur around 3am in the timezone of your event.
Still can’t find what you’re looking for? Email support@lineupninja.com and one of the team will get back to you as soon as possible.
LiveBuzz
Lineup Ninja can publish your agenda in LiveBuzz. A a full-service supplier of event technology.
If you also want to pull LiveBuzz Exhibitors into Lineup Ninja so that speakers can be linked to their Exhibitor profile see the LiveBuzz data source documentation.
Create the integration
In your Lineup Ninja event, navigate to
Agenda Planning
>
Publish Agenda
and then click the ‘Integrate’ button under ‘LiveBuzz’. This will create a new integration.
A dialog will be displayed for the configuration for your LiveBuzz event.
You need some information from your LiveBuzz event. Start by logging in to LiveControl.
Then look at the address in your browser. It will look like this:
In this address:
The ‘Environment’ is ’livebuzz’
The ‘Campaign’ is ’lb-event-2023’
Input the equivalent values for your address into the configuration.
You can then configure the following fields in Speaker and Session Configuration as appropriate for your event
Speaker Configuration
Badge Type
Optional. If you want Lineup Ninja to set each Speaker’s LiveBuzz Badge Type, choose a Speaker ‘Choose One’ Custom Field whose options match the Badge Type names in your LiveBuzz campaign. Each Speaker’s selected option will be used to set their LiveBuzz Badge Type. Leave this blank if you would rather manage Badge Types directly in LiveBuzz.
Info
LiveBuzz Badge Types with the ‘Exhibitor’ role can only be assigned to Speakers who are also linked to a LiveBuzz Exhibitor. If you map a Speaker to an ‘Exhibitor’ Badge Type but do not link them to an Exhibitor via Exhibitor Linking (below), Lineup Ninja will skip setting their Badge Type and email you a list of the affected Speakers after the publish. Other Speaker details still publish as normal.
Add Speakers to Flows?
When a Badge Type field is selected you can additionally choose to assign Speakers to a LiveBuzz registration Stream based on their badge type.
Yes — Stream Mappings appear below. For each Badge Type, enter the LiveBuzz Stream identifier that Speakers with that badge type should be placed into. Leaving a value blank means Speakers with that badge type will not be assigned to a Stream.
No — Lineup Ninja will set each Speaker’s Badge Type but will not place them into any registration Stream. Any existing Stream assignments in LiveBuzz are left untouched.
If you rename an option on the Badge Type field, the corresponding mapping appears under ‘Unused mappings’ so you can remove or update it.
Switching this option back to ‘No’ is safe — Lineup Ninja will stop managing Stream assignments but will not remove Speakers from Streams they are already in.
Exhibitor Linking
If you are also pulling LiveBuzz Exhibitors into Lineup Ninja using the LiveBuzz data source, you can choose that source here. Speakers linked to an Exhibitor in the source will be published as staff on that Exhibitor’s booth in LiveBuzz.
Custom Field / Question Mappings
You can push values from your Speaker custom fields into LiveBuzz Questions, so each Speaker’s answers appear on their LiveBuzz Customer record.
For each Speaker custom field shown in the modal, paste the LiveBuzz Question identifier (the slug shown next to the question in the LiveBuzz admin) to map it. Leave blank to skip a field.
The following combinations are supported:
Lineup Ninja field type
LiveBuzz Question type
Short Answer, Paragraph, Number, e-mail Address, Website Address, Date
Open
Choose One
Select, Radio, or Open
Choose Many
Checkbox or Open
For Choose One and Choose Multiple fields mapped to a LiveBuzz Question that uses options, your option names must match the LiveBuzz option names (case is ignored).
Role Colors
LiveBuzz requires colors for Speaker Roles. If you are using Speaker Roles, set them here.
Session Configuration
Session Color Mode
In LiveBuzz sessions each have a color. You can map either the Location or Track color from Lineup Ninja into LiveBuzz. If a Lineup Ninja session has multiple tracks and you choose to use the Track color, the color of the first track alphabetically will be used.
Session Capacity Mode
If you wish to manage the capacity of a session in LiveBuzz you can choose to use either the capacity of the Location in Lineup Ninja or the Required Capacity of individual sessions.
Session Booking Mode
If you want Lineup Ninja to manage whether a session is bookable or not in LiveBuzz you can choose to enable ‘Session Booking Mode’
When enabled ‘Booking Configuration’ will appear. By default all sessions will be marked as not bookable.
To make sessions bookable choose which Labels, Location or Tracks should be marked bookable.
If you want to make all sessions bookable we suggest adding all your locations.
Session Logo
To set a Session Logo in LiveBuzz choose the Image File Type you would like to map across.
Session Description Image
In additional to a Session Logo you can set a Session Description Image in LiveBuzz. To do this choose the Image File Type you would like to map across.
Session Presentation Document
LiveBuzz supports a single ‘Presentation Document’ per session. You can map a Lineup Ninja File Type, such as Session Slides for this. If a session has multiple ‘Presentation Documents’ in Lineup Ninja the most recently uploaded file will be used.
Session Additional Document
LiveBuzz supports a single ‘Additional Document’ per session. You can map a Lineup Ninja File Type, such as Session Handouts for this. If a session has multiple ‘Additional Documents’ in Lineup Ninja the most recently uploaded file will be used.
Lineup Ninja Support Step
The first time you use a campaign or environment the Lineup Ninja support team may need to do some work behind the scenes to get you set up. If this is required you will see a message notifying you and a support ticket will be raised on your behalf.
The team will be in touch as soon as they have completed the necessary steps.
Publishing your schedule
To publish your schedule just click the ‘Publish’ button.
How are Speakers mapped to Customers
Speakers are published as Customers in LiveBuzz. If you have configured a Badge Type field, each Speaker’s Badge Type will be set accordingly. If you have enabled ‘Add Speakers to Flows?’, Speakers will also be placed into the LiveBuzz registration Stream that matches their badge type.
How can I filter the published content?
You can filter which Speakers and Sessions will be published based on a number of criteria. Some common use cases for filters are:
Preventing ‘Placeholder’ sessions from being published
Holding back a Speaker who is not yet ready to be announced
Excluding sessions scheduled during the ‘build up’ day for the event
Only publishing speakers who have confirmed their slot
Removing a particular location, or track from the published schedule
Anything you can think of using labels!
For Speakers you can filter in 3 ways
Choose which speakers are to be published based on their relationship to sessions
(If Speaker Confirmation is enabled): Publish speakers that have a confirmed session that is published and not filtered out.
Publish speakers that are speaking on any session that is published and not filtered out.
Publish all speakers
Publish no speakers
Apply more granular filters with labels
Only publish speakers with a particular label. For example you might want to use a ‘Content Reviewed’ label to flag speakers that have had their content reviewed.
Exclude speakers with a particular label. For example you might want to exclude a ‘Do not publish’ label to prevent publishing of speakers who are not yet ready to be published.
For Sessions you can filter in numerous ways
Choose which sessions are to be published based on their relationship to speakers
Publish All Scheduled Sessions. Publishes sessions regardless of whether they have confirmed speakers or not.
(If Speaker Confirmation is enabled): Publish sessions that have one confirmed speaker.
(If Speaker Confirmation is enabled): Publish sessions that have all their speakers confirmed.
Publish All Sessions (available on Lineup Ninja Agenda App only)
Apply filters with labels
Only publish sessions with a particular label. For example you might want to use a ‘Content Reviewed’ label to flag sessions that have had their content reviewed.
Exclude session with a particular label. For example you might want to exclude a ‘Placeholder’ label to prevent publishing of sessions which are not yet populated.
Filter by location
Only publish sessions in a particular location, or locations. This can be useful if you are publishing an agenda for just one or two locations.
Exclude sessions in a particular location, or locations. This can be useful if you have scheduled sessions in your Green Room or similar back stage location.
Filter by resource
Only publish sessions needing a particular resource. This could be useful if you are producing an agenda for a particular team that manages some resources.
Exclude sessions needing a particular resource.
Filter by Date
Only publish sessions in a date or dates. Useful if you are producing an agenda for a particular day.
You can exclude a date or dates from your publication. Useful if you have dates for build up and tear down in your agenda.
Filter by Track
Only publish sessions in a particular track or tracks. Useful if you are producing separate agenda for separate parts of your event
Exclude sessions on a particular track. Can be useful to block presenting of a track until a product launch has happened.
To configure filters:
Click ‘Publish Agenda’
Click on the name for your existing publication
Click ‘Configure’
Expand either the ‘Speaker Configuration’ or ‘Session Configuration’ section
Expand the corresponding ‘Filter Speakers’ or ‘Filter Sessions’ sections and configure the filters you need
Save and republish
How are Titles and Post Nominals handled?
Titles are published into the ‘Title’ field in LiveBuzz. Post Nominals are appended onto the Last Name.
You can optionally choose to filter out common Titles and Post Nominals.
How can I merge locations, tracks or roles when publishing?
When publishing you can merge content together. This enables you to publish a simpler agenda for your attendees than the one you are using to plan your event.
You can choose to merge these types of data:
Locations. Merging location A into location B will show all sessions in location A as taking place in location B. This can be useful if you have multiple locations configured for scheduling purposes that will be experienced by the attendee as a single location.
Tracks. Merging track A into track B will show all sessions in track A as being in track B. This can be useful if you have some tracks with only a small number of sessions and wish to present this sessions as being in a more populous track.
Roles. Merging role A into role B will show speakers with role A has having role B. This can be useful if you have a lot of roles internally that are not intended to be shown to attendees. You can merge them into a role with a name appropriate for your attendees.
When merging the location, track, or role that you are merging into does not have to have any sessions itself. So you can use this to show a different name to attendees than you are using internally. For example you could create a ‘Main Hall’ location, and merge ‘Building B - Hall A’ into that location so attendees see ‘Main Hall’ in their agenda.
How can I embargo content that is not yet ready for the public?
You can choose to embargo session titles and descriptions if you have content that should only be shown to the public after being announced in the event.
An embargo is applied by using labels to identify the sessions that should have an embargoed session title or description.
For example if you have a label ‘New Product Launch’, you can configure an embargo to hide the session title and description from sessions with that label. Following the launch of the product you can remove the embargo and republish the agenda.
If you embargo a session or description you can replace the original text with something to indicate that the session will be published later, for example ‘Super Secret Session’.
The speakers for a session will still be shown when it is embargo’ed. To exclude a session, including it’s speakers from being published then use ‘Session Filters’ rather than an ‘Embargo Content’.
To configure an embargo:
Click ‘Publish Agenda’
Click on the name for your existing publication
Click ‘Configure’
Expand the ‘Session Configuration’ section
Expand the ‘Embargo Content’ sections and configure the embargo that you need
Save and republish
How are Sub Sessions handled?
If you are using Sub Sessions the following will happen:
Speakers on the Sub Sessions will be merged into the parent.
You can optionally choose to include the titles and timings of the Sub Sessions in the description of the parent session.
You can find the configuration in the ‘Session Configuration’ / ‘Sub Session Configuration’ section of the integration configuration.
An example template is provided for including the timings of the Sub Sessions. If you require additional placeholder fields please get in touch.
You can choose between 24hr and 12hr time for the times for the Sub Sessions. Times will be shown in the timezone of the event.
Tracks on Sub Sessions are merged into the parent session.
How can I publish automatically?
Warning
Consider your teams workflow as a team before enabling automatic publishing. When you enable automatic publishing there is a potential for the agenda to be published when you have content that is not ready for publication.
To schedule publishing scroll down to the ‘Scheduled Publishing’ part of the configuration.
You can then choose whether to publish once per hour, or once per day. If you choose to publish each day the publication will occur around 3am in the timezone of your event.
Still can’t find what you’re looking for? Email support@lineupninja.com and one of the team will get back to you as soon as possible.
Make
Lineup Ninja can trigger events in Make when you publish your event.
What triggers are available and when do they fire?
The following triggers are available:
Watch Speaker
Watch Session
Watch Label
Watch Location
Watch Track
Watch Resource
Triggers fire when you publish your agenda via the ‘Publish Agenda’ page. They do NOT fire as you update your agenda in ‘Agenda Planning’.
This means you can work in ‘Agenda Planning’ until you are ready to publish your changes. When you are ready, you publish the data to Make to fire the triggers.
What data is available in the trigger?
In the default configuration the data in the trigger includes the data for the object itself and related data that might be useful in a future step. For example, the data for ‘Watch Speaker’ trigger includes the following:
The speaker’s attributes (First Name, Last Name, Bio etc…)
The speaker’s sessions. And for each session:
The session name, description etc
The session location
The session tracks, and for each track:
The track name
The session labels, and for each label:
The label name
The speaker’s labels, and for label:
The label name
If you do not want to include the related data, you can configure the “Should related data be included” option in the integration configuration.
You can download the Interface for each type from these links:
What’s the difference between ‘Id’ and ‘Lineup Ninja Id’ and ‘Lineup Ninja Short Id?
In the trigger you will find each object has three identifiers
‘id’ or ‘Make Id’ - This is an identifier used to cause the trigger to fire. It may change and should not be used in a subsequent step.
’lineupNinjaId’ or ‘Lineup Ninja Id’ - This is a fixed identifier and does not change. You should use this identifier if you need a consistent identifier in your following steps.
’lineupNinjaShortId’ or ‘Lineup Ninja Short Id’ - This is the first 8 characters of the UUID for the object. It can use used when a full UUID is too long to fit into a subsequent step
Create the integration
Creating a Make integration requires configuration on both the Lineup Ninja and Make sides.
Start in Lineup Ninja by following these steps:
In Lineup Ninja, navigate to
Agenda Planning
>
Publish Agenda
Scroll down to ‘Make’ and press ‘Integrate’
In the configuration that is displayed you can set some options for how the data is shared with Make. You can start with the defaults, but please do read all of the documentation because these options affect the number of Make Tasks that will be used, which will have cost implications for you:
You will now see a table containing ‘Username’, ‘Password’, ‘Team Id’ and ‘Publication Id’.
You are now ready to configure Make:
Open Make in a new tab
Create a new Scenario
Click the big + and choose ‘Lineup Ninja Agenda Publishing’
Choose the Trigger you want
Choose / Create the connection. This is where you will input the ‘Username’, ‘Password, ‘Team Id’, and ‘Publication Id’,
Choose how many objects to process per cycle
Click ‘OK’ and add your subsequent steps
Publishing your schedule
To publish your schedule just click the ‘Publish’ button!
How long does it take for Scenarios to fire?
Make looks for new data in your Lineup Ninja event on a regular schedule. The frequency depends on your configuration in the Make scenario.
How do I use ‘related data’ in a Scenario?
As explained above, the data available in the trigger contains related data that might be useful. For example a ‘Speaker’ contains a list, known as an array, of ‘Sessions’ containing the details for each of their sessions.
How you use this data depends on the action you will use. Some actions support arrays natively and you will be able to pass the data directly to the action.
Some actions do not support arrays. In this instance you can use the ‘Iterator’ flow control tool to run an action once for each item in the array.
Note
Using iterators will use extra ‘Operations’.
For example, if you want to trigger an action for each Session a Speaker is presenting you can add an ‘Iterator’ step. Then you can choose the fields from the related data you want to make available in the next step. The ‘Iterator’ can be found in the ‘Flow Control’ tools at the bottom of the screen
You can find more information about ‘Iterators’ in the Make Documentation.
Can I create multiple Make integrations?
Yes you can create multiple Make integrations. Some reasons you might want to do this:
To trigger Scenarios at different times. For example you might want to publish some changes to Scenarios every day, and to some other Scenarios once per week.
To send different content to different Scenarios. You can do this by applying different ‘Session’ and ‘Speaker’ filters to each integration.
How do I use Custom Field data?
You can add Custom Fields to your event. These will be available in the Make feed.
The object has a ‘Custom Fields’ array that contains one item per custom field that has a value set for that object.
For example a Speaker may have multiple items in ‘Custom Field Data’ eg
Custom Field Data - Field Name: 'Number of Hotel Nights'
Custom Field Data - Field Type: number
Custom Field Data - Field Value: 3
and
Custom Field Data - Field Name: 'Short Bio'
Custom Field Data - Field Type: text
Custom Field Data - Field Value: 'Super great presenter'
If you need to extract the data for a specific field you can use the ‘Set Variable’ tool in Make. A full video overview is available here. In short you can do this:
Add ‘Set Variable’ from Tools
Entry a name
Leave the default of ‘One Cycle’ for ‘Variable Lifetime’.
Then use this formula, replacing “Test Field” with the name of the Custom Field you want to use. {{get(map(1.customFieldData; "value"; "fieldName"; "Test Field"); 1)}}
The data is then available for use in subsequent steps.
What this does is:
Takes the value of the ‘Custom Field’ data from the first step
Extracts the value field from each item, where fieldName is Test Field
Returns the first result. Custom Field names must be unique in Lineup Ninja so there can only ever be one result at most.
Note
If you find your Custom Field data is missing check that you don’t have hidden spaces in "value", "fieldName" and "Test Field" you can do this by coping the value from the Make interface into a text editor.
How can I filter the published content?
You can filter which Speakers and Sessions will be published based on a number of criteria. Some common use cases for filters are:
Preventing ‘Placeholder’ sessions from being published
Holding back a Speaker who is not yet ready to be announced
Excluding sessions scheduled during the ‘build up’ day for the event
Only publishing speakers who have confirmed their slot
Removing a particular location, or track from the published schedule
Anything you can think of using labels!
For Speakers you can filter in 3 ways
Choose which speakers are to be published based on their relationship to sessions
(If Speaker Confirmation is enabled): Publish speakers that have a confirmed session that is published and not filtered out.
Publish speakers that are speaking on any session that is published and not filtered out.
Publish all speakers
Publish no speakers
Apply more granular filters with labels
Only publish speakers with a particular label. For example you might want to use a ‘Content Reviewed’ label to flag speakers that have had their content reviewed.
Exclude speakers with a particular label. For example you might want to exclude a ‘Do not publish’ label to prevent publishing of speakers who are not yet ready to be published.
For Sessions you can filter in numerous ways
Choose which sessions are to be published based on their relationship to speakers
Publish All Scheduled Sessions. Publishes sessions regardless of whether they have confirmed speakers or not.
(If Speaker Confirmation is enabled): Publish sessions that have one confirmed speaker.
(If Speaker Confirmation is enabled): Publish sessions that have all their speakers confirmed.
Publish All Sessions (available on Lineup Ninja Agenda App only)
Apply filters with labels
Only publish sessions with a particular label. For example you might want to use a ‘Content Reviewed’ label to flag sessions that have had their content reviewed.
Exclude session with a particular label. For example you might want to exclude a ‘Placeholder’ label to prevent publishing of sessions which are not yet populated.
Filter by location
Only publish sessions in a particular location, or locations. This can be useful if you are publishing an agenda for just one or two locations.
Exclude sessions in a particular location, or locations. This can be useful if you have scheduled sessions in your Green Room or similar back stage location.
Filter by resource
Only publish sessions needing a particular resource. This could be useful if you are producing an agenda for a particular team that manages some resources.
Exclude sessions needing a particular resource.
Filter by Date
Only publish sessions in a date or dates. Useful if you are producing an agenda for a particular day.
You can exclude a date or dates from your publication. Useful if you have dates for build up and tear down in your agenda.
Filter by Track
Only publish sessions in a particular track or tracks. Useful if you are producing separate agenda for separate parts of your event
Exclude sessions on a particular track. Can be useful to block presenting of a track until a product launch has happened.
To configure filters:
Click ‘Publish Agenda’
Click on the name for your existing publication
Click ‘Configure’
Expand either the ‘Speaker Configuration’ or ‘Session Configuration’ section
Expand the corresponding ‘Filter Speakers’ or ‘Filter Sessions’ sections and configure the filters you need
Save and republish
How can I merge locations, tracks and roles when publishing?
When publishing you can merge content together. This enables you to publish a simpler agenda for your attendees than the one you are using to plan your event.
You can choose to merge these types of data:
Locations. Merging location A into location B will show all sessions in location A as taking place in location B. This can be useful if you have multiple locations configured for scheduling purposes that will be experienced by the attendee as a single location.
Tracks. Merging track A into track B will show all sessions in track A as being in track B. This can be useful if you have some tracks with only a small number of sessions and wish to present this sessions as being in a more populous track.
Roles. Merging role A into role B will show speakers with role A has having role B. This can be useful if you have a lot of roles internally that are not intended to be shown to attendees. You can merge them into a role with a name appropriate for your attendees.
When merging the location, track, or role that you are merging into does not have to have any sessions itself. So you can use this to show a different name to attendees than you are using internally. For example you could create a ‘Main Hall’ location, and merge ‘Building B - Hall A’ into that location so attendees see ‘Main Hall’ in their agenda.
How can I embargo content that is not yet ready for the public?
You can choose to embargo session titles and descriptions if you have content that should only be shown to the public after being announced in the event.
An embargo is applied by using labels to identify the sessions that should have an embargoed session title or description.
For example if you have a label ‘New Product Launch’, you can configure an embargo to hide the session title and description from sessions with that label. Following the launch of the product you can remove the embargo and republish the agenda.
If you embargo a session or description you can replace the original text with something to indicate that the session will be published later, for example ‘Super Secret Session’.
The speakers for a session will still be shown when it is embargo’ed. To exclude a session, including it’s speakers from being published then use ‘Session Filters’ rather than an ‘Embargo Content’.
To configure an embargo:
Click ‘Publish Agenda’
Click on the name for your existing publication
Click ‘Configure’
Expand the ‘Session Configuration’ section
Expand the ‘Embargo Content’ sections and configure the embargo that you need
Save and republish
How can I publish automatically?
Warning
Consider your teams workflow as a team before enabling automatic publishing. When you enable automatic publishing there is a potential for the agenda to be published when you have content that is not ready for publication.
To schedule publishing scroll down to the ‘Scheduled Publishing’ part of the configuration.
You can then choose whether to publish once per hour, or once per day. If you choose to publish each day the publication will occur around 3am in the timezone of your event.
Still can’t find what you’re looking for? Email support@lineupninja.com and one of the team will get back to you as soon as possible.
Message Matrix
Lineup Ninja can publish your sessions and speakers into Message Matrix. You can perform an initial import of your schedule then publish it again whenever you have new changes ready to go.
Create the integration
Follow these steps to get the integration initially configured:
Ask Message Matrix for a ‘Webhook URL’ for your event.
In Lineup Ninja, navigate to
Agenda Planning
>
Publish Agenda
and click the ‘Integrate’ button under ‘Message Matrix’. This will create a new integration.
A screen will pop up where you can input the ‘Webhook URL’ you have been given by Message Matrix.
Click ‘Publish’ to publish your agenda. This will make the agenda available for Message Matrix to import.
Publishing your schedule
To update the speakers and sessions in Message Matrix the schedule needs to be published.
To publish your schedule just click the ‘Publish’ button!
How can I filter the published content?
You can filter which Speakers and Sessions will be published based on a number of criteria. Some common use cases for filters are:
Preventing ‘Placeholder’ sessions from being published
Holding back a Speaker who is not yet ready to be announced
Excluding sessions scheduled during the ‘build up’ day for the event
Only publishing speakers who have confirmed their slot
Removing a particular location, or track from the published schedule
Anything you can think of using labels!
For Speakers you can filter in 3 ways
Choose which speakers are to be published based on their relationship to sessions
(If Speaker Confirmation is enabled): Publish speakers that have a confirmed session that is published and not filtered out.
Publish speakers that are speaking on any session that is published and not filtered out.
Publish all speakers
Publish no speakers
Apply more granular filters with labels
Only publish speakers with a particular label. For example you might want to use a ‘Content Reviewed’ label to flag speakers that have had their content reviewed.
Exclude speakers with a particular label. For example you might want to exclude a ‘Do not publish’ label to prevent publishing of speakers who are not yet ready to be published.
For Sessions you can filter in numerous ways
Choose which sessions are to be published based on their relationship to speakers
Publish All Scheduled Sessions. Publishes sessions regardless of whether they have confirmed speakers or not.
(If Speaker Confirmation is enabled): Publish sessions that have one confirmed speaker.
(If Speaker Confirmation is enabled): Publish sessions that have all their speakers confirmed.
Publish All Sessions (available on Lineup Ninja Agenda App only)
Apply filters with labels
Only publish sessions with a particular label. For example you might want to use a ‘Content Reviewed’ label to flag sessions that have had their content reviewed.
Exclude session with a particular label. For example you might want to exclude a ‘Placeholder’ label to prevent publishing of sessions which are not yet populated.
Filter by location
Only publish sessions in a particular location, or locations. This can be useful if you are publishing an agenda for just one or two locations.
Exclude sessions in a particular location, or locations. This can be useful if you have scheduled sessions in your Green Room or similar back stage location.
Filter by resource
Only publish sessions needing a particular resource. This could be useful if you are producing an agenda for a particular team that manages some resources.
Exclude sessions needing a particular resource.
Filter by Date
Only publish sessions in a date or dates. Useful if you are producing an agenda for a particular day.
You can exclude a date or dates from your publication. Useful if you have dates for build up and tear down in your agenda.
Filter by Track
Only publish sessions in a particular track or tracks. Useful if you are producing separate agenda for separate parts of your event
Exclude sessions on a particular track. Can be useful to block presenting of a track until a product launch has happened.
To configure filters:
Click ‘Publish Agenda’
Click on the name for your existing publication
Click ‘Configure’
Expand either the ‘Speaker Configuration’ or ‘Session Configuration’ section
Expand the corresponding ‘Filter Speakers’ or ‘Filter Sessions’ sections and configure the filters you need
Save and republish
How can I merge locations and tracks when publishing?
When publishing you can merge content together. This enables you to publish a simpler agenda for your attendees than the one you are using to plan your event.
You can choose to merge these types of data:
Locations. Merging location A into location B will show all sessions in location A as taking place in location B. This can be useful if you have multiple locations configured for scheduling purposes that will be experienced by the attendee as a single location.
Tracks. Merging track A into track B will show all sessions in track A as being in track B. This can be useful if you have some tracks with only a small number of sessions and wish to present this sessions as being in a more populous track.
When merging the location, or track that you are merging into does not have to have any sessions itself. So you can use this to show a different name to attendees than you are using internally. For example you could create a ‘Main Hall’ location, and merge ‘Building B - Hall A’ into that location so attendees see ‘Main Hall’ in their agenda.
How can I embargo content that is not yet ready for the public?
You can choose to embargo session titles and descriptions if you have content that should only be shown to the public after being announced in the event.
An embargo is applied by using labels to identify the sessions that should have an embargoed session title or description.
For example if you have a label ‘New Product Launch’, you can configure an embargo to hide the session title and description from sessions with that label. Following the launch of the product you can remove the embargo and republish the agenda.
If you embargo a session or description you can replace the original text with something to indicate that the session will be published later, for example ‘Super Secret Session’.
The speakers for a session will still be shown when it is embargo’ed. To exclude a session, including it’s speakers from being published then use ‘Session Filters’ rather than an ‘Embargo Content’.
To configure an embargo:
Click ‘Publish Agenda’
Click on the name for your existing publication
Click ‘Configure’
Expand the ‘Session Configuration’ section
Expand the ‘Embargo Content’ sections and configure the embargo that you need
Save and republish
How are Sub Sessions handled?
If you are using Sub Sessions the following will happen:
Speakers on the Sub Sessions will be merged into the parent.
You can optionally choose to include the titles and timings of the Sub Sessions in the description of the parent session.
You can find the configuration in the ‘Session Configuration’ / ‘Sub Session Configuration’ section of the integration configuration.
An example template is provided for including the timings of the Sub Sessions. If you require additional placeholder fields please get in touch.
You can choose between 24hr and 12hr time for the times for the Sub Sessions. Times will be shown in the timezone of the event.
Tracks on Sub Sessions are merged into the parent session.
How can I publish automatically?
Warning
Consider your teams workflow as a team before enabling automatic publishing. When you enable automatic publishing there is a potential for the agenda to be published when you have content that is not ready for publication.
To schedule publishing scroll down to the ‘Scheduled Publishing’ part of the configuration.
You can then choose whether to publish once per hour, or once per day. If you choose to publish each day the publication will occur around 3am in the timezone of your event.
Still can’t find what you’re looking for? Email support@lineupninja.com and one of the team will get back to you as soon as possible.
Map Your Show (MYS)
Lineup Ninja can integrate your agenda data with Map Your Show.
Integrations can be created with both the ‘staging’ MYS service and the ‘production’ service. You should create one integration for staging and a separate once for production. This will enable you to test any content changes before pushing them live to you attendees.
Create the integration
In Lineup Ninja, navigate to
Agenda Planning
>
Publish Agenda
and click the ‘Integrate’ button under ‘Map Your Show’. This will create a new integration.
A dialog will be displayed, compete the requested fields:
Show Code
Your MYS account manager will provide you with your show code.
Publish To
You can publish to either MYS Production or Staging. You should create one integration for staging and a separate once for production. You cannot change an integration between staging and production after it is created.
Event Types
In MYS sessions can have an ‘Event Type’. There are two ways you can set an Event Type for a session using Lineup Ninja. Either via Labels or via the description of the location in which the session is scheduled. The configuration is in ‘Session Configuration’.
Using Labels for Event Types
To use labels you label your sessions with a label that has the exact same name as the value you would like for the ‘Event Type’. For example, if you want the ‘Event Type’ to be ‘Breakouts And Workshops’ then you must create a label called ‘Breakouts and Workshops’ and then assign this label to the sessions you want to have this ‘Event Type’.
One you have labeled your sessions choose ‘Labels’ for the ‘What to use for Event Types’ option then select the labels in this part of the configuration. When the integration runs it will check to see if an ‘Event Type’ already exists with a matching name. If not it will create it, otherwise it will use the existing ‘Event Type’.
Using Location description for Event Types
Alternatively you can use the description of the location. To do this first add an appropriate description to each location, then choose the ‘Location Description’ for the ‘What to use for the Event Types’ option.
When the integration runs it will check to see if an ‘Event Type’ already exists with a matching name. If not it will create it, otherwise it will use the existing ‘Event Type’.
Tidying Up Data
There are four options you can configure to automatically tidy up data in mys when a session becomes unscheduled or deleted, or a speakers sessions are unscheduled or the speaker is deleted. If you need assistance with configuring these please ask.
Lineup Ninja Support Step
Please note that the first time you use a Show Code the Lineup Ninja support team may need to do some work behind the scenes to get you set up. If this is required you will see a message notifying you and a support ticket will be raised on your behalf.
The team will be in touch as soon as they have completed the necessary steps.
Publishing your schedule
To update the speakers and sessions in mys the schedule needs to be published. This will update the data in mys.
To publish your schedule just click the ‘Publish’ button!
You may be asked if you wish to publish a ‘Full’ schedule or a ‘Changes Only’ update. MYS limits the number of times we can call their API per minute so a ‘Full’ publish can take several minutes. In most instances a ‘Changes Only’ publish will be much quicker and achieve the same results.
How can I filter the published content?
You can filter which Speakers and Sessions will be published based on a number of criteria. Some common use cases for filters are:
Preventing ‘Placeholder’ sessions from being published
Holding back a Speaker who is not yet ready to be announced
Excluding sessions scheduled during the ‘build up’ day for the event
Only publishing speakers who have confirmed their slot
Removing a particular location, or track from the published schedule
Anything you can think of using labels!
For Speakers you can filter in 3 ways
Choose which speakers are to be published based on their relationship to sessions
(If Speaker Confirmation is enabled): Publish speakers that have a confirmed session that is published and not filtered out.
Publish speakers that are speaking on any session that is published and not filtered out.
Publish all speakers
Publish no speakers
Apply more granular filters with labels
Only publish speakers with a particular label. For example you might want to use a ‘Content Reviewed’ label to flag speakers that have had their content reviewed.
Exclude speakers with a particular label. For example you might want to exclude a ‘Do not publish’ label to prevent publishing of speakers who are not yet ready to be published.
For Sessions you can filter in numerous ways
Choose which sessions are to be published based on their relationship to speakers
Publish All Scheduled Sessions. Publishes sessions regardless of whether they have confirmed speakers or not.
(If Speaker Confirmation is enabled): Publish sessions that have one confirmed speaker.
(If Speaker Confirmation is enabled): Publish sessions that have all their speakers confirmed.
Publish All Sessions (available on Lineup Ninja Agenda App only)
Apply filters with labels
Only publish sessions with a particular label. For example you might want to use a ‘Content Reviewed’ label to flag sessions that have had their content reviewed.
Exclude session with a particular label. For example you might want to exclude a ‘Placeholder’ label to prevent publishing of sessions which are not yet populated.
Filter by location
Only publish sessions in a particular location, or locations. This can be useful if you are publishing an agenda for just one or two locations.
Exclude sessions in a particular location, or locations. This can be useful if you have scheduled sessions in your Green Room or similar back stage location.
Filter by resource
Only publish sessions needing a particular resource. This could be useful if you are producing an agenda for a particular team that manages some resources.
Exclude sessions needing a particular resource.
Filter by Date
Only publish sessions in a date or dates. Useful if you are producing an agenda for a particular day.
You can exclude a date or dates from your publication. Useful if you have dates for build up and tear down in your agenda.
Filter by Track
Only publish sessions in a particular track or tracks. Useful if you are producing separate agenda for separate parts of your event
Exclude sessions on a particular track. Can be useful to block presenting of a track until a product launch has happened.
To configure filters:
Click ‘Publish Agenda’
Click on the name for your existing publication
Click ‘Configure’
Expand either the ‘Speaker Configuration’ or ‘Session Configuration’ section
Expand the corresponding ‘Filter Speakers’ or ‘Filter Sessions’ sections and configure the filters you need
Save and republish
How are Titles and Post Nominals Handled?
MYS does not support Titles or Post Nominals. By default Lineup Ninja will merge Titles into First Name and Post Nominals into Last Name.
In the ‘Speaker Configuration’ / ‘Titles and Post Nominals’ section of the MYS configuration you can, for both Titles and Post Nominals, choose to:
Merge the Titles or Post Nominals into the speaker’s name
Stop publishing either Titles or Post Nominals
Filter out common Titles or Post Nominals, for example you may wish to filter our Mr,Mrs,Miss and keep titles such as Dr and Prof.
How are Sub Sessions handled?
If you are using Sub Sessions the following will happen:
Speakers on the Sub Sessions will be merged into the parent.
You can optionally choose to include the titles and timings of the Sub Sessions in the description of the parent session.
You can find the configuration in the ‘Session Configuration’ / ‘Sub Session Configuration’ section of the integration configuration.
An example template is provided for including the timings of the Sub Sessions. If you require additional placeholder fields please get in touch.
You can choose between 24hr and 12hr time for the times for the Sub Sessions. Times will be shown in the timezone of the event.
Tracks on Sub Sessions are merged into the parent session.
How can I publish automatically?
Warning
Consider your teams workflow as a team before enabling automatic publishing. When you enable automatic publishing there is a potential for the agenda to be published when you have content that is not ready for publication.
To schedule publishing scroll down to the ‘Scheduled Publishing’ part of the configuration.
You can then choose whether to publish once per hour, or once per day. If you choose to publish each day the publication will occur around 3am in the timezone of your event.
Still can’t find what you’re looking for? Email support@lineupninja.com and one of the team will get back to you as soon as possible.
Pigeonhole
Lineup Ninja can create Q&A’s for your sessions in Pigeonhole.
Create the integration
In Lineup Ninja, navigate to
Agenda Planning
>
Publish Agenda
then click the ‘Integrate’ button under ‘Pigeonhole’. This will create a new integration.
A dialog will be displayed, compete the requested fields:
API Key
In the Pigeonhole interface:
Click the dropdown in the top left and choose ‘Workspace Settings’ for the workspace you want to integrate.
Click ‘Developer’.
Tick ‘Enable API Access’ if it is not already selected.
Click ‘Copy’ for the API Key and paste that into the API Key field in Lineup Ninja.
Pigeonhole Id
Browse to your event in Pigeonhole and click ‘Event Info’. Click the address bar in your browsers and you will find an address like this: https://dashboard.pigeonholelive.com/p/1234/about. Copy the number between /p/ and /about and paste that into the Pigeonhole Id field in Lineup Ninja.
Prefix for Session Custom Fields
When you create a session in Pigeonhole these URLs are available for the session:
Audience WebApp
Projector Panel
Admin Panel
Moderator Panel
The integration will create Custom Fields for these so you can see the detail for each session in Lineup Ninja.
By default these will be called Pigeonhole Audience WebApp, Pigeonhole Projector Panel etc… If you have multiple Pigeonhole integrations you can change the ‘Prefix’ so that, for example, one set of fields would be called Q&A Audience WebApp and the other Poll Audience WebApp.
Speaker Configuration
Moderator Role
In Pigeonhole speakers can be added as either a ‘Speaker’ or a ‘Moderator’. If you have a corresponding ‘Moderator’ role in Lineup Ninja then choose the role here.
Session Configuration
Type of session to create in Pigeonhole
Choose the type of session to create in Pigeonhole. One session of this type will be created for each session you publish to Pigeonhole.
Publishing your schedule
To publish your schedule just click the ‘Publish’ button!
You may be asked if you wish to publish a ‘Full’ schedule or a ‘Changes Only’ update. A Full update will publish all speakers and sessions regardless of whether they have been updated in Lineup Ninja since you last published. A ‘Changes Only’ update only publishes speakers and sessions that have changed which will be quicker.
Please note that sessions that have a Start Date in the past cannot be updated and any changes will be skipped.
How can I filter the published content?
You can filter which Speakers and Sessions will be published based on a number of criteria. Some common use cases for filters are:
Preventing ‘Placeholder’ sessions from being published
Holding back a Speaker who is not yet ready to be announced
Excluding sessions scheduled during the ‘build up’ day for the event
Only publishing speakers who have confirmed their slot
Removing a particular location, or track from the published schedule
Anything you can think of using labels!
For Speakers you can filter in 3 ways
Choose which speakers are to be published based on their relationship to sessions
(If Speaker Confirmation is enabled): Publish speakers that have a confirmed session that is published and not filtered out.
Publish speakers that are speaking on any session that is published and not filtered out.
Publish all speakers
Publish no speakers
Apply more granular filters with labels
Only publish speakers with a particular label. For example you might want to use a ‘Content Reviewed’ label to flag speakers that have had their content reviewed.
Exclude speakers with a particular label. For example you might want to exclude a ‘Do not publish’ label to prevent publishing of speakers who are not yet ready to be published.
For Sessions you can filter in numerous ways
Choose which sessions are to be published based on their relationship to speakers
Publish All Scheduled Sessions. Publishes sessions regardless of whether they have confirmed speakers or not.
(If Speaker Confirmation is enabled): Publish sessions that have one confirmed speaker.
(If Speaker Confirmation is enabled): Publish sessions that have all their speakers confirmed.
Publish All Sessions (available on Lineup Ninja Agenda App only)
Apply filters with labels
Only publish sessions with a particular label. For example you might want to use a ‘Content Reviewed’ label to flag sessions that have had their content reviewed.
Exclude session with a particular label. For example you might want to exclude a ‘Placeholder’ label to prevent publishing of sessions which are not yet populated.
Filter by location
Only publish sessions in a particular location, or locations. This can be useful if you are publishing an agenda for just one or two locations.
Exclude sessions in a particular location, or locations. This can be useful if you have scheduled sessions in your Green Room or similar back stage location.
Filter by resource
Only publish sessions needing a particular resource. This could be useful if you are producing an agenda for a particular team that manages some resources.
Exclude sessions needing a particular resource.
Filter by Date
Only publish sessions in a date or dates. Useful if you are producing an agenda for a particular day.
You can exclude a date or dates from your publication. Useful if you have dates for build up and tear down in your agenda.
Filter by Track
Only publish sessions in a particular track or tracks. Useful if you are producing separate agenda for separate parts of your event
Exclude sessions on a particular track. Can be useful to block presenting of a track until a product launch has happened.
To configure filters:
Click ‘Publish Agenda’
Click on the name for your existing publication
Click ‘Configure’
Expand either the ‘Speaker Configuration’ or ‘Session Configuration’ section
Expand the corresponding ‘Filter Speakers’ or ‘Filter Sessions’ sections and configure the filters you need
Save and republish
How can I embargo content that is not yet ready for the public?
You can choose to embargo session titles and descriptions if you have content that should only be shown to the public after being announced in the event.
An embargo is applied by using labels to identify the sessions that should have an embargoed session title or description.
For example if you have a label ‘New Product Launch’, you can configure an embargo to hide the session title and description from sessions with that label. Following the launch of the product you can remove the embargo and republish the agenda.
If you embargo a session or description you can replace the original text with something to indicate that the session will be published later, for example ‘Super Secret Session’.
The speakers for a session will still be shown when it is embargo’ed. To exclude a session, including it’s speakers from being published then use ‘Session Filters’ rather than an ‘Embargo Content’.
To configure an embargo:
Click ‘Publish Agenda’
Click on the name for your existing publication
Click ‘Configure’
Expand the ‘Session Configuration’ section
Expand the ‘Embargo Content’ sections and configure the embargo that you need
Save and republish
How can I merge locations when publishing?
When publishing you can merge content together. This enables you to publish a simpler agenda for your attendees than the one you are using to plan your event.
You can choose to merge these types of data:
* Locations. Merging location A into location B will show all sessions in location A as taking place in location B. This can be useful if you have multiple locations configured for scheduling purposes that will be experienced by the attendee as a single location.
When merging the location that you are merging into does not have to have any sessions itself. So you can use this to show a different name to attendees than you are using internally. For example you could create a 'Main Hall' location, and merge 'Building B - Hall A' into that location so attendees see 'Main Hall' in their agenda.
How are Titles handled?
By default titles are published in Pigeonhole as the speakers title. There is a defined set of permitted titles in Pigeonhole, if the speakers’s title is not one of these options it will be ignored. You can find the list of allowed titles in the salutation part of this page. If you don’t want to publish titles configure ‘Should Titles be Published’ in ‘Speaker Configuration’ / ‘Titles, Post Nominals, Position and Company’
Please note that once a title has been published to Pigeonhole it cannot be removed via the integration.
How are Post Nominals handled?
By default post nominals are merged into the name of the speaker in Pigeonhole. If you do not want to publish post nominals configure ‘Should post nominals be published’ in ‘Speaker Configuration’ / ‘Titles, Post Nominals, Position and Company’
How is the Speakers Company name and Position published?
The speakers Company and Position are published as ‘Brief Description in Pigeonhole. The format for this is ‘Director at Top Co’.
You can configure whether to include the company and position, and change the language for ‘at’ in the ‘Company’ parts of the ‘Speaker Configuration’ / ‘Titles, Post Nominals, Position and Company’ configuration.
How can I publish automatically?
Warning
Consider your teams workflow as a team before enabling automatic publishing. When you enable automatic publishing there is a potential for the agenda to be published when you have content that is not ready for publication.
To schedule publishing scroll down to the ‘Scheduled Publishing’ part of the configuration.
You can then choose whether to publish once per hour, or once per day. If you choose to publish each day the publication will occur around 3am in the timezone of your event.
Still can’t find what you’re looking for? Email support@lineupninja.com and one of the team will get back to you as soon as possible.
Sector Global
Lineup Ninja can publish your agenda into Sector Global. You can perform an initial import of your agenda then publish it again whenever you have new changes ready to go.
Create the integration
Follow these steps to get the integration initially configured:
Ask Sector Global for a ‘Webhook URL’ for your event.
In Lineup Ninja, navigate to
Agenda Planning
>
Publish Agenda
Integration and click the ‘Integrate’ button under ‘Sector Global’. This will create a new integration.
A screen will pop up where you can input the ‘Webhook URL’ you have been given by Sector Global. You can also configure the integration to only include a subset of your agenda content if you wish. Save the configuration when complete.
Click ‘Publish’ to publish your agenda. This will make the agenda available for Sector Global to import.
You will see a message like this. Hover over it and click, this will copy the details to your clipboard. Now give those details to Sector Global so they can configure their side of the integration.
Publishing your schedule
To update the speakers and sessions in Sector Global the schedule needs to be published. This will update the data in Sector Global providing the ‘webhook’ has been configured.
To publish your schedule just click the ‘Publish’ button!
How can I filter the published content?
You can filter which Speakers and Sessions will be published based on a number of criteria. Some common use cases for filters are:
Preventing ‘Placeholder’ sessions from being published
Holding back a Speaker who is not yet ready to be announced
Excluding sessions scheduled during the ‘build up’ day for the event
Only publishing speakers who have confirmed their slot
Removing a particular location, or track from the published schedule
Anything you can think of using labels!
For Speakers you can filter in 3 ways
Choose which speakers are to be published based on their relationship to sessions
(If Speaker Confirmation is enabled): Publish speakers that have a confirmed session that is published and not filtered out.
Publish speakers that are speaking on any session that is published and not filtered out.
Publish all speakers
Publish no speakers
Apply more granular filters with labels
Only publish speakers with a particular label. For example you might want to use a ‘Content Reviewed’ label to flag speakers that have had their content reviewed.
Exclude speakers with a particular label. For example you might want to exclude a ‘Do not publish’ label to prevent publishing of speakers who are not yet ready to be published.
For Sessions you can filter in numerous ways
Choose which sessions are to be published based on their relationship to speakers
Publish All Scheduled Sessions. Publishes sessions regardless of whether they have confirmed speakers or not.
(If Speaker Confirmation is enabled): Publish sessions that have one confirmed speaker.
(If Speaker Confirmation is enabled): Publish sessions that have all their speakers confirmed.
Publish All Sessions (available on Lineup Ninja Agenda App only)
Apply filters with labels
Only publish sessions with a particular label. For example you might want to use a ‘Content Reviewed’ label to flag sessions that have had their content reviewed.
Exclude session with a particular label. For example you might want to exclude a ‘Placeholder’ label to prevent publishing of sessions which are not yet populated.
Filter by location
Only publish sessions in a particular location, or locations. This can be useful if you are publishing an agenda for just one or two locations.
Exclude sessions in a particular location, or locations. This can be useful if you have scheduled sessions in your Green Room or similar back stage location.
Filter by resource
Only publish sessions needing a particular resource. This could be useful if you are producing an agenda for a particular team that manages some resources.
Exclude sessions needing a particular resource.
Filter by Date
Only publish sessions in a date or dates. Useful if you are producing an agenda for a particular day.
You can exclude a date or dates from your publication. Useful if you have dates for build up and tear down in your agenda.
Filter by Track
Only publish sessions in a particular track or tracks. Useful if you are producing separate agenda for separate parts of your event
Exclude sessions on a particular track. Can be useful to block presenting of a track until a product launch has happened.
To configure filters:
Click ‘Publish Agenda’
Click on the name for your existing publication
Click ‘Configure’
Expand either the ‘Speaker Configuration’ or ‘Session Configuration’ section
Expand the corresponding ‘Filter Speakers’ or ‘Filter Sessions’ sections and configure the filters you need
Save and republish
How can I merge locations and tracks when publishing?
When publishing you can merge content together. This enables you to publish a simpler agenda for your attendees than the one you are using to plan your event.
You can choose to merge these types of data:
Locations. Merging location A into location B will show all sessions in location A as taking place in location B. This can be useful if you have multiple locations configured for scheduling purposes that will be experienced by the attendee as a single location.
Tracks. Merging track A into track B will show all sessions in track A as being in track B. This can be useful if you have some tracks with only a small number of sessions and wish to present this sessions as being in a more populous track.
When merging the location, or track that you are merging into does not have to have any sessions itself. So you can use this to show a different name to attendees than you are using internally. For example you could create a ‘Main Hall’ location, and merge ‘Building B - Hall A’ into that location so attendees see ‘Main Hall’ in their agenda.
How can I embargo content that is not yet ready for the public?
You can choose to embargo session titles and descriptions if you have content that should only be shown to the public after being announced in the event.
An embargo is applied by using labels to identify the sessions that should have an embargoed session title or description.
For example if you have a label ‘New Product Launch’, you can configure an embargo to hide the session title and description from sessions with that label. Following the launch of the product you can remove the embargo and republish the agenda.
If you embargo a session or description you can replace the original text with something to indicate that the session will be published later, for example ‘Super Secret Session’.
The speakers for a session will still be shown when it is embargo’ed. To exclude a session, including it’s speakers from being published then use ‘Session Filters’ rather than an ‘Embargo Content’.
To configure an embargo:
Click ‘Publish Agenda’
Click on the name for your existing publication
Click ‘Configure’
Expand the ‘Session Configuration’ section
Expand the ‘Embargo Content’ sections and configure the embargo that you need
Save and republish
How are Sub Sessions handled?
If you are using Sub Sessions the following will happen:
Speakers on the Sub Sessions will be merged into the parent.
You can optionally choose to include the titles and timings of the Sub Sessions in the description of the parent session.
You can find the configuration in the ‘Session Configuration’ / ‘Sub Session Configuration’ section of the integration configuration.
An example template is provided for including the timings of the Sub Sessions. If you require additional placeholder fields please get in touch.
You can choose between 24hr and 12hr time for the times for the Sub Sessions. Times will be shown in the timezone of the event.
Tracks on Sub Sessions are merged into the parent session.
How can I publish automatically?
Warning
Consider your teams workflow as a team before enabling automatic publishing. When you enable automatic publishing there is a potential for the agenda to be published when you have content that is not ready for publication.
To schedule publishing scroll down to the ‘Scheduled Publishing’ part of the configuration.
You can then choose whether to publish once per hour, or once per day. If you choose to publish each day the publication will occur around 3am in the timezone of your event.
Next - Snöball
Still can’t find what you’re looking for? Email support@lineupninja.com and one of the team will get back to you as soon as possible.
Sitka
Lineup Ninja can publish your sessions and speakers into Sitka. You can perform an initial import of your schedule then publish it again whenever you have new changes ready to go.
Create the integration
Follow these steps to get the integration initially configured:
Ask Sitka for a ‘Webhook URL’ for your event.
In Lineup Ninja, navigate to
Agenda Planning
>
Publish Agenda
and click the ‘Integrate’ button under ‘Sitka’. This will create a new integration.
A screen will pop up where you can input the ‘Webhook URL’ you have been given by Sitka.
If you would like to publish a session image into Sitka choose the File Type you would like to share. It will be resized to sized to fit 1024512px by Sitka.
Click ‘Publish’ to publish your agenda. This will make the agenda available for Sitka to import.
Publishing your schedule
To update the speakers and sessions in Sitka the schedule needs to be published.
To publish your schedule just click the ‘Publish’ button!
How can I filter the published content?
You can filter which Speakers and Sessions will be published based on a number of criteria. Some common use cases for filters are:
Preventing ‘Placeholder’ sessions from being published
Holding back a Speaker who is not yet ready to be announced
Excluding sessions scheduled during the ‘build up’ day for the event
Only publishing speakers who have confirmed their slot
Removing a particular location, or track from the published schedule
Anything you can think of using labels!
For Speakers you can filter in 3 ways
Choose which speakers are to be published based on their relationship to sessions
(If Speaker Confirmation is enabled): Publish speakers that have a confirmed session that is published and not filtered out.
Publish speakers that are speaking on any session that is published and not filtered out.
Publish all speakers
Publish no speakers
Apply more granular filters with labels
Only publish speakers with a particular label. For example you might want to use a ‘Content Reviewed’ label to flag speakers that have had their content reviewed.
Exclude speakers with a particular label. For example you might want to exclude a ‘Do not publish’ label to prevent publishing of speakers who are not yet ready to be published.
For Sessions you can filter in numerous ways
Choose which sessions are to be published based on their relationship to speakers
Publish All Scheduled Sessions. Publishes sessions regardless of whether they have confirmed speakers or not.
(If Speaker Confirmation is enabled): Publish sessions that have one confirmed speaker.
(If Speaker Confirmation is enabled): Publish sessions that have all their speakers confirmed.
Publish All Sessions (available on Lineup Ninja Agenda App only)
Apply filters with labels
Only publish sessions with a particular label. For example you might want to use a ‘Content Reviewed’ label to flag sessions that have had their content reviewed.
Exclude session with a particular label. For example you might want to exclude a ‘Placeholder’ label to prevent publishing of sessions which are not yet populated.
Filter by location
Only publish sessions in a particular location, or locations. This can be useful if you are publishing an agenda for just one or two locations.
Exclude sessions in a particular location, or locations. This can be useful if you have scheduled sessions in your Green Room or similar back stage location.
Filter by resource
Only publish sessions needing a particular resource. This could be useful if you are producing an agenda for a particular team that manages some resources.
Exclude sessions needing a particular resource.
Filter by Date
Only publish sessions in a date or dates. Useful if you are producing an agenda for a particular day.
You can exclude a date or dates from your publication. Useful if you have dates for build up and tear down in your agenda.
Filter by Track
Only publish sessions in a particular track or tracks. Useful if you are producing separate agenda for separate parts of your event
Exclude sessions on a particular track. Can be useful to block presenting of a track until a product launch has happened.
To configure filters:
Click ‘Publish Agenda’
Click on the name for your existing publication
Click ‘Configure’
Expand either the ‘Speaker Configuration’ or ‘Session Configuration’ section
Expand the corresponding ‘Filter Speakers’ or ‘Filter Sessions’ sections and configure the filters you need
Save and republish
How can I merge locations and tracks when publishing?
When publishing you can merge content together. This enables you to publish a simpler agenda for your attendees than the one you are using to plan your event.
You can choose to merge these types of data:
Locations. Merging location A into location B will show all sessions in location A as taking place in location B. This can be useful if you have multiple locations configured for scheduling purposes that will be experienced by the attendee as a single location.
Tracks. Merging track A into track B will show all sessions in track A as being in track B. This can be useful if you have some tracks with only a small number of sessions and wish to present this sessions as being in a more populous track.
When merging the location, or track that you are merging into does not have to have any sessions itself. So you can use this to show a different name to attendees than you are using internally. For example you could create a ‘Main Hall’ location, and merge ‘Building B - Hall A’ into that location so attendees see ‘Main Hall’ in their agenda.
How can I embargo content that is not yet ready for the public?
You can choose to embargo session titles and descriptions if you have content that should only be shown to the public after being announced in the event.
An embargo is applied by using labels to identify the sessions that should have an embargoed session title or description.
For example if you have a label ‘New Product Launch’, you can configure an embargo to hide the session title and description from sessions with that label. Following the launch of the product you can remove the embargo and republish the agenda.
If you embargo a session or description you can replace the original text with something to indicate that the session will be published later, for example ‘Super Secret Session’.
The speakers for a session will still be shown when it is embargo’ed. To exclude a session, including it’s speakers from being published then use ‘Session Filters’ rather than an ‘Embargo Content’.
To configure an embargo:
Click ‘Publish Agenda’
Click on the name for your existing publication
Click ‘Configure’
Expand the ‘Session Configuration’ section
Expand the ‘Embargo Content’ sections and configure the embargo that you need
Save and republish
How are Sub Sessions handled?
If you are using Sub Sessions the following will happen:
Speakers on the Sub Sessions will be merged into the parent.
You can optionally choose to include the titles and timings of the Sub Sessions in the description of the parent session.
You can find the configuration in the ‘Session Configuration’ / ‘Sub Session Configuration’ section of the integration configuration.
An example template is provided for including the timings of the Sub Sessions. If you require additional placeholder fields please get in touch.
You can choose between 24hr and 12hr time for the times for the Sub Sessions. Times will be shown in the timezone of the event.
Tracks on Sub Sessions are merged into the parent session.
How can I publish automatically?
Warning
Consider your teams workflow as a team before enabling automatic publishing. When you enable automatic publishing there is a potential for the agenda to be published when you have content that is not ready for publication.
To schedule publishing scroll down to the ‘Scheduled Publishing’ part of the configuration.
You can then choose whether to publish once per hour, or once per day. If you choose to publish each day the publication will occur around 3am in the timezone of your event.
Still can’t find what you’re looking for? Email support@lineupninja.com and one of the team will get back to you as soon as possible.
Snöball
Lineup Ninja can integrate Snöball in two ways. You can publish your agenda to Snöball, documented on this page, and you can integrate the ‘Snöball Social Widget’, which you can learn about here.
Integrating your agenda into Snöball enables you to push your agenda with an initial set of content, then refresh as your agenda evolves.
Create the integration
Follow these steps to get the integration initially configured:
Ask Snöball for a ‘Webhook URL’ for your event.
In Lineup Ninja, navigate to
Agenda Planning
>
Publish Agenda
and click the ‘Integrate’ button under ‘Snöball’. This will create a new integration.
A screen will pop up where you can input the ‘Webhook URL’ you have been given by Snöball. You can also configure the integration to only include a subset of your agenda content if you wish. Save the configuration when complete.
Click ‘Publish’ to publish your agenda. This will make the agenda available for Snöball to import.
Publishing your schedule
To update the speakers and sessions in Snöball the schedule needs to be published. This will update the data in Snöball providing the ‘webhook’ has been configured.
To publish your schedule just click the ‘Publish’ button!
How are Titles and Post Nominals Handled?
You can configure how Titles and Post Nominals are handled in the ‘Speaker Configuration’ / ‘Titles and Post Nominals’ section of the configuration.
Titles
Titles are published into a ‘Title’ field that you can use in your campaign.
You can also choose to filter out some common titles such as Mr, Mrs, Ms etc… or you can choose to skip publishing Titles entirely.
Post Nominals
Post nominals are not published by default. To include Post nominals you can choose to merge them into the Last Name.
You can also choose to filter out unwanted Post Nominals.
How can I filter the published content?
You can filter which Speakers and Sessions will be published based on a number of criteria. Some common use cases for filters are:
Preventing ‘Placeholder’ sessions from being published
Holding back a Speaker who is not yet ready to be announced
Excluding sessions scheduled during the ‘build up’ day for the event
Only publishing speakers who have confirmed their slot
Removing a particular location, or track from the published schedule
Anything you can think of using labels!
For Speakers you can filter in 3 ways
Choose which speakers are to be published based on their relationship to sessions
(If Speaker Confirmation is enabled): Publish speakers that have a confirmed session that is published and not filtered out.
Publish speakers that are speaking on any session that is published and not filtered out.
Publish all speakers
Publish no speakers
Apply more granular filters with labels
Only publish speakers with a particular label. For example you might want to use a ‘Content Reviewed’ label to flag speakers that have had their content reviewed.
Exclude speakers with a particular label. For example you might want to exclude a ‘Do not publish’ label to prevent publishing of speakers who are not yet ready to be published.
For Sessions you can filter in numerous ways
Choose which sessions are to be published based on their relationship to speakers
Publish All Scheduled Sessions. Publishes sessions regardless of whether they have confirmed speakers or not.
(If Speaker Confirmation is enabled): Publish sessions that have one confirmed speaker.
(If Speaker Confirmation is enabled): Publish sessions that have all their speakers confirmed.
Publish All Sessions (available on Lineup Ninja Agenda App only)
Apply filters with labels
Only publish sessions with a particular label. For example you might want to use a ‘Content Reviewed’ label to flag sessions that have had their content reviewed.
Exclude session with a particular label. For example you might want to exclude a ‘Placeholder’ label to prevent publishing of sessions which are not yet populated.
Filter by location
Only publish sessions in a particular location, or locations. This can be useful if you are publishing an agenda for just one or two locations.
Exclude sessions in a particular location, or locations. This can be useful if you have scheduled sessions in your Green Room or similar back stage location.
Filter by resource
Only publish sessions needing a particular resource. This could be useful if you are producing an agenda for a particular team that manages some resources.
Exclude sessions needing a particular resource.
Filter by Date
Only publish sessions in a date or dates. Useful if you are producing an agenda for a particular day.
You can exclude a date or dates from your publication. Useful if you have dates for build up and tear down in your agenda.
Filter by Track
Only publish sessions in a particular track or tracks. Useful if you are producing separate agenda for separate parts of your event
Exclude sessions on a particular track. Can be useful to block presenting of a track until a product launch has happened.
To configure filters:
Click ‘Publish Agenda’
Click on the name for your existing publication
Click ‘Configure’
Expand either the ‘Speaker Configuration’ or ‘Session Configuration’ section
Expand the corresponding ‘Filter Speakers’ or ‘Filter Sessions’ sections and configure the filters you need
Save and republish
How can I merge locations and tracks when publishing?
When publishing you can merge content together. This enables you to publish a simpler agenda for your attendees than the one you are using to plan your event.
You can choose to merge these types of data:
Locations. Merging location A into location B will show all sessions in location A as taking place in location B. This can be useful if you have multiple locations configured for scheduling purposes that will be experienced by the attendee as a single location.
Tracks. Merging track A into track B will show all sessions in track A as being in track B. This can be useful if you have some tracks with only a small number of sessions and wish to present this sessions as being in a more populous track.
When merging the location, or track that you are merging into does not have to have any sessions itself. So you can use this to show a different name to attendees than you are using internally. For example you could create a ‘Main Hall’ location, and merge ‘Building B - Hall A’ into that location so attendees see ‘Main Hall’ in their agenda.
How can I embargo content that is not yet ready for the public?
You can choose to embargo session titles and descriptions if you have content that should only be shown to the public after being announced in the event.
An embargo is applied by using labels to identify the sessions that should have an embargoed session title or description.
For example if you have a label ‘New Product Launch’, you can configure an embargo to hide the session title and description from sessions with that label. Following the launch of the product you can remove the embargo and republish the agenda.
If you embargo a session or description you can replace the original text with something to indicate that the session will be published later, for example ‘Super Secret Session’.
The speakers for a session will still be shown when it is embargo’ed. To exclude a session, including it’s speakers from being published then use ‘Session Filters’ rather than an ‘Embargo Content’.
To configure an embargo:
Click ‘Publish Agenda’
Click on the name for your existing publication
Click ‘Configure’
Expand the ‘Session Configuration’ section
Expand the ‘Embargo Content’ sections and configure the embargo that you need
Save and republish
How are Sub Sessions handled?
If you are using Sub Sessions the following will happen:
Speakers on the Sub Sessions will be merged into the parent.
You can optionally choose to include the titles and timings of the Sub Sessions in the description of the parent session.
You can find the configuration in the ‘Session Configuration’ / ‘Sub Session Configuration’ section of the integration configuration.
An example template is provided for including the timings of the Sub Sessions. If you require additional placeholder fields please get in touch.
You can choose between 24hr and 12hr time for the times for the Sub Sessions. Times will be shown in the timezone of the event.
Tracks on Sub Sessions are merged into the parent session.
How can I publish automatically?
Warning
Consider your teams workflow as a team before enabling automatic publishing. When you enable automatic publishing there is a potential for the agenda to be published when you have content that is not ready for publication.
To schedule publishing scroll down to the ‘Scheduled Publishing’ part of the configuration.
You can then choose whether to publish once per hour, or once per day. If you choose to publish each day the publication will occur around 3am in the timezone of your event.
Still can’t find what you’re looking for? Email support@lineupninja.com and one of the team will get back to you as soon as possible.
SpeakerStacks
Lineup Ninja can publish your agenda into SpeakerStacks
Integrating your agenda into SpeakerStacks enables you to push your agenda with an initial set of content, then refresh as your agenda evolves.
Create the integration
Follow these steps to get the integration initially configured:
In SpeakerStacks navigate to ‘Integrations’ then click ‘Configure’ for the Lineup Ninja integration
Choose your initial options, save the integration and then click ‘Manage’.
In Lineup Ninja, navigate to
Agenda Planning
>
Publish Agenda
and click the ‘Integrate’ button under ‘SpeakerStacks’. This will create a new integration.
A screen will pop up asking you for the SpeakerStacks Provisioning Webhook and the SpeakerStacks Publishing Webhook. Copy both of these from SpeakerStacks into Lineup Ninja.
Click ‘Publish’ to publish your agenda. This will make the agenda available for SpeakerStacks to import.
Publishing your schedule
To update the speakers and sessions in SpeakerStacks the schedule needs to be published. This will update the data in SpeakerStacks providing the ‘webhook’ has been configured.
To publish your schedule just click the ‘Publish’ button!
How can I filter the published content?
You can filter which Speakers and Sessions will be published based on a number of criteria. Some common use cases for filters are:
Preventing ‘Placeholder’ sessions from being published
Holding back a Speaker who is not yet ready to be announced
Excluding sessions scheduled during the ‘build up’ day for the event
Only publishing speakers who have confirmed their slot
Removing a particular location, or track from the published schedule
Anything you can think of using labels!
For Speakers you can filter in 3 ways
Choose which speakers are to be published based on their relationship to sessions
(If Speaker Confirmation is enabled): Publish speakers that have a confirmed session that is published and not filtered out.
Publish speakers that are speaking on any session that is published and not filtered out.
Publish all speakers
Publish no speakers
Apply more granular filters with labels
Only publish speakers with a particular label. For example you might want to use a ‘Content Reviewed’ label to flag speakers that have had their content reviewed.
Exclude speakers with a particular label. For example you might want to exclude a ‘Do not publish’ label to prevent publishing of speakers who are not yet ready to be published.
For Sessions you can filter in numerous ways
Choose which sessions are to be published based on their relationship to speakers
Publish All Scheduled Sessions. Publishes sessions regardless of whether they have confirmed speakers or not.
(If Speaker Confirmation is enabled): Publish sessions that have one confirmed speaker.
(If Speaker Confirmation is enabled): Publish sessions that have all their speakers confirmed.
Publish All Sessions (available on Lineup Ninja Agenda App only)
Apply filters with labels
Only publish sessions with a particular label. For example you might want to use a ‘Content Reviewed’ label to flag sessions that have had their content reviewed.
Exclude session with a particular label. For example you might want to exclude a ‘Placeholder’ label to prevent publishing of sessions which are not yet populated.
Filter by location
Only publish sessions in a particular location, or locations. This can be useful if you are publishing an agenda for just one or two locations.
Exclude sessions in a particular location, or locations. This can be useful if you have scheduled sessions in your Green Room or similar back stage location.
Filter by resource
Only publish sessions needing a particular resource. This could be useful if you are producing an agenda for a particular team that manages some resources.
Exclude sessions needing a particular resource.
Filter by Date
Only publish sessions in a date or dates. Useful if you are producing an agenda for a particular day.
You can exclude a date or dates from your publication. Useful if you have dates for build up and tear down in your agenda.
Filter by Track
Only publish sessions in a particular track or tracks. Useful if you are producing separate agenda for separate parts of your event
Exclude sessions on a particular track. Can be useful to block presenting of a track until a product launch has happened.
To configure filters:
Click ‘Publish Agenda’
Click on the name for your existing publication
Click ‘Configure’
Expand either the ‘Speaker Configuration’ or ‘Session Configuration’ section
Expand the corresponding ‘Filter Speakers’ or ‘Filter Sessions’ sections and configure the filters you need
Save and republish
How can I merge locations and tracks when publishing?
When publishing you can merge content together. This enables you to publish a simpler agenda for your attendees than the one you are using to plan your event.
You can choose to merge these types of data:
Locations. Merging location A into location B will show all sessions in location A as taking place in location B. This can be useful if you have multiple locations configured for scheduling purposes that will be experienced by the attendee as a single location.
Tracks. Merging track A into track B will show all sessions in track A as being in track B. This can be useful if you have some tracks with only a small number of sessions and wish to present this sessions as being in a more populous track.
When merging the location, or track that you are merging into does not have to have any sessions itself. So you can use this to show a different name to attendees than you are using internally. For example you could create a ‘Main Hall’ location, and merge ‘Building B - Hall A’ into that location so attendees see ‘Main Hall’ in their agenda.
How can I embargo content that is not yet ready for the public?
You can choose to embargo session titles and descriptions if you have content that should only be shown to the public after being announced in the event.
An embargo is applied by using labels to identify the sessions that should have an embargoed session title or description.
For example if you have a label ‘New Product Launch’, you can configure an embargo to hide the session title and description from sessions with that label. Following the launch of the product you can remove the embargo and republish the agenda.
If you embargo a session or description you can replace the original text with something to indicate that the session will be published later, for example ‘Super Secret Session’.
The speakers for a session will still be shown when it is embargo’ed. To exclude a session, including it’s speakers from being published then use ‘Session Filters’ rather than an ‘Embargo Content’.
To configure an embargo:
Click ‘Publish Agenda’
Click on the name for your existing publication
Click ‘Configure’
Expand the ‘Session Configuration’ section
Expand the ‘Embargo Content’ sections and configure the embargo that you need
Save and republish
How are Sub Sessions handled?
If you are using Sub Sessions the speakers on the Sub Sessions will be merged into the parent.
How can I publish automatically?
Warning
Consider your teams workflow as a team before enabling automatic publishing. When you enable automatic publishing there is a potential for the agenda to be published when you have content that is not ready for publication.
To schedule publishing scroll down to the ‘Scheduled Publishing’ part of the configuration.
You can then choose whether to publish once per hour, or once per day. If you choose to publish each day the publication will occur around 3am in the timezone of your event.
Still can’t find what you’re looking for? Email support@lineupninja.com and one of the team will get back to you as soon as possible.
Swapcard
Lineup Ninja can publish your schedule into a Swapcard application. You can perform an initial import of your schedule then publish it again whenever you have new changes ready to go.
The Lineup Ninja / Swapcard integration has some sophisticated features to enable you to easily map your Lineup Ninja session and speaker content to Swapcard people.
It is strongly recommended you engage Lineup Ninja support to configure this integration, we can then ensure it is configured correctly to ensure you get the most out of it.
Lineup Ninja Speakers and Swapcard People
Your Speakers in Lineup Ninja are represented by People in Swapcard. There are a few options you can choose between to manage this connection between the two systems.
The standard approach is that your speakers should register with your registration system. This will create a Swapcard account, and Lineup Ninja can match the data you
have in your agenda with the registration data in Swapcard. The speaker bio’s and headshots can be updated and their accounts will be linked to their sessions automatically.
However this wil leave gaps in your Swapcard agenda until the speakers exist in your registration system. If you want to show a complete agenda there are two options
Create a Temporary person in Swapcard
In the ‘Temporary’ mode Lineup Ninja will create a Person for each Speaker that does not match an existing Person in Swapcard.
When the Speaker registers for the event the Temporary Person will be deleted and the real Person will be linked to the Session.
Create a Full person in Swapcard
If you wish you can have Lineup Ninja create Full accounts in Swapcard for all speakers that are not currently matched to a Swapcard Person.
The person will have an account, and the email address used will be their email in Lineup Ninja.
However you must consider the impact on your registration system if you go down this approach. For example, if you create a Swapcard Person from
Lineup Ninja and they subsequently register for the event in your registration system, what will happen? Swapcard will likely merge the data
from Lineup Ninja and your registration system.
It is strongly recommended that you test this situation and ensure things work as you expect. In the configuration you can choose whether
you want Lineup Ninja to be the ‘single source of truth’ for your speaker data on a field by field basis. This means you can configure the system
to overwrite data in Swapcard or to leave data unchanged.
Create the integration
First start by configuring a Data Source to represent Swapcard Peoplez. See the Sources documentation for configuration.
In Lineup Ninja, navigate to
Agenda Planning
>
Publish Agenda
and click the ‘Integrate’ button under ‘Swapcard’. This will create a new integration.
You will now be presented with a screen of configuration. The initial fields are as follows:
Name - This name will be used to show the data source in the left hand menu
Event Id - The ID of you event in Swapcard. You can find this at the bottom of the ‘Event Settings’ page in Swapcard.
API Key - Generate an API Key by clicking your name in the top right of the Swapcard interface and choosing ‘API Keys’.
Name or ID of Location Field - If you have renamed the Location field in Swapcard you need to input the new name here.
Name or ID of Topics Field - If you have renamed the Topics field in Swapcard you need to input the new name here.
Then in ‘Speaker Configuration’
Which Data Source represents Swapcard Speakers - Choose the data source you created in ‘Importing Swapcard People’ above.
Optional - Name of ‘Speakers’ group in Swapcard - If you have renamed the ‘Speakers’ group to a different name in Swapcard input the name here.
Optional - Name of ID of Speaker Labels Field - Lineup Ninja can map selected labels to a field in Swapcard. If you want this to happen enter the name or ID of the field you want to map to and then choose the labels you want to map.
When should Lineup Ninja update data for speakers created by your registration system? - For Speakers that have been created in your registration system you can choose if Lineup Ninja should set their Bio and Headshot if it is blank in Swapcard,
or if it should always set the data, even if that means overwriting a change in Swapcard
What would you like to do for Speaker that are not yet matched to People in Swapcard? - This question asks you what you would like to happen if the Speaker does not already match to a Person in Swapcard
Ignore the person - The unmatched Speaker will be ignored and will not appear on the session.
Create a temporary person - See ‘Create a Temporary person in Swapcard’ above.
Create a full person - See ‘Create a Full person in Swapcard’ above.
When should Lineup Ninja update data for speakers created by Lineup Ninja? If you select to ‘Create a full person’ you can configure when you would like Lineup Ninja to set the data in Swapcard for various fields. You can choose to always use the data in Lineup Ninja
in Swapcard, or to only use it when it’s blank. If you choose ‘Always’ any change made in Swapcard, either via your registration or by the Speaker themselves in the Swapcard app will be overwritten.
And in ‘Session Configuration’
Optional - Name of ID of Sessions Labels Field - Lineup Ninja can map selected labels to a field in Swapcard. If you want this to happen enter the name or ID of the field you want to map to and then choose the labels you want to map.
When showing a session, sort the speakers by - Choose how you would like speakers to be sorted when a session is displayed.
Optional - Sessions with this label will be marked private - You can mark sessions by private by creating a label called, for example ‘Private’, and choosing that label for this field. Then assign the label to all sessions you want to be marked as Private in Swapcard.
Optional - Which file type do you want to use for Session Banner images? - See ‘How do I add banner images to sessions?’ below
Do you want Lineup Ninja to manage registration limits in Swapcard? - If you want Lineup Ninja to manage session capacities then choose how the configuration should be used here.
There are two options you can configure to automatically tidy up data in Swapcard when a session becomes unscheduled or deleted. If you need assistance with configuring these please ask.
Things to know
When Lineup Ninja adds Swapcard People to a session Swapcard will automatically add the ‘Speakers’ group to their record. When a speaker is removed from a session the ‘Speakers’ group will NOT be removed automatically. If you need this to happen please reach out to support.
Note that Locations and Tracks will be created with a base language value removing non alphanumeric characters, then the actual value is applied as a language translation.
When changing tracks on a session the new tracks are added and the existing tracks are not removed. If you need the existing tracks to be removed the please reach out to support.
How do I add banner images to sessions?
Swapcard can display a banner image for Sessions. You can map an image in Lineup Ninja to this Swapcard banner.
Swapcard recommend “a rectangular image (16:9 ratio), size of 1920x1080px and no larger than 1MB is perfect.”
You can map any Lineup Ninja image type to the Swapcard image but we recommend creating a new File Type for this image and then uploading images as per the Swapcard recommendation.
To do this:
Navigate to
Event Settings
>File Types
Create an new Image file type and choose ‘Do not crop the image’ and ‘PNG’.
Naviate to the Swapcard integration configuration and add this new Image file type to the Which file type do you want to use for Session Banner images option.
Add the images to the sessions. If desired you can request this content from your Submitters via a Submission Flow.
If you already have a ‘Session Sponsor Logo’ or alternative File Type you can choose to use that. The integration will upload the uncropped image to Swapcard.
How can I filter the published content?
You can filter which Speakers and Sessions will be published based on a number of criteria. Some common use cases for filters are:
Preventing ‘Placeholder’ sessions from being published
Holding back a Speaker who is not yet ready to be announced
Excluding sessions scheduled during the ‘build up’ day for the event
Only publishing speakers who have confirmed their slot
Removing a particular location, or track from the published schedule
Anything you can think of using labels!
For Speakers you can filter in 3 ways
Choose which speakers are to be published based on their relationship to sessions
(If Speaker Confirmation is enabled): Publish speakers that have a confirmed session that is published and not filtered out.
Publish speakers that are speaking on any session that is published and not filtered out.
Publish all speakers
Publish no speakers
Apply more granular filters with labels
Only publish speakers with a particular label. For example you might want to use a ‘Content Reviewed’ label to flag speakers that have had their content reviewed.
Exclude speakers with a particular label. For example you might want to exclude a ‘Do not publish’ label to prevent publishing of speakers who are not yet ready to be published.
For Sessions you can filter in numerous ways
Choose which sessions are to be published based on their relationship to speakers
Publish All Scheduled Sessions. Publishes sessions regardless of whether they have confirmed speakers or not.
(If Speaker Confirmation is enabled): Publish sessions that have one confirmed speaker.
(If Speaker Confirmation is enabled): Publish sessions that have all their speakers confirmed.
Publish All Sessions (available on Lineup Ninja Agenda App only)
Apply filters with labels
Only publish sessions with a particular label. For example you might want to use a ‘Content Reviewed’ label to flag sessions that have had their content reviewed.
Exclude session with a particular label. For example you might want to exclude a ‘Placeholder’ label to prevent publishing of sessions which are not yet populated.
Filter by location
Only publish sessions in a particular location, or locations. This can be useful if you are publishing an agenda for just one or two locations.
Exclude sessions in a particular location, or locations. This can be useful if you have scheduled sessions in your Green Room or similar back stage location.
Filter by resource
Only publish sessions needing a particular resource. This could be useful if you are producing an agenda for a particular team that manages some resources.
Exclude sessions needing a particular resource.
Filter by Date
Only publish sessions in a date or dates. Useful if you are producing an agenda for a particular day.
You can exclude a date or dates from your publication. Useful if you have dates for build up and tear down in your agenda.
Filter by Track
Only publish sessions in a particular track or tracks. Useful if you are producing separate agenda for separate parts of your event
Exclude sessions on a particular track. Can be useful to block presenting of a track until a product launch has happened.
To configure filters:
Click ‘Publish Agenda’
Click on the name for your existing publication
Click ‘Configure’
Expand either the ‘Speaker Configuration’ or ‘Session Configuration’ section
Expand the corresponding ‘Filter Speakers’ or ‘Filter Sessions’ sections and configure the filters you need
Save and republish
Can I set the order of sessions that start at the same time
If you have multiple sessions starting at the same time you can set the order in Swapcard by following this process:
Navigate to
Event Settings
>
Custom Fields
. Add a Custom Field to Sessions that is of type ’Number’, call it ’Swapcard Order’ (or something similar)
For the sessions you have that start at the same time, navigate into the first one and in the ’Swapcard Order’ Field set 1, then 2 in the second one and so on.
Now go to the Configuration for the Swapcard integration and find the ‘Swapcard Session Order’ field question and choose the Custom Field you created.
Publish as normal.
How are Sub Sessions handled?
If you are using Sub Sessions the following will happen:
Speakers on the Sub Sessions will be merged into the parent.
You can optionally choose to include the titles and timings of the Sub Sessions in the description of the parent session.
You can find the configuration in the ‘Session Configuration’ / ‘Sub Session Configuration’ section of the integration configuration.
An example template is provided for including the timings of the Sub Sessions. If you require additional placeholder fields please get in touch.
You can choose between 24hr and 12hr time for the times for the Sub Sessions. Times will be shown in the timezone of the event.
Tracks on Sub Sessions are merged into the parent session.
How can I publish automatically?
Warning
Consider your teams workflow as a team before enabling automatic publishing. When you enable automatic publishing there is a potential for the agenda to be published when you have content that is not ready for publication.
To schedule publishing scroll down to the ‘Scheduled Publishing’ part of the configuration.
You can then choose whether to publish once per hour, or once per day. If you choose to publish each day the publication will occur around 3am in the timezone of your event.
Can I add Lineup Ninja Speakers as Attendees in Swapcard?
Yes it is possible to add Lineup Ninja Speakers as Attendees in Swapcard, however this is considered an advanced feature and we recommend discussing with support before enabling.
Warning
This can only be used for Private sessions where Swapcard Attendees cannot add themselves to a session. Otherwise the integration would remove attendees who have added themselves to the session.
It works like this:
You choose which sessions should have their attendees managed by Lineup Ninja. This is done by assigning a label to these session. You can use an existing label, such as the one you are using to mark sessions as ‘Private’ or create a new one.
Then create a Speaker Role that you will use to identify which speakers should be attendees. We recommend calling this ‘Attendee’ but you can choose which ever name you want.
Now navigate to the ‘Advanced’ settings in the Swapcard configuration.
Choose the label you selected for ‘Sessions with this label will have their attendees managed by Lineup Ninja’.
Choose the role you created for ‘What role represents attendees on a session’.
Note that a Lineup Ninja Speaker can be an Attendee for one session in Swapcard and a Speaker for another. However they cannot be both an Attendee and Speaker on the same session.
When you run the integration the below will happen
Any Lineup Ninja Speakers who have the ‘Attendee’ role for a labeled session will be added as ‘Attendees’ to the session rather than as a Speaker.
Any existing Attendees on the Swapcard session, who are not ‘Attendee’ speakers in Lineup Ninja will be removed from the Swapcard session.
Still can’t find what you’re looking for? Email support@lineupninja.com and one of the team will get back to you as soon as possible.
Here is a quick video outlining the process. For more detail, scroll down.
Info
Swoogo only supports one track per session. If you have a session with multiple tracks, the alphabetically first track will be used for the session.
Create the integration
In Lineup Ninja, navigate to
Agenda Planning
>
Publish Agenda
and click the ‘Integrate’ button under ‘Swoogo’. This will create a new integration.
A dialog will be displayed, compete the requested fields:
Event Id
This can be found in the first column in the list of events in the Swoogo console.
Customer API Key and Customer Secret
Create these by clicking your name in the top right of the Swoogo console and choosing ‘Account Setup’. Scroll down to ‘API Keys’ and generate one.
Publishing your agenda to Swoogo
Once your integration with Swoogo has been configured, you can publish (and update) your agenda in Swoogo by clicking the ‘Publish’ button.
You can find this button either on the Agenda Planning / Publish Agenda page, which lists all of your publications, and on the Swoogo Integration page itself.
If you are updating a previously published agenda, you may be asked to choose between “Changes only” and “Full publish”:
Tip
Swoogo limits the rate at which we can send data to them, so a ‘Full Publish’ may take several minutes to complete.
In most instances, a ‘Changes Only’ publish will be much quicker and achieve the same results.
How can I filter the published content?
You can filter which Speakers and Sessions will be published based on a number of criteria. Some common use cases for filters are:
Preventing ‘Placeholder’ sessions from being published
Holding back a Speaker who is not yet ready to be announced
Excluding sessions scheduled during the ‘build up’ day for the event
Only publishing speakers who have confirmed their slot
Removing a particular location, or track from the published schedule
Anything you can think of using labels!
For Speakers you can filter in 3 ways
Choose which speakers are to be published based on their relationship to sessions
(If Speaker Confirmation is enabled): Publish speakers that have a confirmed session that is published and not filtered out.
Publish speakers that are speaking on any session that is published and not filtered out.
Publish all speakers
Publish no speakers
Apply more granular filters with labels
Only publish speakers with a particular label. For example you might want to use a ‘Content Reviewed’ label to flag speakers that have had their content reviewed.
Exclude speakers with a particular label. For example you might want to exclude a ‘Do not publish’ label to prevent publishing of speakers who are not yet ready to be published.
For Sessions you can filter in numerous ways
Choose which sessions are to be published based on their relationship to speakers
Publish All Scheduled Sessions. Publishes sessions regardless of whether they have confirmed speakers or not.
(If Speaker Confirmation is enabled): Publish sessions that have one confirmed speaker.
(If Speaker Confirmation is enabled): Publish sessions that have all their speakers confirmed.
Publish All Sessions (available on Lineup Ninja Agenda App only)
Apply filters with labels
Only publish sessions with a particular label. For example you might want to use a ‘Content Reviewed’ label to flag sessions that have had their content reviewed.
Exclude session with a particular label. For example you might want to exclude a ‘Placeholder’ label to prevent publishing of sessions which are not yet populated.
Filter by location
Only publish sessions in a particular location, or locations. This can be useful if you are publishing an agenda for just one or two locations.
Exclude sessions in a particular location, or locations. This can be useful if you have scheduled sessions in your Green Room or similar back stage location.
Filter by resource
Only publish sessions needing a particular resource. This could be useful if you are producing an agenda for a particular team that manages some resources.
Exclude sessions needing a particular resource.
Filter by Date
Only publish sessions in a date or dates. Useful if you are producing an agenda for a particular day.
You can exclude a date or dates from your publication. Useful if you have dates for build up and tear down in your agenda.
Filter by Track
Only publish sessions in a particular track or tracks. Useful if you are producing separate agenda for separate parts of your event
Exclude sessions on a particular track. Can be useful to block presenting of a track until a product launch has happened.
To configure filters:
Click ‘Publish Agenda’
Click on the name for your existing publication
Click ‘Configure’
Expand either the ‘Speaker Configuration’ or ‘Session Configuration’ section
Expand the corresponding ‘Filter Speakers’ or ‘Filter Sessions’ sections and configure the filters you need
Save and republish
How can I merge locations and tracks when publishing?
When publishing you can merge content together. This enables you to publish a simpler agenda for your attendees than the one you are using to plan your event.
You can choose to merge these types of data:
Locations. Merging location A into location B will show all sessions in location A as taking place in location B. This can be useful if you have multiple locations configured for scheduling purposes that will be experienced by the attendee as a single location.
Tracks. Merging track A into track B will show all sessions in track A as being in track B. This can be useful if you have some tracks with only a small number of sessions and wish to present this sessions as being in a more populous track.
When merging the location, or track that you are merging into does not have to have any sessions itself. So you can use this to show a different name to attendees than you are using internally. For example you could create a ‘Main Hall’ location, and merge ‘Building B - Hall A’ into that location so attendees see ‘Main Hall’ in their agenda.
How can I embargo content that is not yet ready for the public?
You can choose to embargo session titles and descriptions if you have content that should only be shown to the public after being announced in the event.
An embargo is applied by using labels to identify the sessions that should have an embargoed session title or description.
For example if you have a label ‘New Product Launch’, you can configure an embargo to hide the session title and description from sessions with that label. Following the launch of the product you can remove the embargo and republish the agenda.
If you embargo a session or description you can replace the original text with something to indicate that the session will be published later, for example ‘Super Secret Session’.
The speakers for a session will still be shown when it is embargo’ed. To exclude a session, including it’s speakers from being published then use ‘Session Filters’ rather than an ‘Embargo Content’.
To configure an embargo:
Click ‘Publish Agenda’
Click on the name for your existing publication
Click ‘Configure’
Expand the ‘Session Configuration’ section
Expand the ‘Embargo Content’ sections and configure the embargo that you need
Save and republish
How are Sub Sessions handled?
If you are using Sub Sessions the following will happen:
Speakers on the Sub Sessions will be merged into the parent.
You can optionally choose to include the titles and timings of the Sub Sessions in the description of the parent session.
You can find the configuration in the ‘Session Configuration’ / ‘Sub Session Configuration’ section of the integration configuration.
An example template is provided for including the timings of the Sub Sessions. If you require additional placeholder fields please get in touch.
You can choose between 24hr and 12hr time for the times for the Sub Sessions. Times will be shown in the timezone of the event.
Managing Deleted and Unpublished Data
When you delete or unschedule a session in Lineup Ninja, you may want to tidy up the data in Swoogo. In both cases, the Swoogo integration configuration gives you two choices:
Delete the Session: tells Swoogo to delete the session.
Keep the Session: does not tell Swoogo to delete the session.
How can I publish automatically?
Warning
Consider your workflow as a team before enabling automatic publishing.
When you enable automatic publishing, the agenda may be published with content that is not ready for publication.
To schedule publishing scroll down to the ‘Scheduled Publishing’ part of the configuration.
You can then choose whether to publish once per hour, or once per day. If you choose to publish each day the publication will occur around 3am in the timezone of your event.
Still can’t find what you’re looking for? Email support@lineupninja.com and one of the team will get back to you as soon as possible.
VenuIQ
Lineup Ninja can integrate your agenda data with VenuIQ.
Create the integration
In your Lineup Ninja event, navigate to
Agenda Planning
>Publish Agenda
and then click the ‘Integrate’ button under ‘VenuIQ’. This will create a new integration.
A dialog will be displayed, compete the requested fields:
Master account email and password
Input the email address and password of the master account. If you do not have the details for the master account your VenuIQ account manager can provide them.
Conference Id
In the VenuIQ interface browse to ‘Conferences’ / ‘List’. You will see a list of your conferences, for the conference you want to integrate copy the value in the ‘Conference Id’ column into the ‘Conference Id’ field in Lineup Ninja.
Order Package Id
In the VenuIQ interface browse to your Dashboard. Click the address bar in your browser and you will find an address like this: https://live.venu-iq.com/dashboard/123 Copy the number from the end of the address into the ‘Order Package Id’ field in Lineup Ninja.
Publishing your schedule
To publish your schedule just click the ‘Publish’ button!
You may be asked if you wish to publish a ‘Full’ schedule or a ‘Changes Only’ update. A Full update will publish all speakers and sessions regardless of whether they have been updated in Lineup Ninja since you last published. A ‘Changes Only’ update only publishes speakers and sessions that have changed which will be quicker.
How can I filter the published content?
You can filter which Speakers and Sessions will be published based on a number of criteria. Some common use cases for filters are:
Preventing ‘Placeholder’ sessions from being published
Holding back a Speaker who is not yet ready to be announced
Excluding sessions scheduled during the ‘build up’ day for the event
Only publishing speakers who have confirmed their slot
Removing a particular location, or track from the published schedule
Anything you can think of using labels!
For Speakers you can filter in 3 ways
Choose which speakers are to be published based on their relationship to sessions
(If Speaker Confirmation is enabled): Publish speakers that have a confirmed session that is published and not filtered out.
Publish speakers that are speaking on any session that is published and not filtered out.
Publish all speakers
Publish no speakers
Apply more granular filters with labels
Only publish speakers with a particular label. For example you might want to use a ‘Content Reviewed’ label to flag speakers that have had their content reviewed.
Exclude speakers with a particular label. For example you might want to exclude a ‘Do not publish’ label to prevent publishing of speakers who are not yet ready to be published.
For Sessions you can filter in numerous ways
Choose which sessions are to be published based on their relationship to speakers
Publish All Scheduled Sessions. Publishes sessions regardless of whether they have confirmed speakers or not.
(If Speaker Confirmation is enabled): Publish sessions that have one confirmed speaker.
(If Speaker Confirmation is enabled): Publish sessions that have all their speakers confirmed.
Publish All Sessions (available on Lineup Ninja Agenda App only)
Apply filters with labels
Only publish sessions with a particular label. For example you might want to use a ‘Content Reviewed’ label to flag sessions that have had their content reviewed.
Exclude session with a particular label. For example you might want to exclude a ‘Placeholder’ label to prevent publishing of sessions which are not yet populated.
Filter by location
Only publish sessions in a particular location, or locations. This can be useful if you are publishing an agenda for just one or two locations.
Exclude sessions in a particular location, or locations. This can be useful if you have scheduled sessions in your Green Room or similar back stage location.
Filter by resource
Only publish sessions needing a particular resource. This could be useful if you are producing an agenda for a particular team that manages some resources.
Exclude sessions needing a particular resource.
Filter by Date
Only publish sessions in a date or dates. Useful if you are producing an agenda for a particular day.
You can exclude a date or dates from your publication. Useful if you have dates for build up and tear down in your agenda.
Filter by Track
Only publish sessions in a particular track or tracks. Useful if you are producing separate agenda for separate parts of your event
Exclude sessions on a particular track. Can be useful to block presenting of a track until a product launch has happened.
To configure filters:
Click ‘Publish Agenda’
Click on the name for your existing publication
Click ‘Configure’
Expand either the ‘Speaker Configuration’ or ‘Session Configuration’ section
Expand the corresponding ‘Filter Speakers’ or ‘Filter Sessions’ sections and configure the filters you need
Save and republish
How can I embargo content that is not yet ready for the public?
You can choose to embargo session titles and descriptions if you have content that should only be shown to the public after being announced in the event.
An embargo is applied by using labels to identify the sessions that should have an embargoed session title or description.
For example if you have a label ‘New Product Launch’, you can configure an embargo to hide the session title and description from sessions with that label. Following the launch of the product you can remove the embargo and republish the agenda.
If you embargo a session or description you can replace the original text with something to indicate that the session will be published later, for example ‘Super Secret Session’.
The speakers for a session will still be shown when it is embargo’ed. To exclude a session, including it’s speakers from being published then use ‘Session Filters’ rather than an ‘Embargo Content’.
To configure an embargo:
Click ‘Publish Agenda’
Click on the name for your existing publication
Click ‘Configure’
Expand the ‘Session Configuration’ section
Expand the ‘Embargo Content’ sections and configure the embargo that you need
Save and republish
How can I merge locations and tracks when publishing?
When publishing you can merge content together. This enables you to publish a simpler agenda for your attendees than the one you are using to plan your event.
You can choose to merge these types of data:
Locations. Merging location A into location B will show all sessions in location A as taking place in location B. This can be useful if you have multiple locations configured for scheduling purposes that will be experienced by the attendee as a single location.
Tracks. Merging track A into track B will show all sessions in track A as being in track B. This can be useful if you have some tracks with only a small number of sessions and wish to present this sessions as being in a more populous track.
When merging the location, or track that you are merging into does not have to have any sessions itself. So you can use this to show a different name to attendees than you are using internally. For example you could create a ‘Main Hall’ location, and merge ‘Building B - Hall A’ into that location so attendees see ‘Main Hall’ in their agenda.
How are Titles and Post Nominals Handled?
By default the integration will merge Titles and Post Nominals into the speakers full name in VenuIQ. If you don’t want to include them, or you want to filter particular titles you can do this in the ‘Speaker Configuration’ / ‘Titles and Post Nominals’ section of the configuration.
How are Sub Sessions handled?
If you are using Sub Sessions the following will happen:
Speakers on the Sub Sessions will be merged into the parent.
You can optionally choose to include the titles and timings of the Sub Sessions in the description of the parent session.
You can find the configuration in the ‘Session Configuration’ / ‘Sub Session Configuration’ section of the integration configuration.
An example template is provided for including the timings of the Sub Sessions. If you require additional placeholder fields please get in touch.
You can choose between 24hr and 12hr time for the times for the Sub Sessions. Times will be shown in the timezone of the event.
Tracks on Sub Sessions are merged into the parent session.
How can I publish automatically?
Warning
Consider your teams workflow as a team before enabling automatic publishing. When you enable automatic publishing there is a potential for the agenda to be published when you have content that is not ready for publication.
To schedule publishing scroll down to the ‘Scheduled Publishing’ part of the configuration.
You can then choose whether to publish once per hour, or once per day. If you choose to publish each day the publication will occur around 3am in the timezone of your event.
Still can’t find what you’re looking for? Email support@lineupninja.com and one of the team will get back to you as soon as possible.
Zapier
Lineup Ninja can trigger events in Zapier when you publish your event.
What triggers are available and when do they fire?
The following triggers are available:
Speaker Created
Speaker Updated
Session Created
Session Updated
Label Created
Label Updated
Location Created
Location Updated
Resource Created
Resource Updated
Track Created
Track Updated
Triggers fire when you publish your agenda via the ‘Publish Agenda’ page. They do NOT fire as you update your agenda in ‘Agenda Planning’.
This means you can work in ‘Agenda Planning’ until you are ready to publish your changes. When you are ready, you publish the data to Zapier to fire the triggers.
What data is available in the trigger?
In the default configuration the data in the trigger includes the data for the object itself and related data that might be useful in a future step. For example, the data for Speaker Created / Speaker Updated trigger includes the following:
The speaker’s attributes (First Name, Last Name, Bio etc…)
The speaker’s sessions. And for each session:
The session name, description etc
The session location
The session tracks, and for each track:
The track name
The session labels, and for each label:
The label name
The speaker’s labels, and for label:
The label name
If you do not want to include the related data, you can configure the “Should related data be included” option in the integration configuration.
You can download the Field Schema for each type from these links:
You may see a ’list item’ called ‘Contributors’, this means ‘Speakers’. At the time of writing there is a Zapier but that means our internal naming is shown in the Zapier UI.
What’s the difference between a ‘Created’ and ‘Updated’ trigger?
A ‘Created’ trigger will only fire once, at the time the item is first published. I.e. if you add a new speaker to the agenda, then publish your event, the ‘Speaker Created’ trigger will fire. If you subsequently update the speaker the trigger will not fire again.
An ‘Updated’ trigger will fire when the item is first published and again for any future update. This will result in more ‘Tasks’ running, which may incur extra cost, but will ensure your data is up to date.
Warning
In the default configuration related data is included in the trigger data. This means that an ‘Updated’ trigger may fire more frequently than you expect.
For example:
You are using the ‘Speaker Updated’ trigger
‘Speaker A’ is presenting ‘Session B’ and the description of ‘Session B’ changes
The ‘Speaker Updated’ trigger will fire because their session description has changed
This is designed to ensure your data is always accurate. If you do not want to include related data set the “Should related data be included” option in the integration configuration.
How do I publish existing data?
Zapier is intended to only process new and updated data. However you probably want to publish all of your event data rather than just new changes, at least initially.
To manage this there is an option in the integration configuration “How should existing data be handled”.
This changes the interaction between Lineup Ninja and Zapier at the point where you turn the Zap on.
When you turn on a Zap, Zapier asks Lineup Ninja if there is any existing data. It takes the response from Lineup Ninja and considers everything received as ‘old’ and will not trigger Zaps for this data.
To publish all content Lineup Ninja can return an empty response in this initial response. This will cause Zapier to consider all of your event data as ’new’ and will trigger Zaps for all of it. See the Zapier Documentation for more details.
If ‘Zaps will fire for all existing data’ is set then Lineup Ninja will tell Zapier there is no existing data and Zaps will fire for all data
If ‘Existing published data is ignored’ is set then Lineup Ninja will tell Zapier that currently published data should be considered as ‘old’ and it will not trigger Zaps. New / Updated content will trigger Zaps (depending on the trigger used).
Warning
When this option is set to ‘Zaps will fire for all existing data’, Zaps will trigger for every item every time you turn your Zap on. If you do not want to receive Zaps for all data when turning your Zap on you should change the option to ‘Existing published data is ignored’ before turning your Zap on.
You may want to change this setting to ‘Existing published data is ignored’ after your first main data import.
What data is used for sample / test data?
By default the integration will use pre-defined sample data when you create a new Zap. This is intended to ensure you can use example data for all properties that are available in the trigger.
If you would prefer to use your real event data then change the “What data should be used for testing Zaps” setting in the integration configuration.
You can download the sample data for each type from these links:
What’s the difference between ‘Zapier Id’, ‘Lineup Ninja Id’ and ‘Lineup Ninja Short Id’?
In the trigger you will find each object has two identifiers
‘id’ or ‘Zapier Id’ - This identifier is used to ensure the ‘Updated’ Zapier triggers fire. It changes when the data changes. You should not use this identifier in a following step.
’lineupNinjaId’ or ‘Lineup Ninja Id’ - This is a fixed identifier and does not change. You should use this identifier if you need a consistent identifier in your following steps.
’lineupNinjaShortId’ or ‘Lineup Ninja Short Id’ - This is the first 8 characters of the UUID for the object. It can use used when a full UUID is too long to fit into a subsequent step
Create the integration
Creating a Zapier integration requires configuration on both the Lineup Ninja and Zapier sides.
Start in Lineup Ninja by following these steps:
Navigate to
Agenda Planning
>
Publish Agenda
Scroll down to ‘Zapier’ and press ‘Integrate’
In the configuration that is displayed you can set some options for how the data is shared with Zapier. You can start with the defaults, but please do read all of the documentation because these options affect the number of Zapier Tasks that will be used, which will have cost implications for you:
You will now see a table containing ‘Username’, ‘Password, ‘Team Id’ and ‘Publication Id’.
You are now ready to configure Zapier:
Open Zapier in a new tab.
Create a new Zap
For trigger choose ‘Lineup Ninja - Agenda Publishing’
Choose the event you are interested in
Click continue
Click ‘Connect’ to connect to Lineup Ninja. A pop-up window will appear, if you do not see it then turn off any pop-up blockers. Input the information from the integration you created in Lineup Ninja. If you hover over each field in Lineup Ninja you can click it to copy it to your clipboard.
Username - This is always zapier.
Password - This is unique to Zapier. It is not your login password.
Team Id
Publication Id
Zapier will then confirm your credentials and you can proceed to add the actions you need.
Publishing your schedule
To publish your schedule just click the ‘Publish’ button!
How long does it take for Zaps to fire?
Zapier looks for new data in your Lineup Ninja event on a regular schedule. The frequency depends on your Zapier package and ranges between 1 and 15 minutes.
How do I use ‘related data’ in a Zap?
As explained above, the data available in the trigger contains related data that might be useful. For example, a ‘Speaker’ contains ‘List Items’ containing the details for each of their sessions.
How you use this data depends on the action you will use. Some actions support ‘List Items’ natively and you will be able to pass the data in the ‘List Item’ directly to the action.
Some actions do not support ‘List Items’. In this instance you can use the ‘Looping By Zapier’ action to run an action once for each item in a list.
For example, if you want to trigger an action for each Session a Speaker is presenting you can add a ‘Looping By Zapier’ step, and choose the ‘Line Items’ option. Then you can choose the fields from the related data you want to make available in the next step.
Then in a subsequent step you can choose data from the original ‘Speaker’ data in step 1, and the ‘Session’ data from the looping step. For example:
In this subsequent step it is important not to accidentally pick the ‘Preview Loop Values’ data as this data is only shown when building a Zap, it is not available when it runs. You need to click ‘Show All Options’ and choose the field with the name you configured in the looping step.
You can find more information about ‘Looping By Zapier’ in the Zapier Documentation.
Can I create multiple Zapier integrations?
Yes you can create multiple Zapier integrations. Some reasons you might want to do this:
To trigger Zaps at different times. For example you might want to publish some changes to Zaps every day, and to some other Zaps once per week.
To send different content to different Zaps. You can do this by applying different ‘Session’ and ‘Speaker’ filters to each integration.
How do Speaker Profile Photos work?
If an ‘Speaker Profile Photo’ has been uploaded for a Speaker it will be available in 4 fields.
Profile Picture URL - 128x128
Profile Picture File - 128x128
Profile Picture URL - 256x256
Profile Picture File - 256x256
There are two different sizes available, 128x128 and 256x256 and you can choose between a ‘File’ and a ‘URL’.
The choice between a ‘File’ and a ‘URL’ depends on the action you are using. If the action expects a File then choose the ‘File’ option, otherwise the ‘URL’ option will normally suffice.
How do I use Custom Field data?
You can add Custom Fields to your event. These will be available in the Zapier feed.
The object has a ‘Custom Fields’ list item that contains one row per custom field that has a value set for that object.
For example a Speaker may have multiple items in ‘Custom Field Data’ eg
Custom Field Data - Field Name: 'Number of Hotel Nights'
Custom Field Data - Field Type: number
Custom Field Data - Field Value: 3
and
Custom Field Data - Field Name: 'Short Bio'
Custom Field Data - Field Type: text
Custom Field Data - Field Value: 'Super great presenter'
If you need to extract the data for a specific field you can use the ‘Formatter’ action in Zapier. A full guide is available here. In short you can do this:
Add ‘Formatter By Zapier’ action
Choose ‘Text’ as event type
Choose ‘Spreadsheet-Style Formula’ for the transform
Then use this formula, replacing “Test Field” with the name of the Custom Field you want to use. See this guide for an explanation of how this works.
The data is then available for use in subsequent steps.
How can I filter the published content?
You can filter which Speakers and Sessions will be published based on a number of criteria. Some common use cases for filters are:
Preventing ‘Placeholder’ sessions from being published
Holding back a Speaker who is not yet ready to be announced
Excluding sessions scheduled during the ‘build up’ day for the event
Only publishing speakers who have confirmed their slot
Removing a particular location, or track from the published schedule
Anything you can think of using labels!
For Speakers you can filter in 3 ways
Choose which speakers are to be published based on their relationship to sessions
(If Speaker Confirmation is enabled): Publish speakers that have a confirmed session that is published and not filtered out.
Publish speakers that are speaking on any session that is published and not filtered out.
Publish all speakers
Publish no speakers
Apply more granular filters with labels
Only publish speakers with a particular label. For example you might want to use a ‘Content Reviewed’ label to flag speakers that have had their content reviewed.
Exclude speakers with a particular label. For example you might want to exclude a ‘Do not publish’ label to prevent publishing of speakers who are not yet ready to be published.
For Sessions you can filter in numerous ways
Choose which sessions are to be published based on their relationship to speakers
Publish All Scheduled Sessions. Publishes sessions regardless of whether they have confirmed speakers or not.
(If Speaker Confirmation is enabled): Publish sessions that have one confirmed speaker.
(If Speaker Confirmation is enabled): Publish sessions that have all their speakers confirmed.
Publish All Sessions (available on Lineup Ninja Agenda App only)
Apply filters with labels
Only publish sessions with a particular label. For example you might want to use a ‘Content Reviewed’ label to flag sessions that have had their content reviewed.
Exclude session with a particular label. For example you might want to exclude a ‘Placeholder’ label to prevent publishing of sessions which are not yet populated.
Filter by location
Only publish sessions in a particular location, or locations. This can be useful if you are publishing an agenda for just one or two locations.
Exclude sessions in a particular location, or locations. This can be useful if you have scheduled sessions in your Green Room or similar back stage location.
Filter by resource
Only publish sessions needing a particular resource. This could be useful if you are producing an agenda for a particular team that manages some resources.
Exclude sessions needing a particular resource.
Filter by Date
Only publish sessions in a date or dates. Useful if you are producing an agenda for a particular day.
You can exclude a date or dates from your publication. Useful if you have dates for build up and tear down in your agenda.
Filter by Track
Only publish sessions in a particular track or tracks. Useful if you are producing separate agenda for separate parts of your event
Exclude sessions on a particular track. Can be useful to block presenting of a track until a product launch has happened.
To configure filters:
Click ‘Publish Agenda’
Click on the name for your existing publication
Click ‘Configure’
Expand either the ‘Speaker Configuration’ or ‘Session Configuration’ section
Expand the corresponding ‘Filter Speakers’ or ‘Filter Sessions’ sections and configure the filters you need
Save and republish
How can I merge locations and tracks when publishing?
When publishing you can merge content together. This enables you to publish a simpler agenda for your attendees than the one you are using to plan your event.
You can choose to merge these types of data:
Locations. Merging location A into location B will show all sessions in location A as taking place in location B. This can be useful if you have multiple locations configured for scheduling purposes that will be experienced by the attendee as a single location.
Tracks. Merging track A into track B will show all sessions in track A as being in track B. This can be useful if you have some tracks with only a small number of sessions and wish to present this sessions as being in a more populous track.
When merging the location, or track that you are merging into does not have to have any sessions itself. So you can use this to show a different name to attendees than you are using internally. For example you could create a ‘Main Hall’ location, and merge ‘Building B - Hall A’ into that location so attendees see ‘Main Hall’ in their agenda.
How can I embargo content that is not yet ready for the public?
You can choose to embargo session titles and descriptions if you have content that should only be shown to the public after being announced in the event.
An embargo is applied by using labels to identify the sessions that should have an embargoed session title or description.
For example if you have a label ‘New Product Launch’, you can configure an embargo to hide the session title and description from sessions with that label. Following the launch of the product you can remove the embargo and republish the agenda.
If you embargo a session or description you can replace the original text with something to indicate that the session will be published later, for example ‘Super Secret Session’.
The speakers for a session will still be shown when it is embargo’ed. To exclude a session, including it’s speakers from being published then use ‘Session Filters’ rather than an ‘Embargo Content’.
To configure an embargo:
Click ‘Publish Agenda’
Click on the name for your existing publication
Click ‘Configure’
Expand the ‘Session Configuration’ section
Expand the ‘Embargo Content’ sections and configure the embargo that you need
Save and republish
How can I publish automatically?
Warning
Consider your teams workflow as a team before enabling automatic publishing. When you enable automatic publishing there is a potential for the agenda to be published when you have content that is not ready for publication.
To schedule publishing scroll down to the ‘Scheduled Publishing’ part of the configuration.
You can then choose whether to publish once per hour, or once per day. If you choose to publish each day the publication will occur around 3am in the timezone of your event.
Still can’t find what you’re looking for? Email support@lineupninja.com and one of the team will get back to you as soon as possible.
Agenda Reports
What are Agenda Reports?
Agenda reports are where you can export the agenda data you have in Lineup Ninja. You can use a report to do things like:
Analyze the data in a spreadsheet format
Access all the files that have been uploaded
Create a spreadsheet that you can share with another team or external company
Export the data to be able to import it into another system
Still can’t find what you’re looking for? Email support@lineupninja.com and one of the team will get back to you as soon as possible.
Subsections of Agenda Reports
Spreadsheet Report
What is a Spreadsheet Report?
A spreadsheet report contains sheets on Sessions and Speakers. There are four sheets available in the spreadsheet export. You can configure which columns are shown in each sheet, or use the default configuration.
Sessions Sheet - This contains one row per session
Speakers Sheet - This contains one row per speaker
Combined Sessions and Speakers Sheet - One row per combination of Speaker and Session - This contains one row per combination of session and speaker. For example if a session has 3 speakers, then there will be 3 rows in the sheet. One containing the session and the first speaker, one containing the session and the second speaker, and one containing the session and the third speaker
Combined Sheet - One row per session - This contains one row per session, then repeats the speaker columns as many times as necessary to include all the speakers for a session on the same row. For example a session with 3 speakers will have ‘First Name - 1’, ‘First Name - 2’ and ‘First Name - 3’ columns. This sheet it intended for use in a mail merge into Microsoft Word or similar.
How do I create a spreadsheet report?
To create a spreadsheet report:
Navigate to
Agenda Planning
>
Agenda Reports
Click ‘Create Report’ on one of the spreadsheet formats. You can choose between ‘Excel’, ‘ODS’ (Open Document) or ‘CSV’.
You will see a screen to configure the report. You can:
For CSV exports, choose the sheet you want to include in the report. CSV does not support multiple sheets per file. You can create multiple reports, one for each sheet type if you need.
For each sheet you can choose whether the sheet should be included, excluded, or it can be included with a custom configuration.
If you choose ‘Custom’ you will be presented with a list of available columns in the report. You can configure the column with these icons:
When checked the column will be included in the report. When unchecked the column will be skipped
Use this to drag the columns into the order you want in the report
Some column have this icon. When enabled it means the cell will link to the relevant session, speaker or location in Lineup Ninja.
You can optionally include links to uploaded files in the report. One column exists for each file type that you have configured. When you enable a file type column you will see additional options to choose the filename that will be used when the file is downloaded from the link in the report.
Once you are happy with the configuration press ‘Save’
To run the report click ‘Run’, the report will generated and will appear in a list titled ‘Generated Reports’. Click the ‘Download’ button to download the report.
Note
If you include links to uploaded files in a report then the created links are unique for that report, and are the same across each run of the report.
If you delete the report the links will stop working. This means you can revoke access to files that were previously shared be deleting the report.
How do I filter the sessions and speakers in a report?
You can filter which Speakers and Sessions will be included based on a number of criteria. Some common use cases for filters are:
Preventing ‘Placeholder’ sessions from being included
Holding back a Speaker who is not yet ready to be announced
Excluding sessions scheduled during the ‘build up’ day for the event
Only including speakers who have confirmed their slot
Removing a particular location, or track from the included schedule
Anything you can think of using labels!
For Speakers you can filter in 3 ways
Choose which speakers are to be included based on their relationship to sessions
(If Speaker Confirmation is enabled): Include speakers that have a confirmed session that is include and not filtered out.
Include speakers that are speaking on any session that is included and not filtered out.
Include all speakers
Include no speakers
Apply more granular filters with labels
Only include speakers with a particular label. For example you might want to use a ‘Content Reviewed’ label to flag speakers that have had their content reviewed.
Exclude speakers with a particular label. For example you might want to exclude a ‘Do not include’ label to prevent including of speakers who are not yet ready to be included.
For Sessions you can filter in numerous ways
Choose which sessions are to be included based on their relationship to speakers
Include All Scheduled Sessions. Includes sessions regardless of whether they have confirmed speakers or not.
(If Speaker Confirmation is enabled): Include sessions that have one confirmed speaker.
(If Speaker Confirmation is enabled): Include sessions that have all their speakers confirmed.
Include All Sessions (available on Lineup Ninja Agenda App only)
Apply filters with labels
Only include sessions with a particular label. For example you might want to use a ‘Content Reviewed’ label to flag sessions that have had their content reviewed.
Exclude session with a particular label. For example you might want to exclude a ‘Placeholder’ label to prevent including of sessions which are not yet populated.
Filter by location
Only include sessions in a particular location, or locations. This can be useful if you are including an agenda for just one or two locations.
Exclude sessions in a particular location, or locations. This can be useful if you have scheduled sessions in your Green Room or similar back stage location.
Filter by resource
Only include sessions needing a particular resource. This could be useful if you are producing an agenda for a particular team that manages some resources.
Exclude sessions needing a particular resource.
Filter by Date
Only include sessions in a date or dates. Useful if you are producing an agenda for a particular day.
You can exclude a date or dates from your publication. Useful if you have dates for build up and tear down in your agenda.
Filter by Track
Only include sessions in a particular track or tracks. Useful if you are producing separate agenda for separate parts of your event
Exclude sessions on a particular track. Can be useful to block presenting of a track until a product launch has happened.
How do I merge locations, tracks and roles in a spreadsheet report?
When running a report you can merge content together. This enables you to include a simpler report than the one you are using to plan your event.
You can choose to merge these types of data:
Locations. Merging location A into location B will show all sessions in location A as taking place in location B. This can be useful if you have multiple locations configured for scheduling purposes that should be presented a single location in the report.
Tracks. Merging track A into track B will show all sessions in track A as being in track B. This can be useful if you have some tracks with only a small number of sessions and wish to present this sessions as being in a more populous track.
Roles. Merging role A into role B will show speakers with role A has having role B. This can be useful if you have a lot of roles internally that are not intended to be shown in the report. You can merge them into a role with a name appropriate for the report.
When merging the location, track, or role that you are merging into does not have to have any sessions itself. So you can use this to show a different name in the report than you are using internally. For example you could create a ‘Main Hall’ location, and merge ‘Building B - Hall A’ into that location the report shows ‘Main Hall’.
How do I embargo content in a spreadsheet report?
You can choose to embargo session titles and descriptions if you have content that should only be included in the report at a later day.
An embargo is applied by using labels to identify the sessions that should have an embargoed session title or description.
For example if you have a label ‘New Product Launch’, you can configure an embargo to hide the session title and description from sessions with that label. Following the launch of the product you can remove the embargo and re-run the report.
If you embargo a session or description you can replace the original text with something to indicate that the session will be included later, for example ‘Super Secret Session’.
The speakers for a session will still be shown when it is embargo’ed. To exclude a session, including it’s speakers from being included then use ‘Session Filters’ rather than an ‘Embargo Content’.
To configure an embargo:
Click ‘Agenda Reports’
Click on the name for your existing publication
Click ‘Configure’
Expand the ‘Embargo Content’ sections and configure the embargo that you need
Still can’t find what you’re looking for? Email support@lineupninja.com and one of the team will get back to you as soon as possible.
JSON Report
What is a JSON Report?
A JSON report contains the Agenda for your event in a format that is designed to be read by a machine. It is a good format to use when sharing the data with a developer.
Note
The JSON report is useful for an occasional transfer of data. If you are going to regularly share data with another system you should consider using the JSON Publishing Endpoint instead.
How do I create a JSON report?
Navigate to
Agenda Planning
>
Agenda Reports
Click ‘Create Report’ for the ‘JSON’ option
You will see a screen to configure the report. You can choose which sessions and speakers to include (see below for details).
Once you are happy with the configuration press ‘Save’
To run the report click ‘Run’, the report will generated and will appear in a list titled ‘Generated Reports’. Click the ‘Download’ button to download the report
How do I filter the sessions and speakers in a JSON report?
You can filter which Speakers and Sessions will be included based on a number of criteria. Some common use cases for filters are:
Preventing ‘Placeholder’ sessions from being included
Holding back a Speaker who is not yet ready to be announced
Excluding sessions scheduled during the ‘build up’ day for the event
Only including speakers who have confirmed their slot
Removing a particular location, or track from the included schedule
Anything you can think of using labels!
For Speakers you can filter in 3 ways
Choose which speakers are to be included based on their relationship to sessions
(If Speaker Confirmation is enabled): Include speakers that have a confirmed session that is include and not filtered out.
Include speakers that are speaking on any session that is included and not filtered out.
Include all speakers
Include no speakers
Apply more granular filters with labels
Only include speakers with a particular label. For example you might want to use a ‘Content Reviewed’ label to flag speakers that have had their content reviewed.
Exclude speakers with a particular label. For example you might want to exclude a ‘Do not include’ label to prevent including of speakers who are not yet ready to be included.
For Sessions you can filter in numerous ways
Choose which sessions are to be included based on their relationship to speakers
Include All Scheduled Sessions. Includes sessions regardless of whether they have confirmed speakers or not.
(If Speaker Confirmation is enabled): Include sessions that have one confirmed speaker.
(If Speaker Confirmation is enabled): Include sessions that have all their speakers confirmed.
Include All Sessions (available on Lineup Ninja Agenda App only)
Apply filters with labels
Only include sessions with a particular label. For example you might want to use a ‘Content Reviewed’ label to flag sessions that have had their content reviewed.
Exclude session with a particular label. For example you might want to exclude a ‘Placeholder’ label to prevent including of sessions which are not yet populated.
Filter by location
Only include sessions in a particular location, or locations. This can be useful if you are including an agenda for just one or two locations.
Exclude sessions in a particular location, or locations. This can be useful if you have scheduled sessions in your Green Room or similar back stage location.
Filter by resource
Only include sessions needing a particular resource. This could be useful if you are producing an agenda for a particular team that manages some resources.
Exclude sessions needing a particular resource.
Filter by Date
Only include sessions in a date or dates. Useful if you are producing an agenda for a particular day.
You can exclude a date or dates from your publication. Useful if you have dates for build up and tear down in your agenda.
Filter by Track
Only include sessions in a particular track or tracks. Useful if you are producing separate agenda for separate parts of your event
Exclude sessions on a particular track. Can be useful to block presenting of a track until a product launch has happened.
Still can’t find what you’re looking for? Email support@lineupninja.com and one of the team will get back to you as soon as possible.
ZIP Report
What is a Zip Report?
A ZIP report places the files attached to your sessions and speakers in a Zip file. You can use it to download files in bulk.
Note
If you want to generate links to files, rather than a zip of the files themselves, you can use a Spreadsheet Report.
How do I create a Zip report?
Navigate to
Agenda Planning
>
Agenda Reports
Click ‘Create Report’ for the ‘ZIP’ option
You will see a screen to configure the report. You can choose which sessions and speakers to include (see below for details). You can also choose which File Types to include.
Once you are happy with the configuration press ‘Save’
To run the report click ‘Run’, the report will generated and will appear in a list titled ‘Generated Reports’. Click the ‘Download’ button to download the report.
How do I filter the sessions and speakers in a Zip report?
You can filter which Speakers and Sessions will be included based on a number of criteria. Some common use cases for filters are:
Preventing ‘Placeholder’ sessions from being included
Holding back a Speaker who is not yet ready to be announced
Excluding sessions scheduled during the ‘build up’ day for the event
Only including speakers who have confirmed their slot
Removing a particular location, or track from the included schedule
Anything you can think of using labels!
For Speakers you can filter in 3 ways
Choose which speakers are to be included based on their relationship to sessions
(If Speaker Confirmation is enabled): Include speakers that have a confirmed session that is include and not filtered out.
Include speakers that are speaking on any session that is included and not filtered out.
Include all speakers
Include no speakers
Apply more granular filters with labels
Only include speakers with a particular label. For example you might want to use a ‘Content Reviewed’ label to flag speakers that have had their content reviewed.
Exclude speakers with a particular label. For example you might want to exclude a ‘Do not include’ label to prevent including of speakers who are not yet ready to be included.
For Sessions you can filter in numerous ways
Choose which sessions are to be included based on their relationship to speakers
Include All Scheduled Sessions. Includes sessions regardless of whether they have confirmed speakers or not.
(If Speaker Confirmation is enabled): Include sessions that have one confirmed speaker.
(If Speaker Confirmation is enabled): Include sessions that have all their speakers confirmed.
Include All Sessions (available on Lineup Ninja Agenda App only)
Apply filters with labels
Only include sessions with a particular label. For example you might want to use a ‘Content Reviewed’ label to flag sessions that have had their content reviewed.
Exclude session with a particular label. For example you might want to exclude a ‘Placeholder’ label to prevent including of sessions which are not yet populated.
Filter by location
Only include sessions in a particular location, or locations. This can be useful if you are including an agenda for just one or two locations.
Exclude sessions in a particular location, or locations. This can be useful if you have scheduled sessions in your Green Room or similar back stage location.
Filter by resource
Only include sessions needing a particular resource. This could be useful if you are producing an agenda for a particular team that manages some resources.
Exclude sessions needing a particular resource.
Filter by Date
Only include sessions in a date or dates. Useful if you are producing an agenda for a particular day.
You can exclude a date or dates from your publication. Useful if you have dates for build up and tear down in your agenda.
Filter by Track
Only include sessions in a particular track or tracks. Useful if you are producing separate agenda for separate parts of your event
Exclude sessions on a particular track. Can be useful to block presenting of a track until a product launch has happened.
Still can’t find what you’re looking for? Email support@lineupninja.com and one of the team will get back to you as soon as possible.
Print Agenda
How do I print the agenda?
To print the agenda as it is shown on the Agenda Planning Board view click the printer icon in the top right of the page.
You will then be asked to choose the size and orientation of the paper you are printing on, along with the font size for the text used for sessions.
You can then choose to download a PDF for later use or to print it immediately.
Info
Safari users will only see ‘Download as PDF’. To print the agenda find the downloaded PDF in ‘Downloads’ and then open it in preview and print the document.
Here is an example of the pdf print out:
How is the print formatted?
The print is formatted to one page per date, with the field data visible that you have configured to appear on your Agenda Planning Board.
This means that you can print different versions of your agenda for different viewers (e.g. AV team, moderators, hosts). For example, you may want to just print the Day 1 of a certain Location in landscape with the session title, synopsis, speaker names, job titles, company names and speaker bios for your moderator. We have included a handy ‘reset’ button for you to revert back to the default Agenda Planning settings.
Note
Please note, this is not your standard view but the default Lineup Ninja Agenda Planning board view.
How can I print certain Locations?
If you have a large number of Locations you may find that they become quite small when printed. To print a certain Location/certain Locations:
Navigate to
Agenda Planning
>
Locations
Select the Location(s) you wish to print using the tick box on the left-hand side
Scroll to the actions drop down and select ‘Print Agenda for Locations’
Configure your print and either download as PDF or print straight away
How can I print or save a PDF of an individual Speaker’s timetable/schedule?
Navigate to
Agenda Planning
>
Speakers
Select the Speakers(s) you wish to print using the tick box on the left-hand side
Scroll to the actions drop down and select ‘Print Agenda for Speakers’
Configure your print and either download as PDF or print straight away
Still can’t find what you’re looking for? Email support@lineupninja.com and one of the team will get back to you as soon as possible.