Speaker Tasks
Lineup Ninja allows you to create tasks for speakers to complete.
There are templates for common tasks like collecting speaker’s details, asking speakers to accept a speaker agreement and collecting speakers’ hotel requirements which you can use and adapt. You can also create your own custom tasks.
Info
Speaker Tasks vs Session Tasks
Lineup Ninja gives you both “Speaker Tasks” and “Session Tasks”. The difference between them is subtle, but important.
Speaker Tasks are used for gathering information about speakers - e.g. speaker profiles (headshots, biographies etc), speaker agreements, travel and hotel booking info etc.
Session Tasks are used for gathering information about sessions, such as slide decks and handouts.
It might be tempting to think “I need to ask the speakers for their slides, so I’ll create a Speaker Task for it”.
However, if any of your speakers are delivering two or more sessions, and need to provide different slides for each session, you’ll run into problems if you use a Speaker Task, because they’ll only be able to upload one slide deck, and those slides will not be linked to the session.
Note
You can also use fully-blown Submission Flows to collect this kind of data.
However, Speaker tasks (and Session Tasks) are quicker and simpler to set up, and they provide different tracking tools that allow you to see their status from within the Agenda half of Lineup Ninja.
You might choose to use a Submission Flow if you want submitters to provide speaker details AND session details on a single form.
On this page:
- How do I ask speakers to provide their profile information?
- How do I ask speakers to complete a Speaker Agreement?
- How do I ask speakers to provide their hotel requirements?
- How do I edit a question in a Speaker Task?
- How do I add a standard question to a Speaker Task?
- How do I add a custom question to a Speaker Task?
- How do I delete a question from a Speaker Task?
- How do I edit the buttons at the bottom of the form in a Speaker Task?
- How do I add a button to the bottom of the form in a Speaker Task?
- How do I add a confirmation popup to the buttons at the bottom of the form?
- How do I edit the email templates for a Speaker Task?
- How do I add email templates for a Speaker Task?
- How do I create deadline reminder emails for my Speaker Tasks?
- How do I copy a Speaker Task?
- How do I delete a Speaker Task?
- How do I assign Speaker Tasks to Task Owners (e.g. speakers)?
- How do I manage and track Speakers Tasks’ progress?
- How do I run a report of a Speaker Task’s status?
How do I ask speakers to provide their profile information?
You can collect speakers’ information in several ways:
- Using the ‘Speaker Details’ Task template. This is recommended for B2B and producer-led conferences where you just want speakers’ details - and not session details.
- As part of a ‘Submission Flow’. Recommended if you’re running a call for sessions/abstracts/papers and you want to collect speakers’ (or authors’) details at the same time as their session/abstract/paper submissions.
- Manually adding the information yourself via the admin interface. It is common for producers to do this for VIP speakers who you don’t expect to interact with the platform directly.
- Via the My Profile Section on the Home Page of the Content Portal. This is a ‘quick and dirty method’. We recommend that you only use this to let speakers double-check their profile info after it’s been added via one of the above methods.
How do I ask speakers to complete a Speaker Agreement?
You have a couple of options here.
-
Recommended: Use the Speaker Agreement Task template. This is designed specifically for this purpose. You can adapt the template to your specific needs. Using a speaker task for this allows you to track the speakers’ progress with this task from within the Speaker list.
-
Alternative: Use the Speaker Confirmation tool. This way, you can advise speakers of the times of their sessions and ask them to confirm:
- that they have seen their session times, AND
- that they accept the speaker agreement
…at the same time.
How do I ask speakers to provide their hotel requirements?
We recommend that you use Lineup Ninja’s Hotel Requirements Speaker Task template for this.
How do I edit a question in a Speaker Task?
To edit an existing question in a Speaker Task, hover over the question, and then click on the blue pencil button. This will open the question for editing: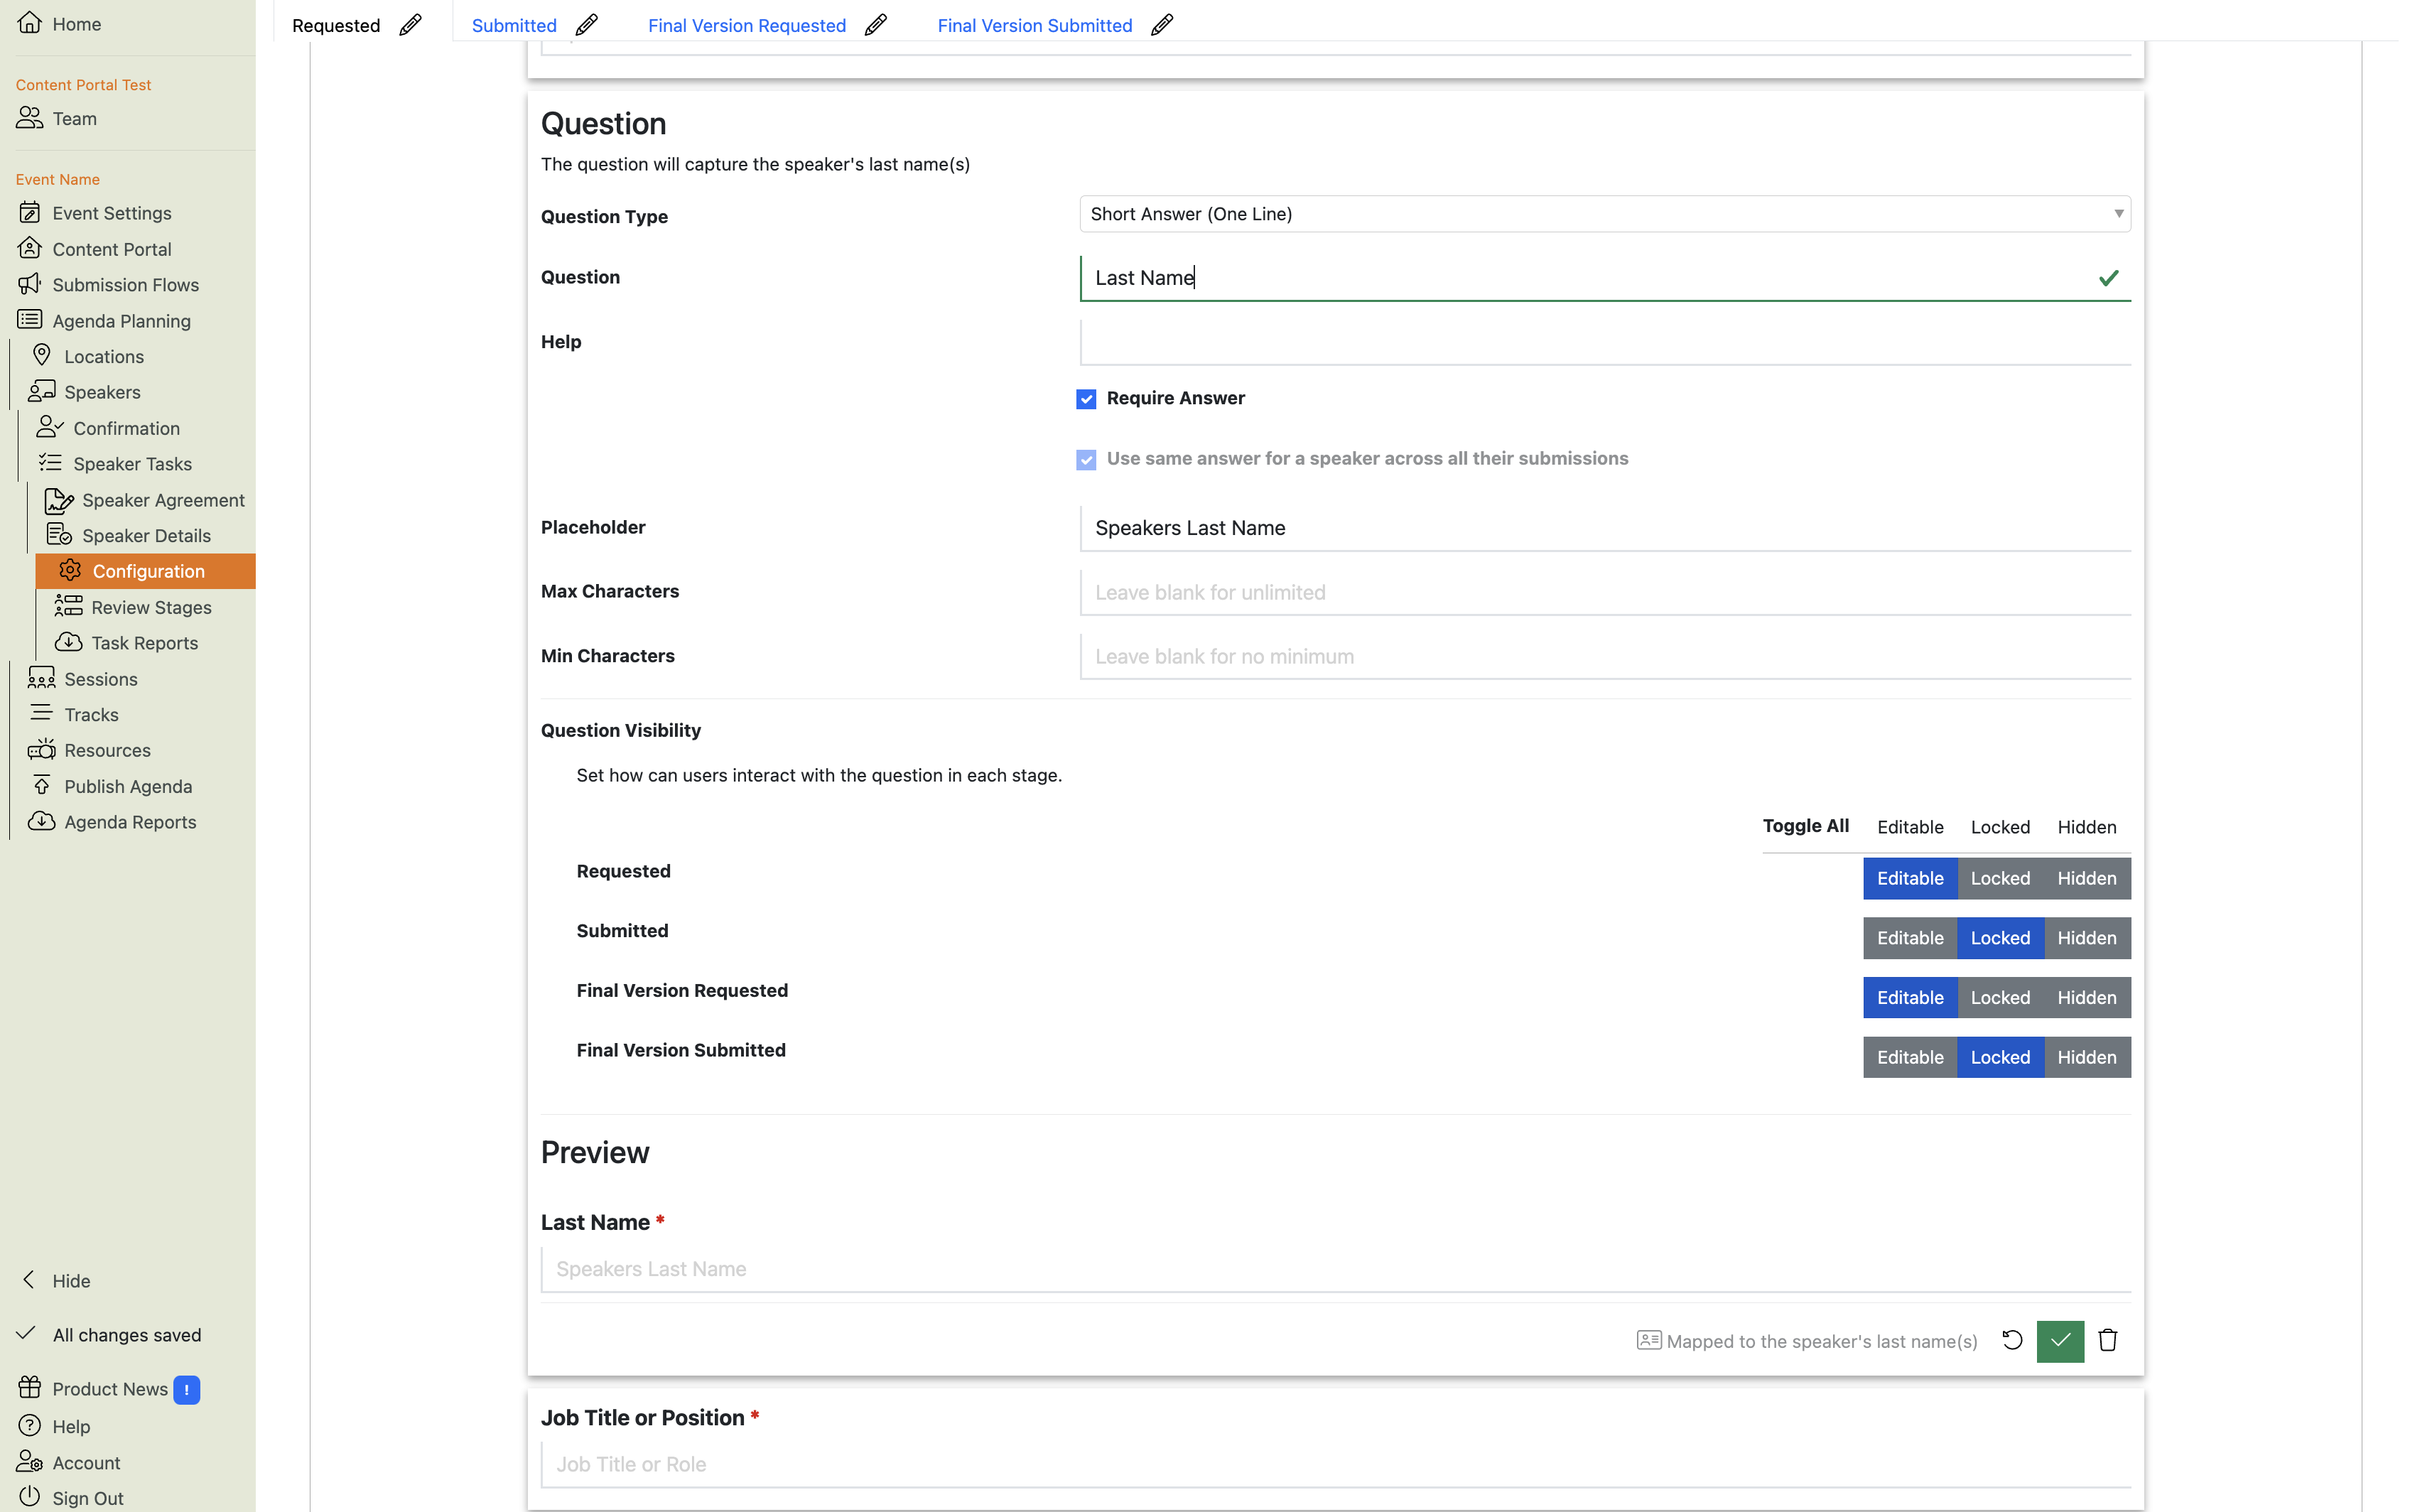

When you’ve made your changes, click the green ‘check’ button
to save your changes, or the ‘circular arrow’ button to cancel your changes.
Warning
IMPORTANT: You MUST use Standard questions for their intended purpose.
Questions on the form are mapped to specific fields in the database.
You can edit the question text, but DO NOT use them to store fields other than the one it is mapped to.
Why?
Lineup Ninja expects each field to have the relevant data in the right place. For example, the speaker’s first name should be stored in the first name field, their job title should be in the job title field etc.
When you publish your agenda to your Agenda app, 3rd party show websites, mobile apps, digital signage, marketing platforms etc. Lineup Ninja will send the values in these fields to the corresponding fields in the other systems.
If you edited the ‘First Name’ question to say “Dietary requirements”, you’d end up with speakers on your website called “Vegan Johnson” or “Gluten-free Smith” etc.
DO NOT CHANGE THE QUESTIONs TO SOMETHING OTHER THAN THEIR INTENDED PURPOSES.
If you need to ask a question for a field that is not on the form, add a Custom Question and map it to a new Custom Field.
How do I add a Standard Question to a Speaker Task?
In this example, we’ll use the Speaker Details Task template, but the principle works for any speaker task:
-
Navigate to your Speaker Task’s Configuration:
Agenda Planning / Speakers / Speaker Tasks / Speaker Details / Configuration -
Hover your mouse over the form to show the “Add Questions” button:
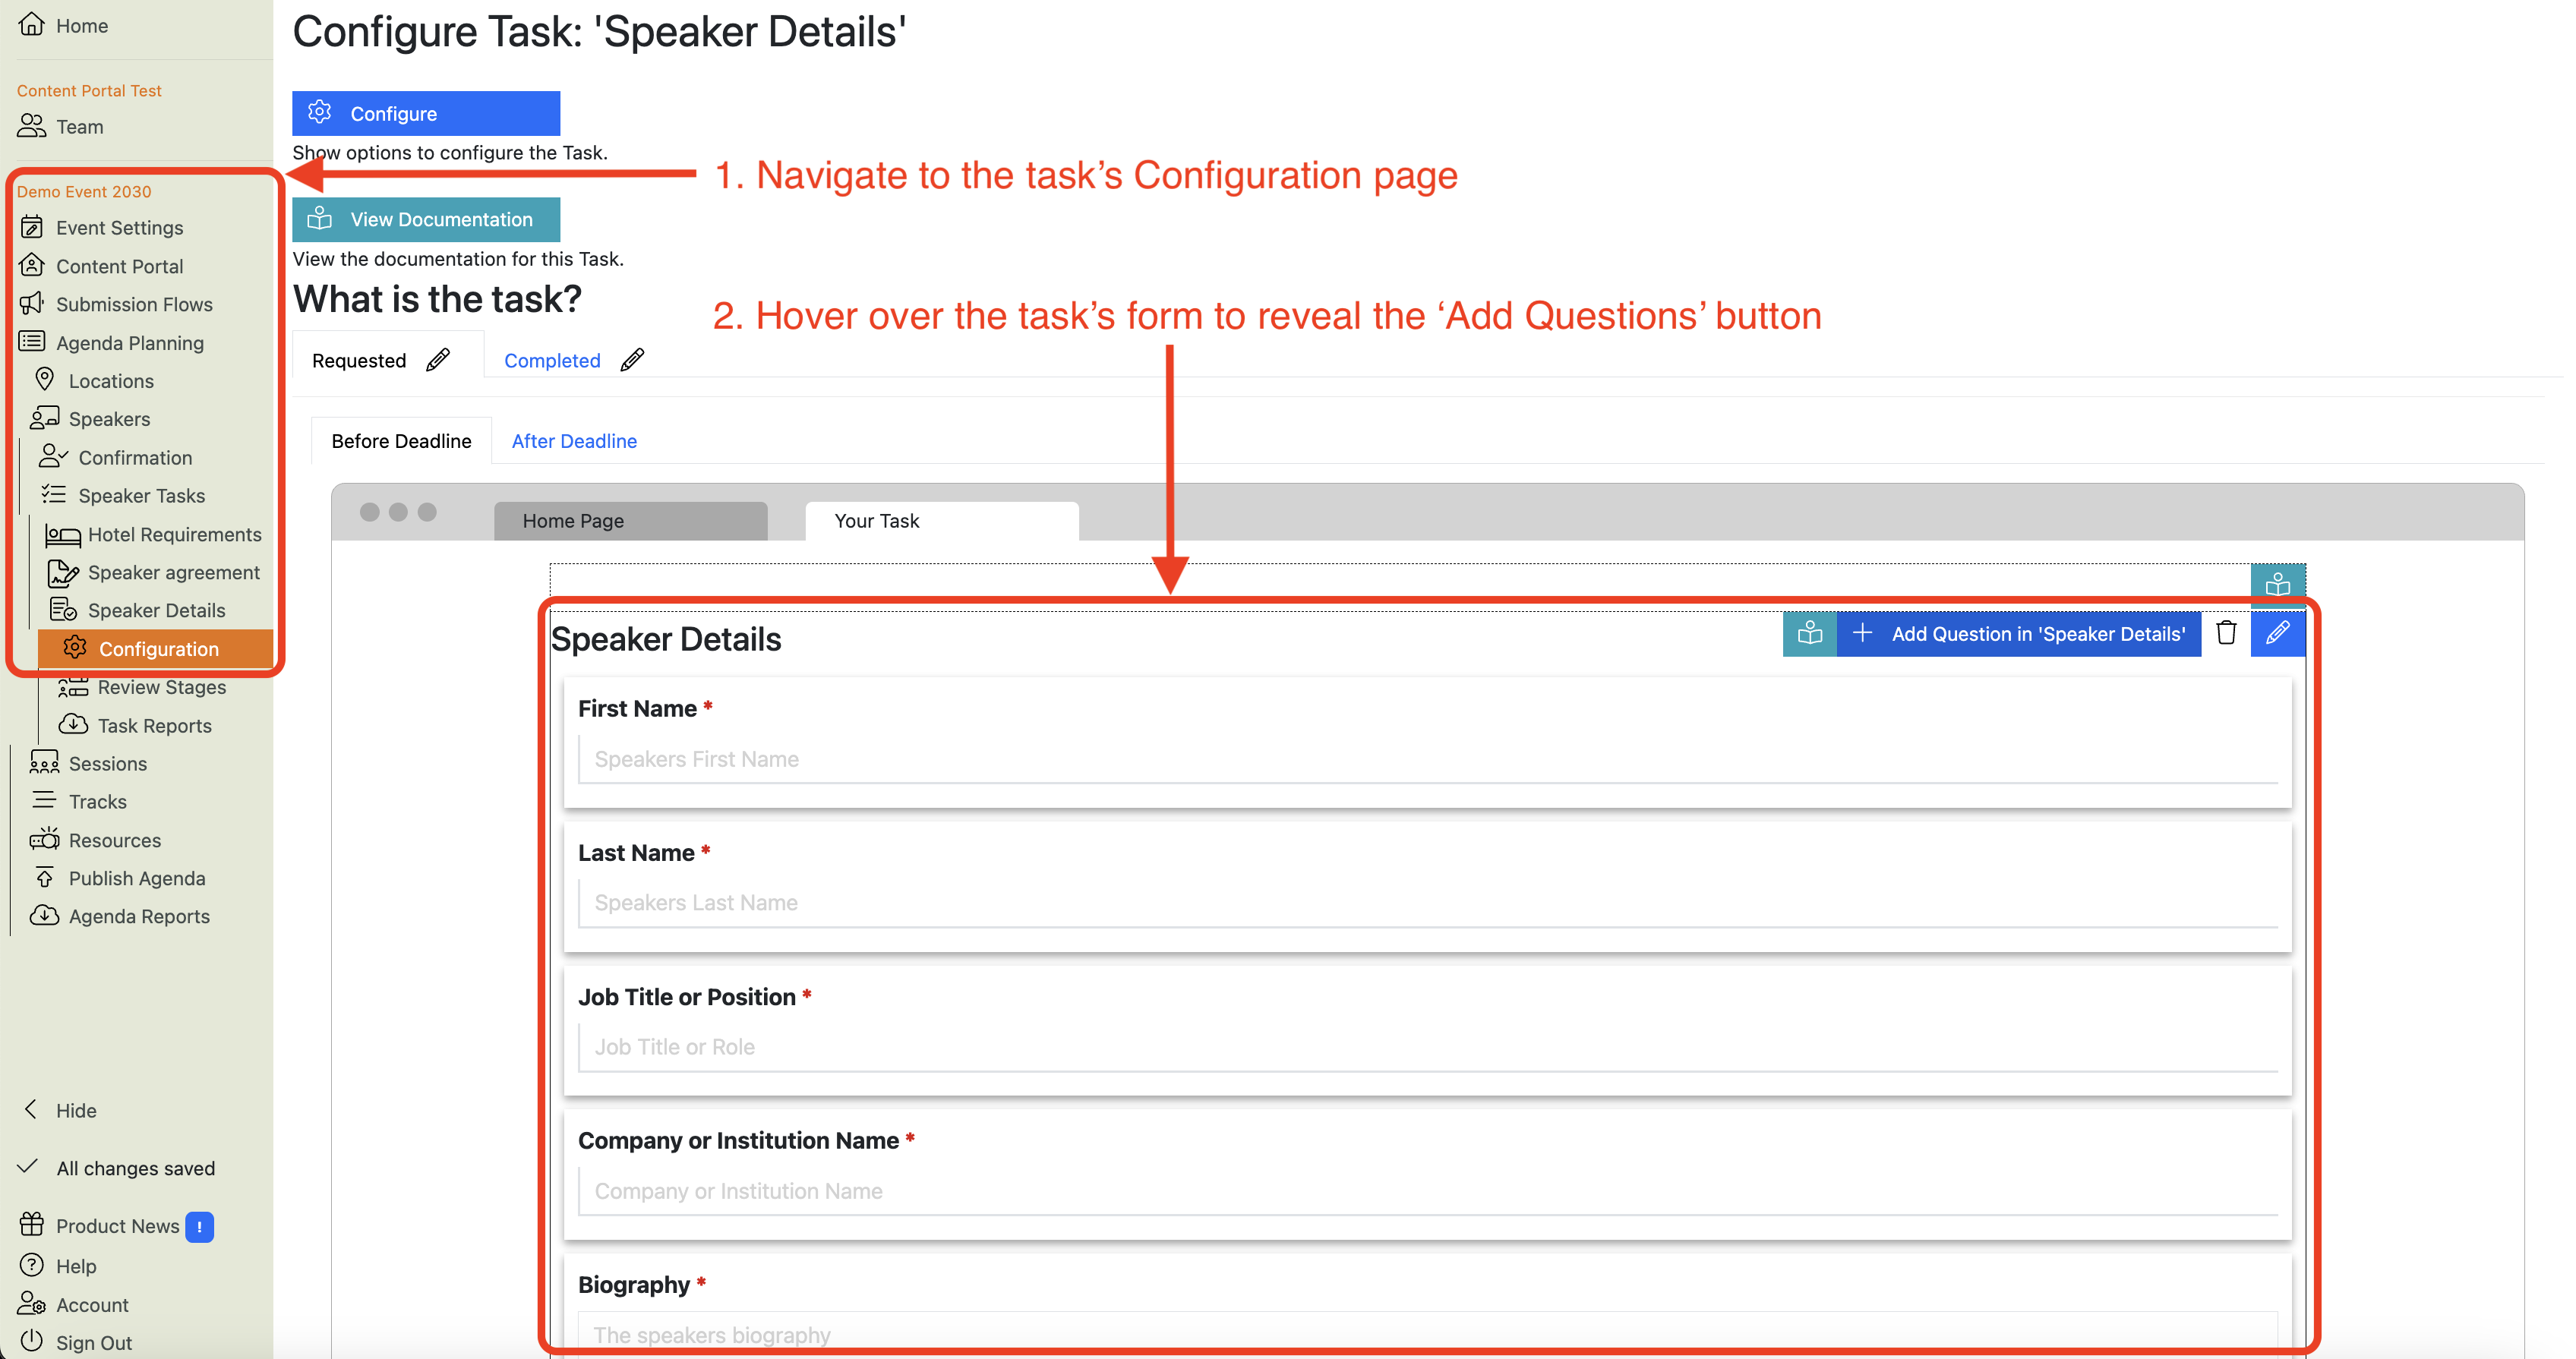

-
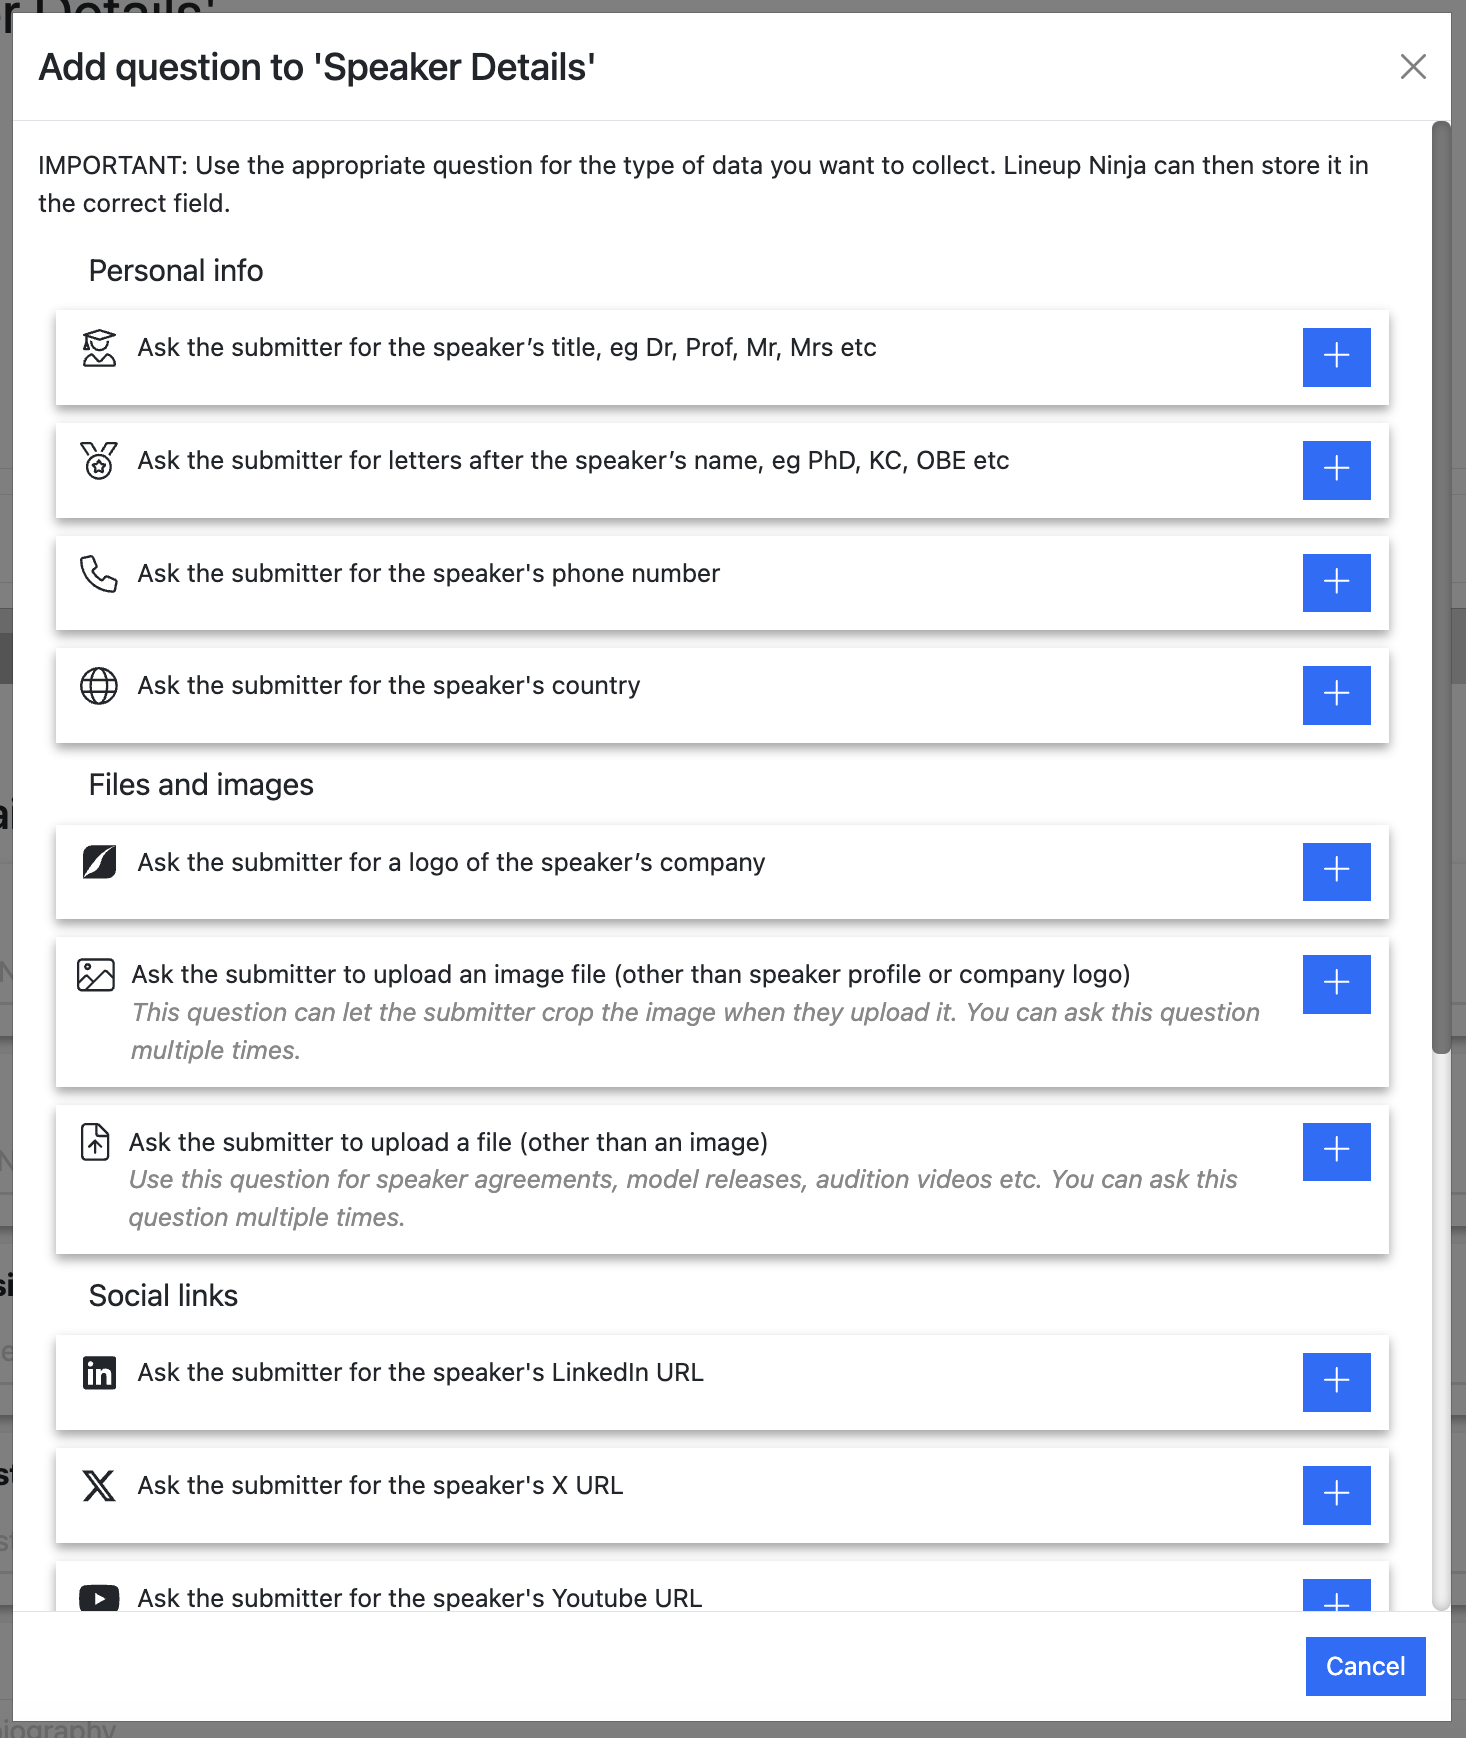
Click the “Add Questions” button. This will bring up the list of standard questions:
Warning
IMPORTANT: You MUST use Standard questions for their intended purpose.
For example, if you want to capture the speaker’s biography, USE THE BIOGRAPHY QUESTION for it.
Why? Because these questions are mapped to corresponding fields in the database, and the answers to these questions will eventually be published on your event website.
If you use the ‘First Name’ question to ask for Dietary requirements, your event website will end up with speakers called things like “Vegan Johnson” and “Gluten-free Smith”.
You are not able to change this later.
You’ve been warned! -
Find the question you want to add, and click the blue ‘plus’ button. This will add that question to the bottom of your Task’s form, and open that question for editing.
Here, we’ve chosen to add the Phone Number question to our Speaker Details task: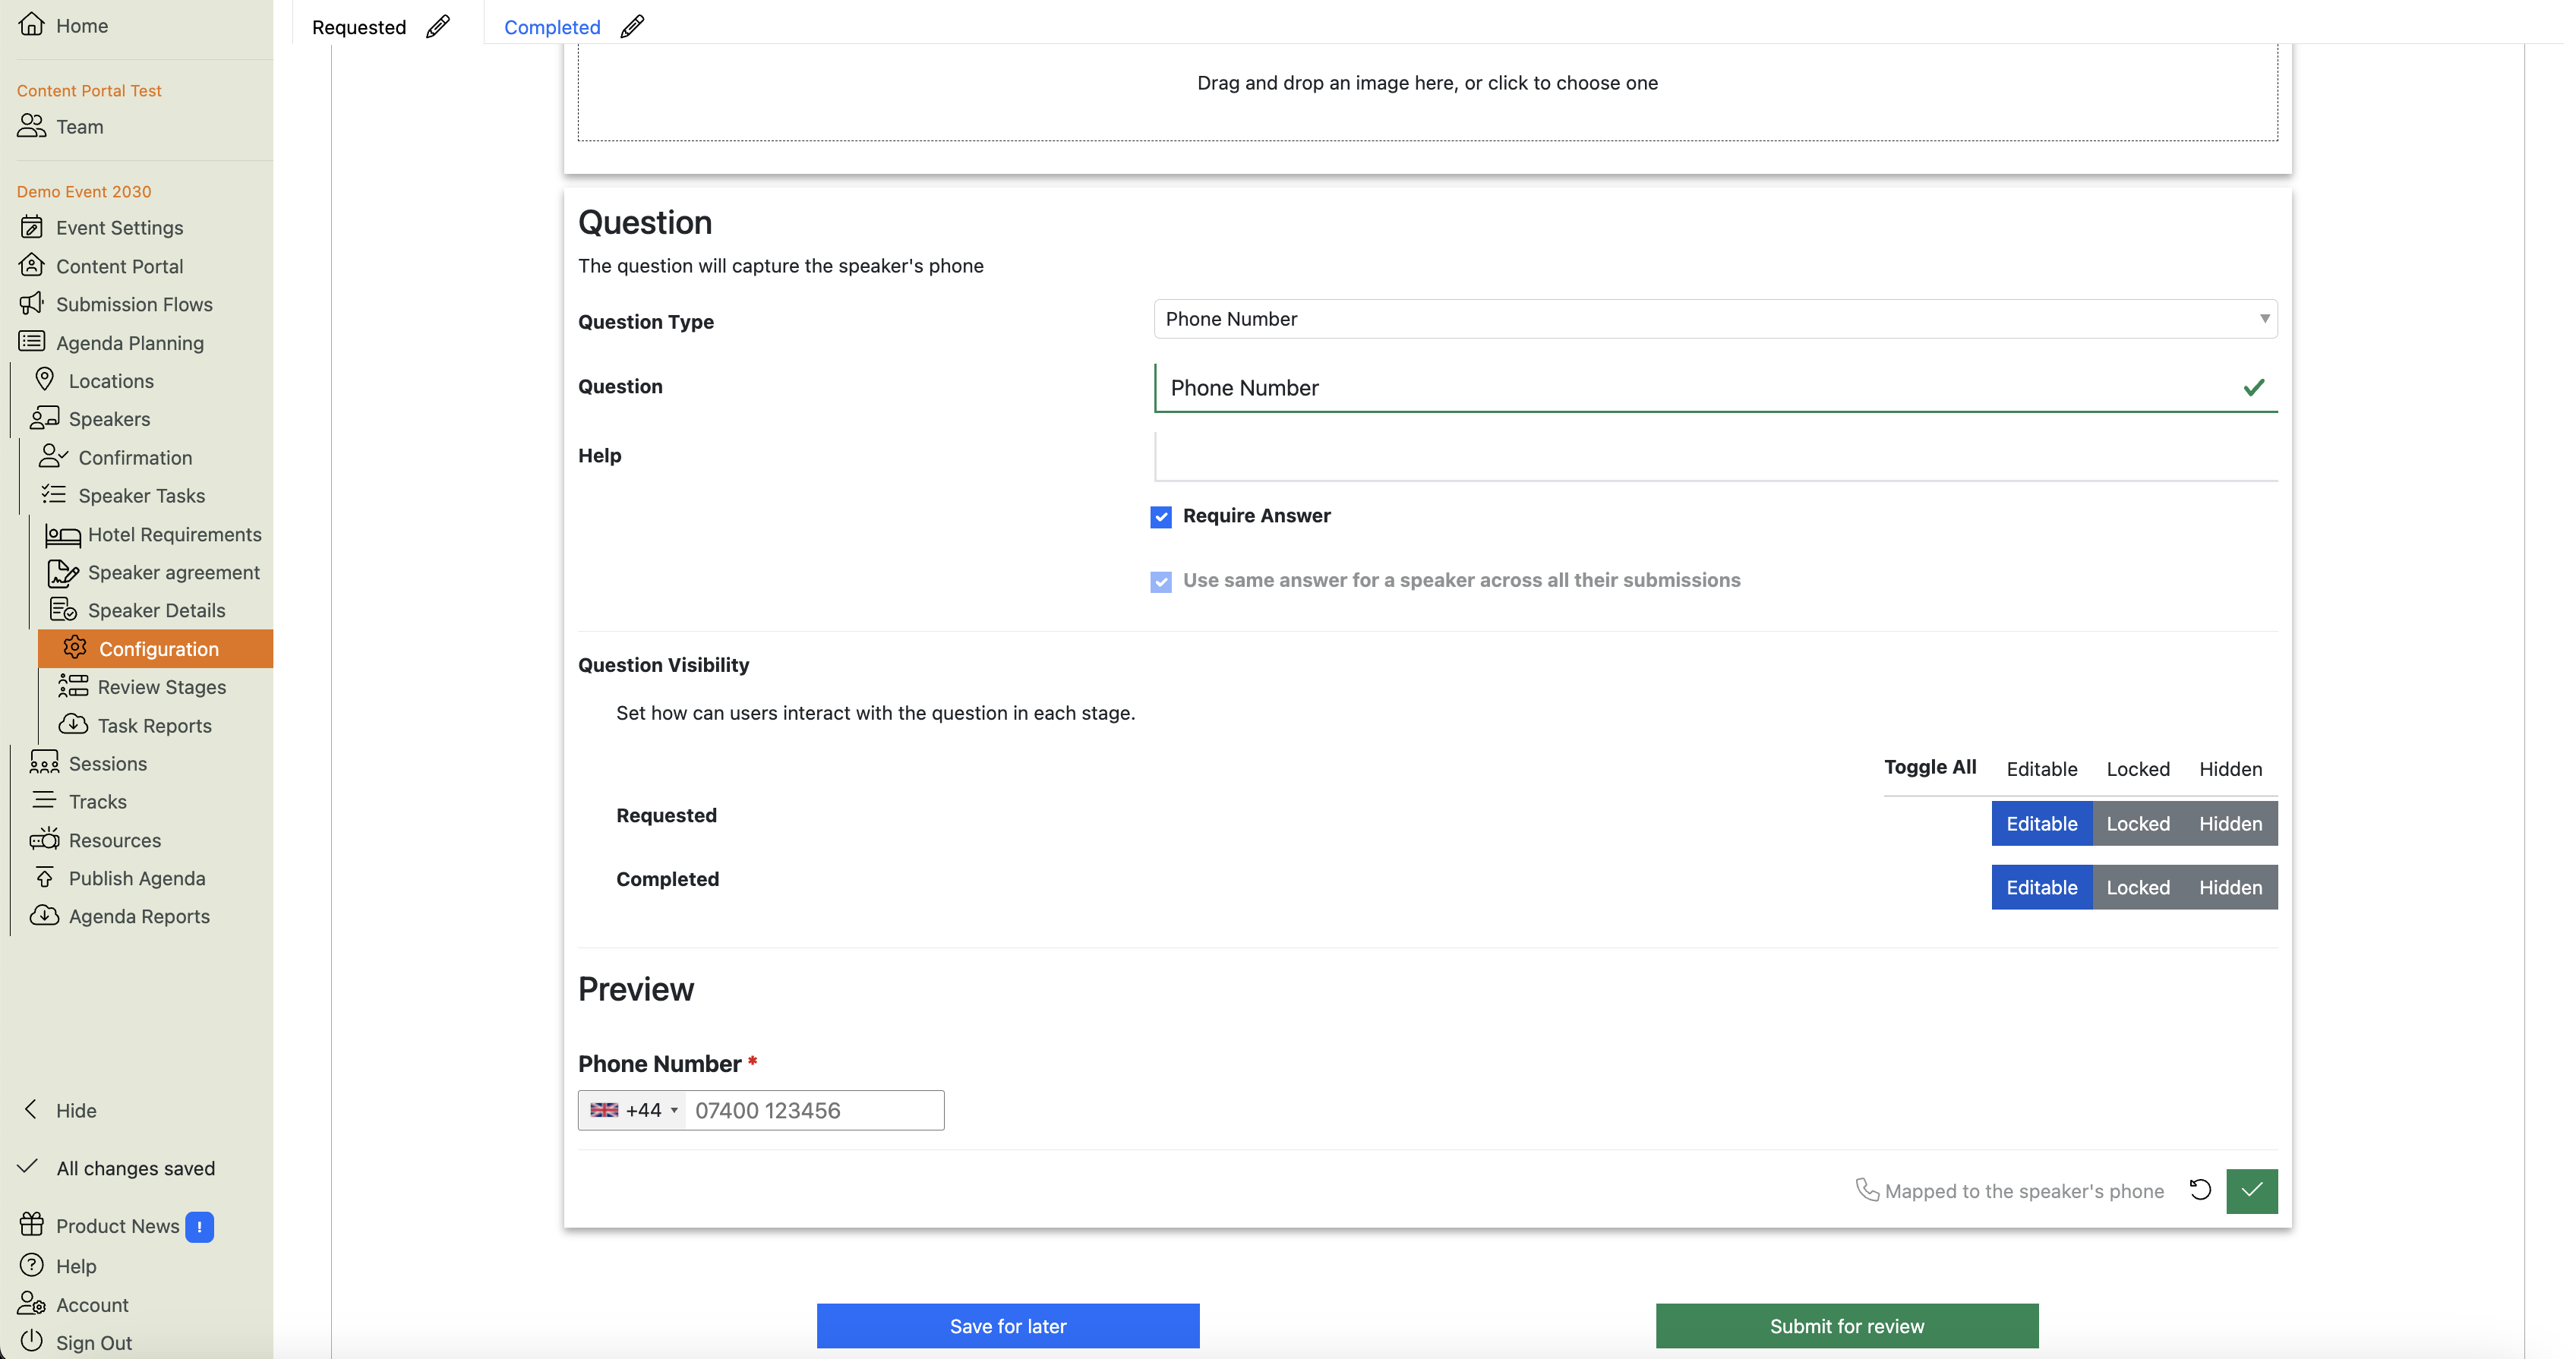

-
Make any changes to the question that you want to make, and click the green ‘check’ button to save your changes, and you’re done!
How do I add a Custom Question to a Speaker Task?
In this example, we’ll use the Speaker Details Task template, but the principle works for any speaker task:
-
Navigate to your Speaker Task’s Configuration:
Agenda Planning / Speakers / Speaker Tasks / Speaker Details / Configuration -
Hover your mouse over the form to show the “Add Questions” button:


-
Click the “Add Questions” button. This will bring up the list of standard questions:
-
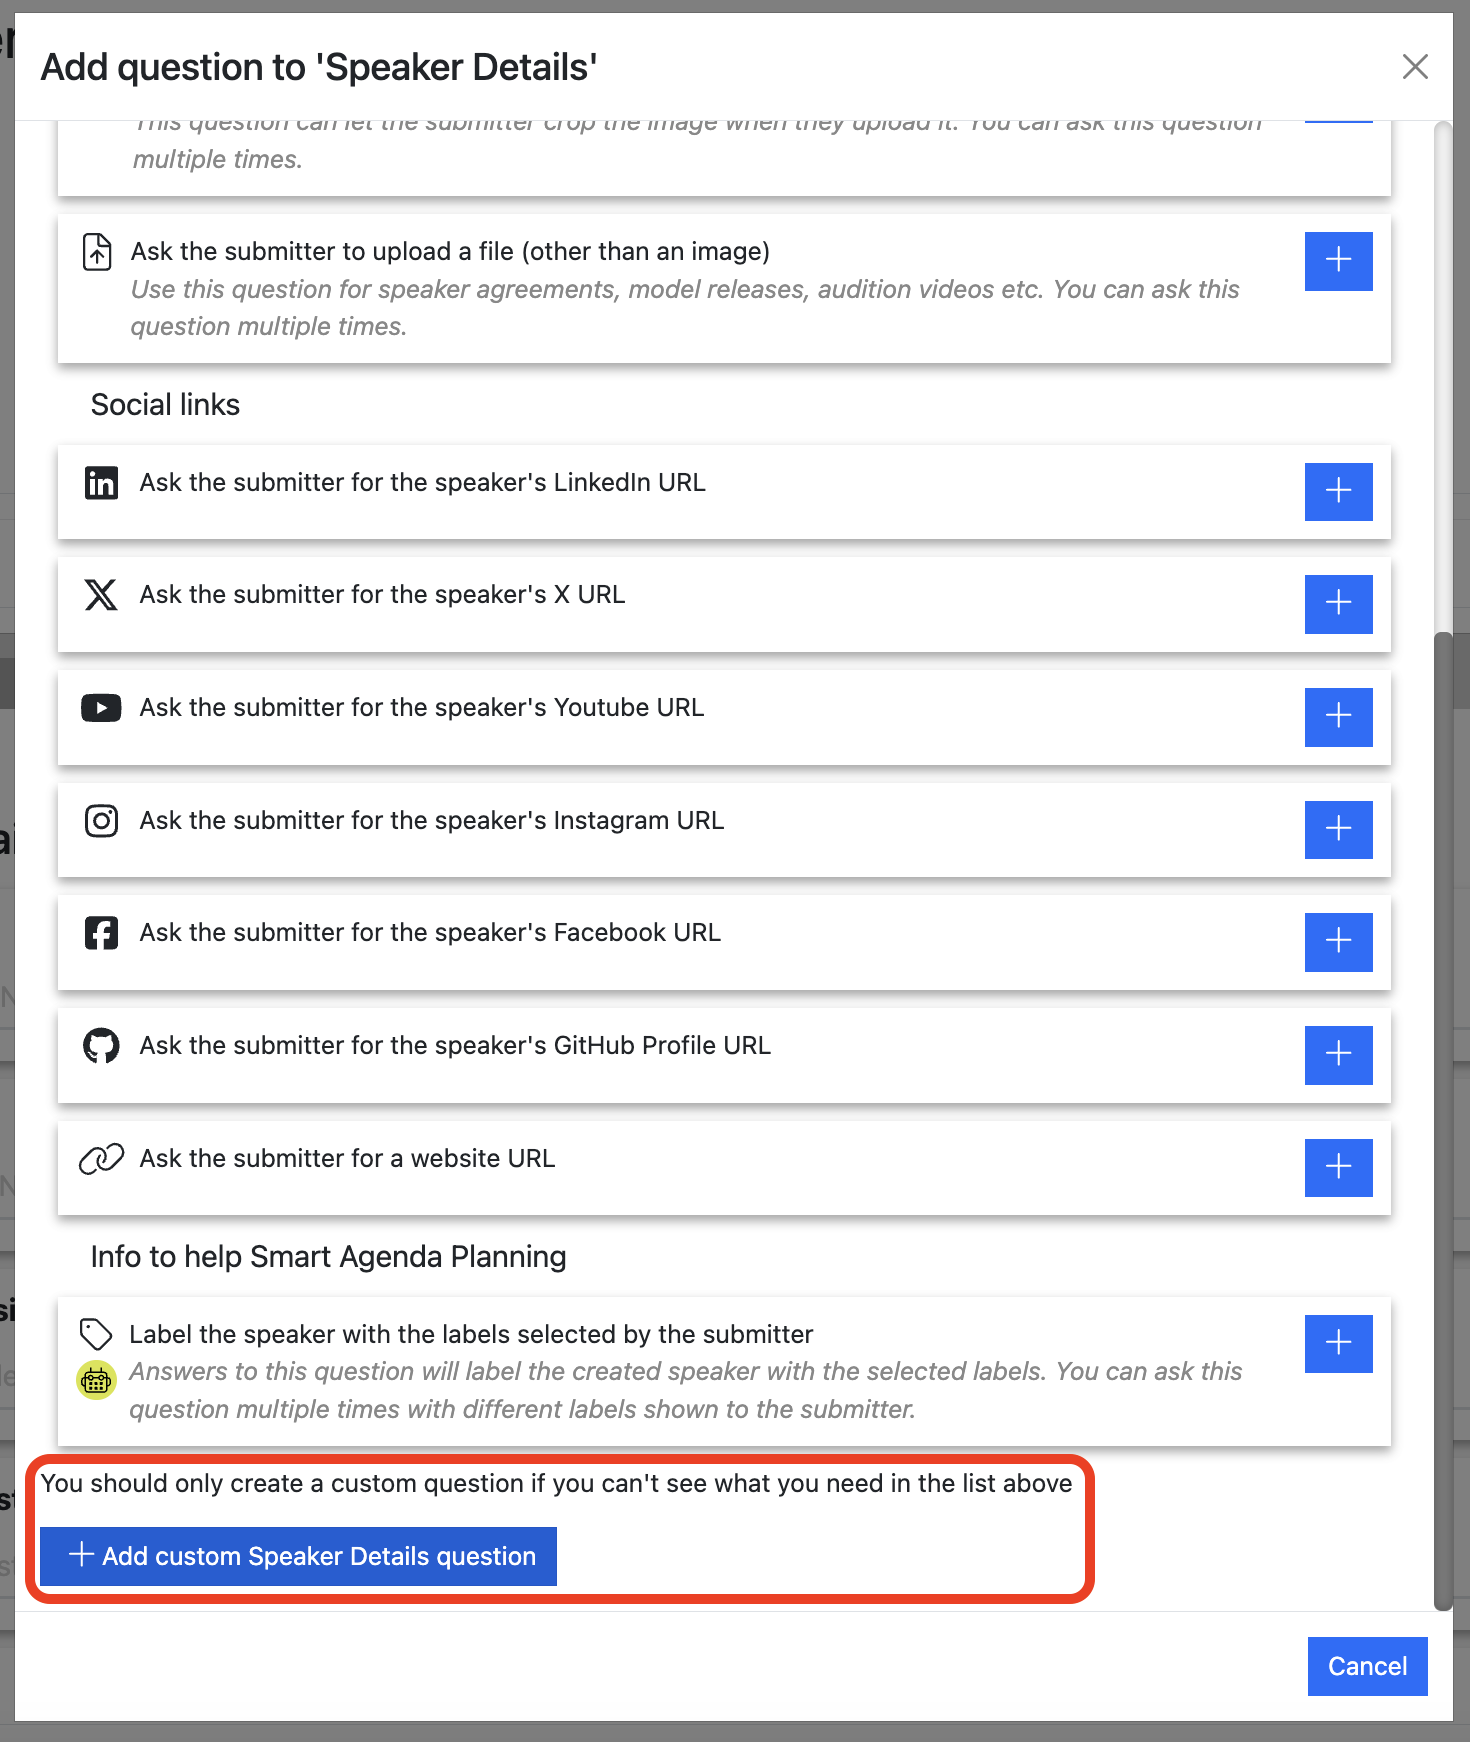
Scroll down to the bottom of this list, and you will find the “Add Custom Question” button.
Warning
IMPORTANT: Only create a custom question if you are sure there isn’t already a standard question for the data that you want to capture.
For example, if you want to capture the speaker’s LinkedIn URL, USE THE LinkedIn QUESTION for it.
Why? Because these questions are mapped to corresponding fields in the database, and the answers to these questions will eventually be published on your event website, mobile app, signage etc.
If you use the ‘First Name’ question to ask for Dietary requirements, your event website will end up with speakers called things like “Vegan Johnson” and “Gluten-free Smith”.
You are not able to change this later.
You’ve been warned! -
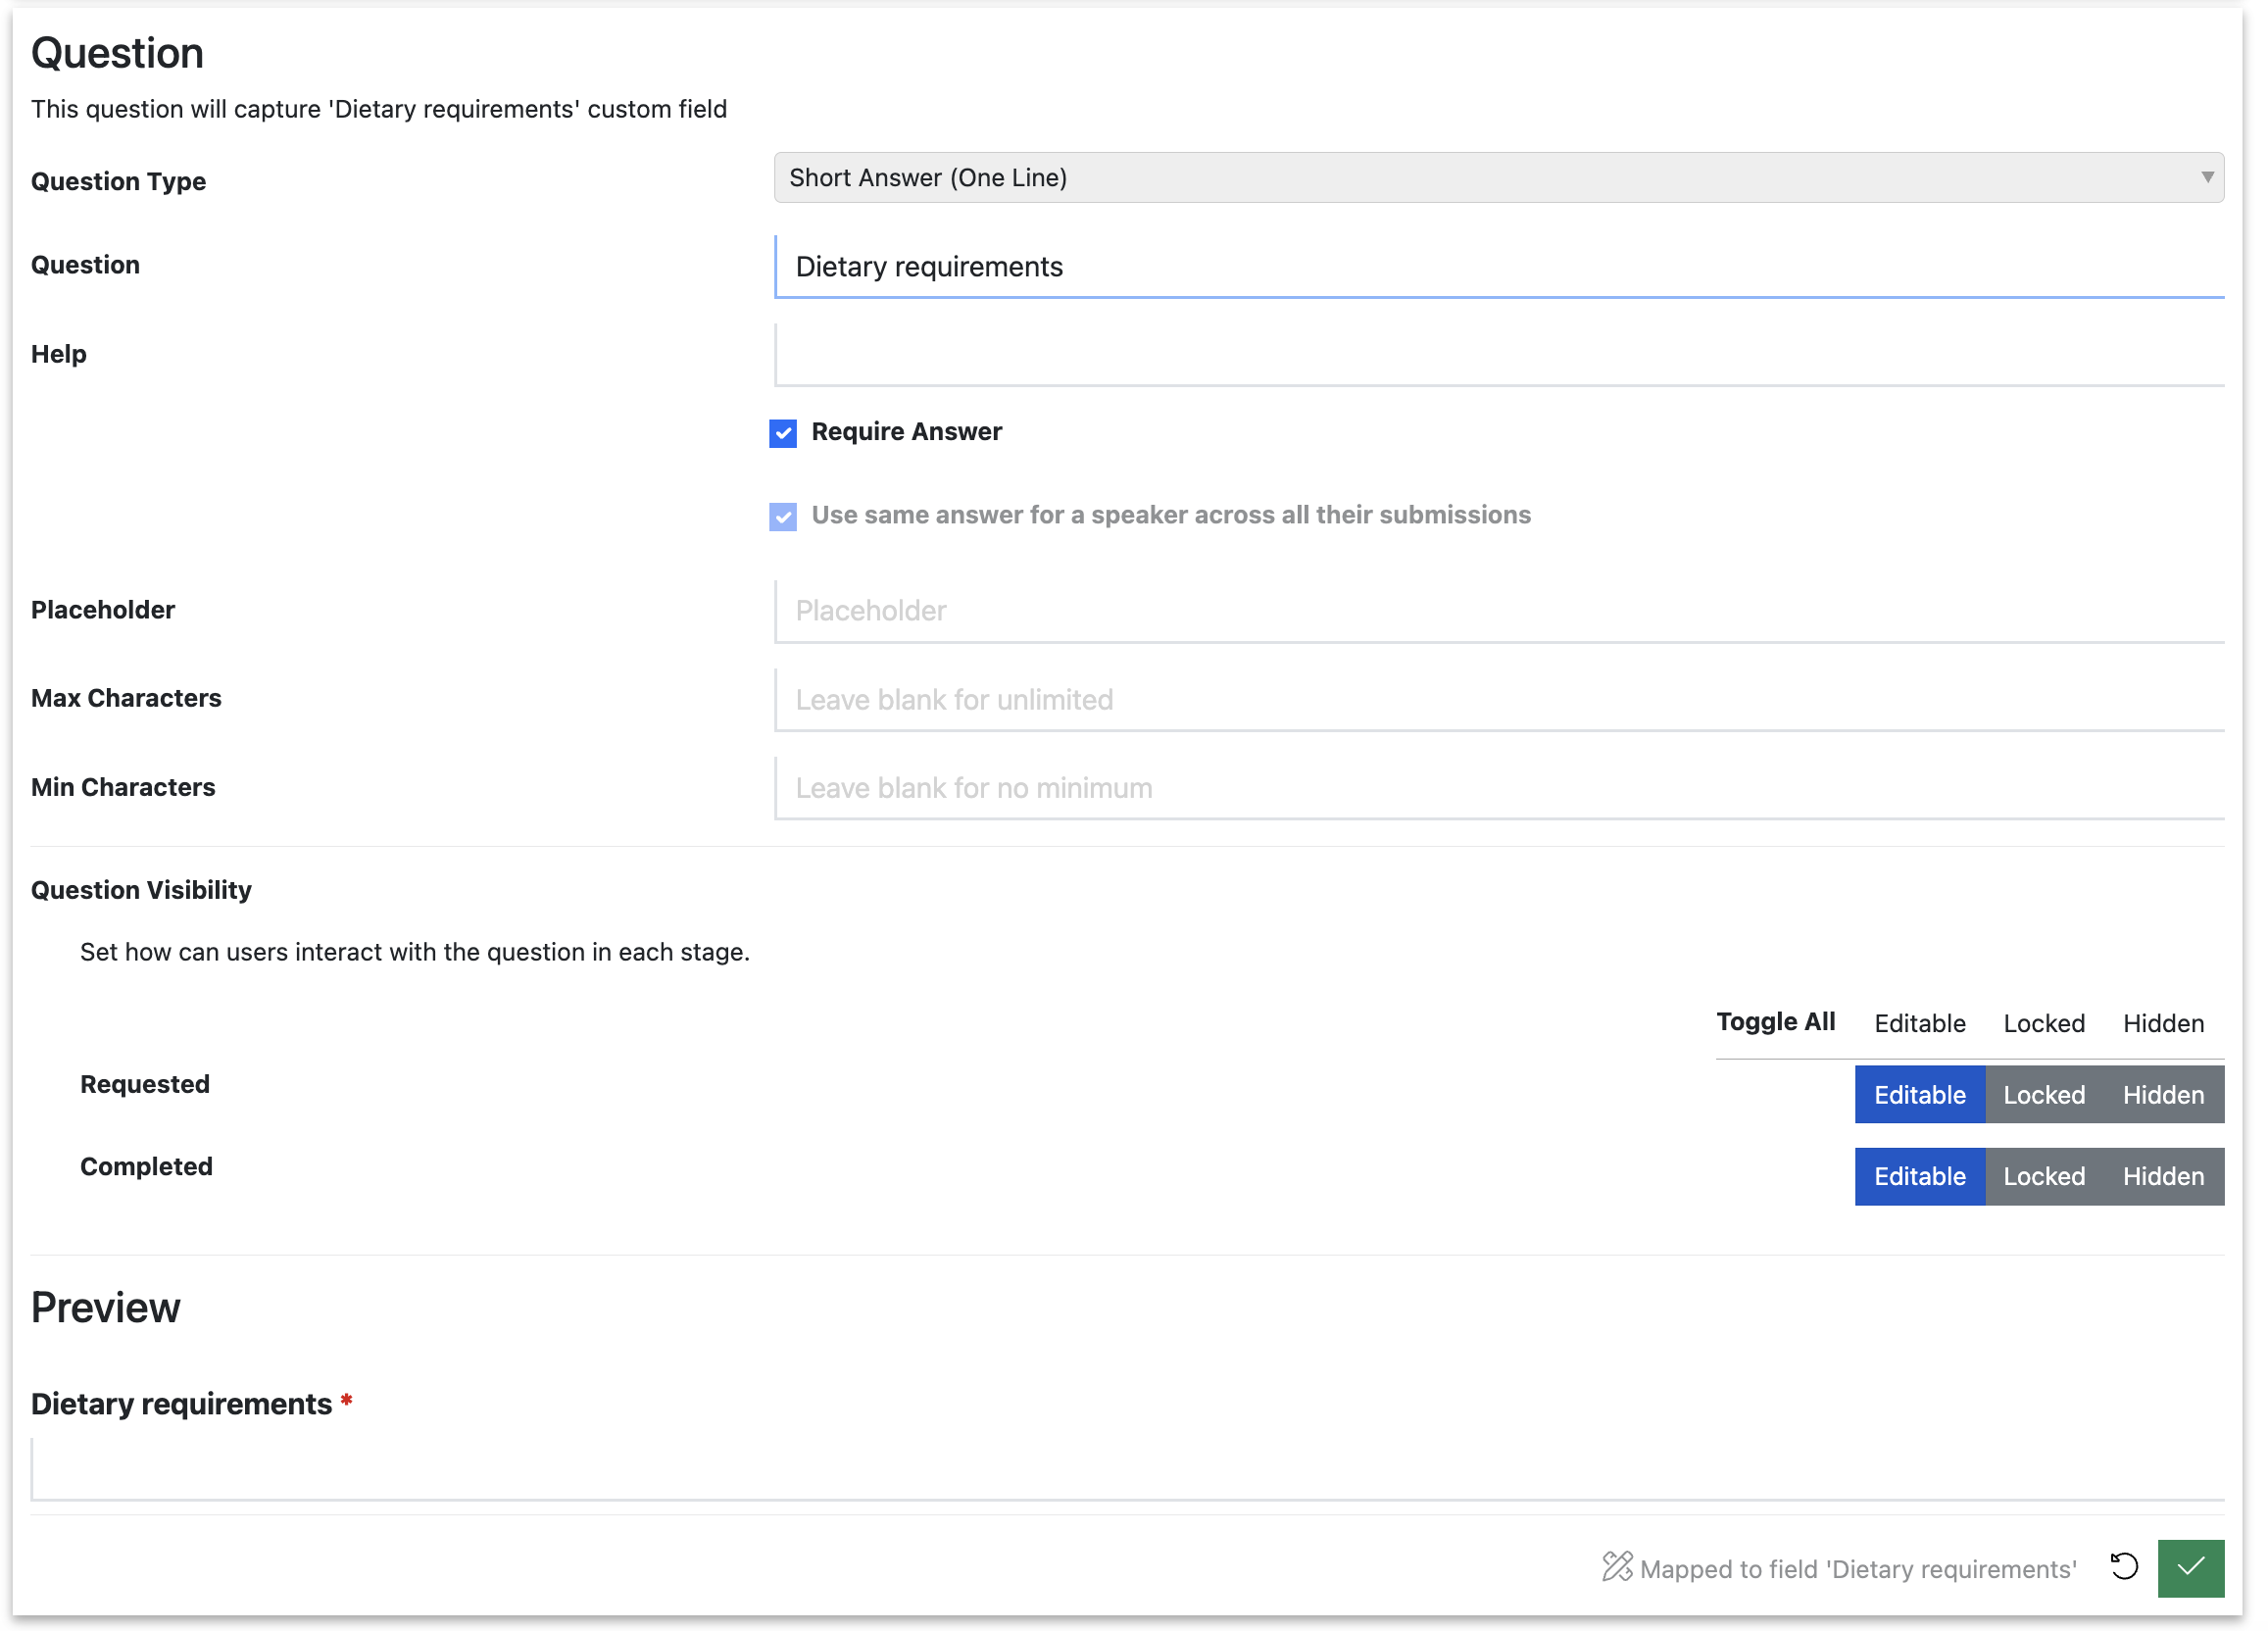
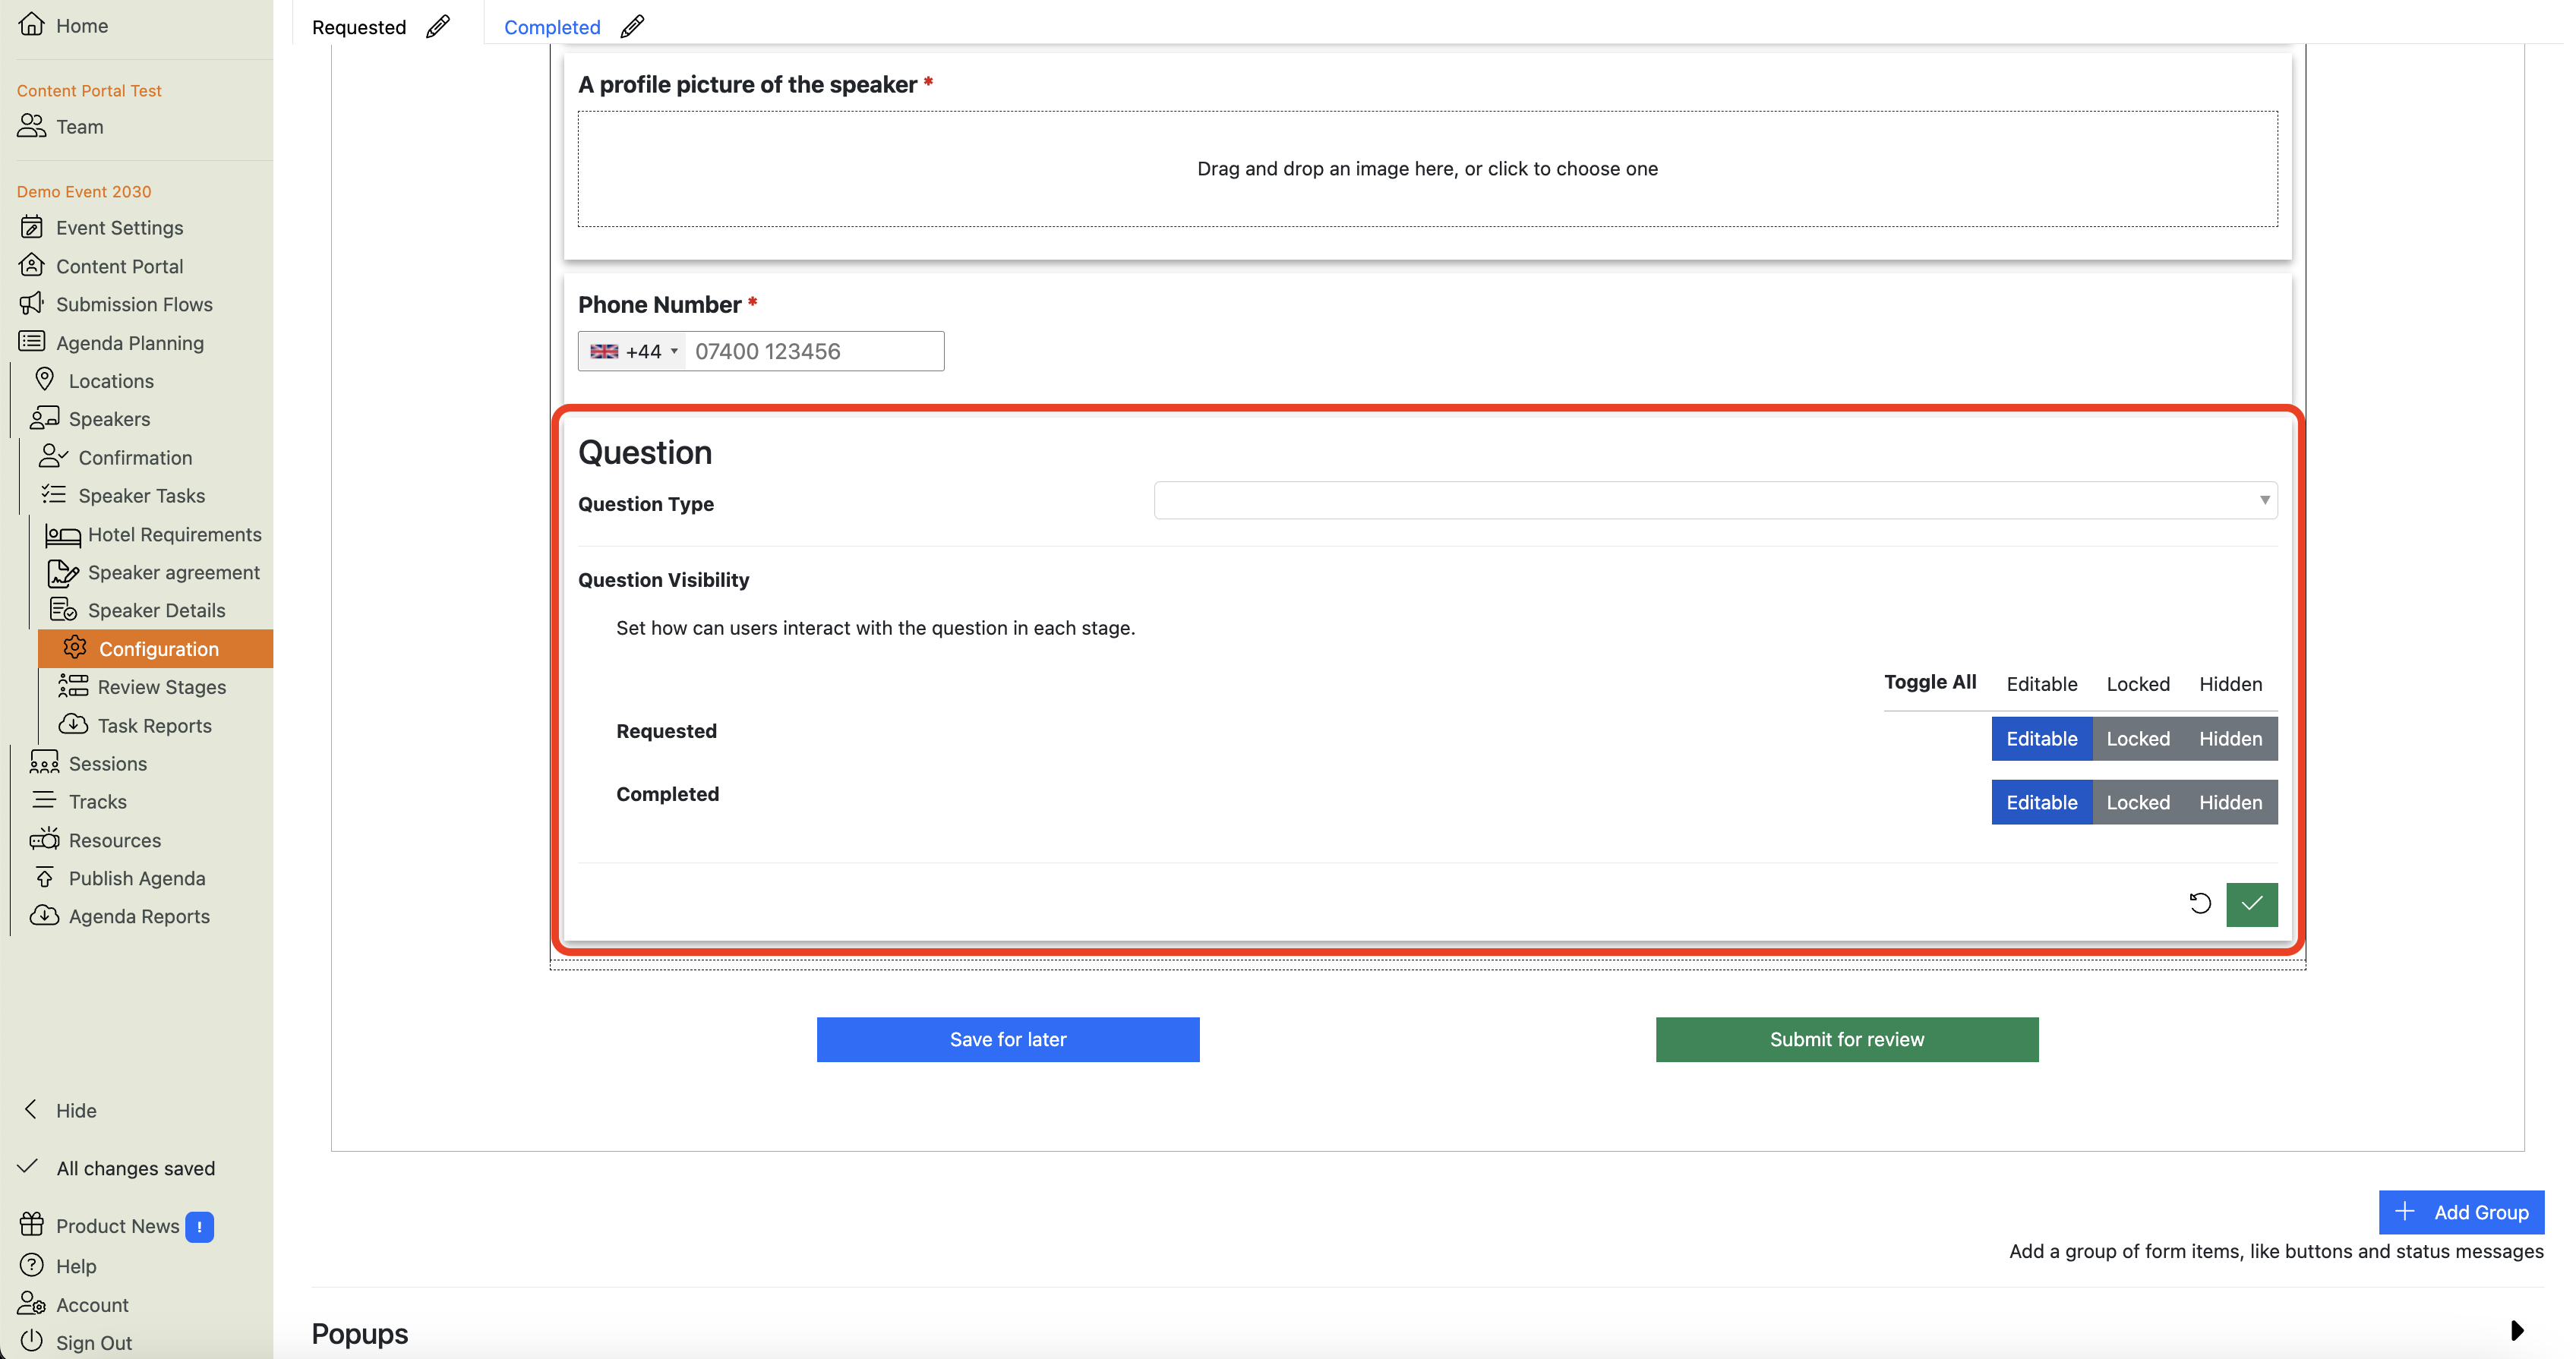
Click on the ‘Add Custom Question’ button. This will add the new custom question to the form and open it for editing:

-
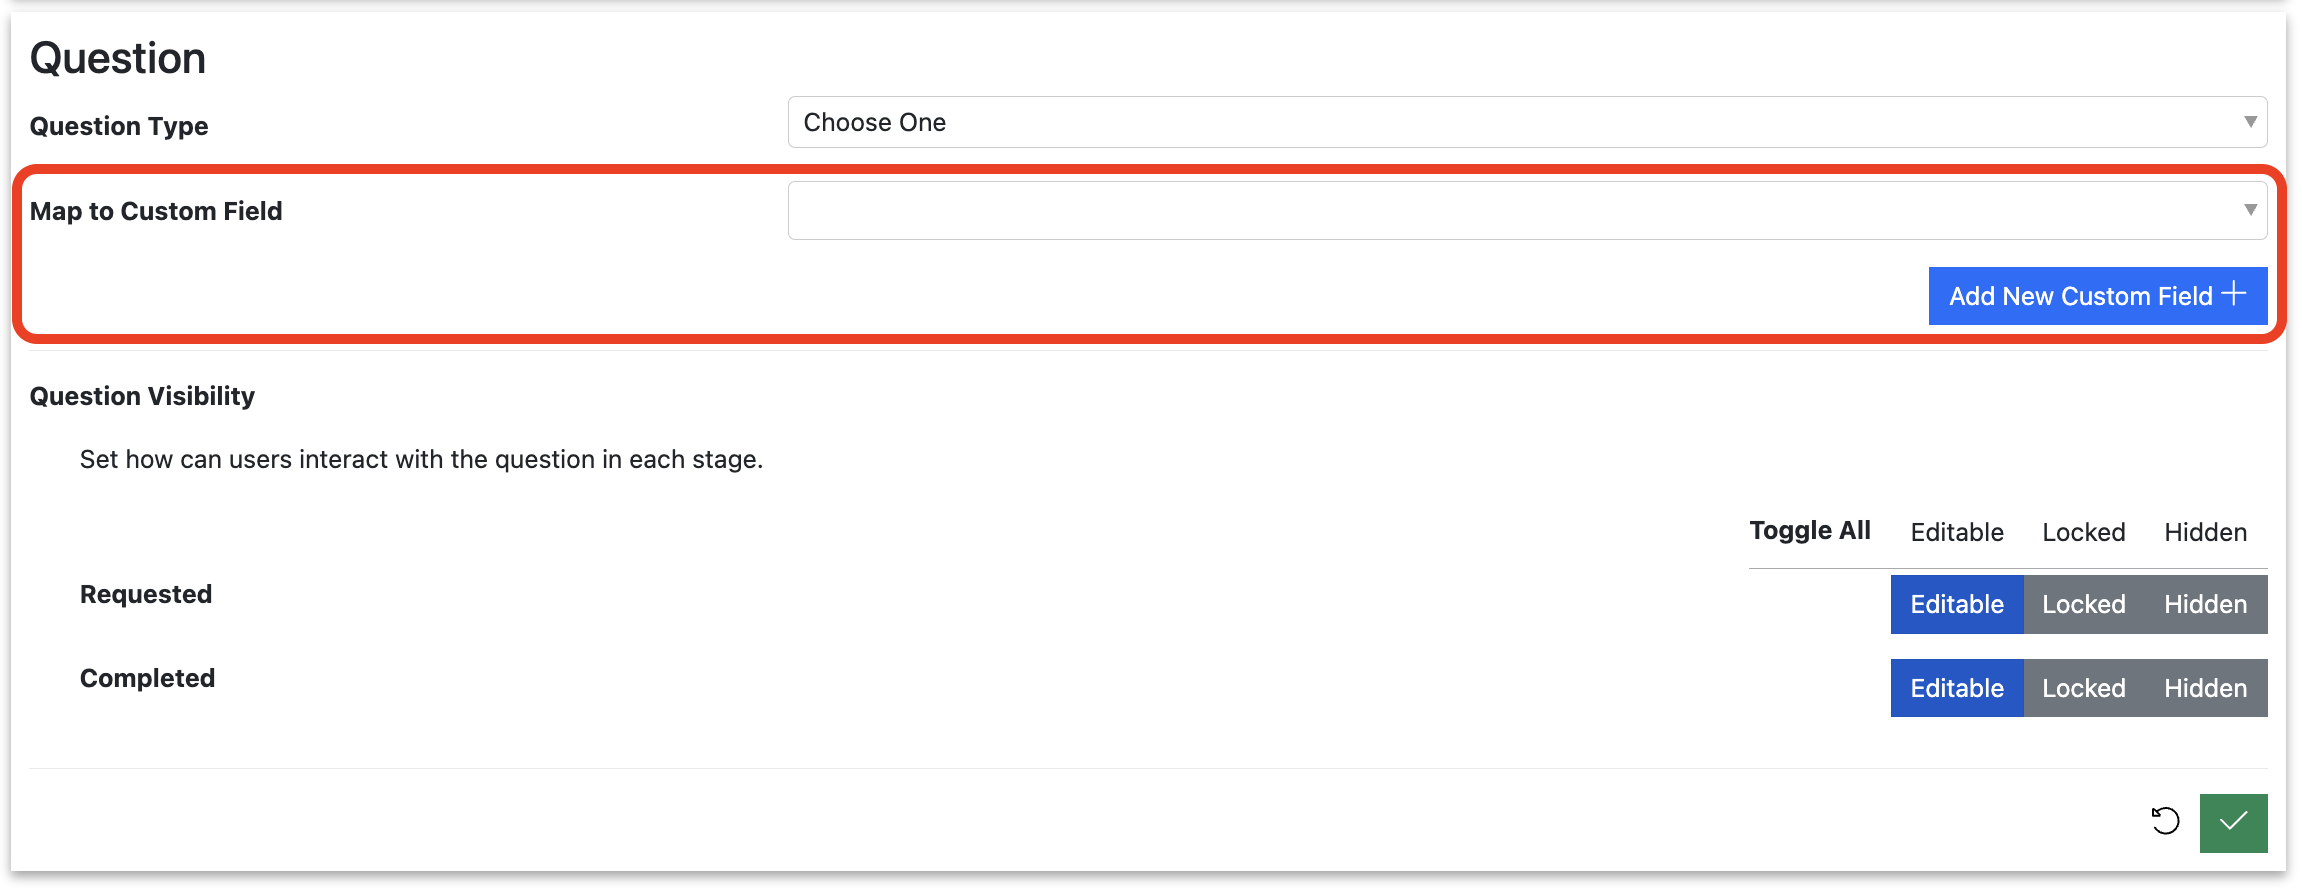
Once you’ve chosen a question type, you will need to map this to an existing Custom Field, or create a new one to store the answers:

-
Once you have mapped (or created) a Custom Field to store your new question’s answers, you can edit the other settings, such as:
- The question text,
- Help text
- Whether it is optional or mandatory,
- Character limits
- Question visibility in different Task Stages
-
Make any changes to the question that you want to make, and click the green ‘check’ button to save your changes, and you’re done!
How do I delete a question from a Speaker Task?
-
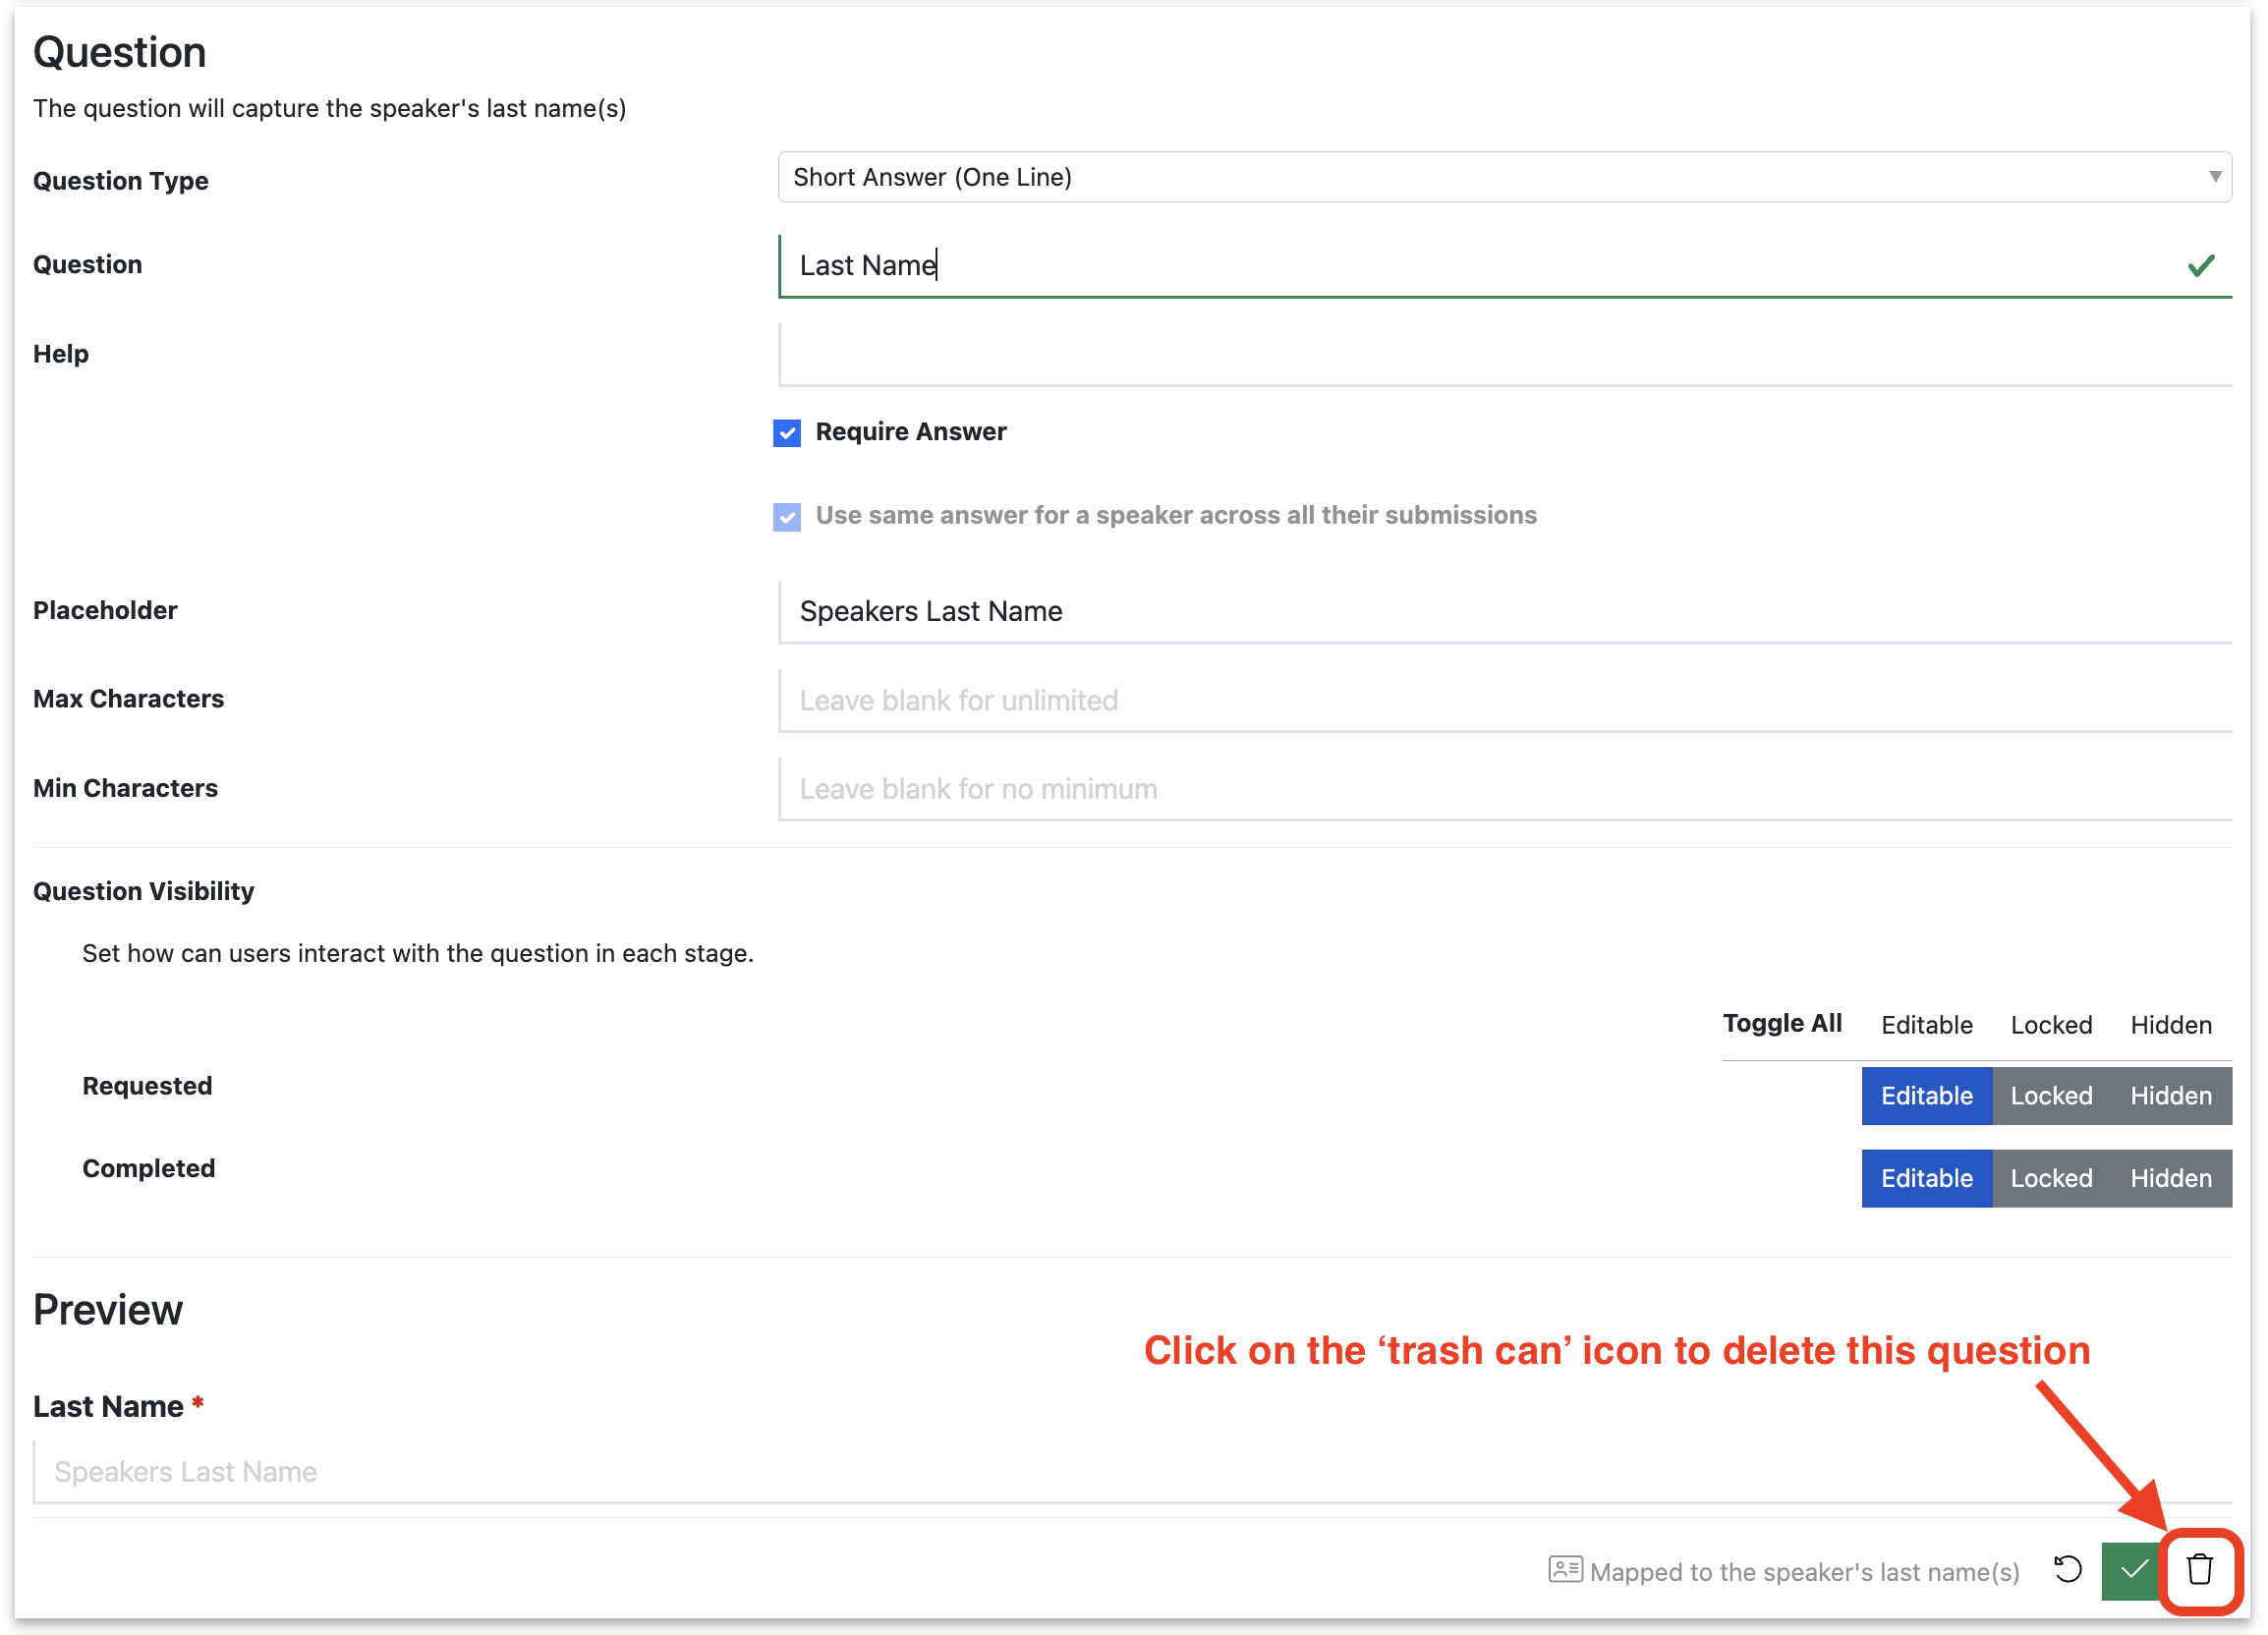
Open the question you want to delete for editing (like this).
-
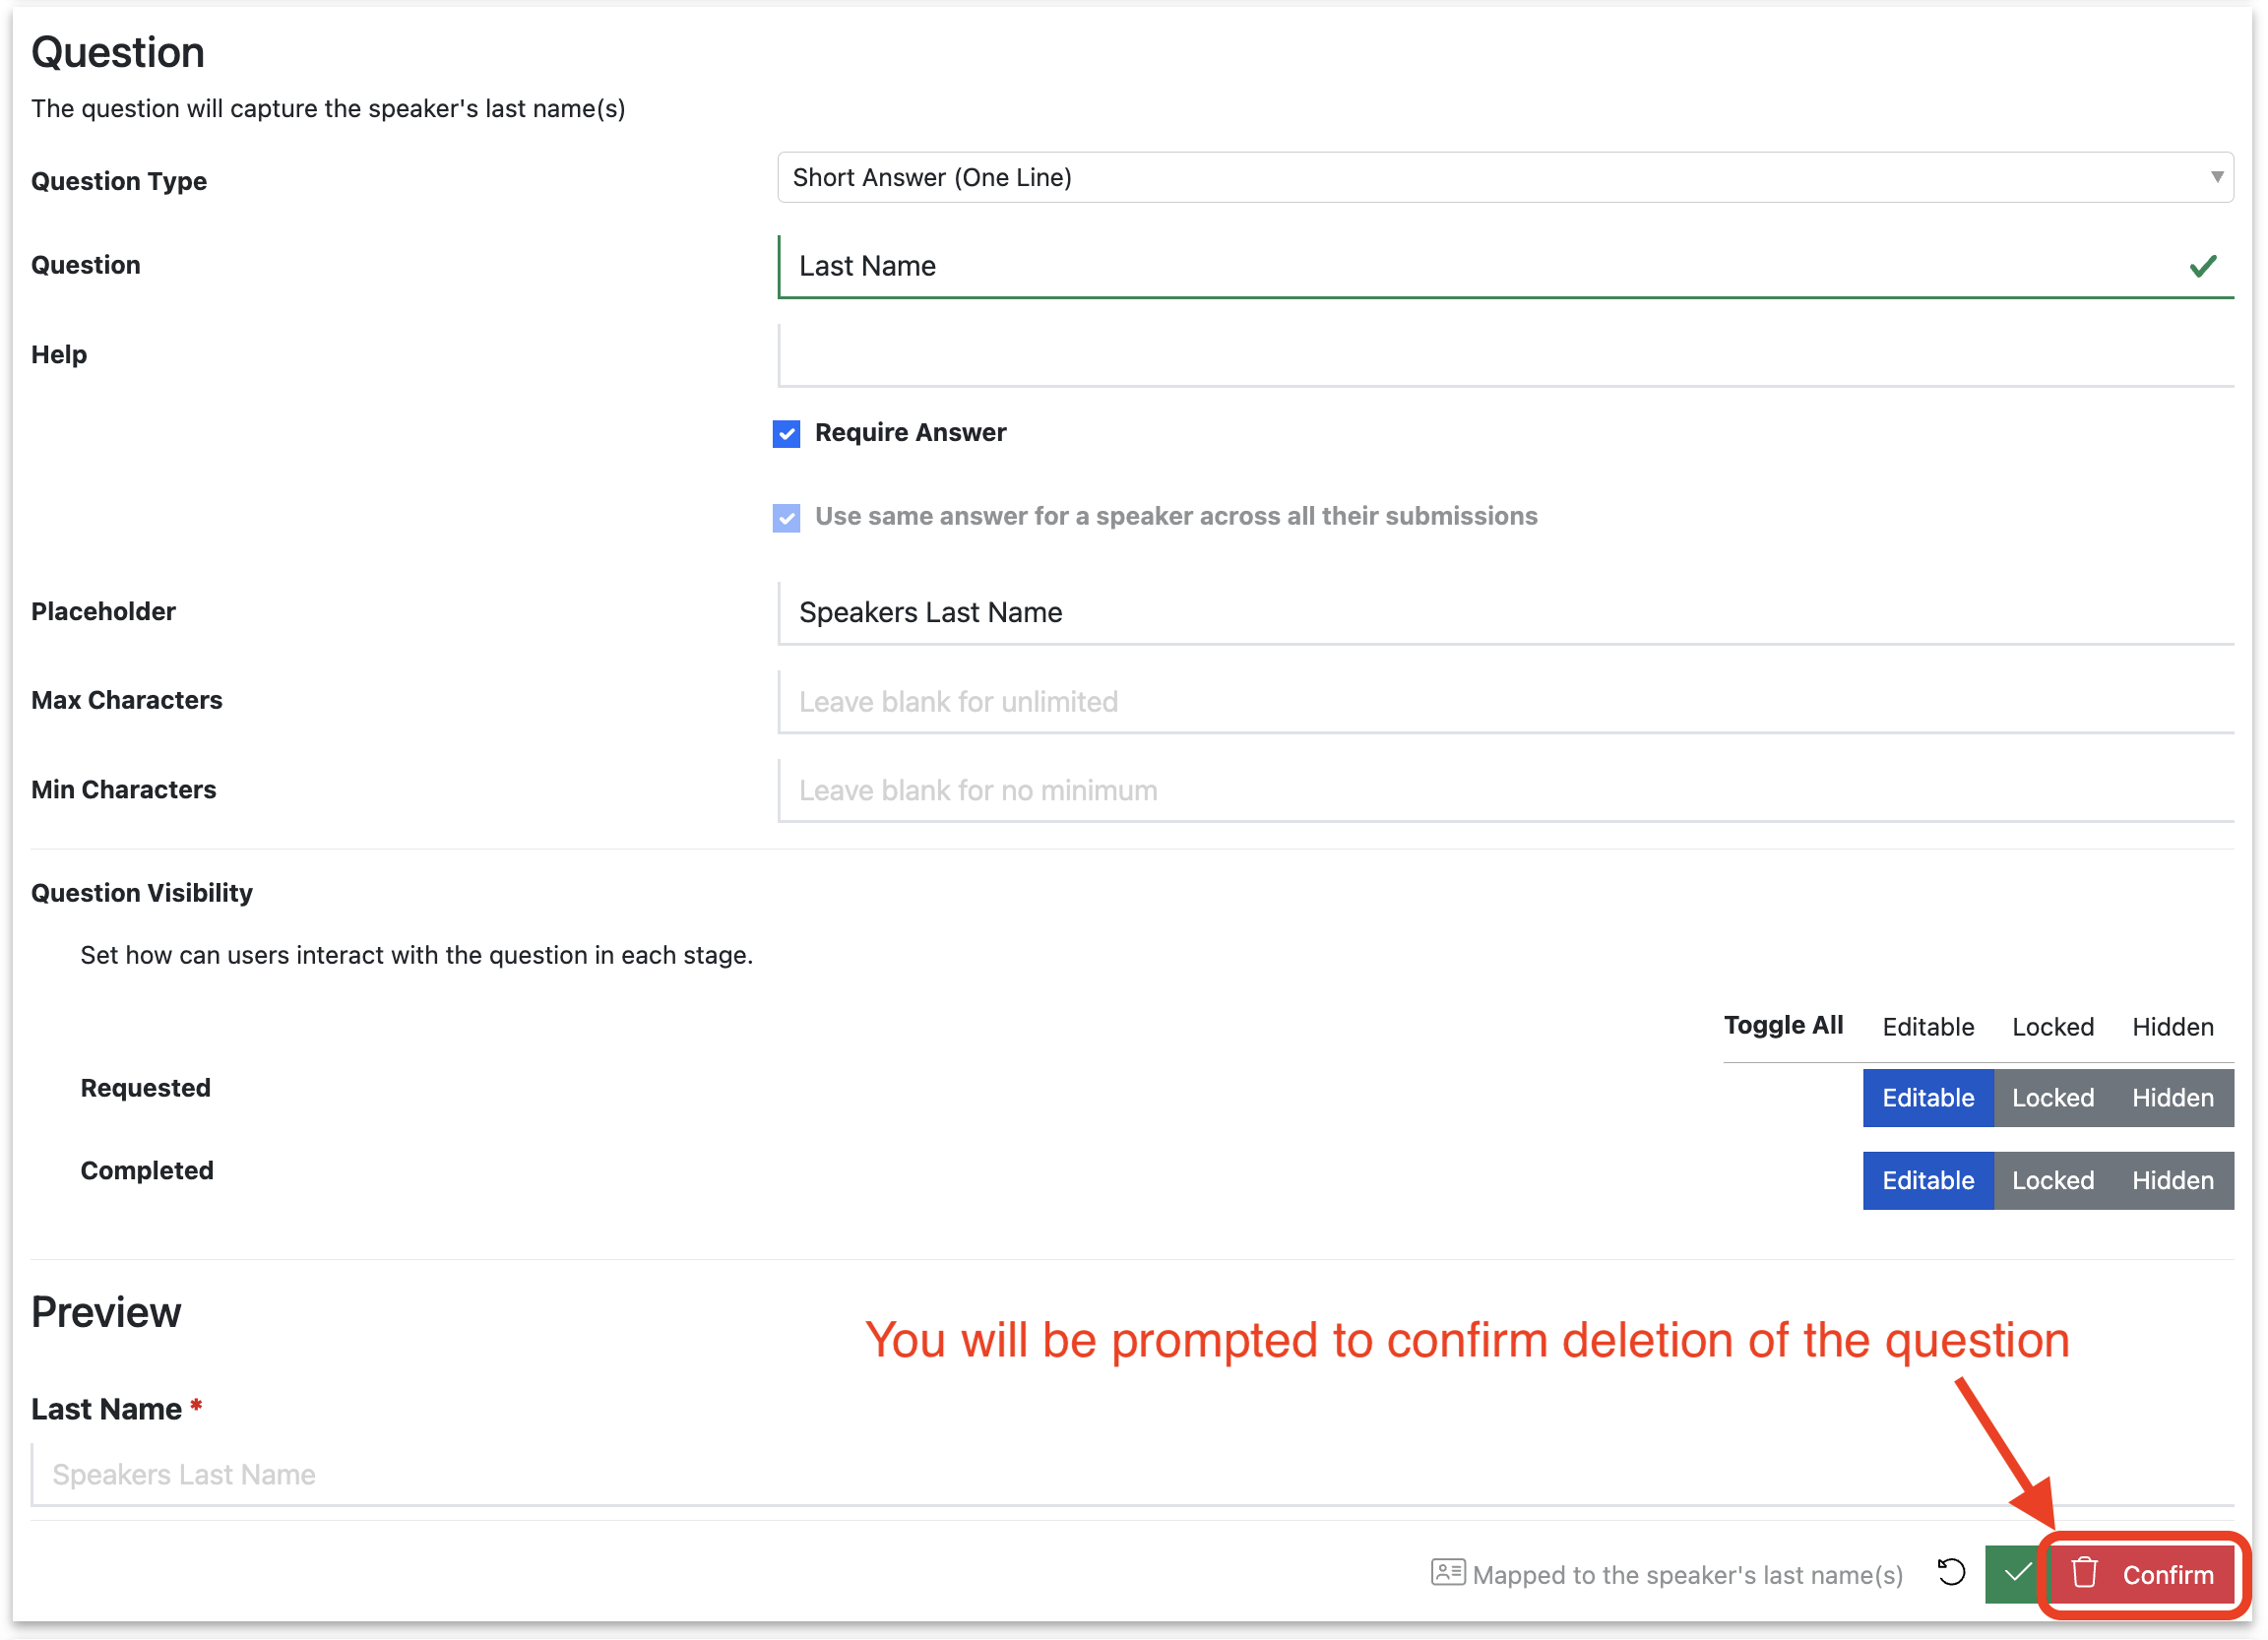
In the bottom-right corner of the question you will find the delete button, which has a ’trash can’ icon:

-
You will be prompted to confirm that you want to delete the question:
How do I edit the buttons at the bottom of the form in a Speaker Task?
Editing buttons can happen in two ways: basic editing and advanced editing.
1. To edit a button in basic editing mode:
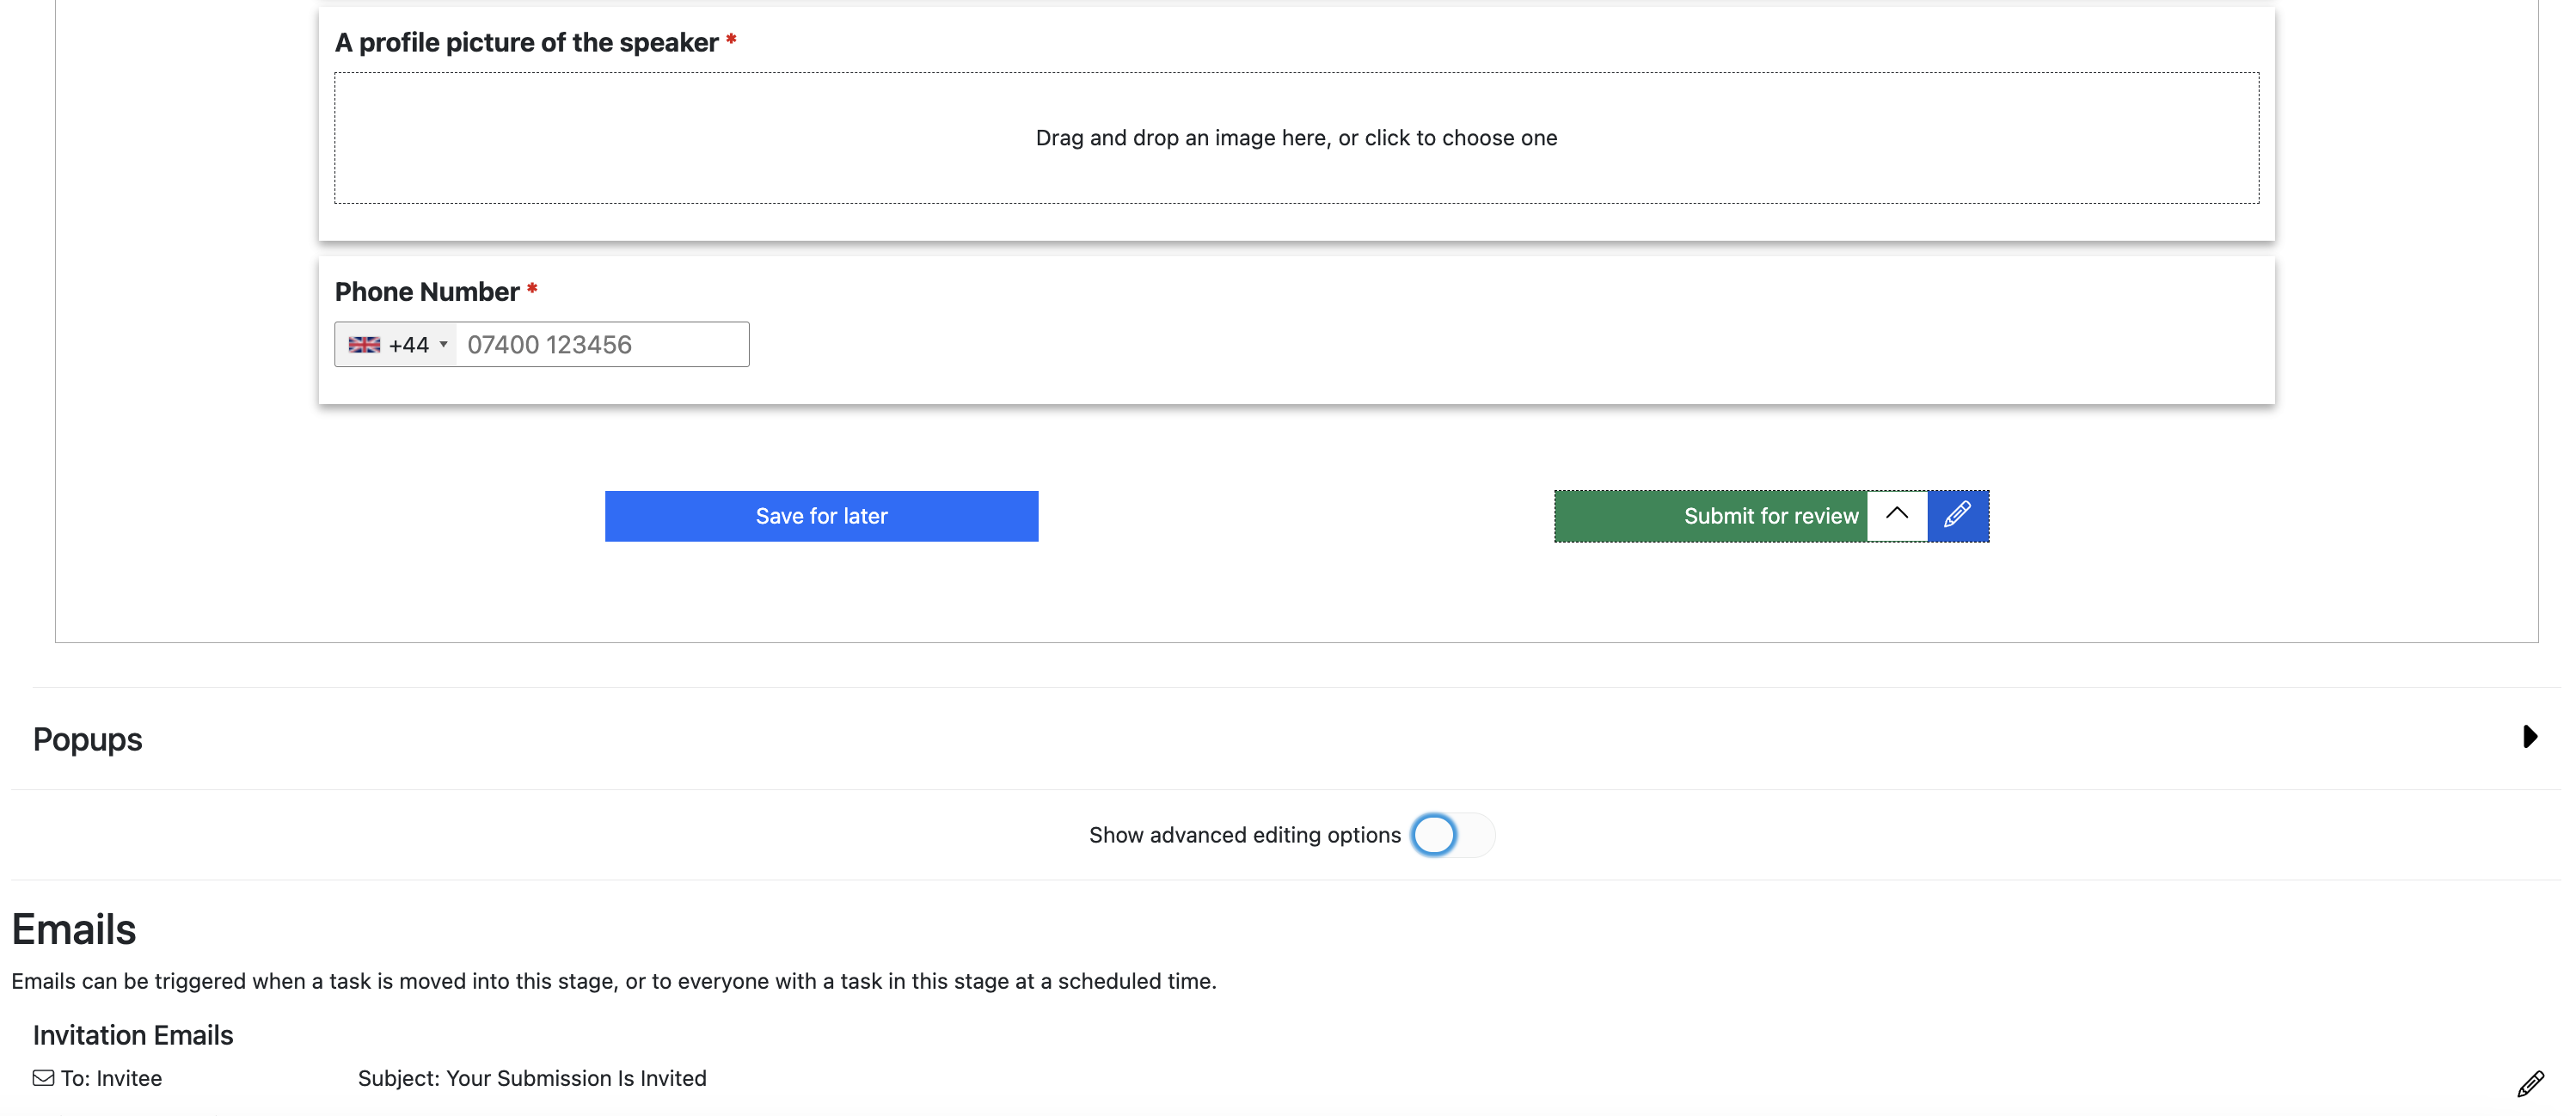
-
Go to the Speaker Task’s Configuration page and scroll down to the bottom of the form.
-
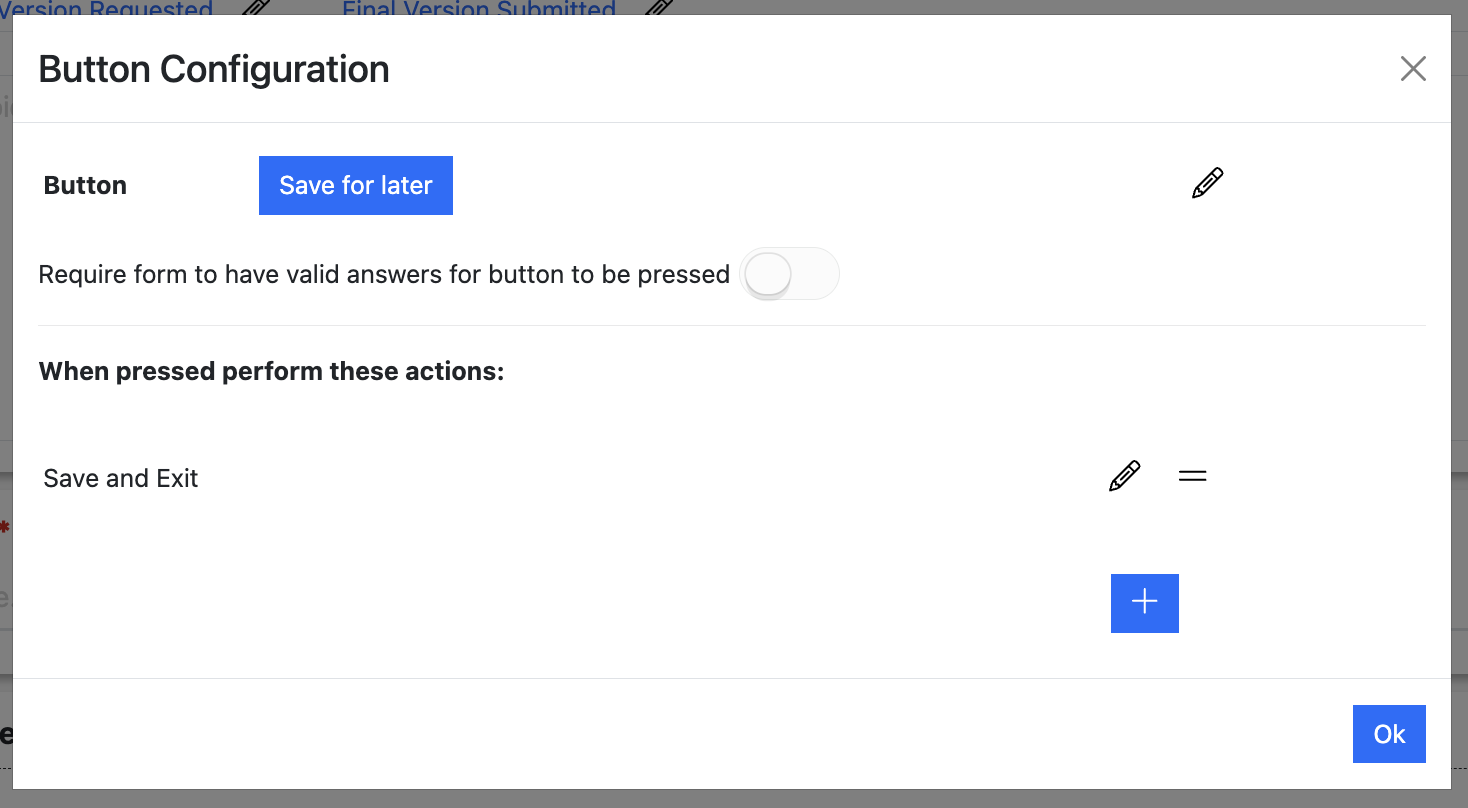
Click the edit button. This will bring up the basic button editing popup:
-
Click the pencil icon. This will allow you to edit the wording on the button and the button’s color.
-
Make your changes and click the green ‘check’ button to save your changes, or the circular arrow button to discard your changes.
2. To edit a button in advanced editing mode:
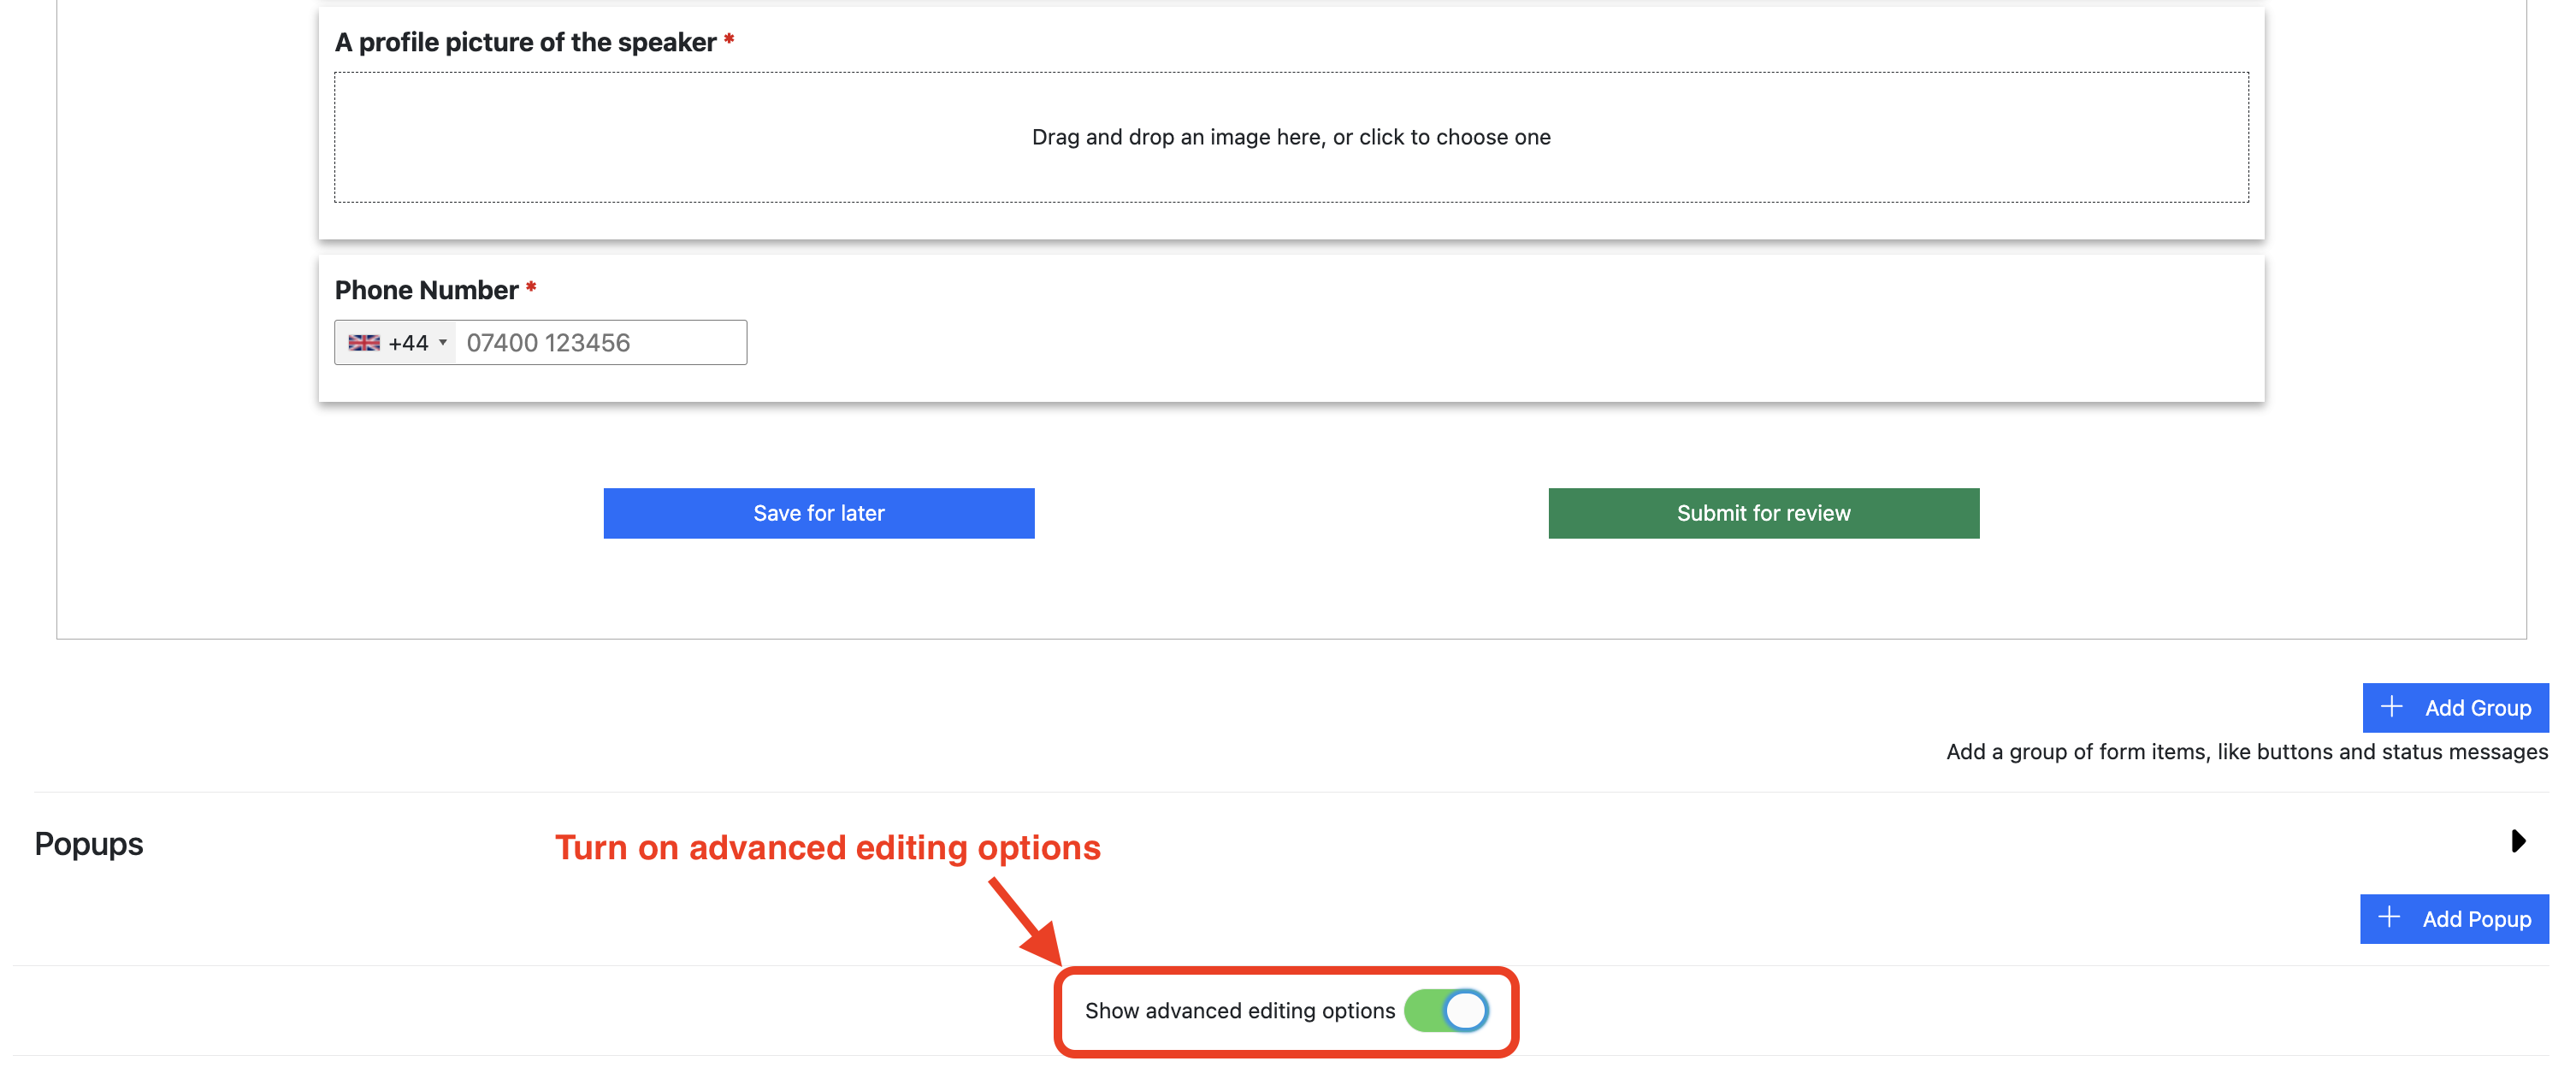
- Go to the Speaker Task’s Configuration page and scroll down to the bottom of the form.
- Switch on the “Show advanced editing options” toggle on:

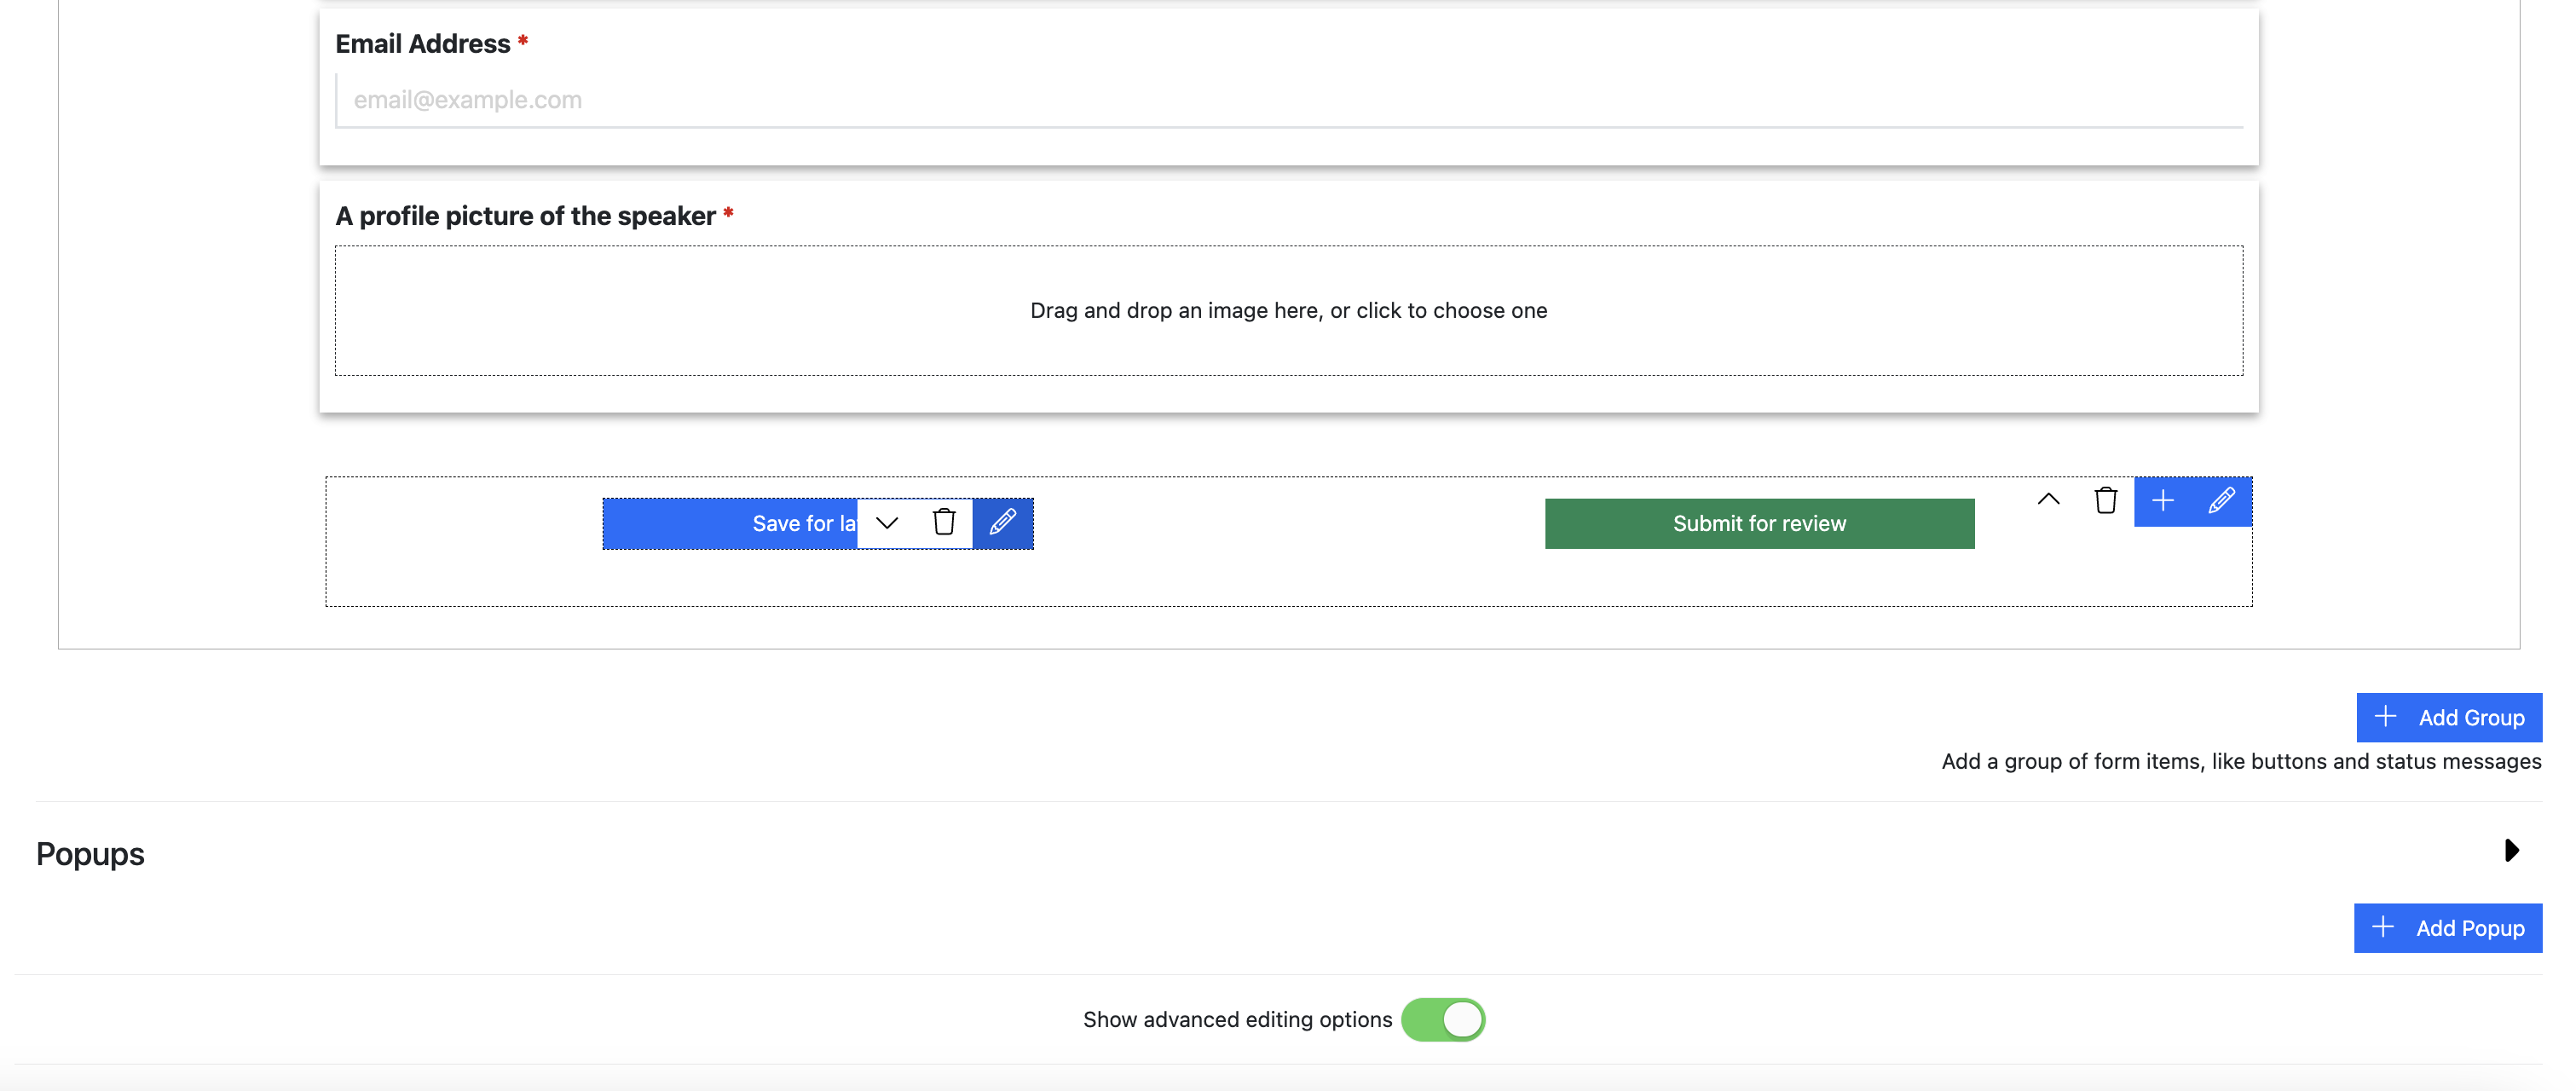
- Hover your mouse over a button to reveal the edit button
:

- Click the edit button. This will bring up the advanced button editing popup:

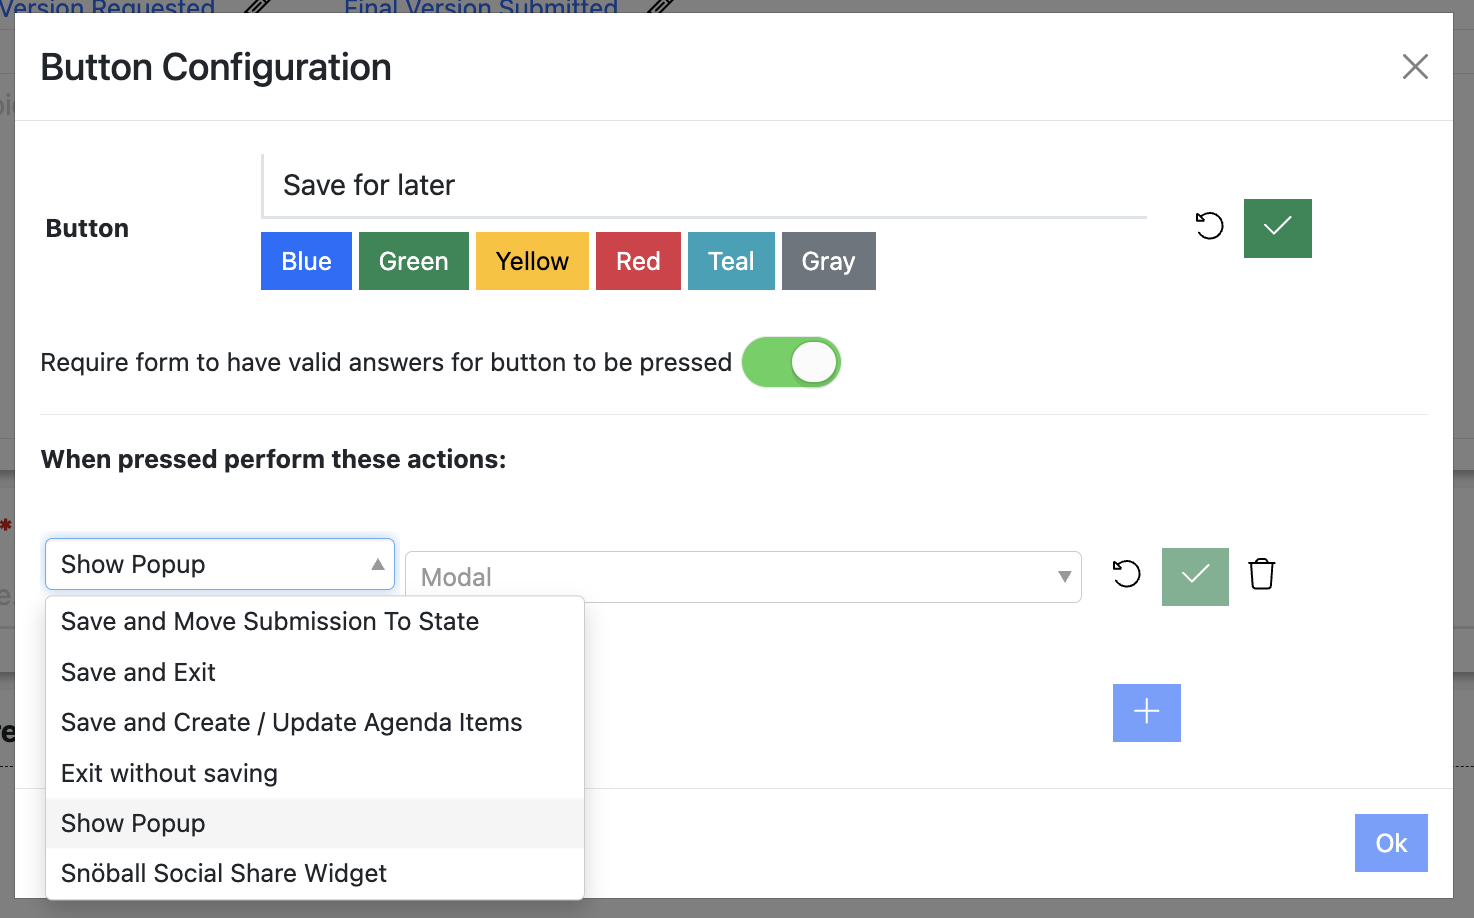
- Here you have various options:
- Like the basic editing mode, you can change the button text and color.
- You can also toggle whether the form should have valid answers in order for the user to click the button. This is useful if you want to make sure speakers have completed all mandatory fields before they can press the button.
- You can change what happens when the button is pressed:

- Make your changes and click the ‘OK’ button to save your changes.
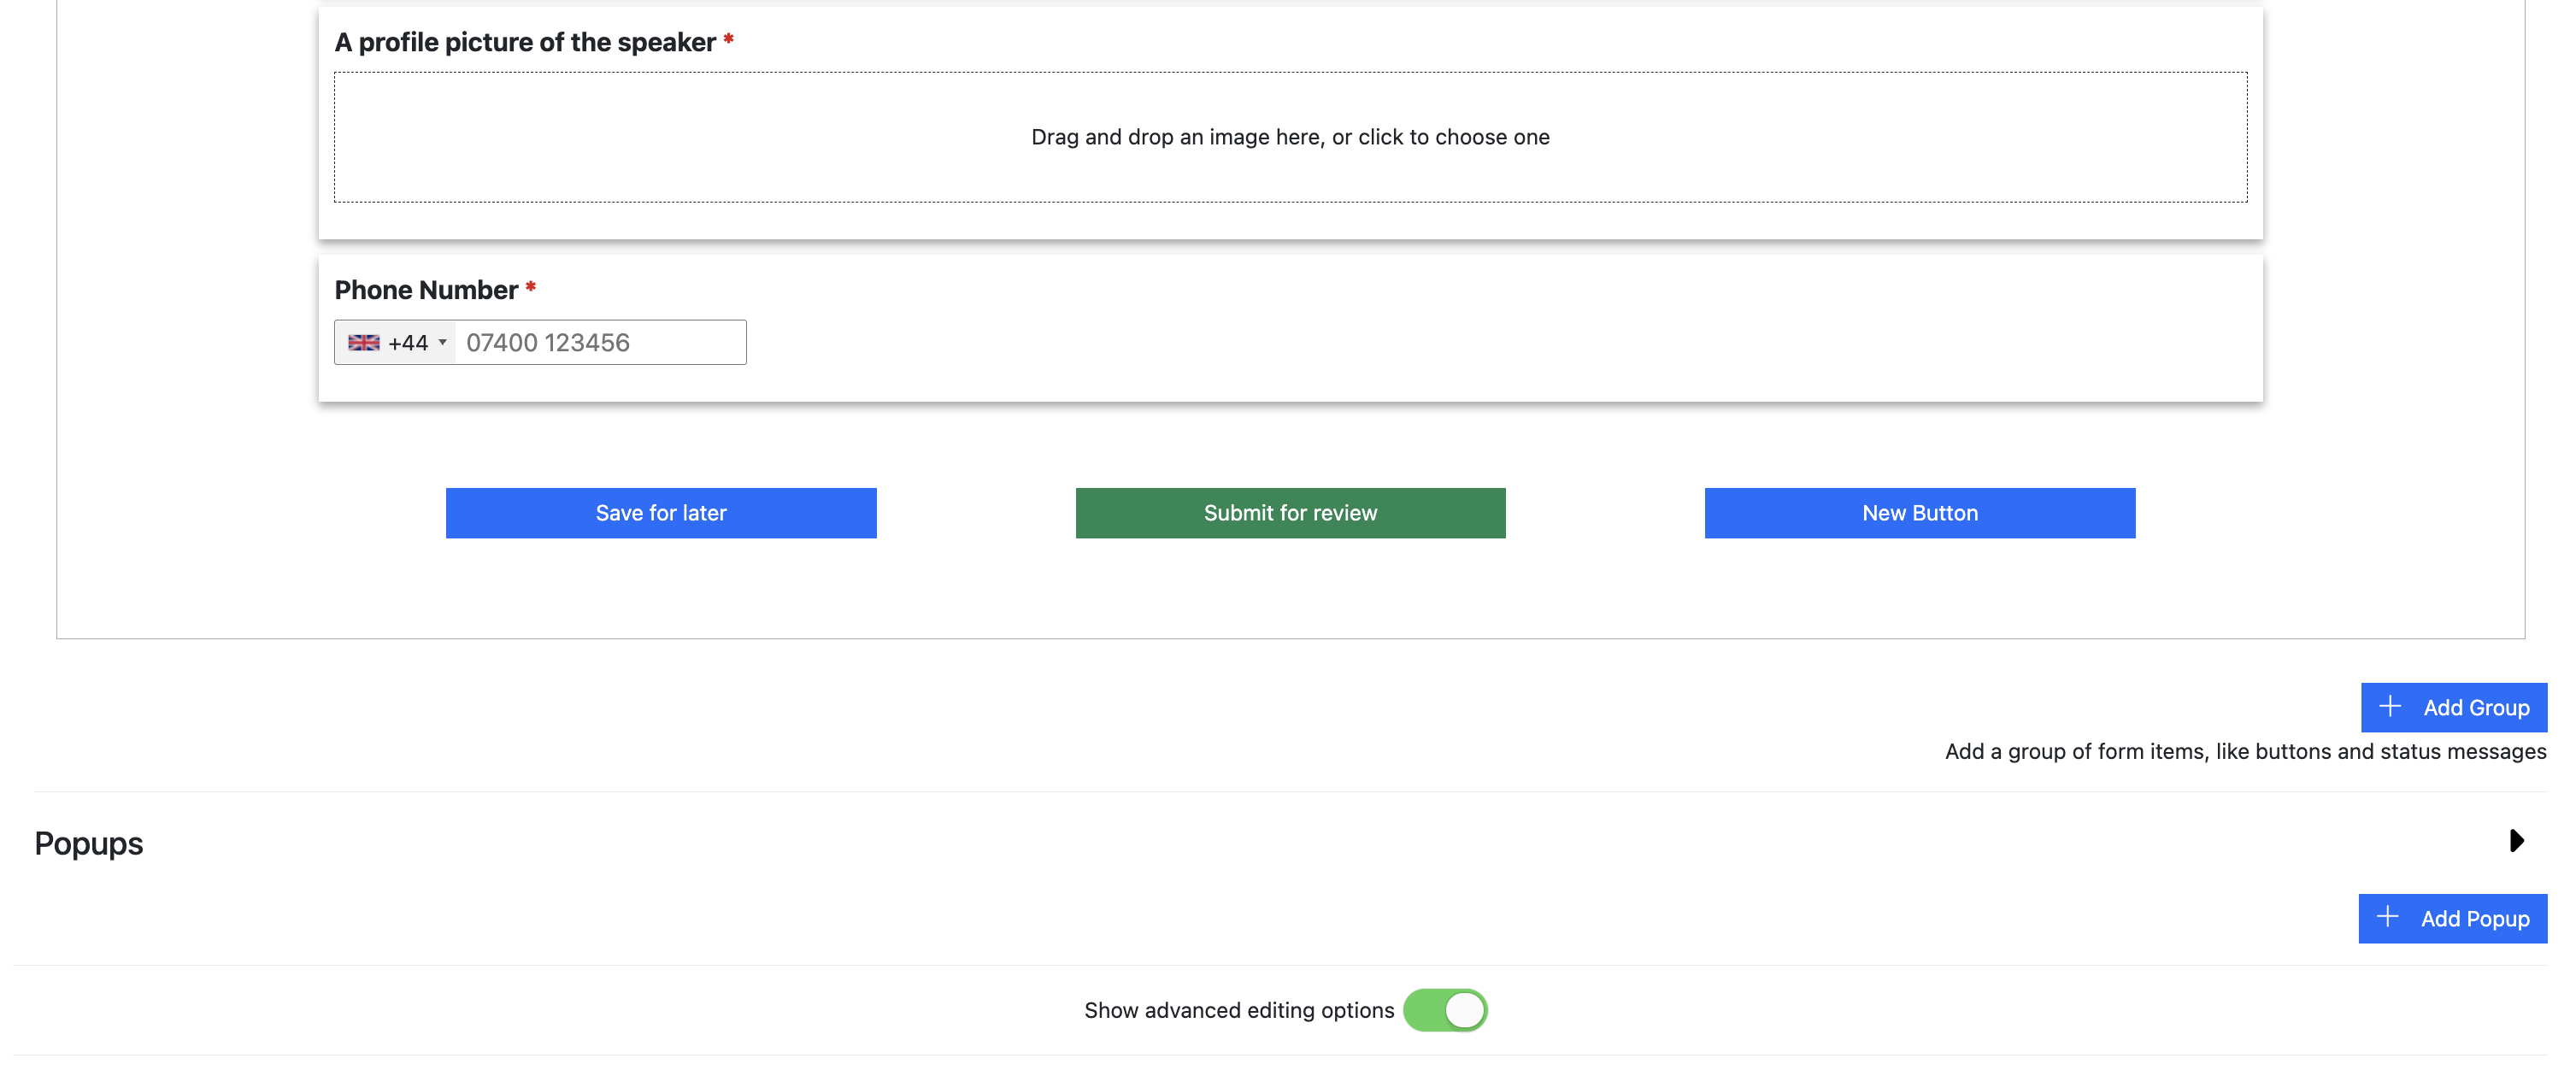
How do I add a button to the bottom of the form in a Speaker Task?
-
Go to the Speaker Task’s Configuration page and scroll down to the bottom of the form.
-
Now hover your mouse over the area around the buttons at the bottom of the form. This will reveal the Reposition, Delete, Add New Element and Edit buttons:
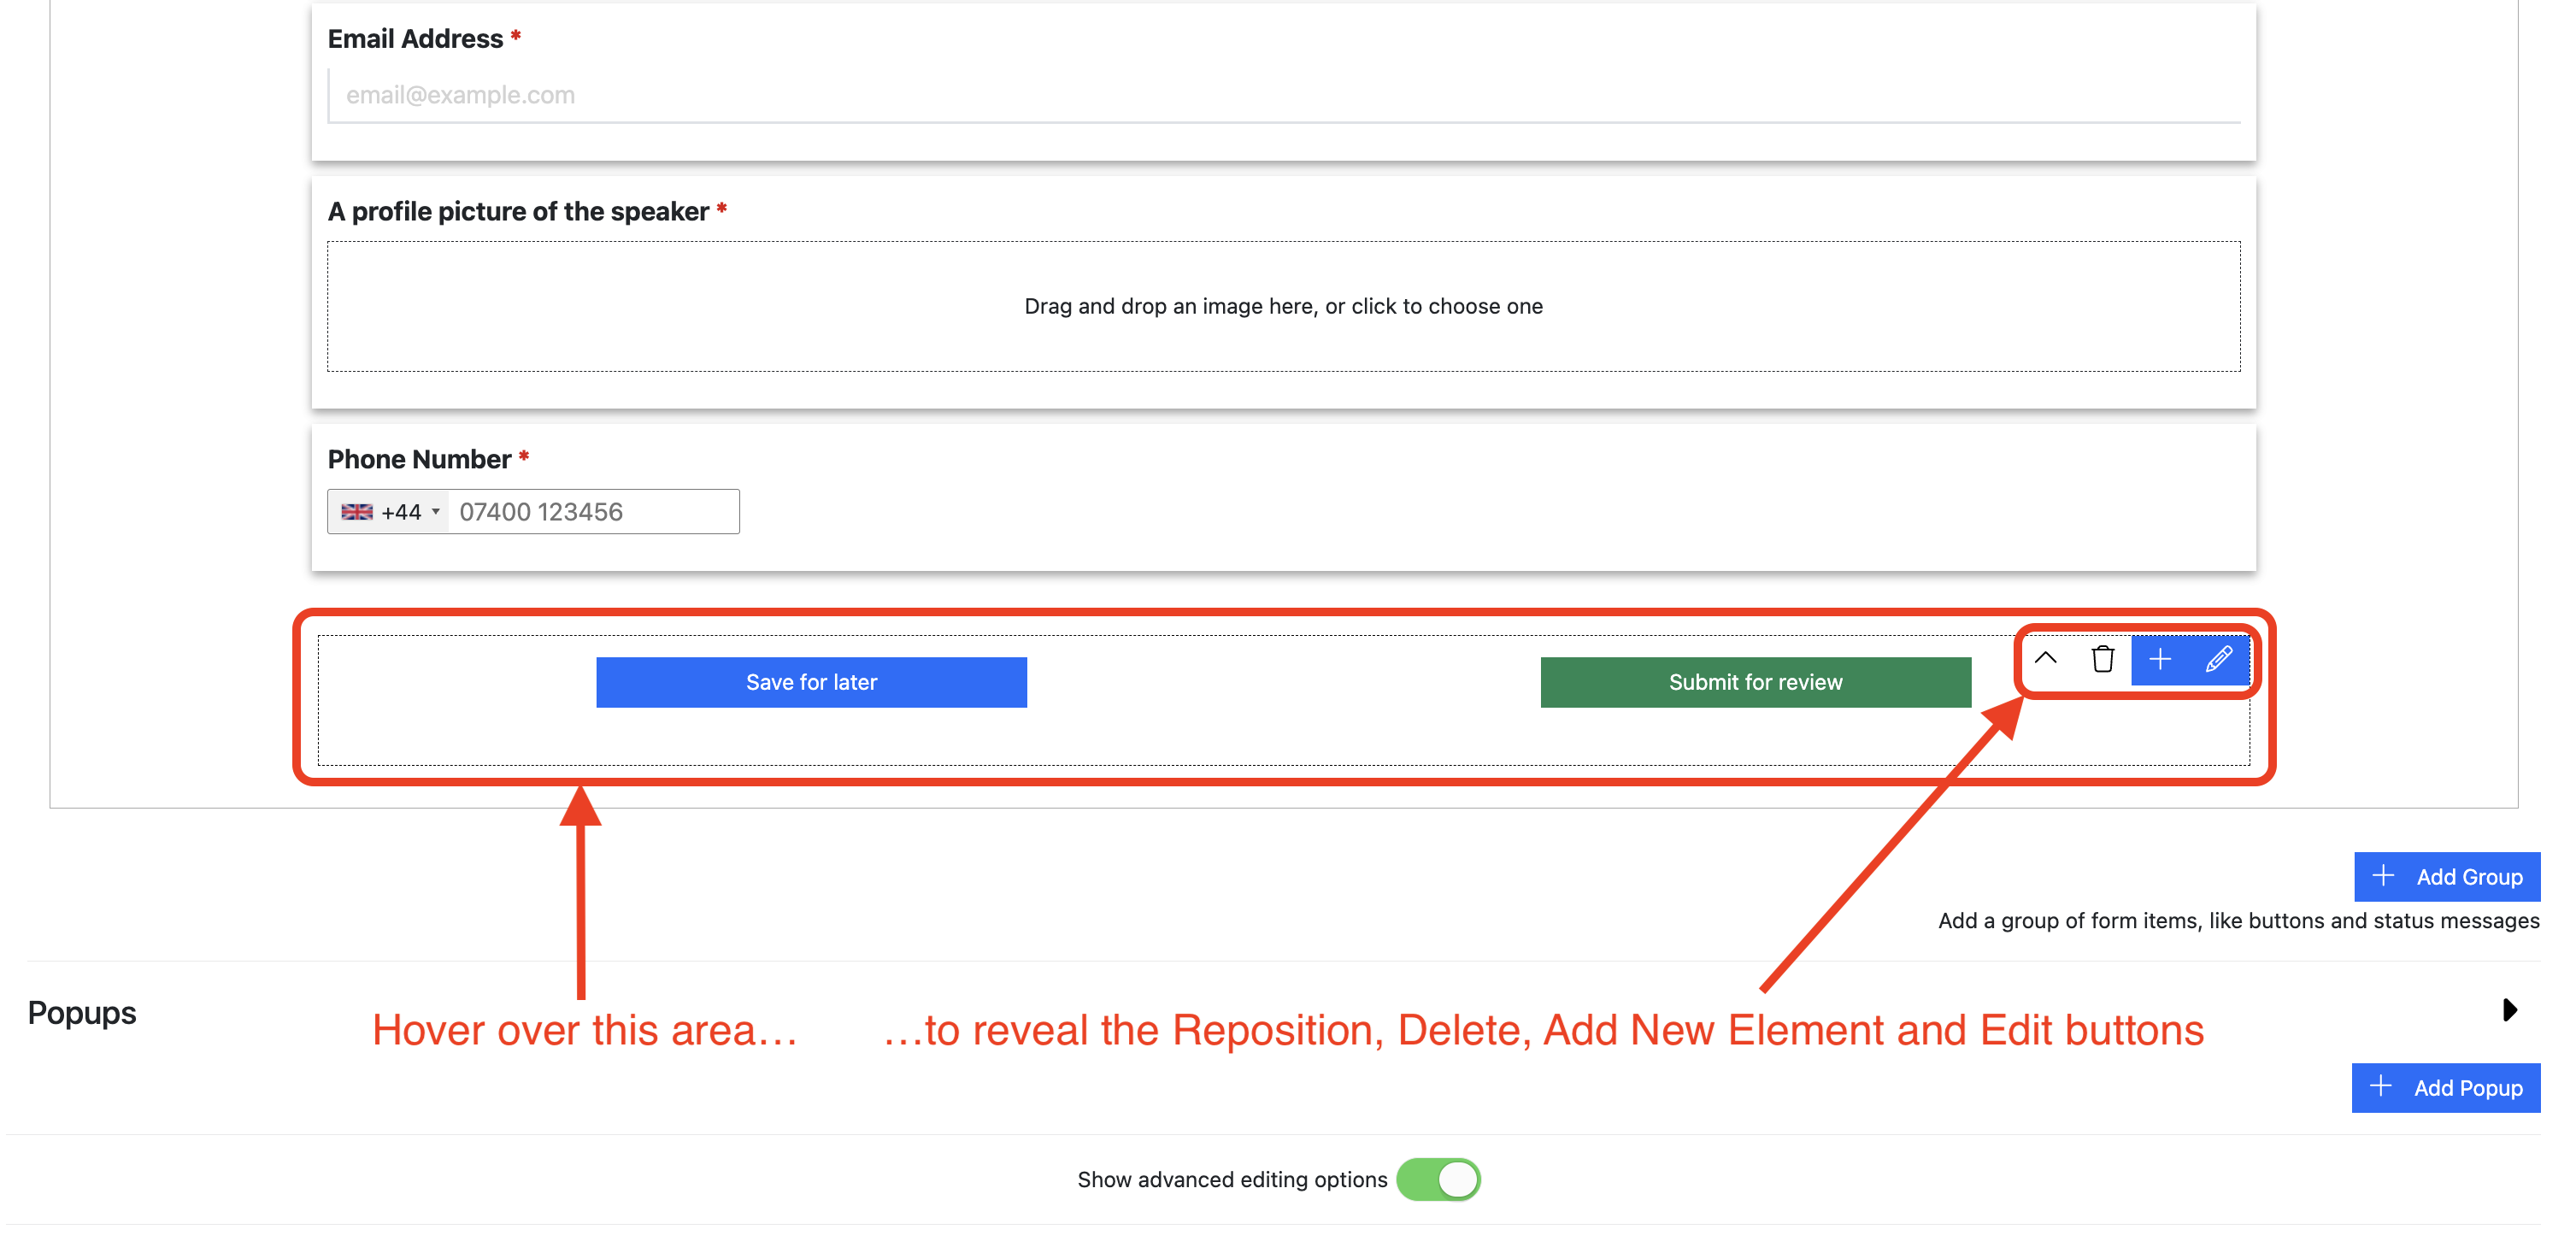

-
Click the blue plus button , and you’ll be given the option to add either a new button, or some text:
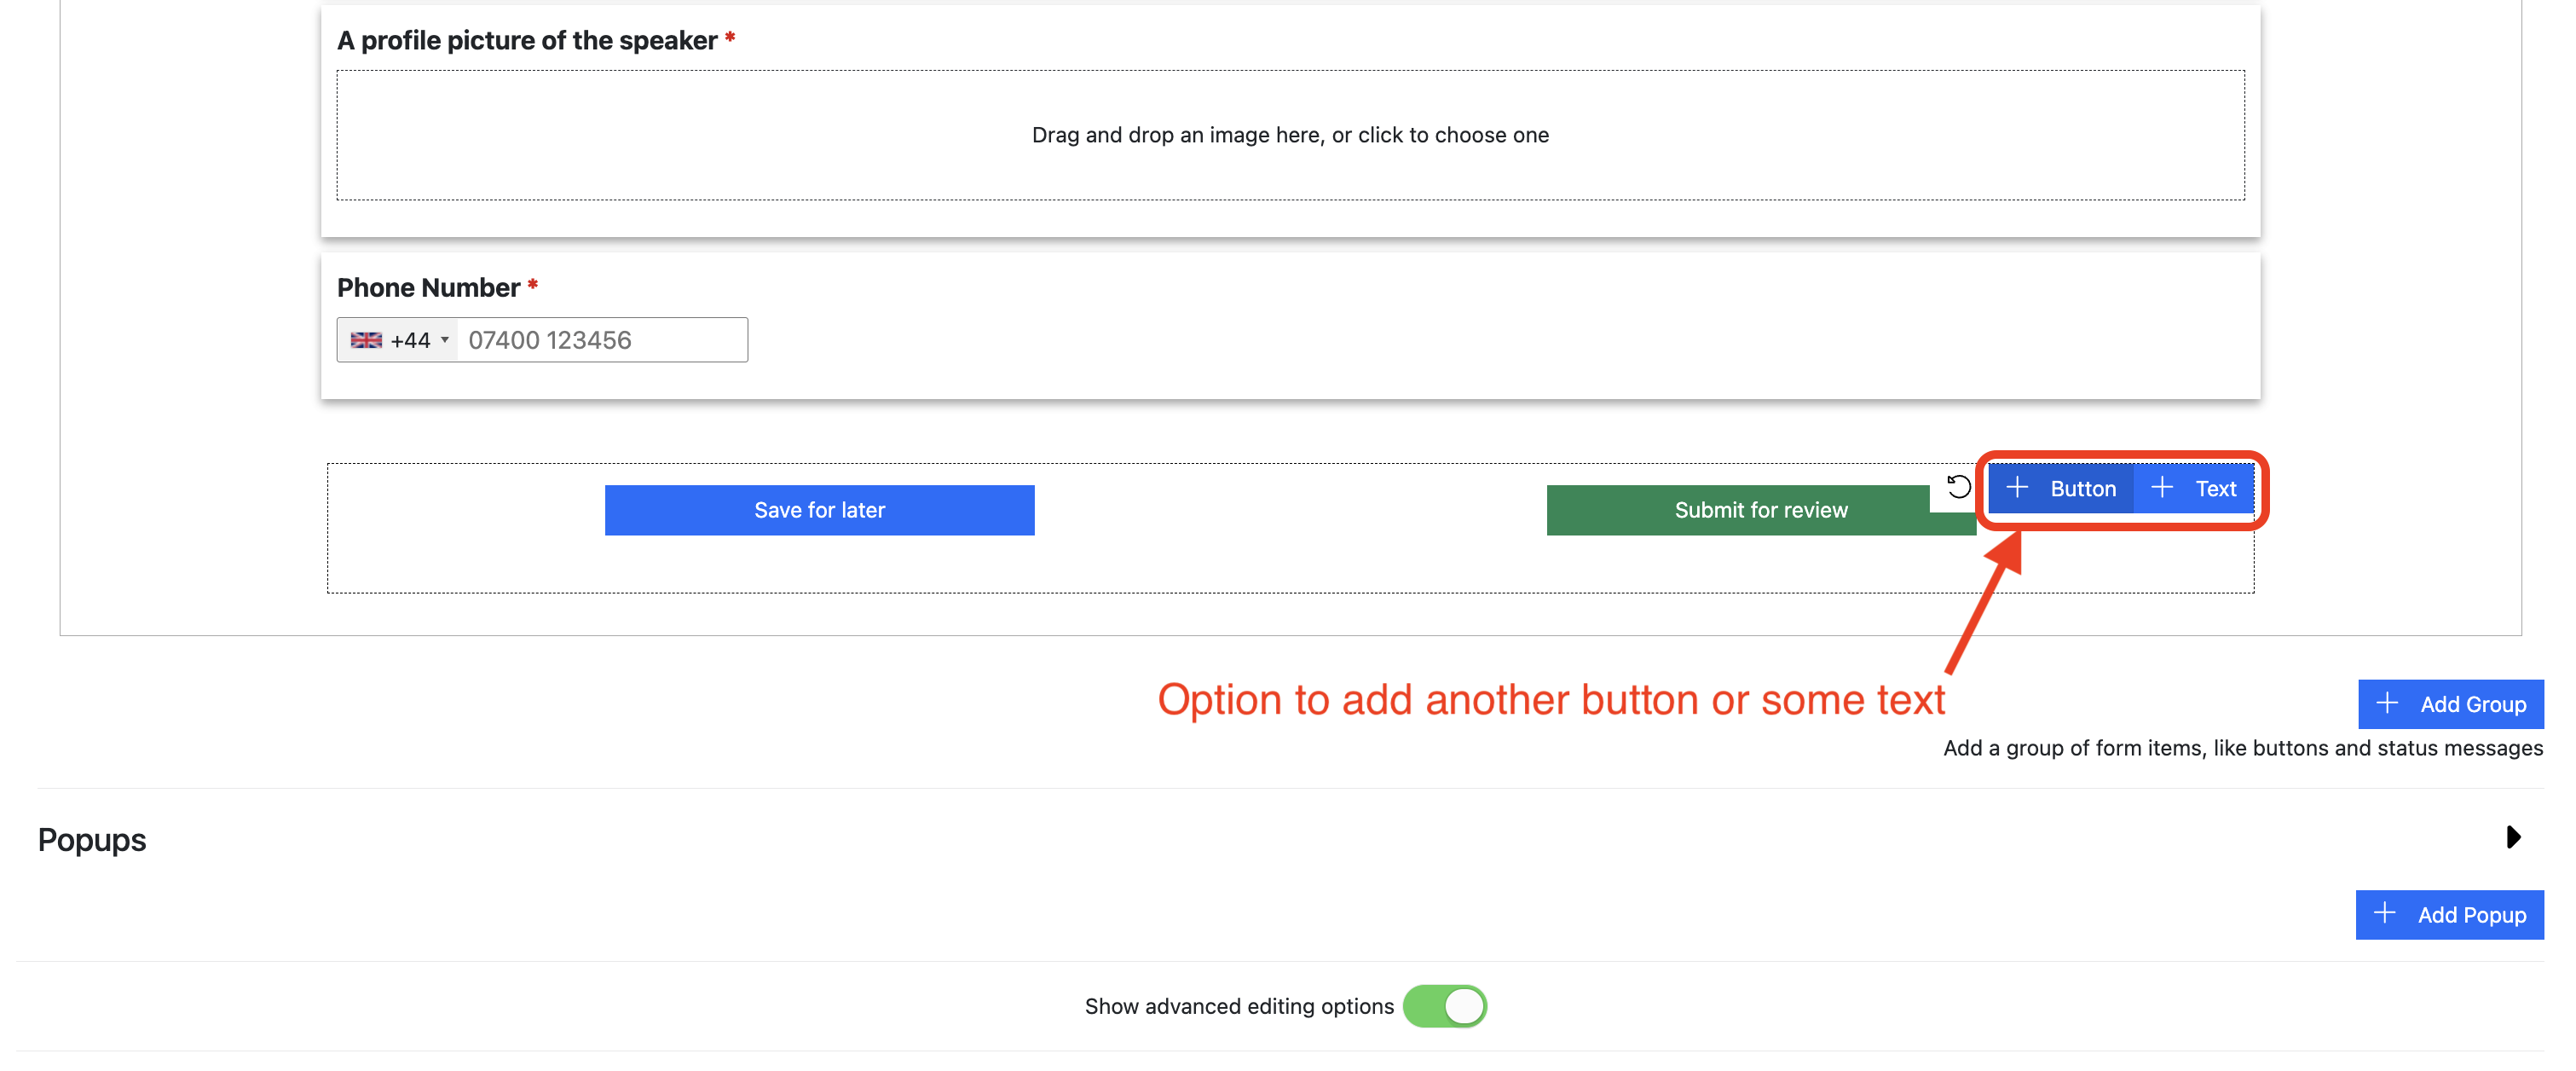

-
Click on “+ button”. This will create a new button, which you can edit in the usual way:
How do I add a confirmation popup to the buttons at the bottom of the form in a speaker task?
ANSWER COMING SOON!
How do I edit email templates for a Speaker Task?
-
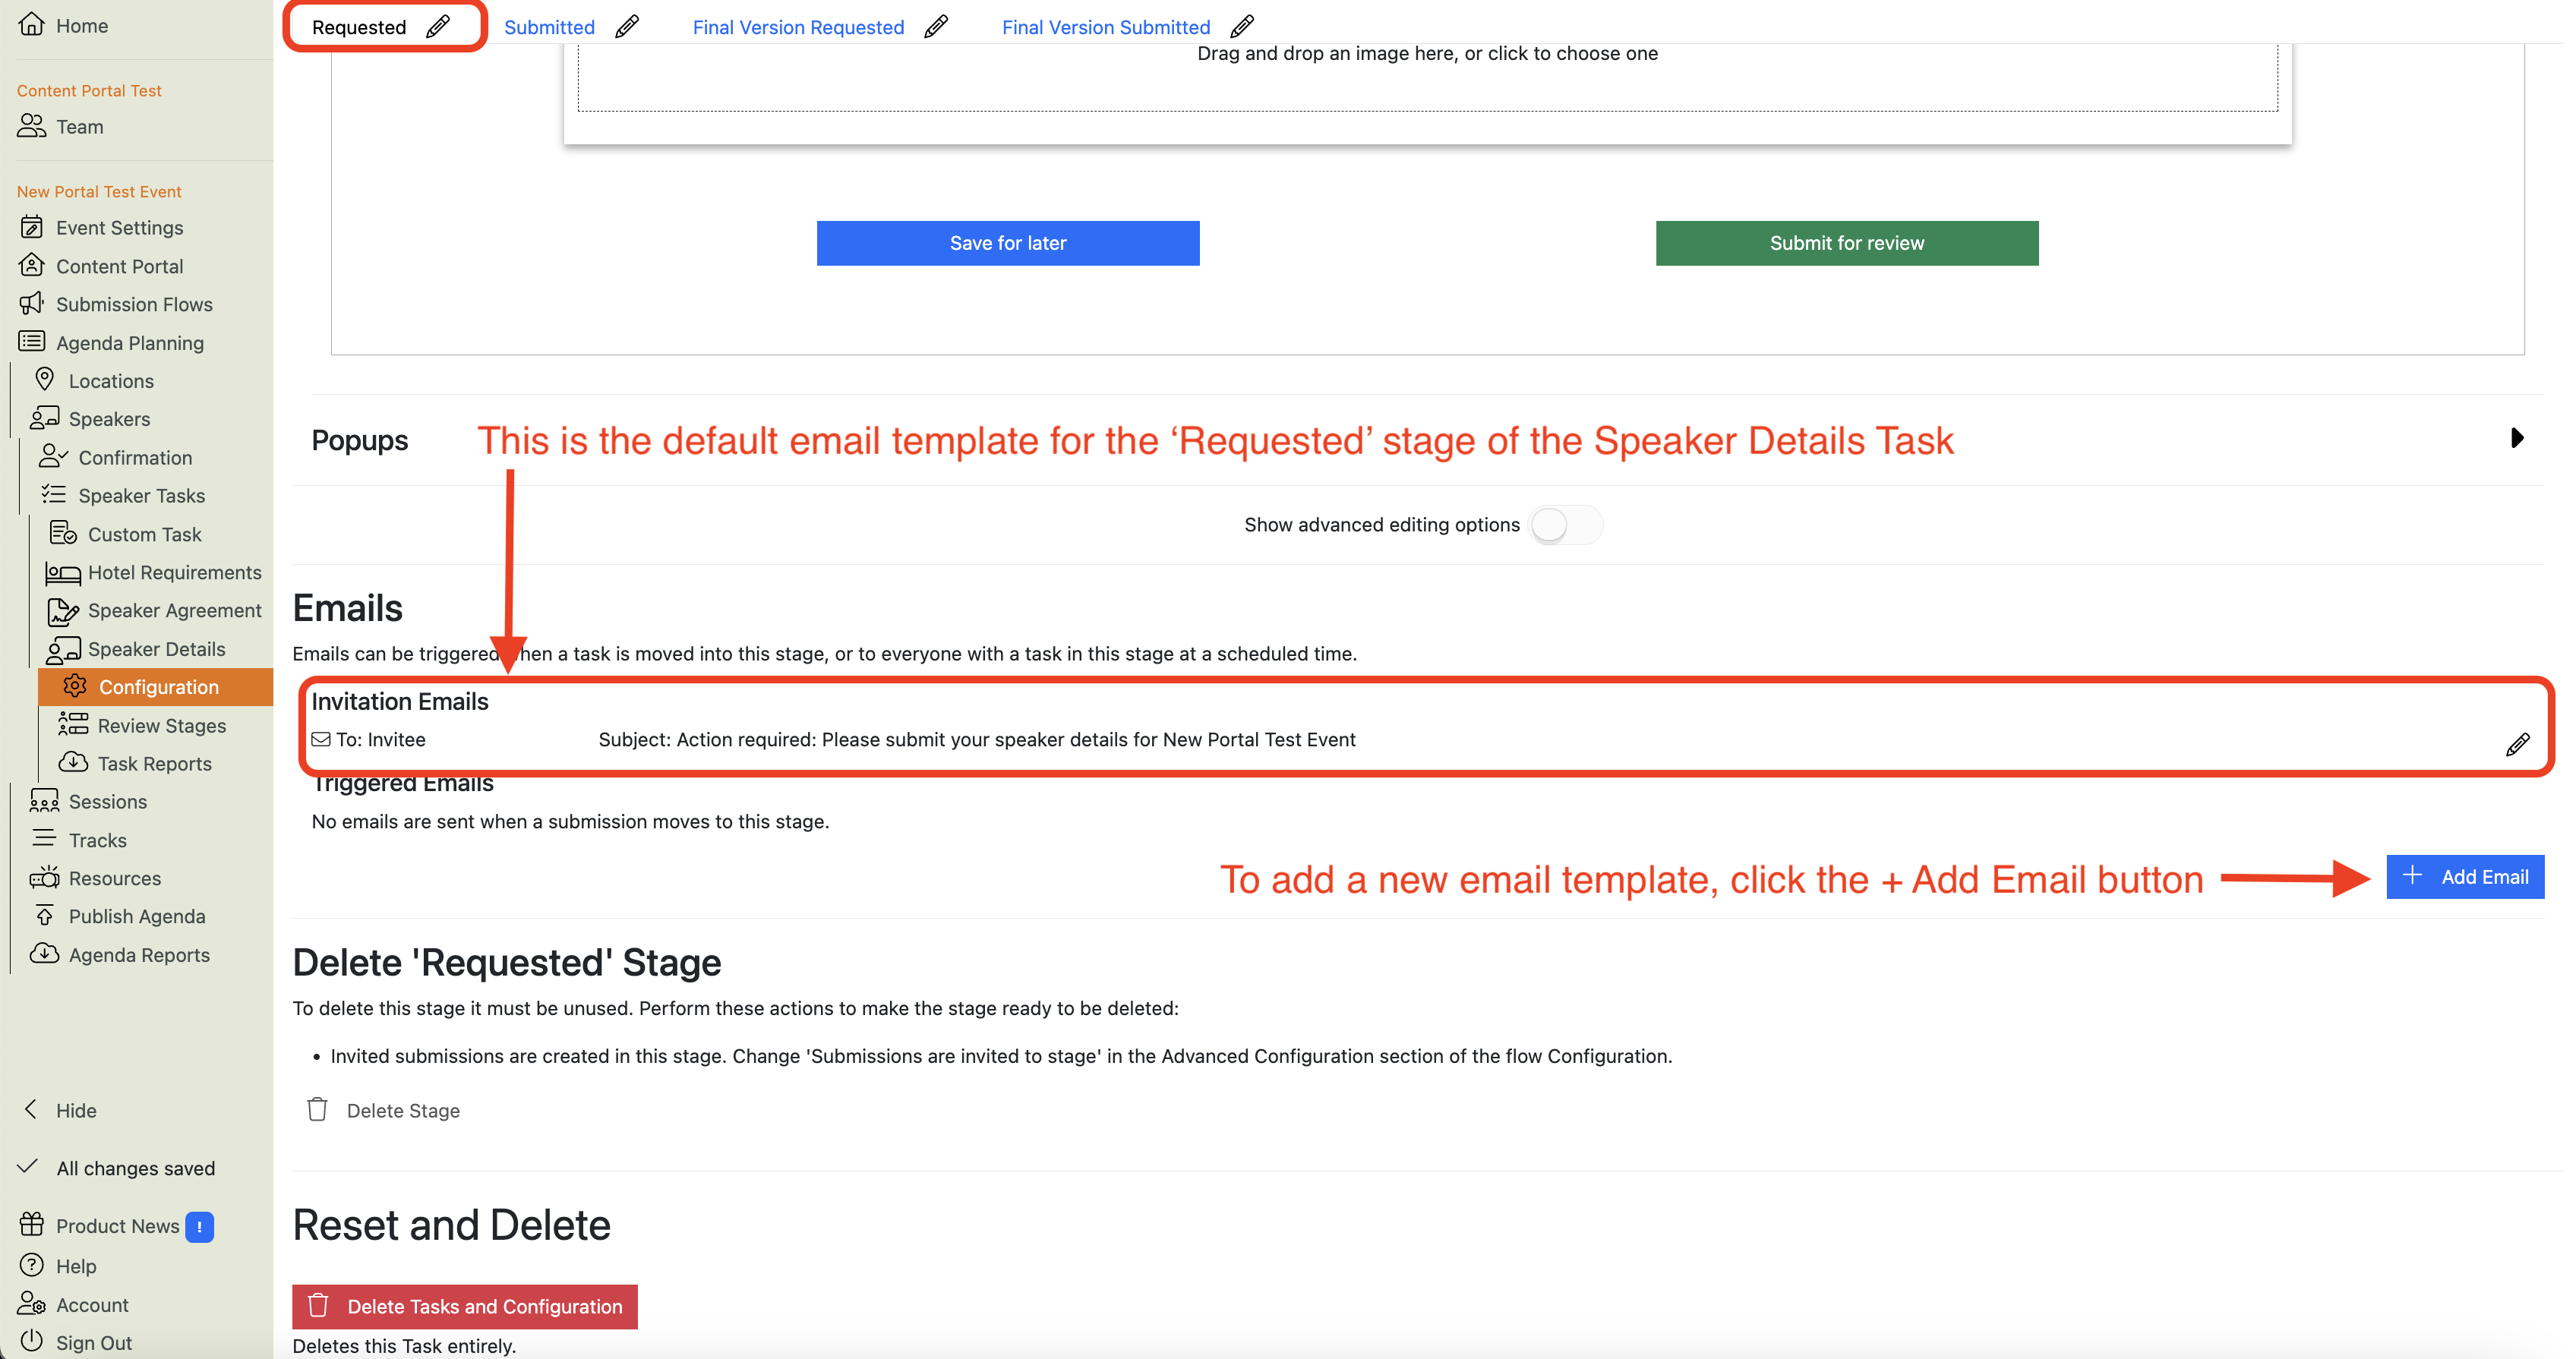
Go to the Speaker Task’s Configuration page and scroll down to the bottom of the page. Here you will find the email templates for the task:
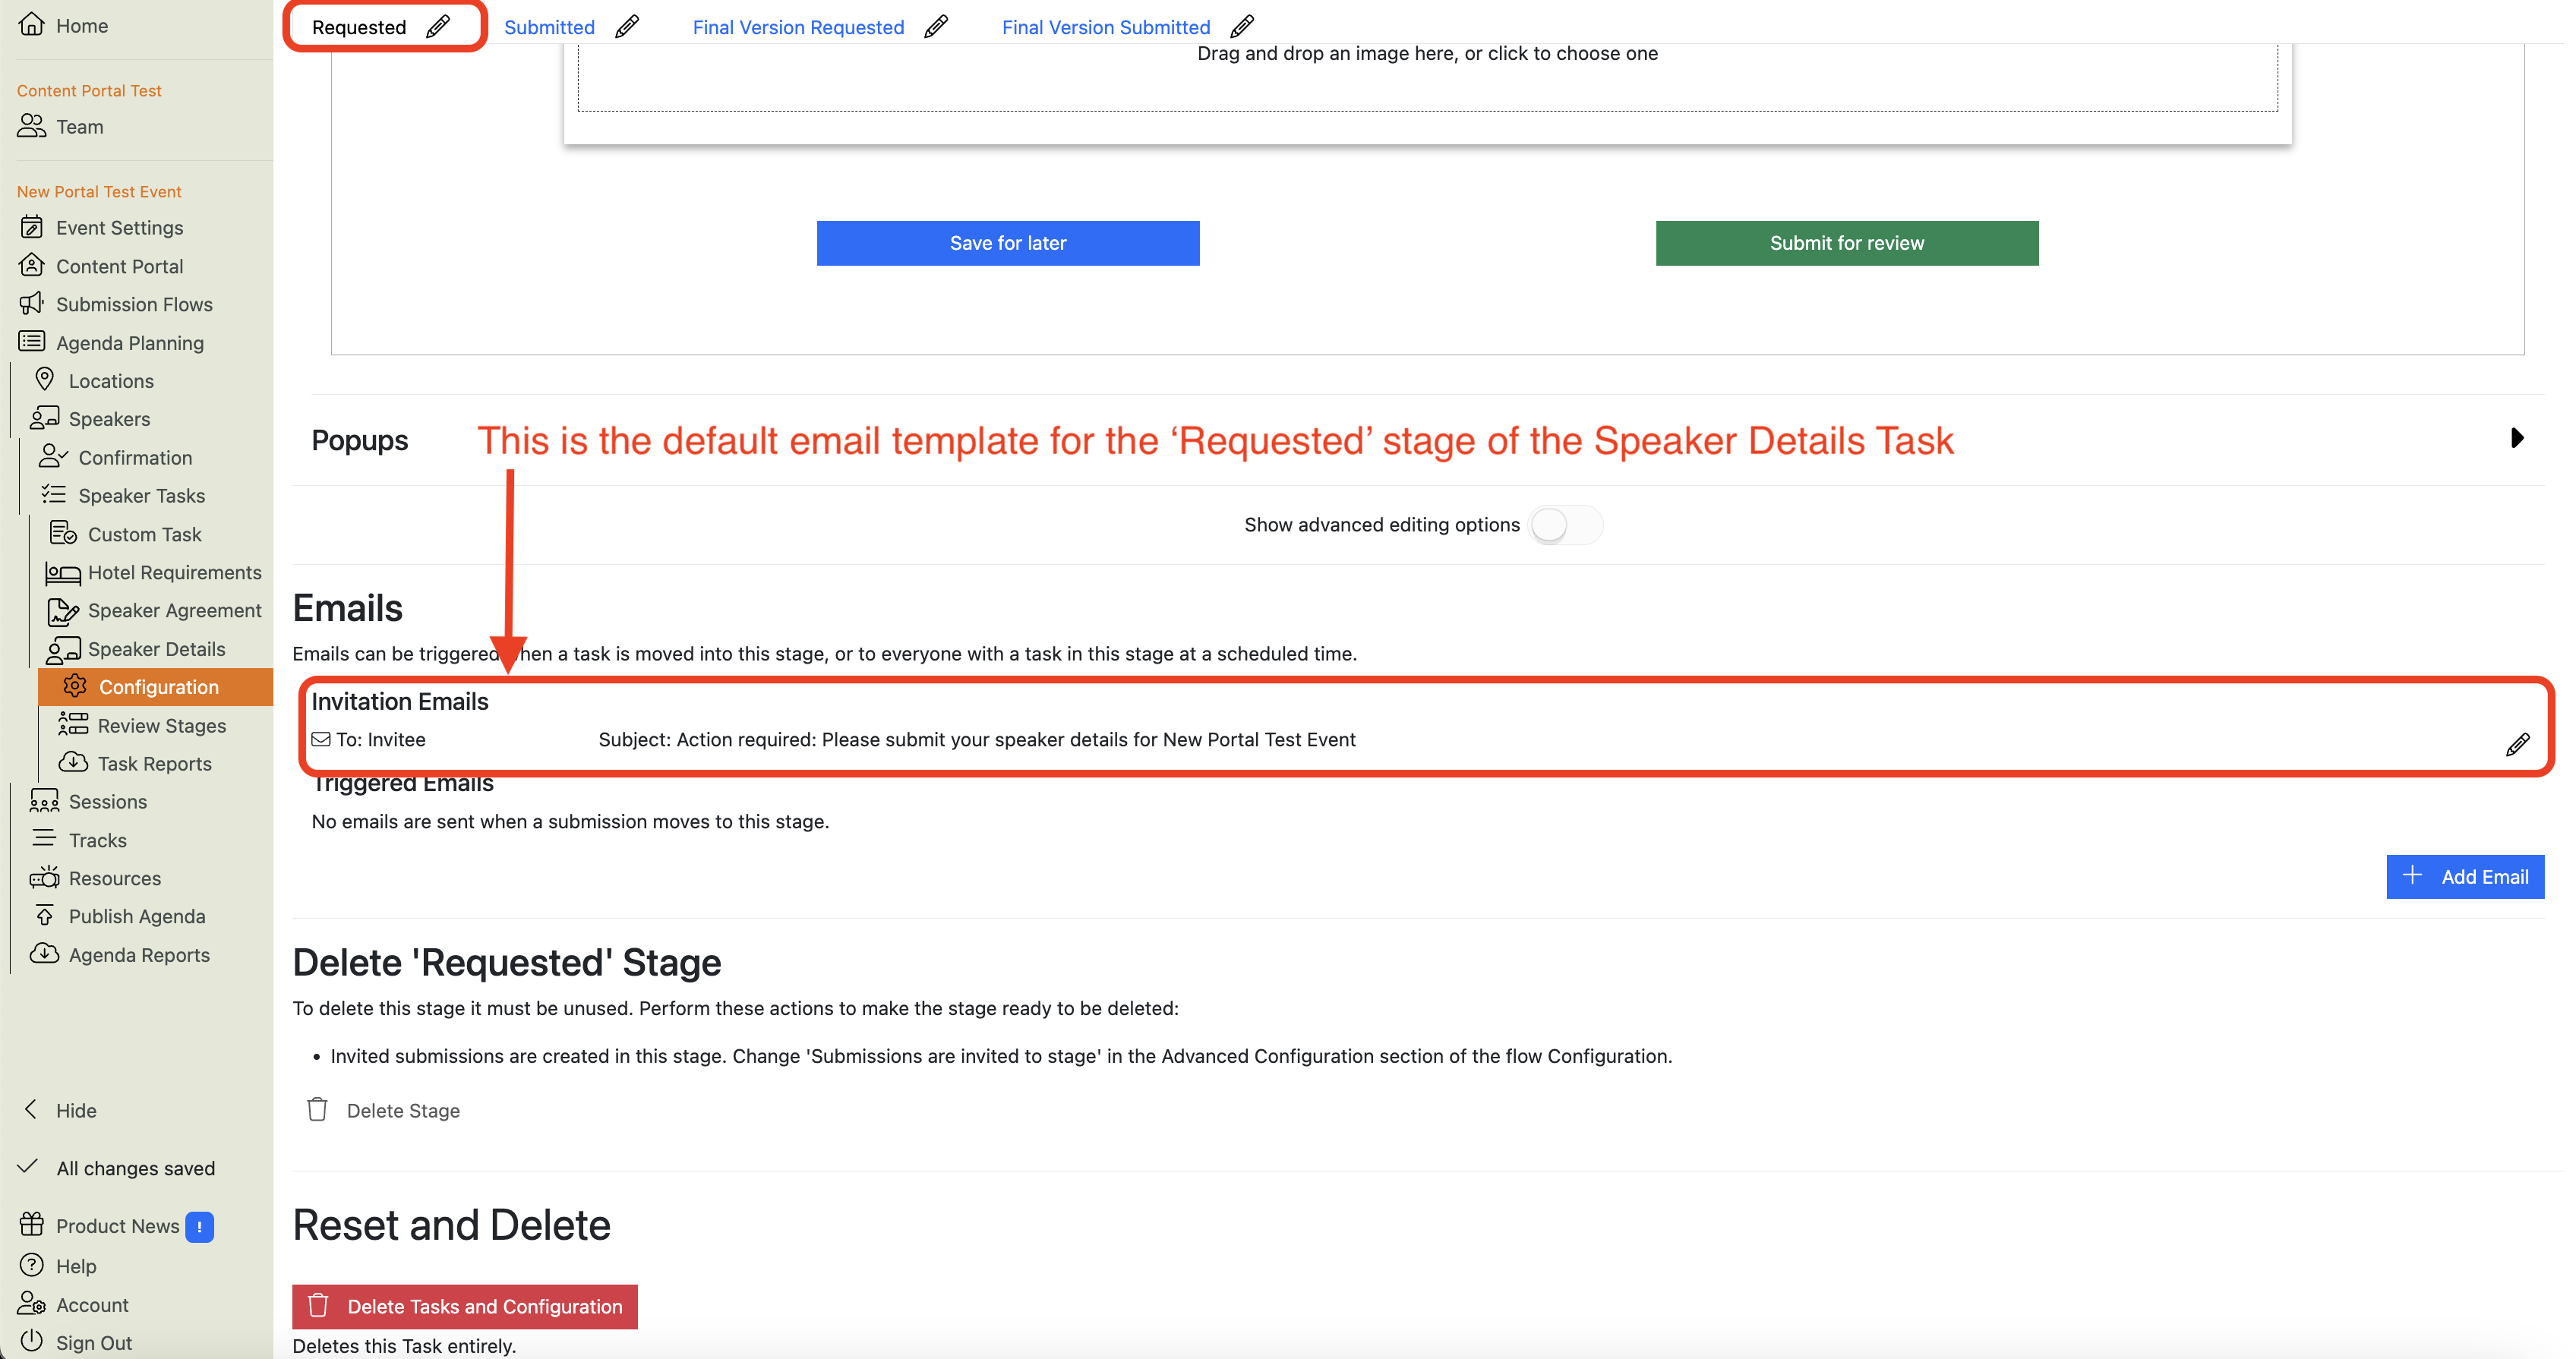

Note
Each Task Stage has its own email templates, because you will want to send Task Owners different messages at different stages of the process.
-
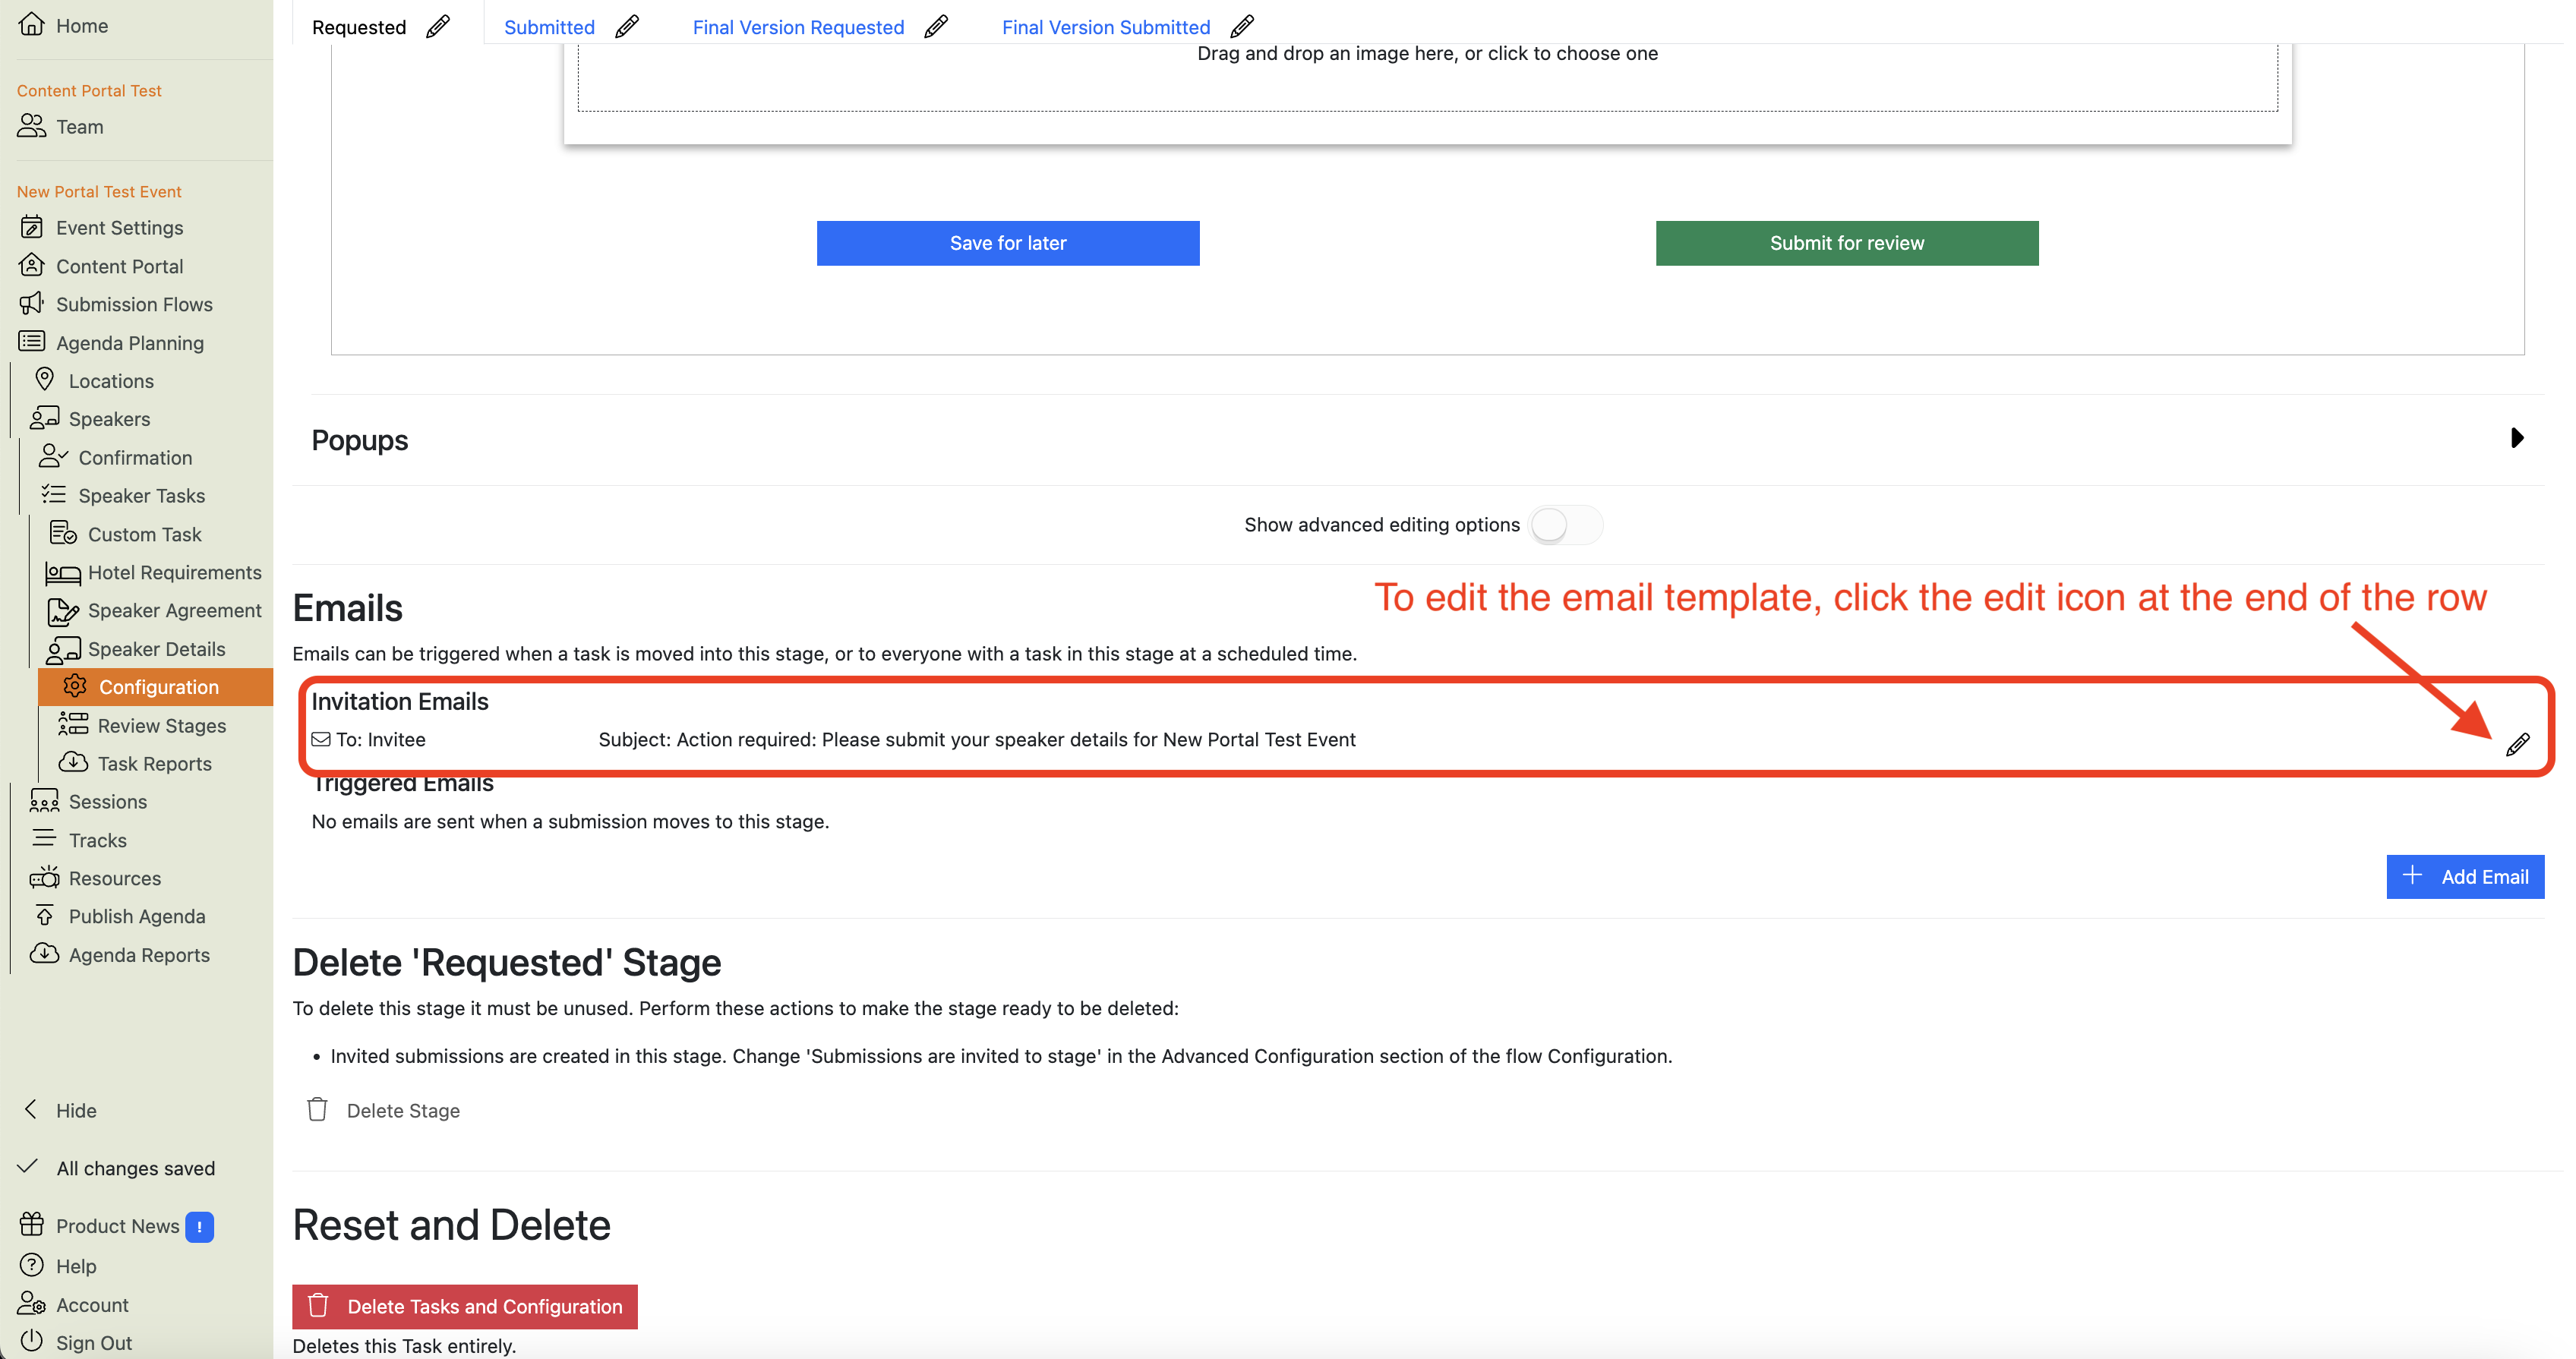
To edit the existing template, click the pencil icon at the end of the row:

How do I add email templates for a Speaker Task?
-
-
Go to the Speaker Task’s Configuration page and scroll down to the bottom of the page. Here you will find the email templates for the task:


Note
Each Task Stage has its own email templates, because you will want to send Task Owners different messages at different stages of the process.
-
To add a new template, click the pencil icon at the end of the row:

-
How do I create deadline reminder emails for my Speaker Tasks?
ANSWER COMING SOON!
How do I copy a Speaker Task?
- Go to Agenda Planning / Speakers / Speaker Tasks
- Here you will see a table with a list of your existing Speaker Tasks.
- At the end of each Task’s row is a ‘copy’ icon
:
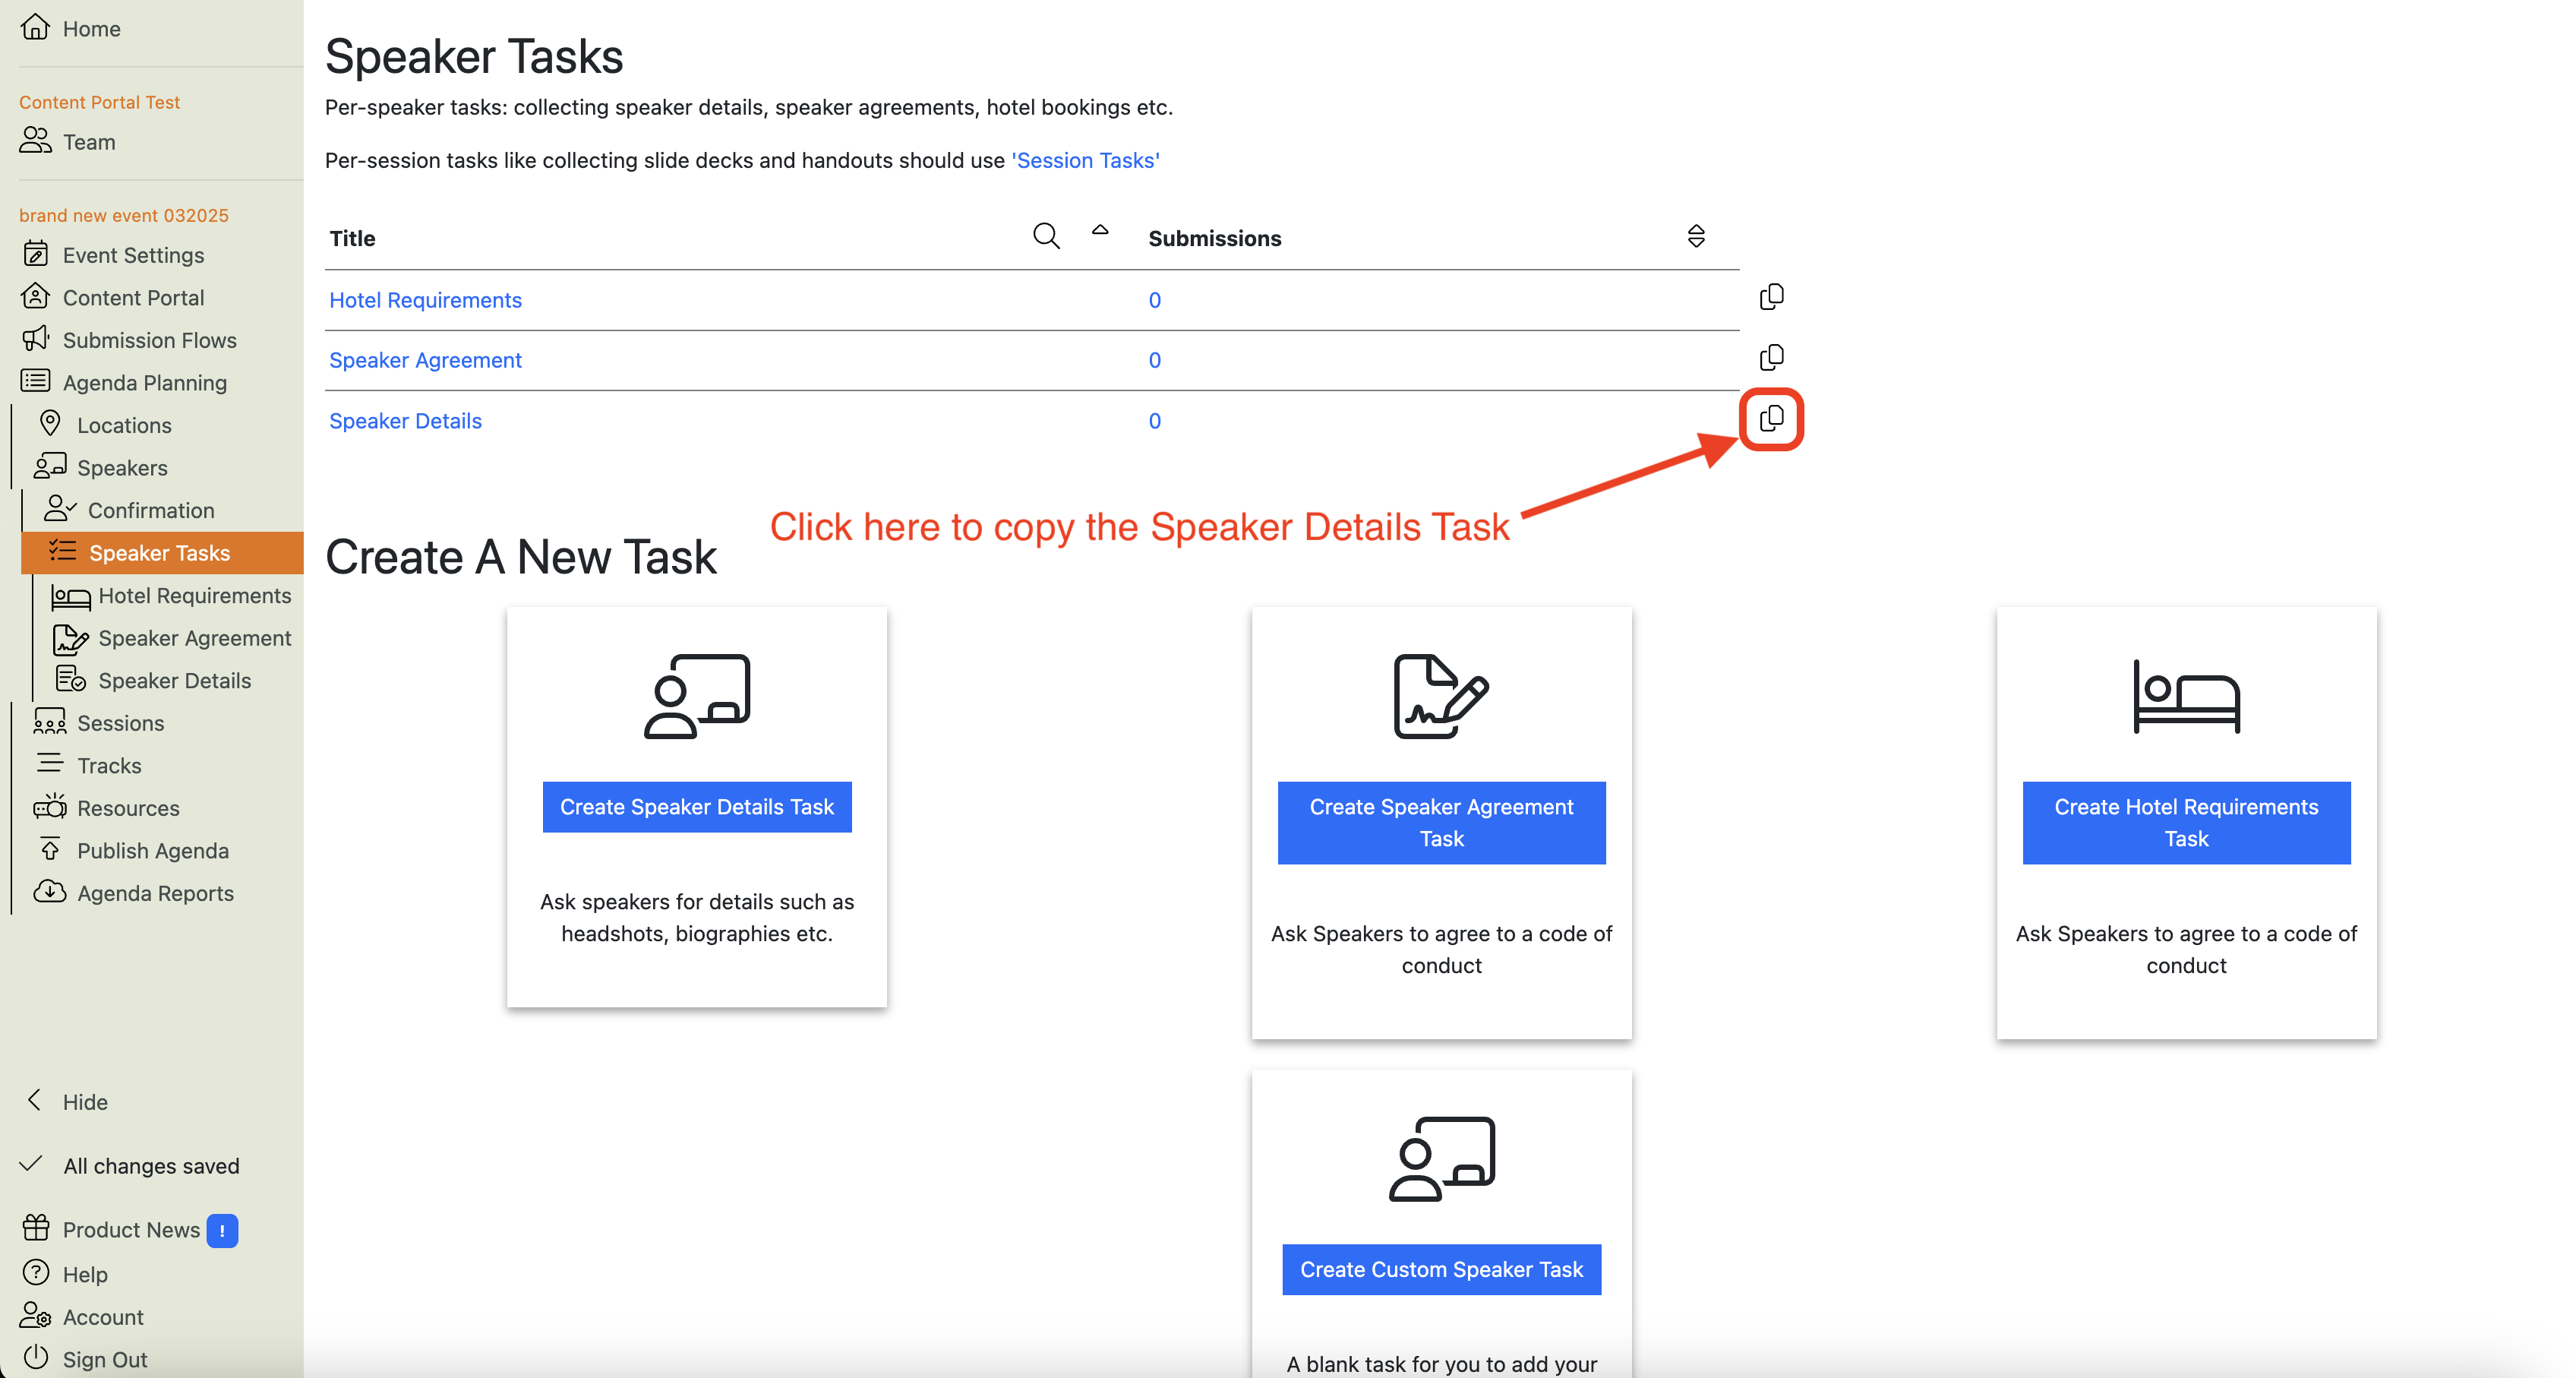

- Click this icon. It will bring up a dialogue box asking for the name of your new Task:
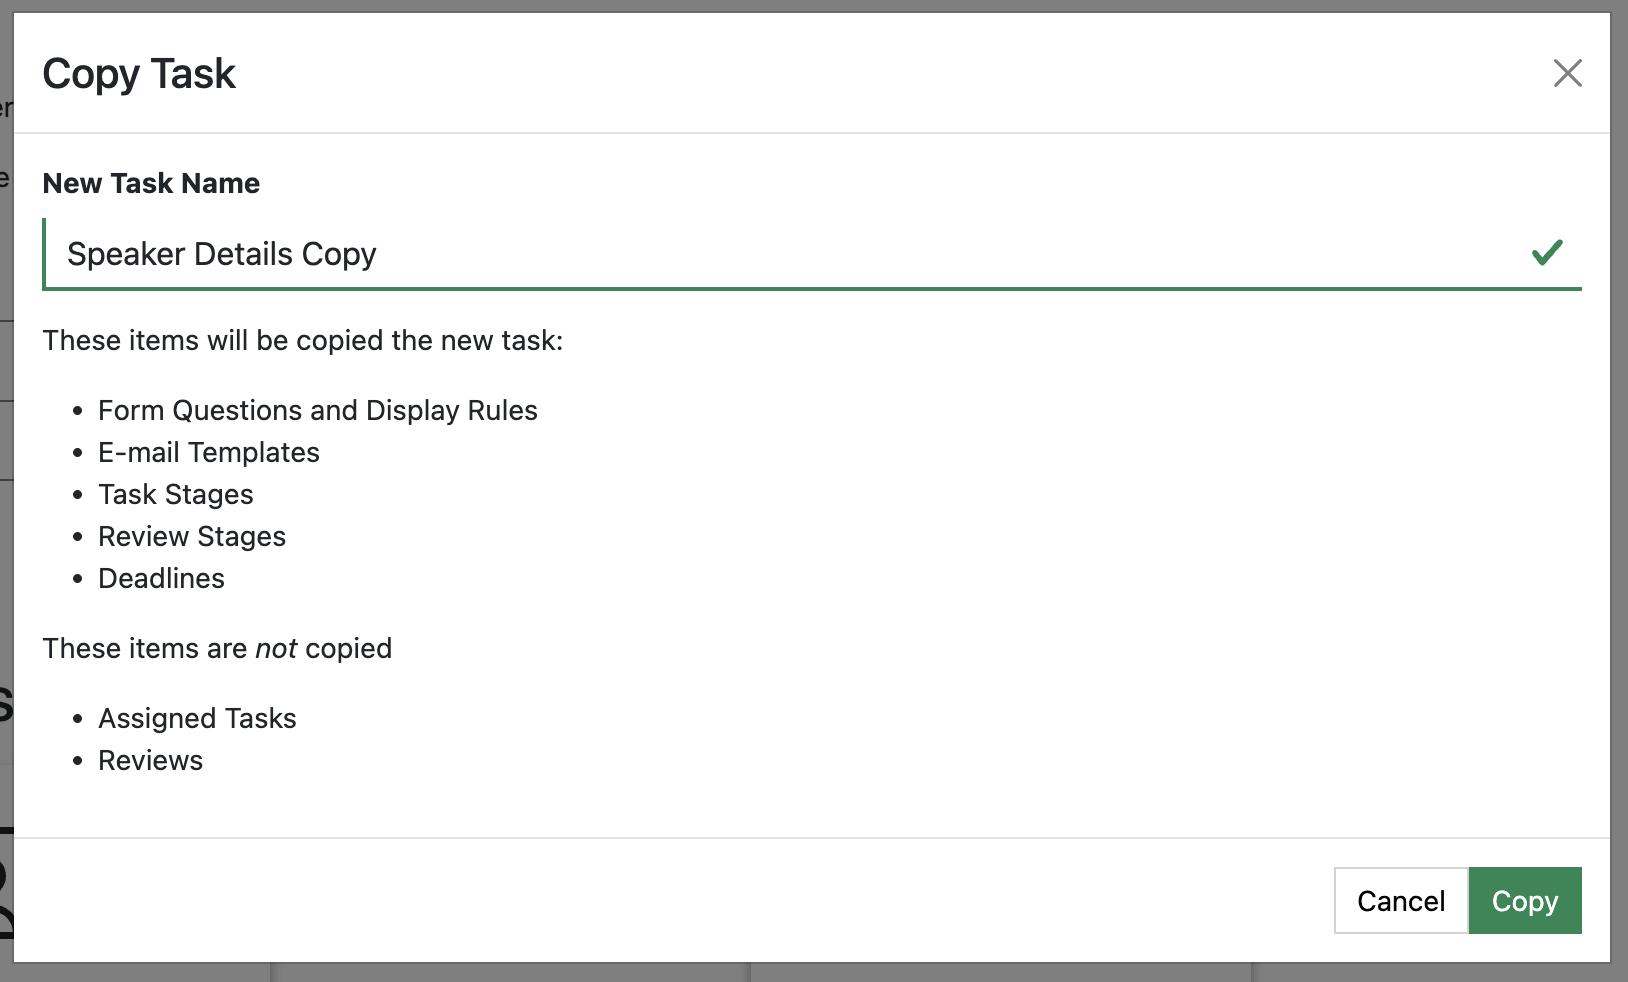

- Give the new task a name and click the Green “Copy” button. You will now have a copy of the original Speaker Task.
How do I delete a Speaker Task?
-
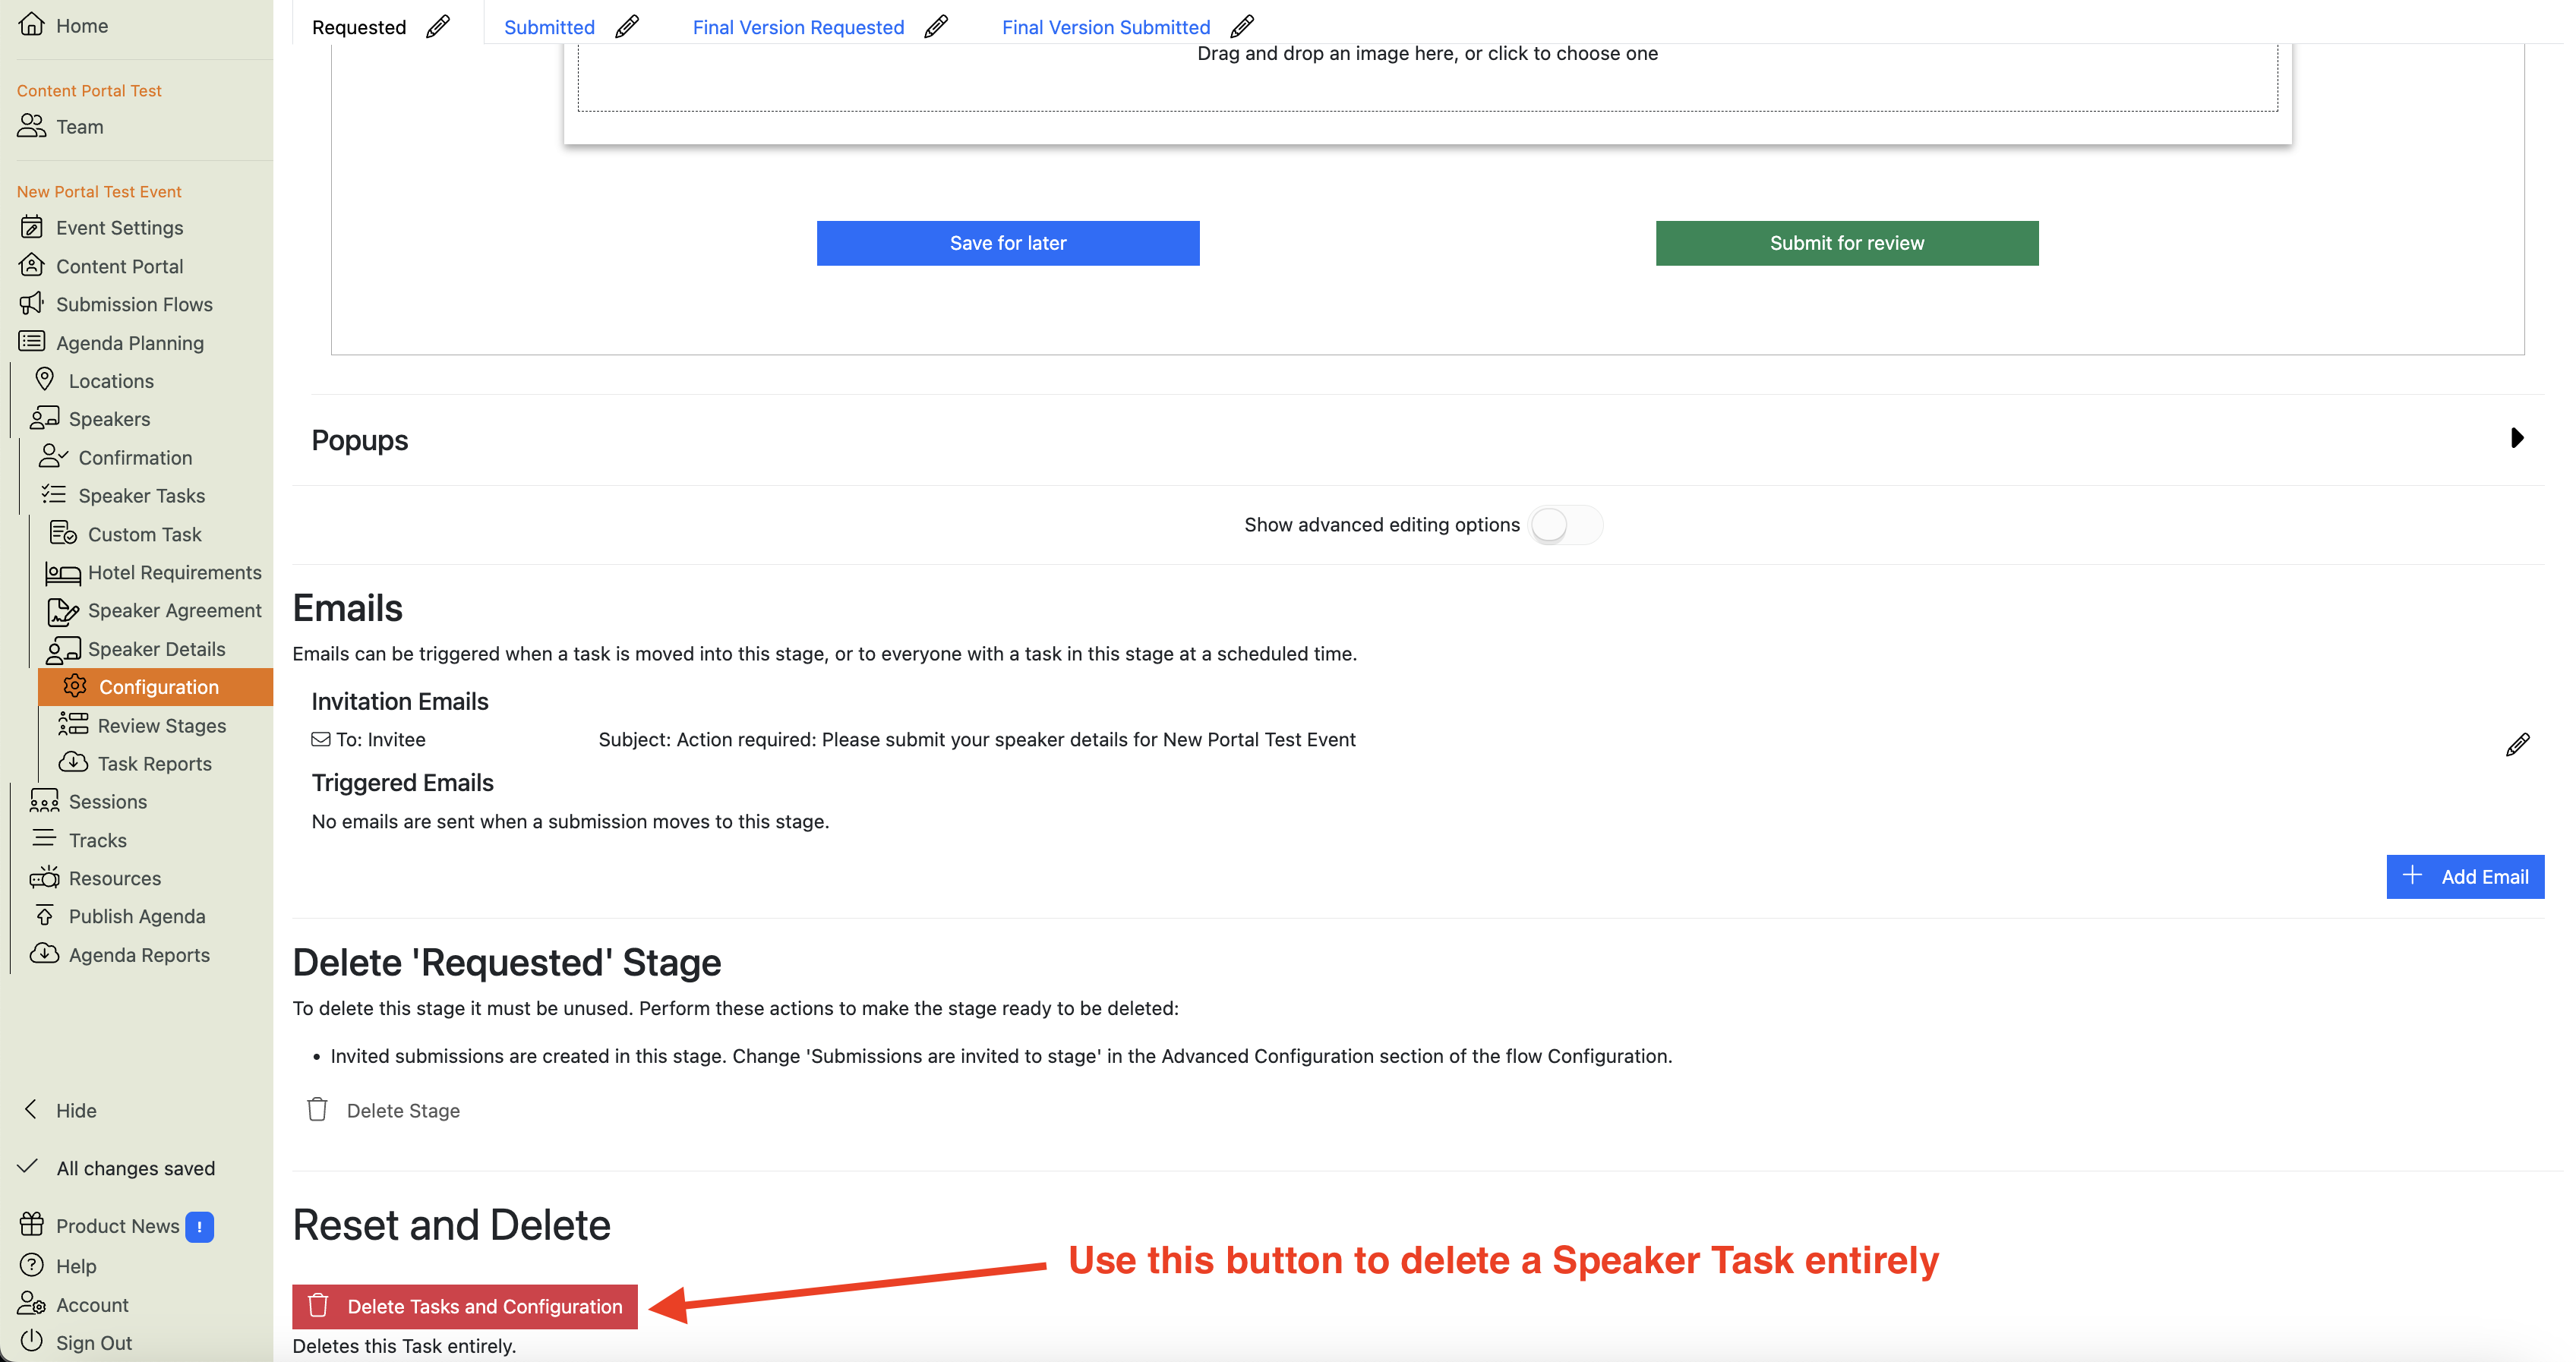
Go to the Speaker Task’s Configuration page and scroll down to the very bottom of the page. Here you will find the “Delete Tasks and Configuration” button:

Warning
This will delete the task configuration and all the data associated with it.
If you’ve assigned the task to Task Owners and they’ve submitted responses, all of those responses will be deleted as well. -
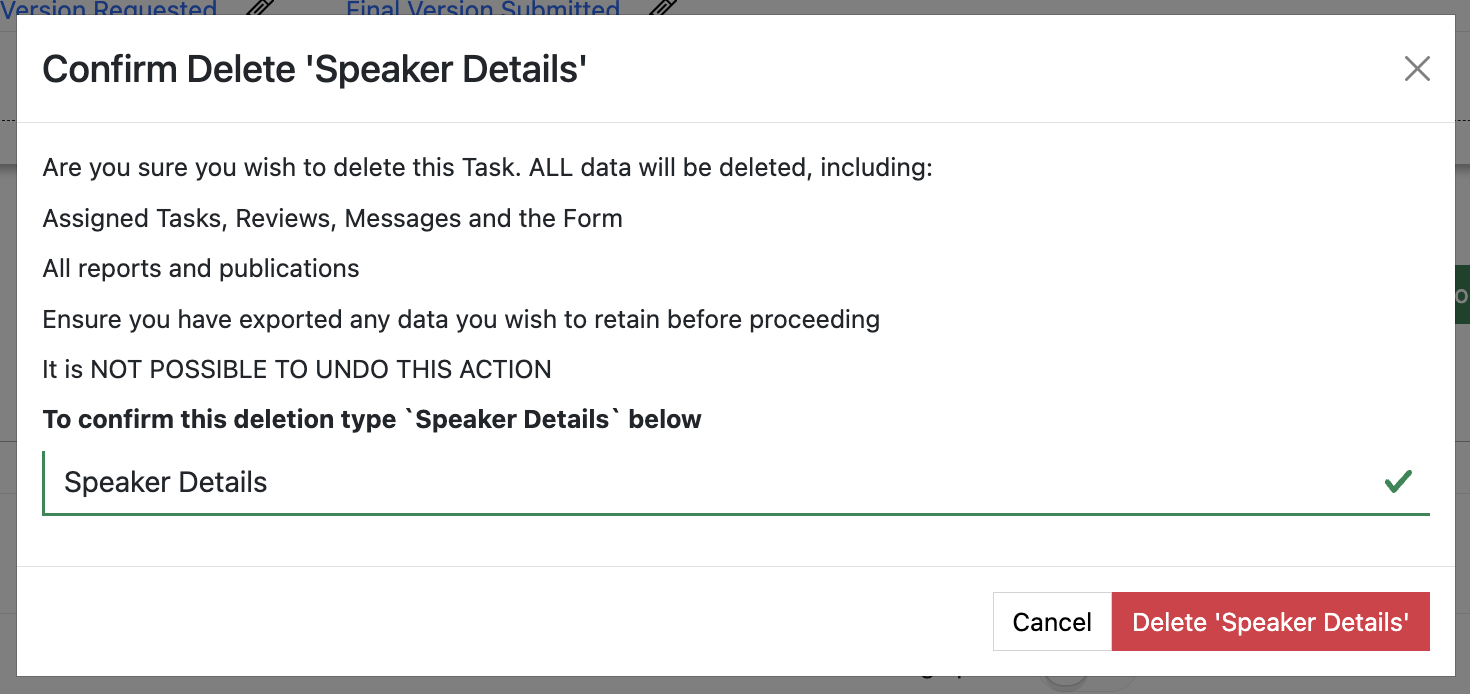
You will be prompted to confirm that you DEFINITELY want to delete the task by typing its name in a form and clicking another delete button:

How do I assign Speaker Tasks?
You can assign Speaker Tasks to Task Owners (usually the speaker themselves, but they can be other people) in a couple of ways:
- Individually
- In bulk (i.e. several at the same time)
Go to / Agenda Planning / Speakers
Here you’ll see the list of your speakers, and (once you’ve set up some tasks) a column for each task.
In each task’s column is a ‘status button’ which shows you the status of that task for each speaker.


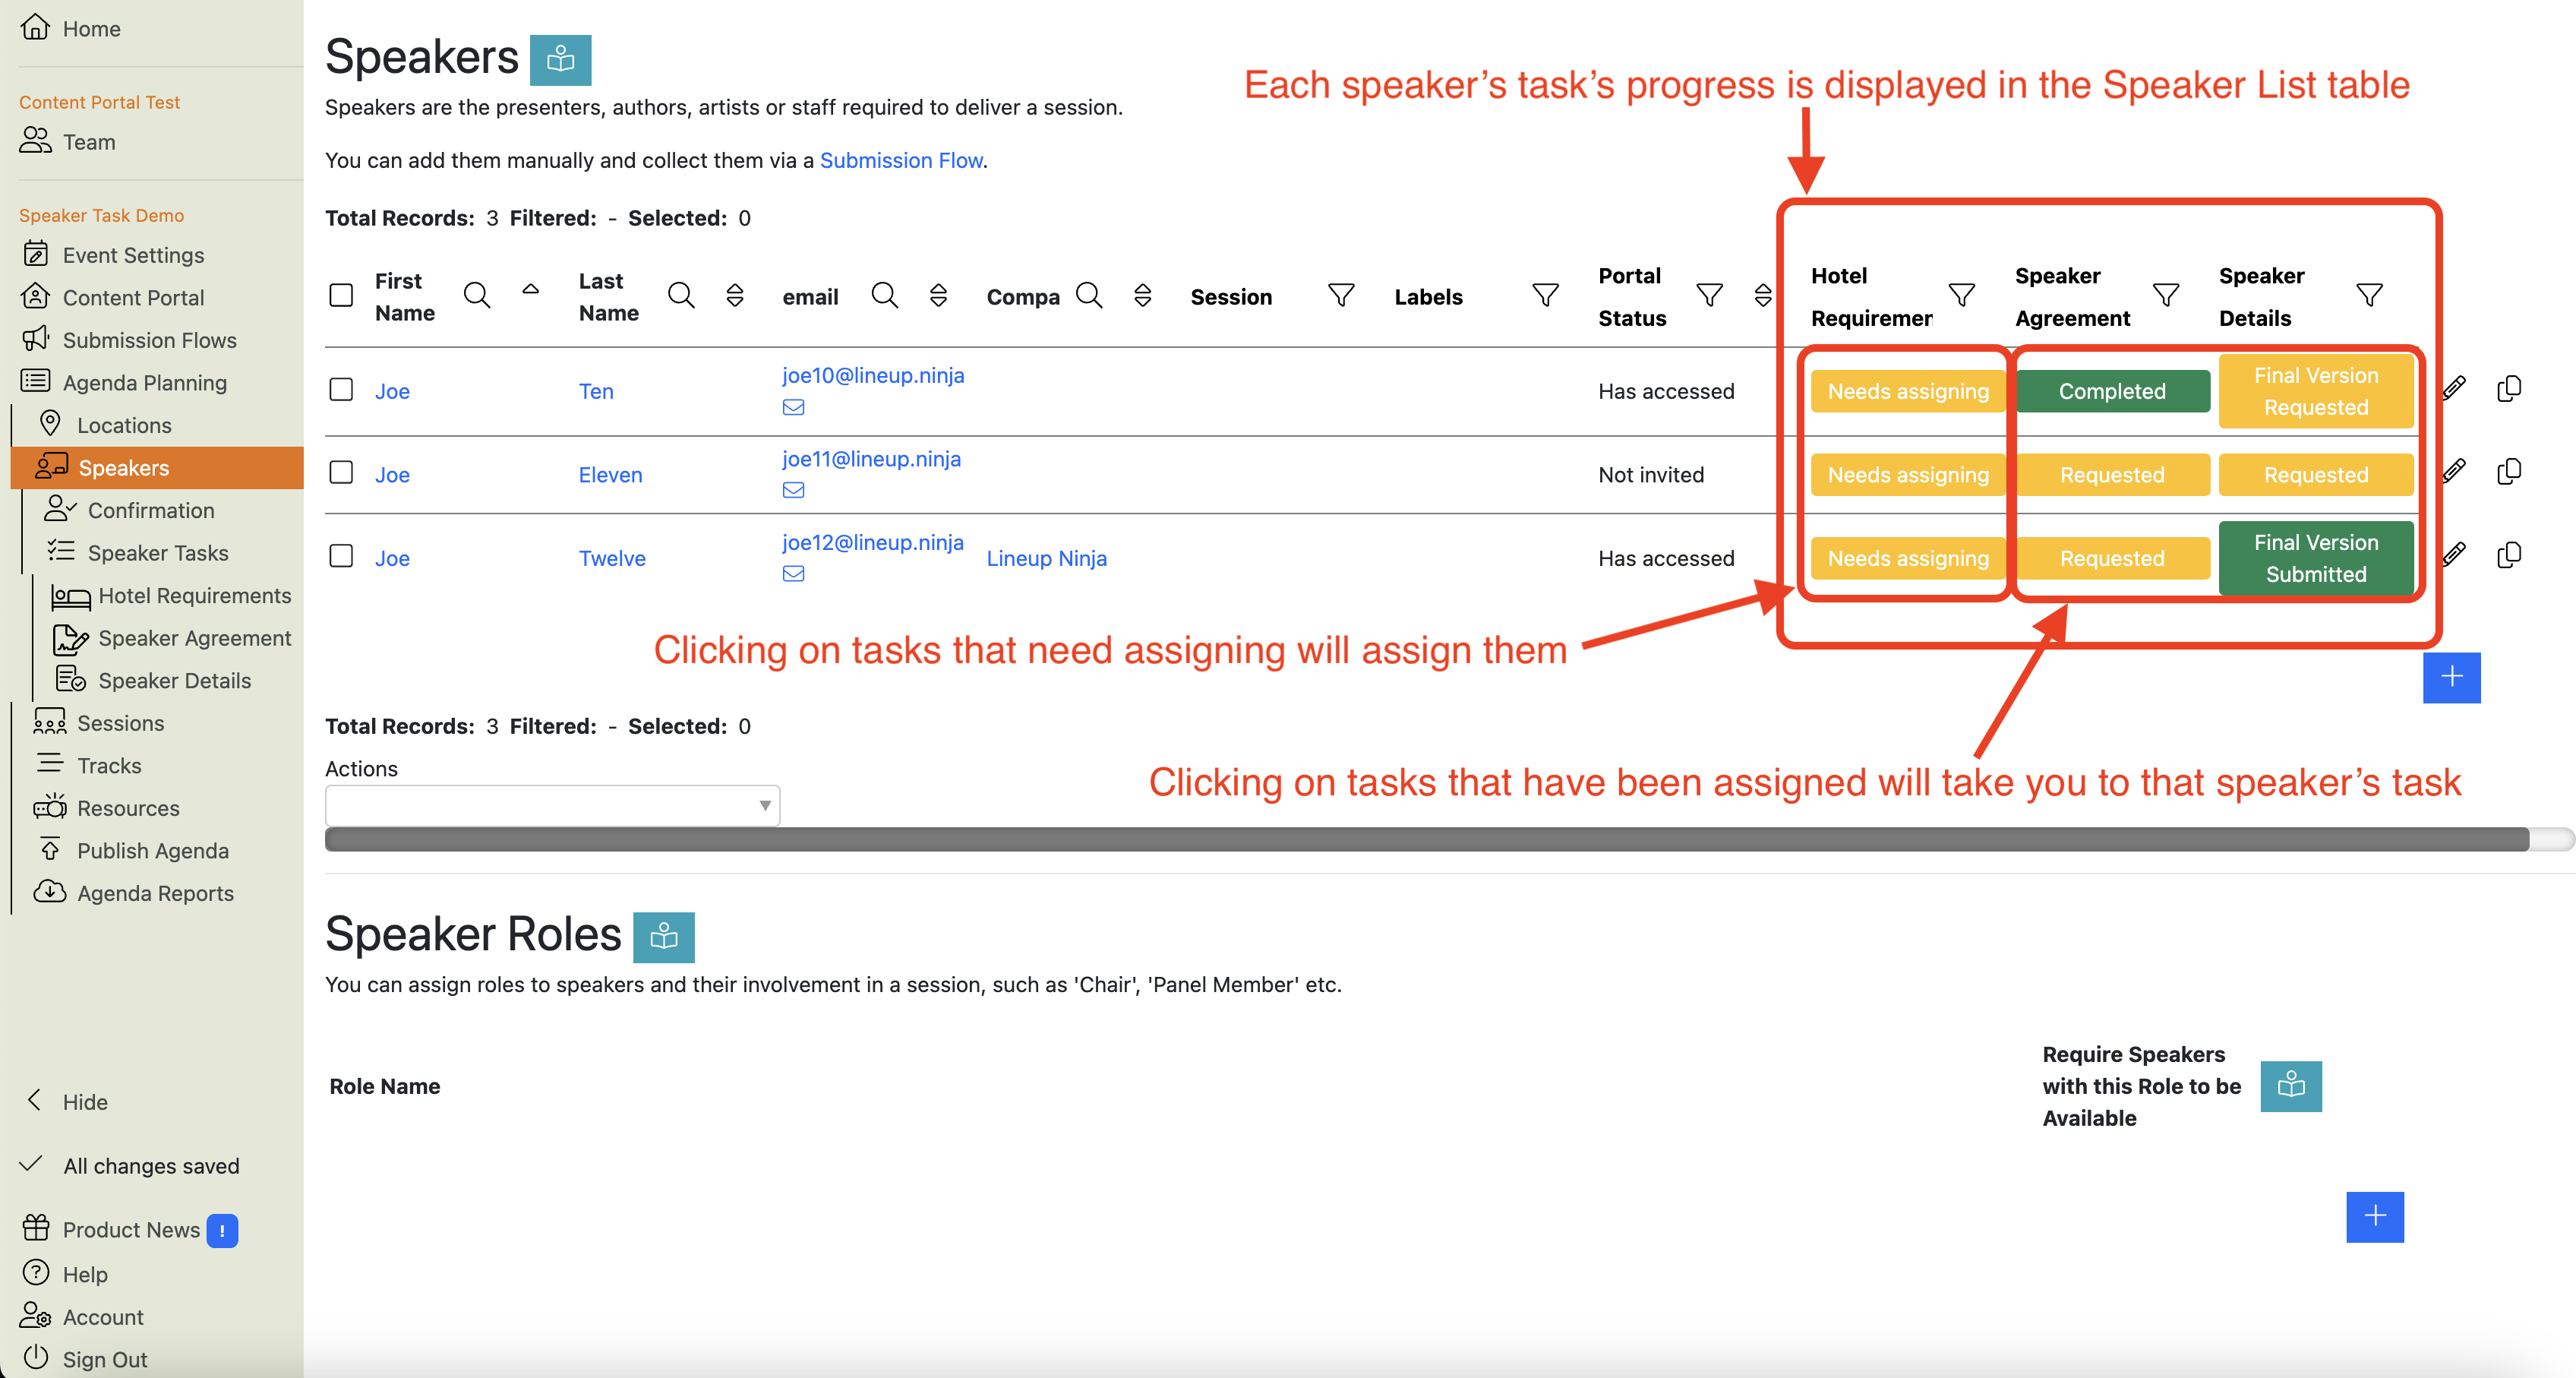
If you hover over the ‘Needs assigning’ button, it reveals an information popup. This popup tells you why the task needs to be performed for this speaker, and who the task will be assigned to (i.e. who will be the Task Owner) when you click the button.
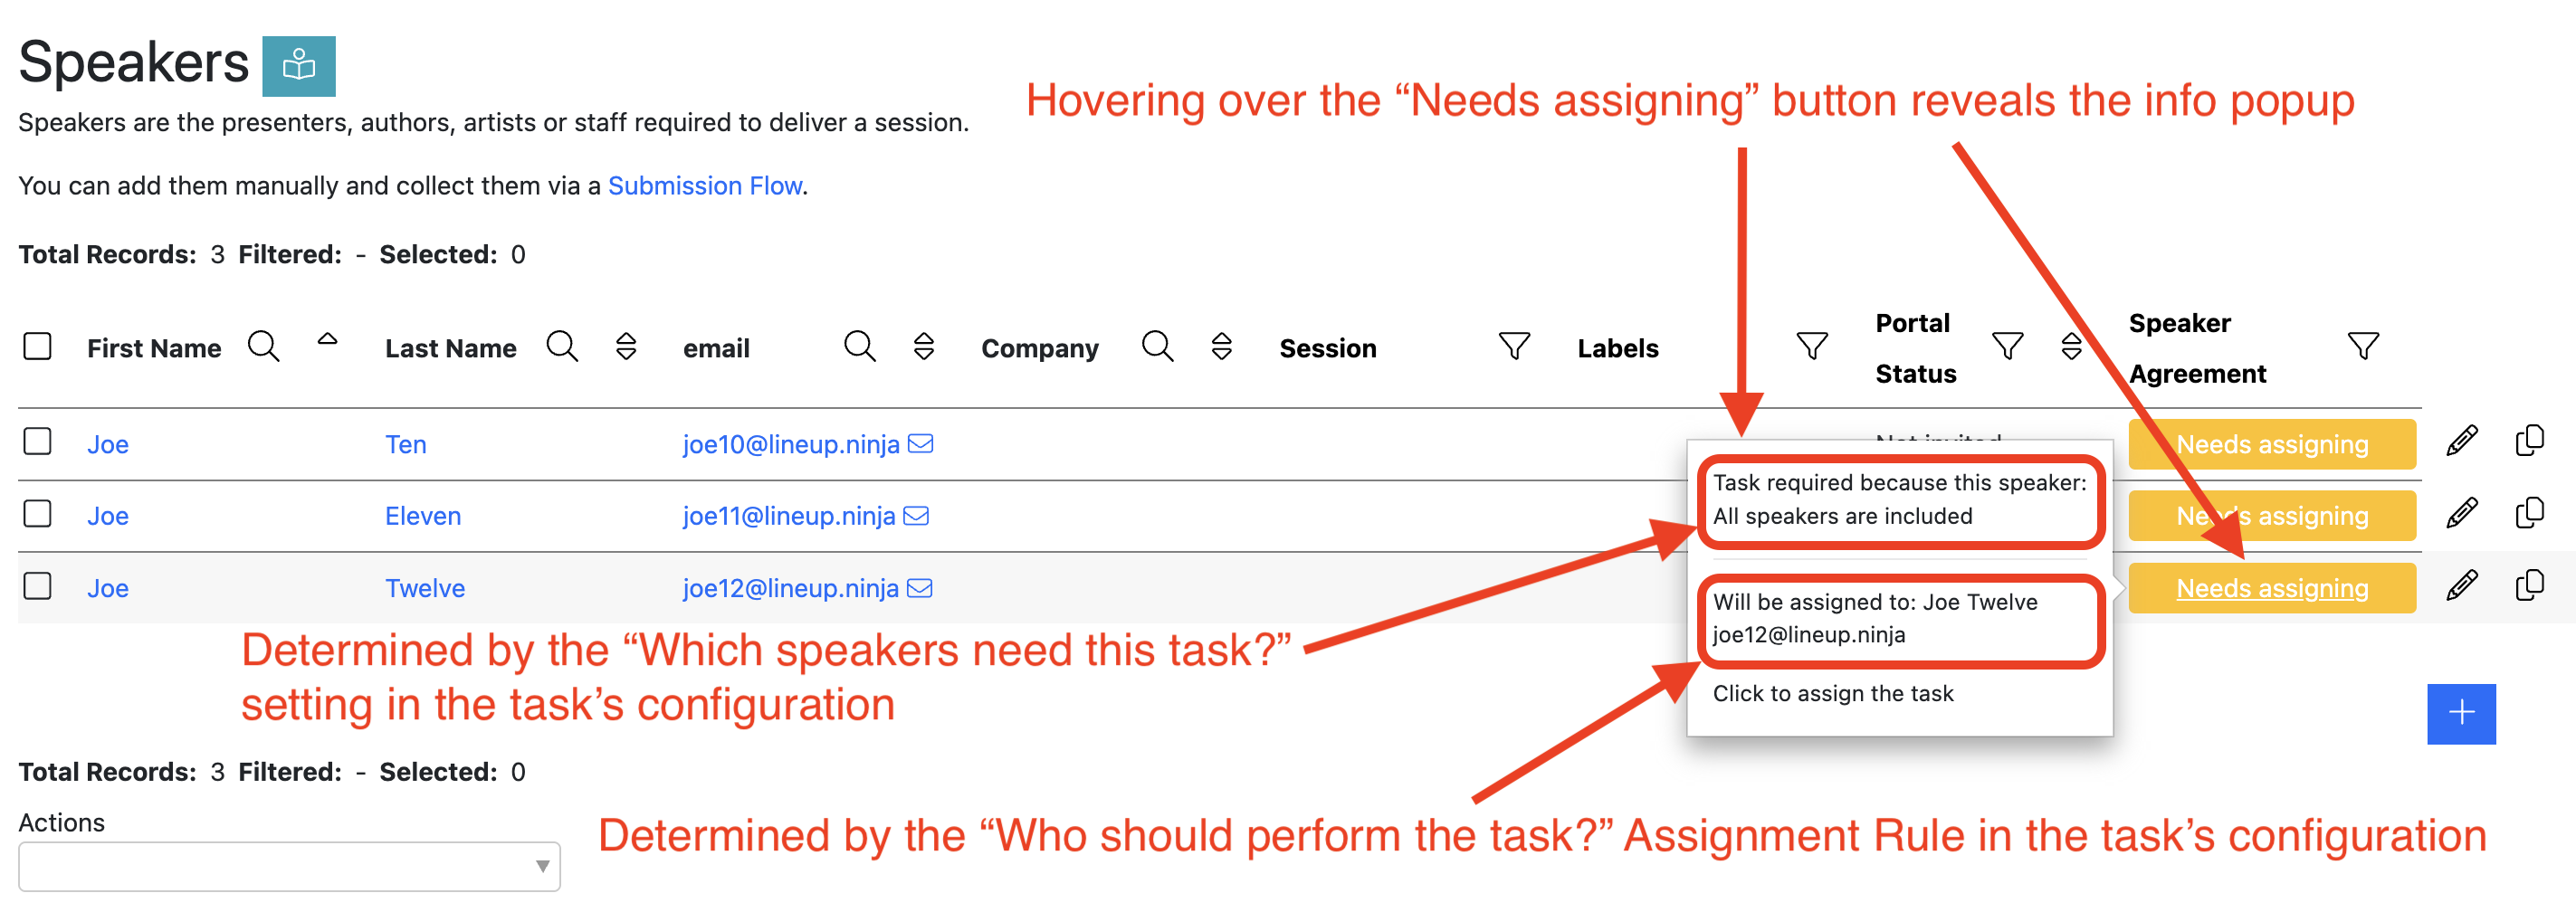

To assign a task to an individual speaker, click the orange ‘Needs assigning’ button in that speaker’s row.
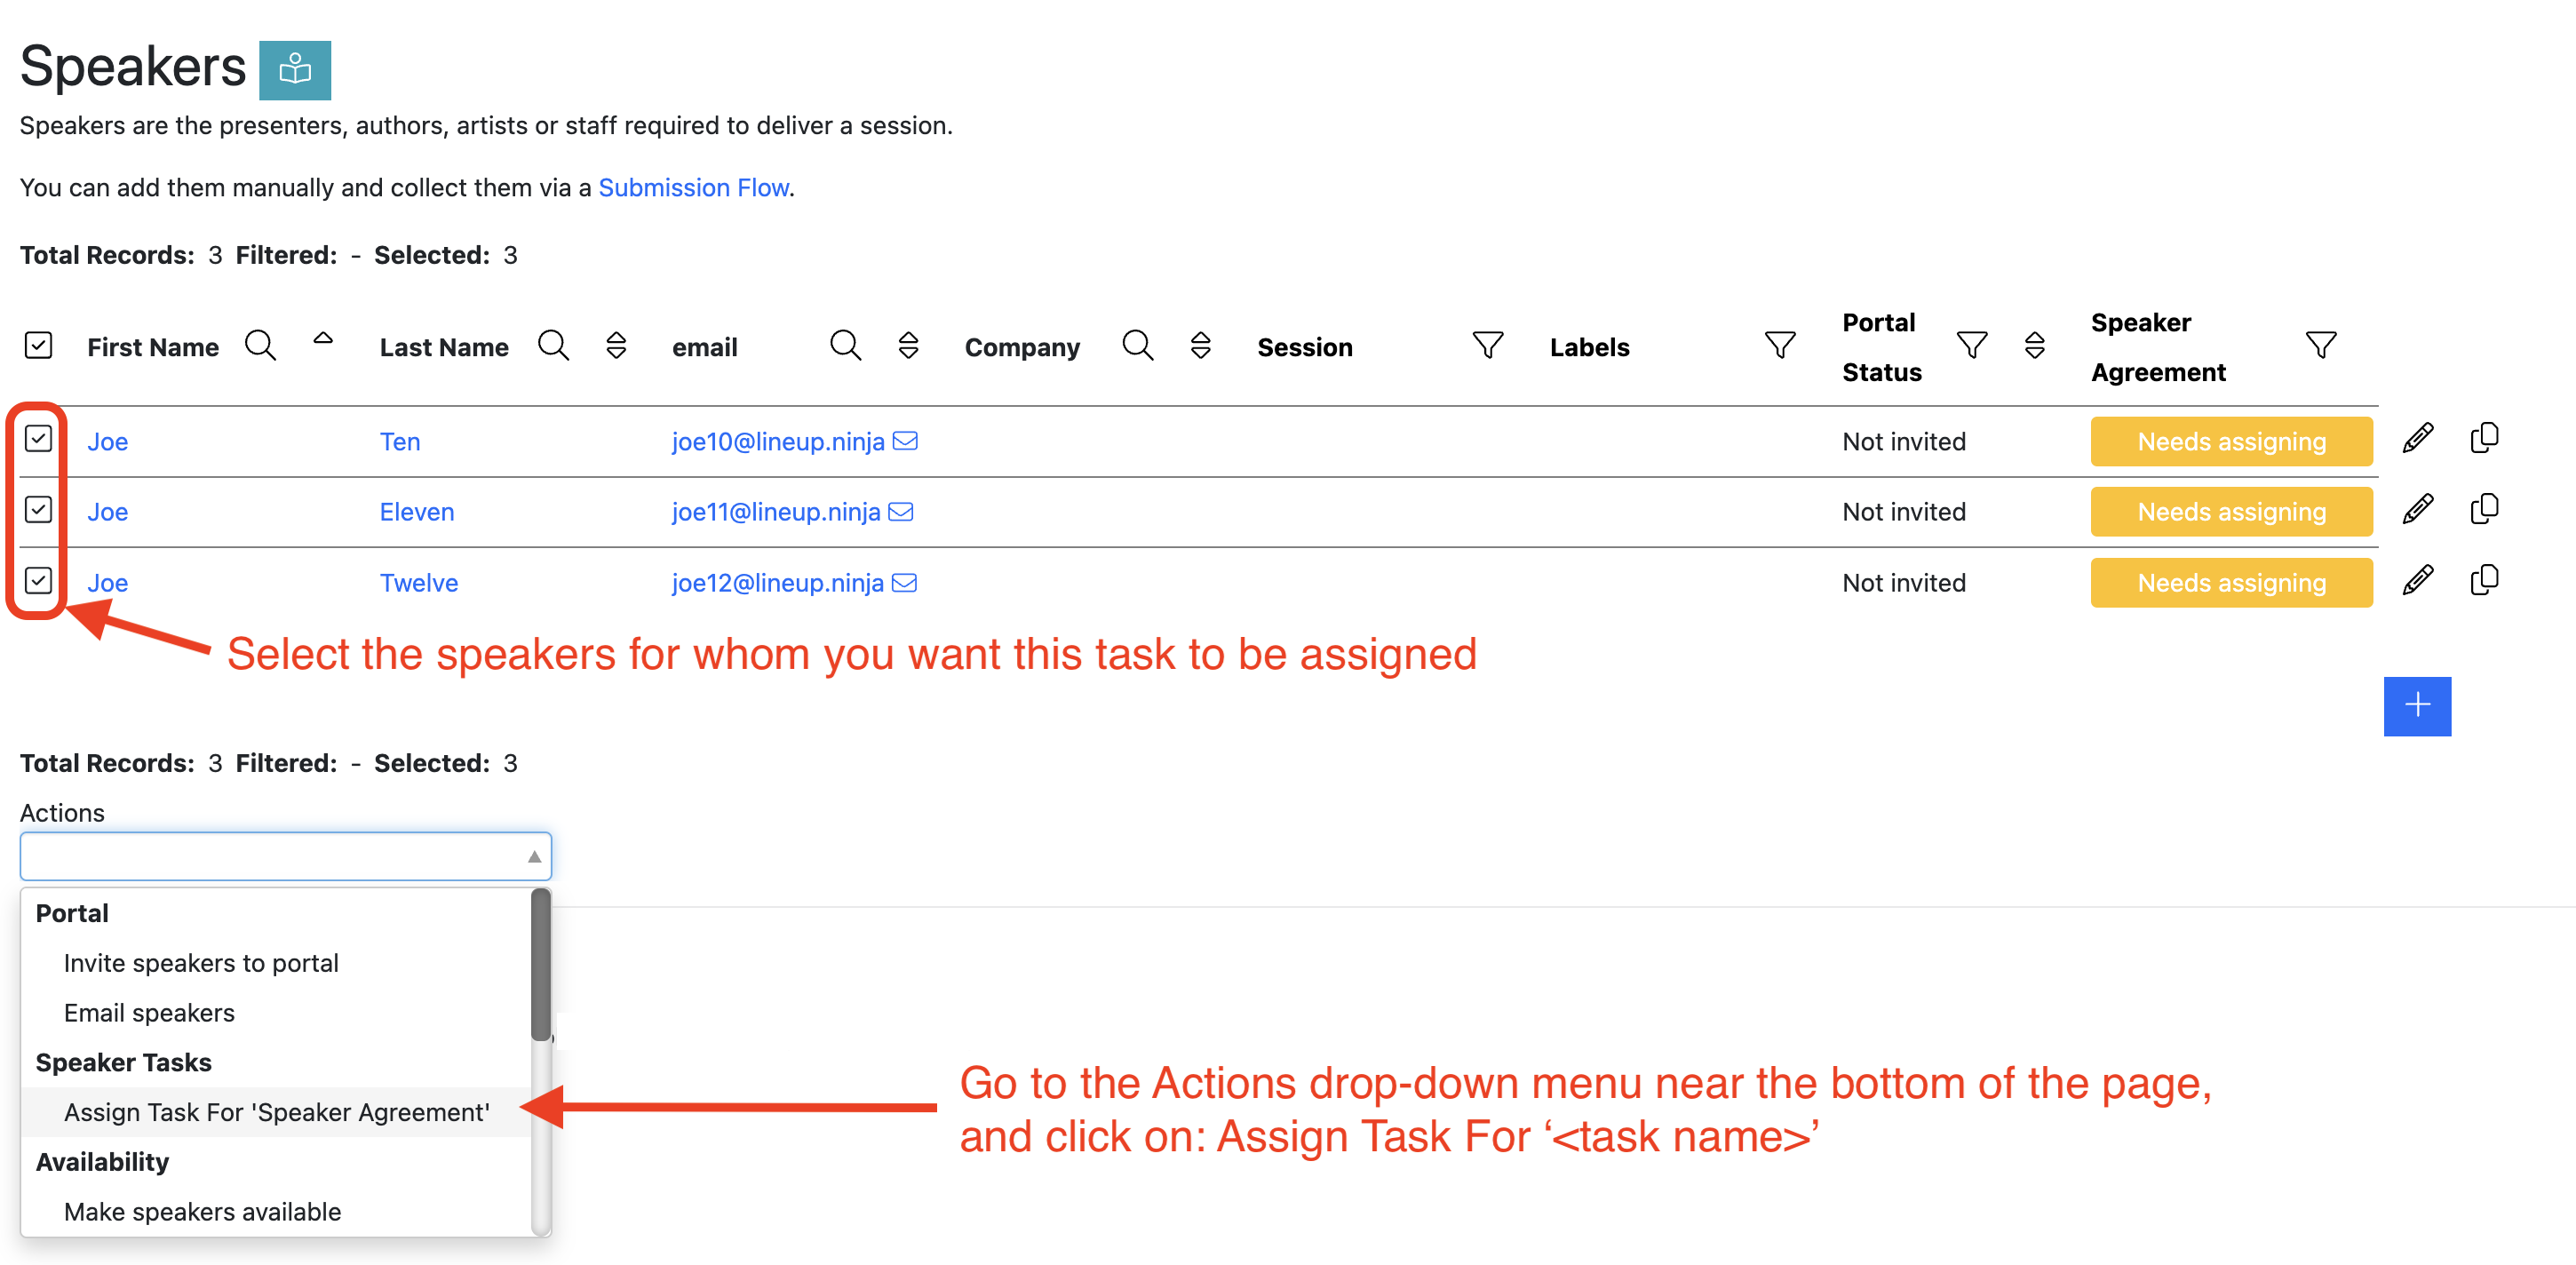
To assign a task in bulk (i.e. to assign the task to several speakers at the same time):
- select all of the speakers who you want to assign the task to.
- Scroll down to the ‘Actions’ drop-down menu at the bottom of the page
- Click on ‘Assign Task For <Task Name>’:

Next you will see the email template that is associated with the Task’s “Requested” stage. If you like, you can edit it for this instance of sending: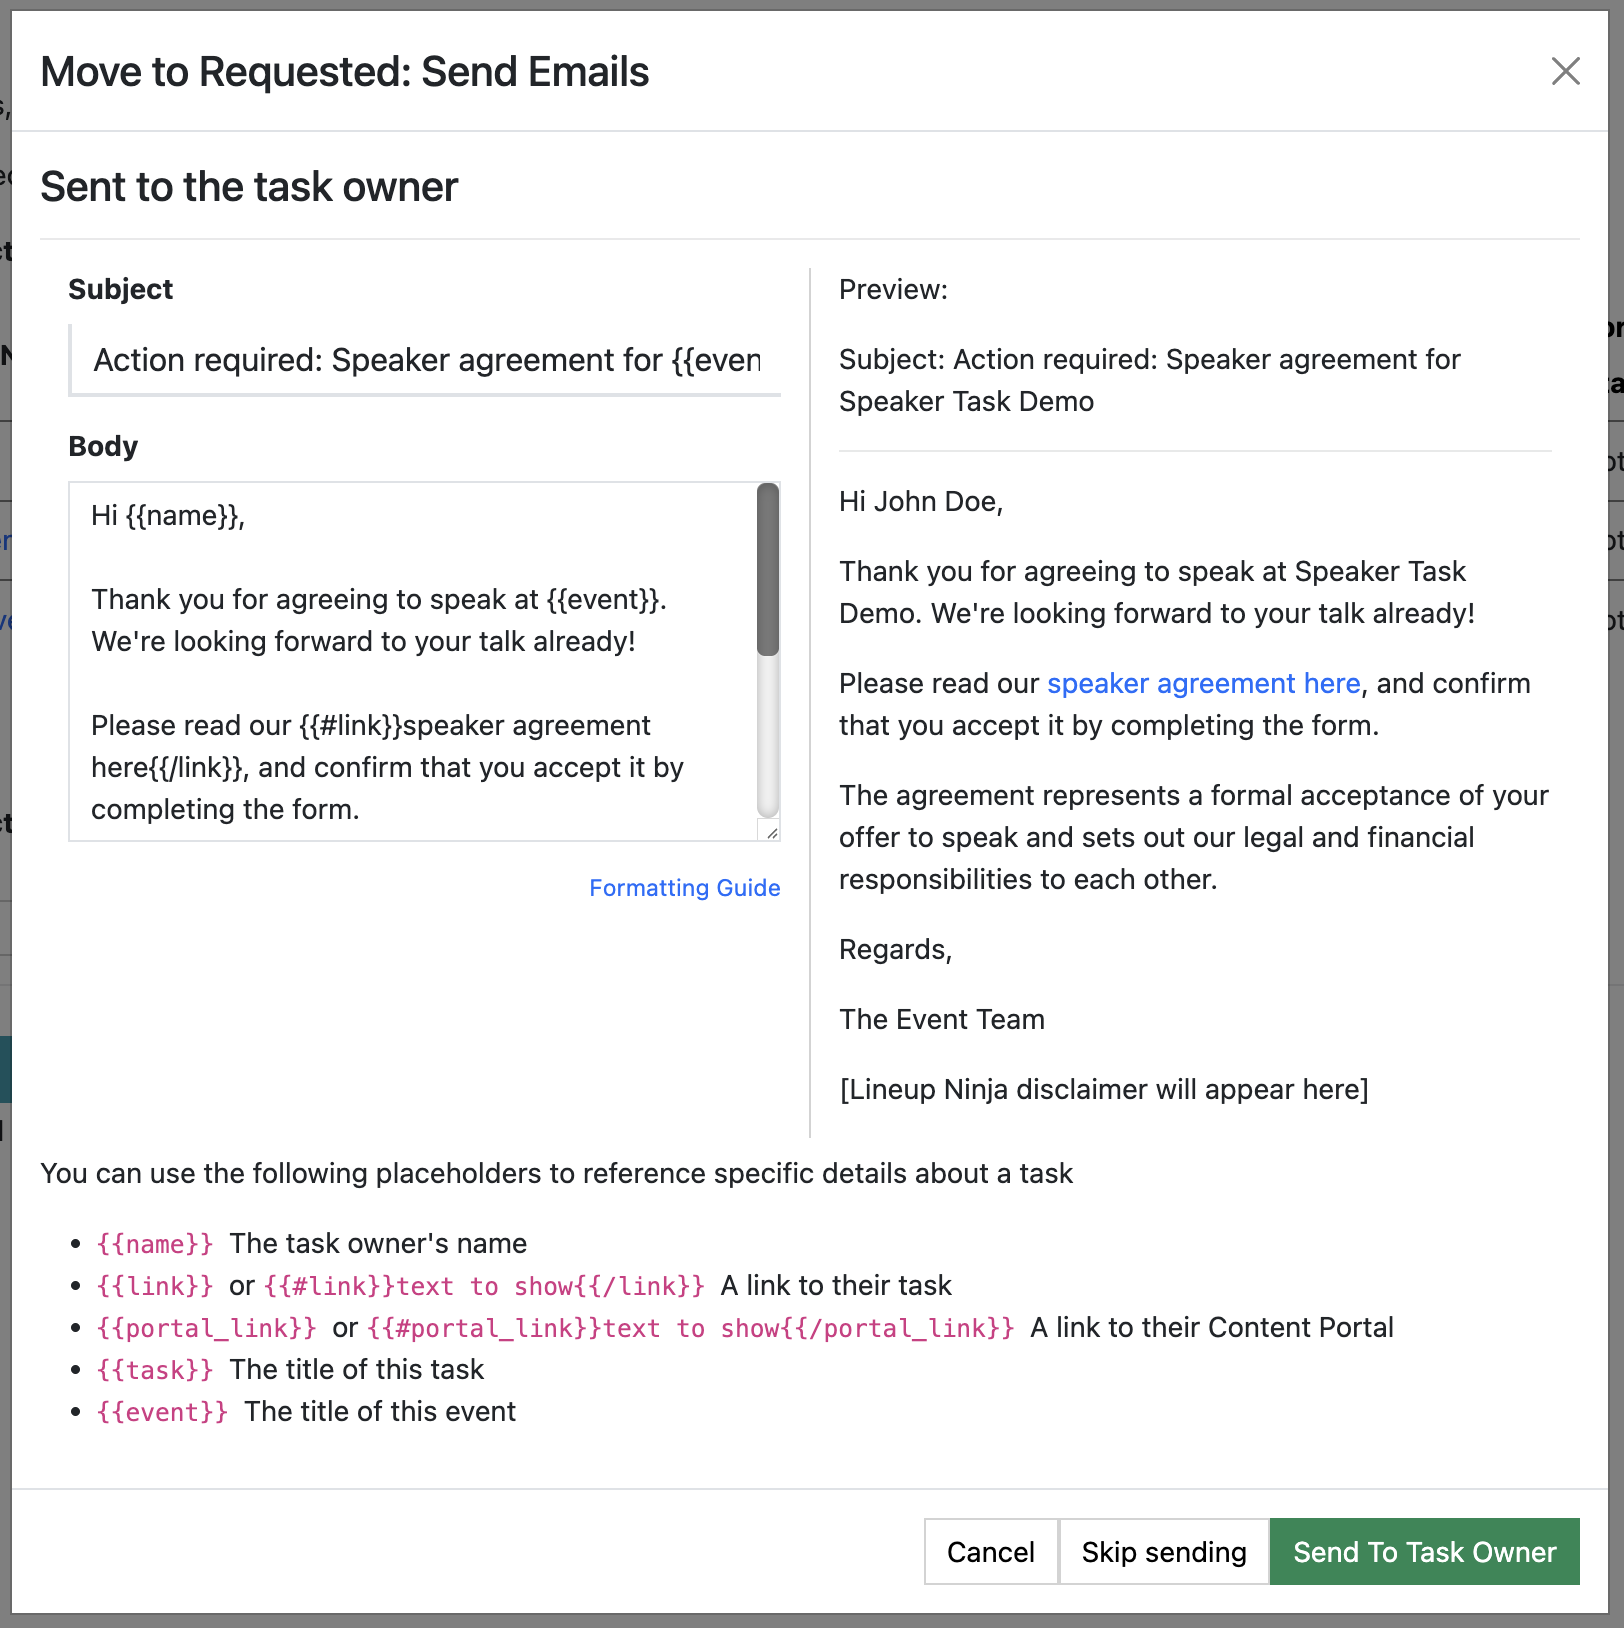

Click ‘Send to Task Owner’ to send them the email.
You can also opt to NOT send the email to Task Owners if you wish, by clicking ‘Skip sending’.**
**In both cases, the task will be created and assigned to the Task Owner, which will make it visible to them in the ‘My Tasks’ section of the content portal.
Once the task has been assigned, the button in the Task’s colum in the speaker list will change to say ‘Requested’. If you hover over the button, you will see who the Task has been assigned to. In this example, it is simply the speaker themselves:

How do I manage/track Speaker Tasks?
You can track the status of speaker tasks and manage them in a couple of places: the Speaker list and the Task’s page.
The speaker list shows the list of all speakers, with a column for each task. This gives you a good overview of every speaker’s tasks’ status. You can also click these buttons to either assign the tasks or, once the task has been assigned, see the details of that task:

You can see more detail of a specific task by navigating to that task’s home page at: /agenda Planning / Speakers / Speaker Tasks / <task name>
Here you can filter tasks by stage, search for speakers, Task Owners, sort by Updated time, and perform a wide range of actions on tasks.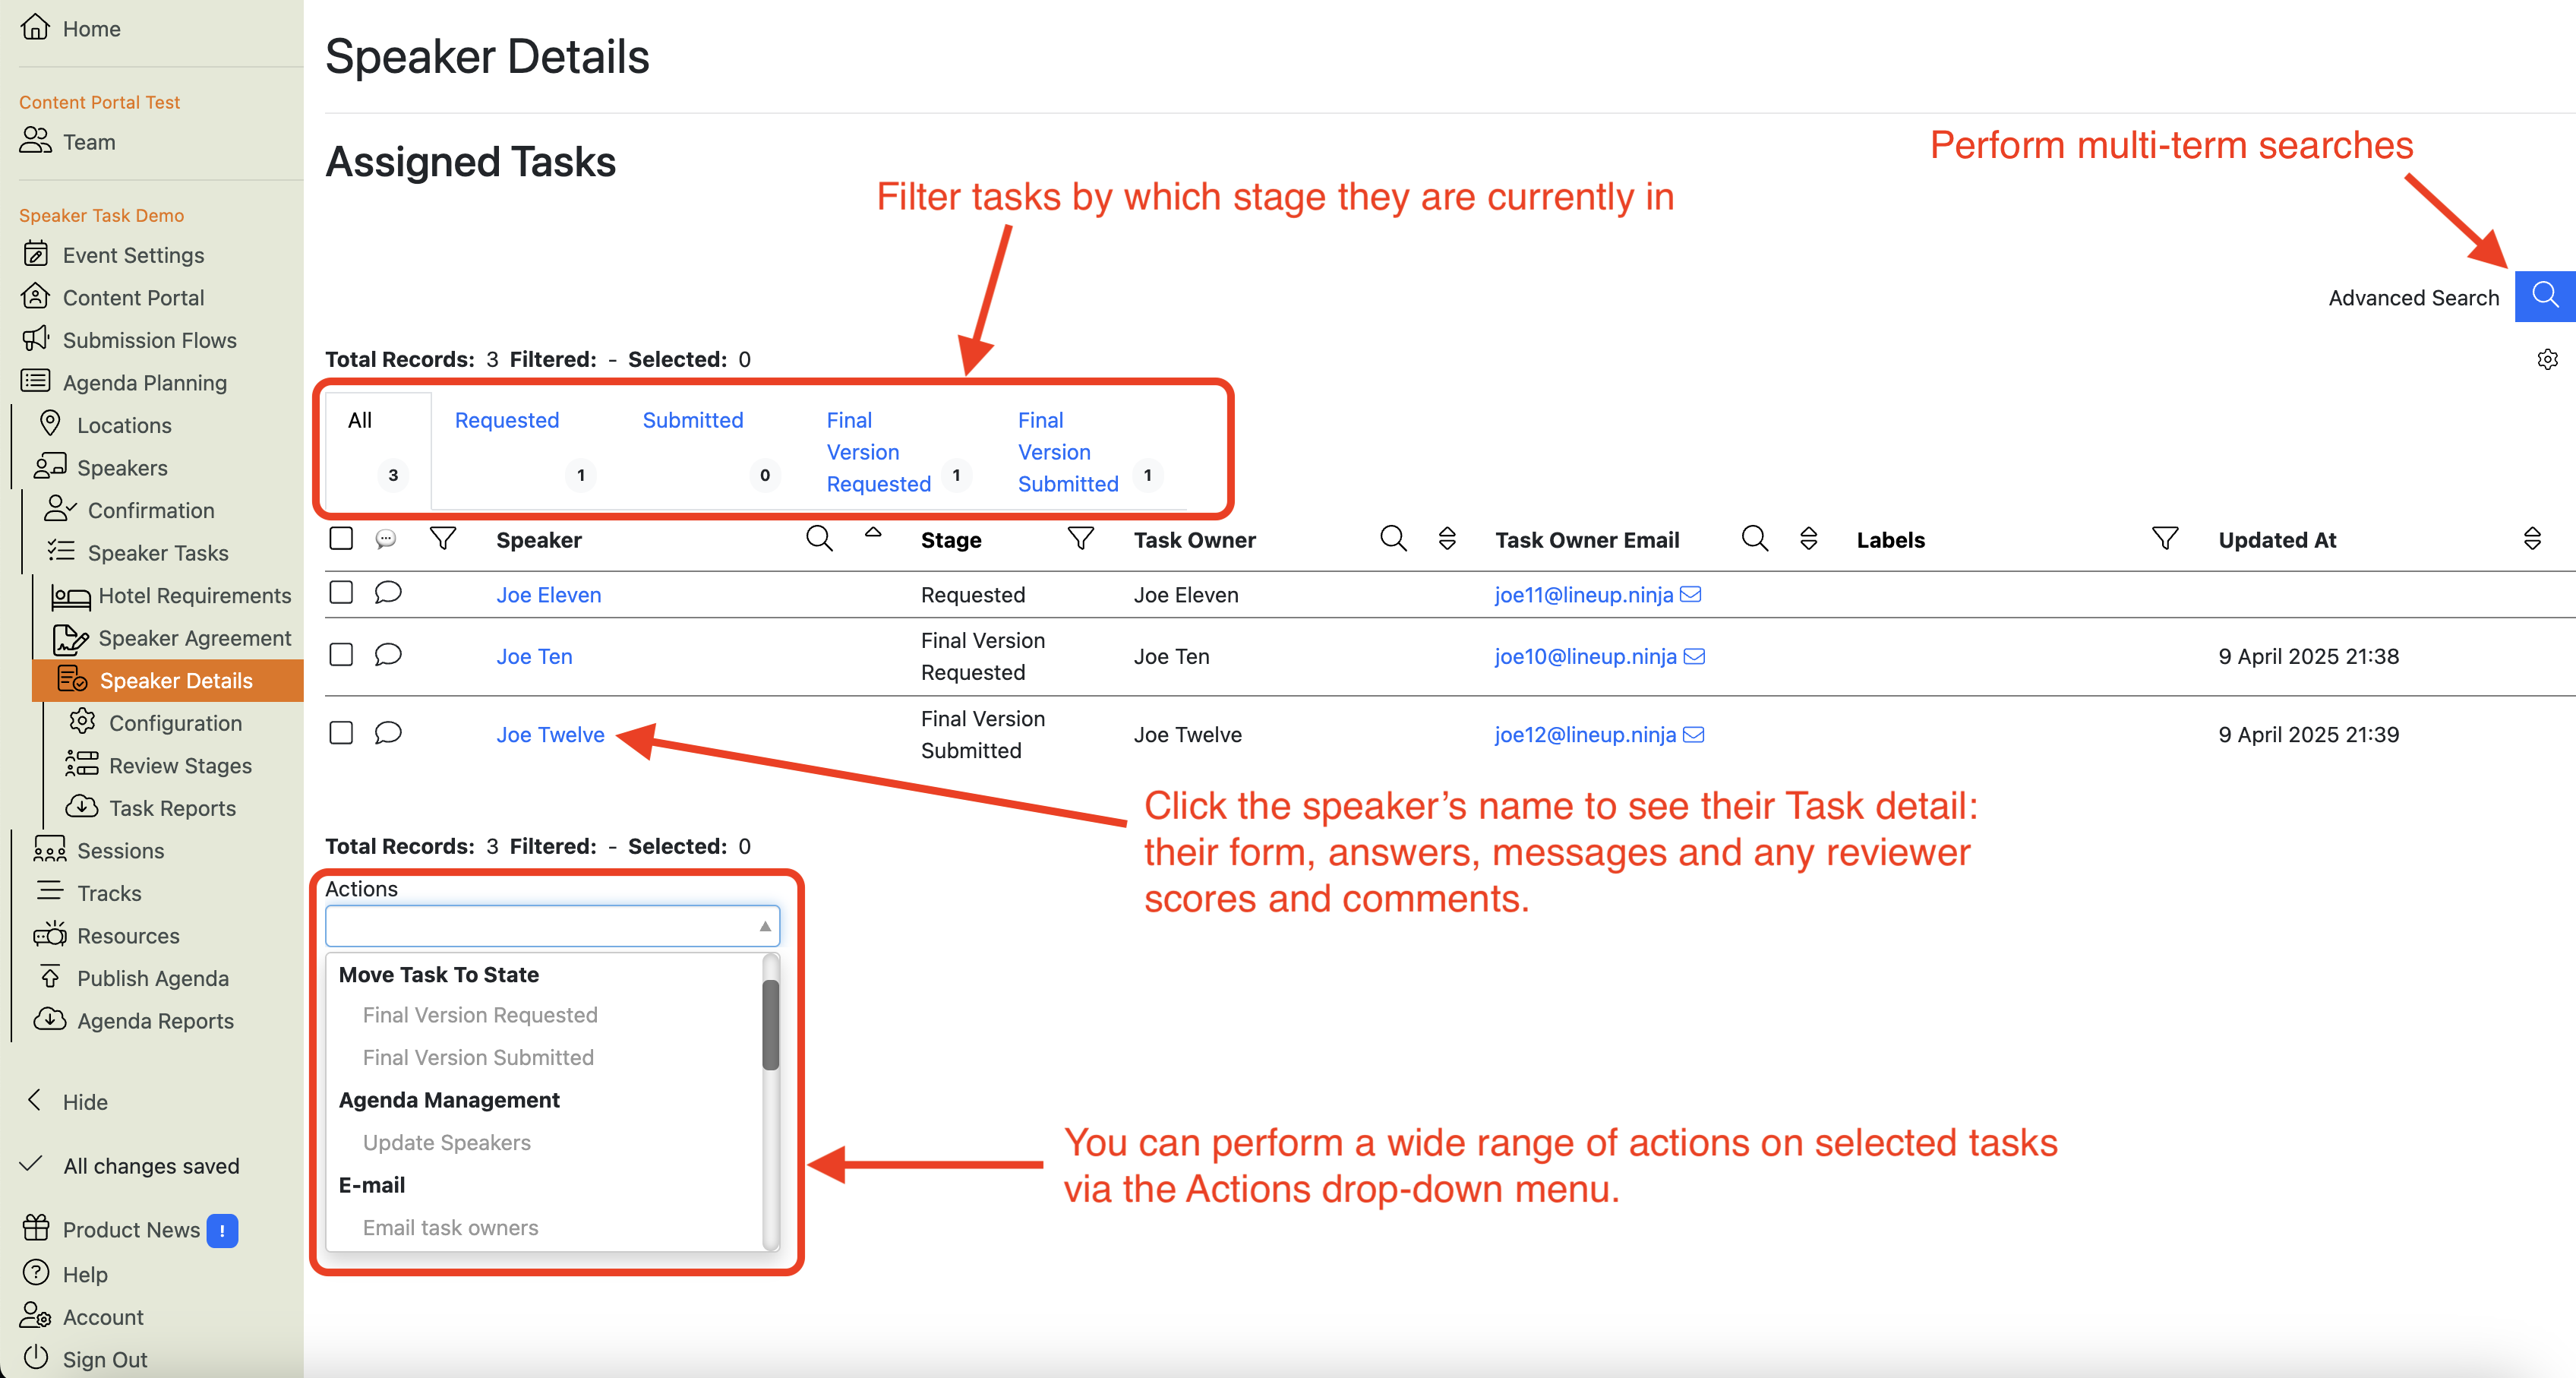

How do I run a report of a Speaker Task’s status?
Navigate to / Agenda Planning / Speakers / Speaker Tasks / <task name> / Task Reports
Here you will see the option to create new reports of various types. They all work exactly the same as their ‘Submission Reports’ counterparts:
-
Spreadsheet Reports - export your data to spreadsheet & CSV formats
-
ZIP Reports - export any attached files to zip archives
-
JSON report - export your data in a machine-readable format
