Content Portal: Home Page
The Home Page is what portal users see once they’ve logged in. It can contain several sections that users can interact with.
This page explains:
- What each section is for
- How to add, edit, reorder and delete sections
- How you can use Display Rules to show different sections to different users
What does each section of the Home Page in the Content Portal do?
The Home Page has several sections. Each of which performs different functions:
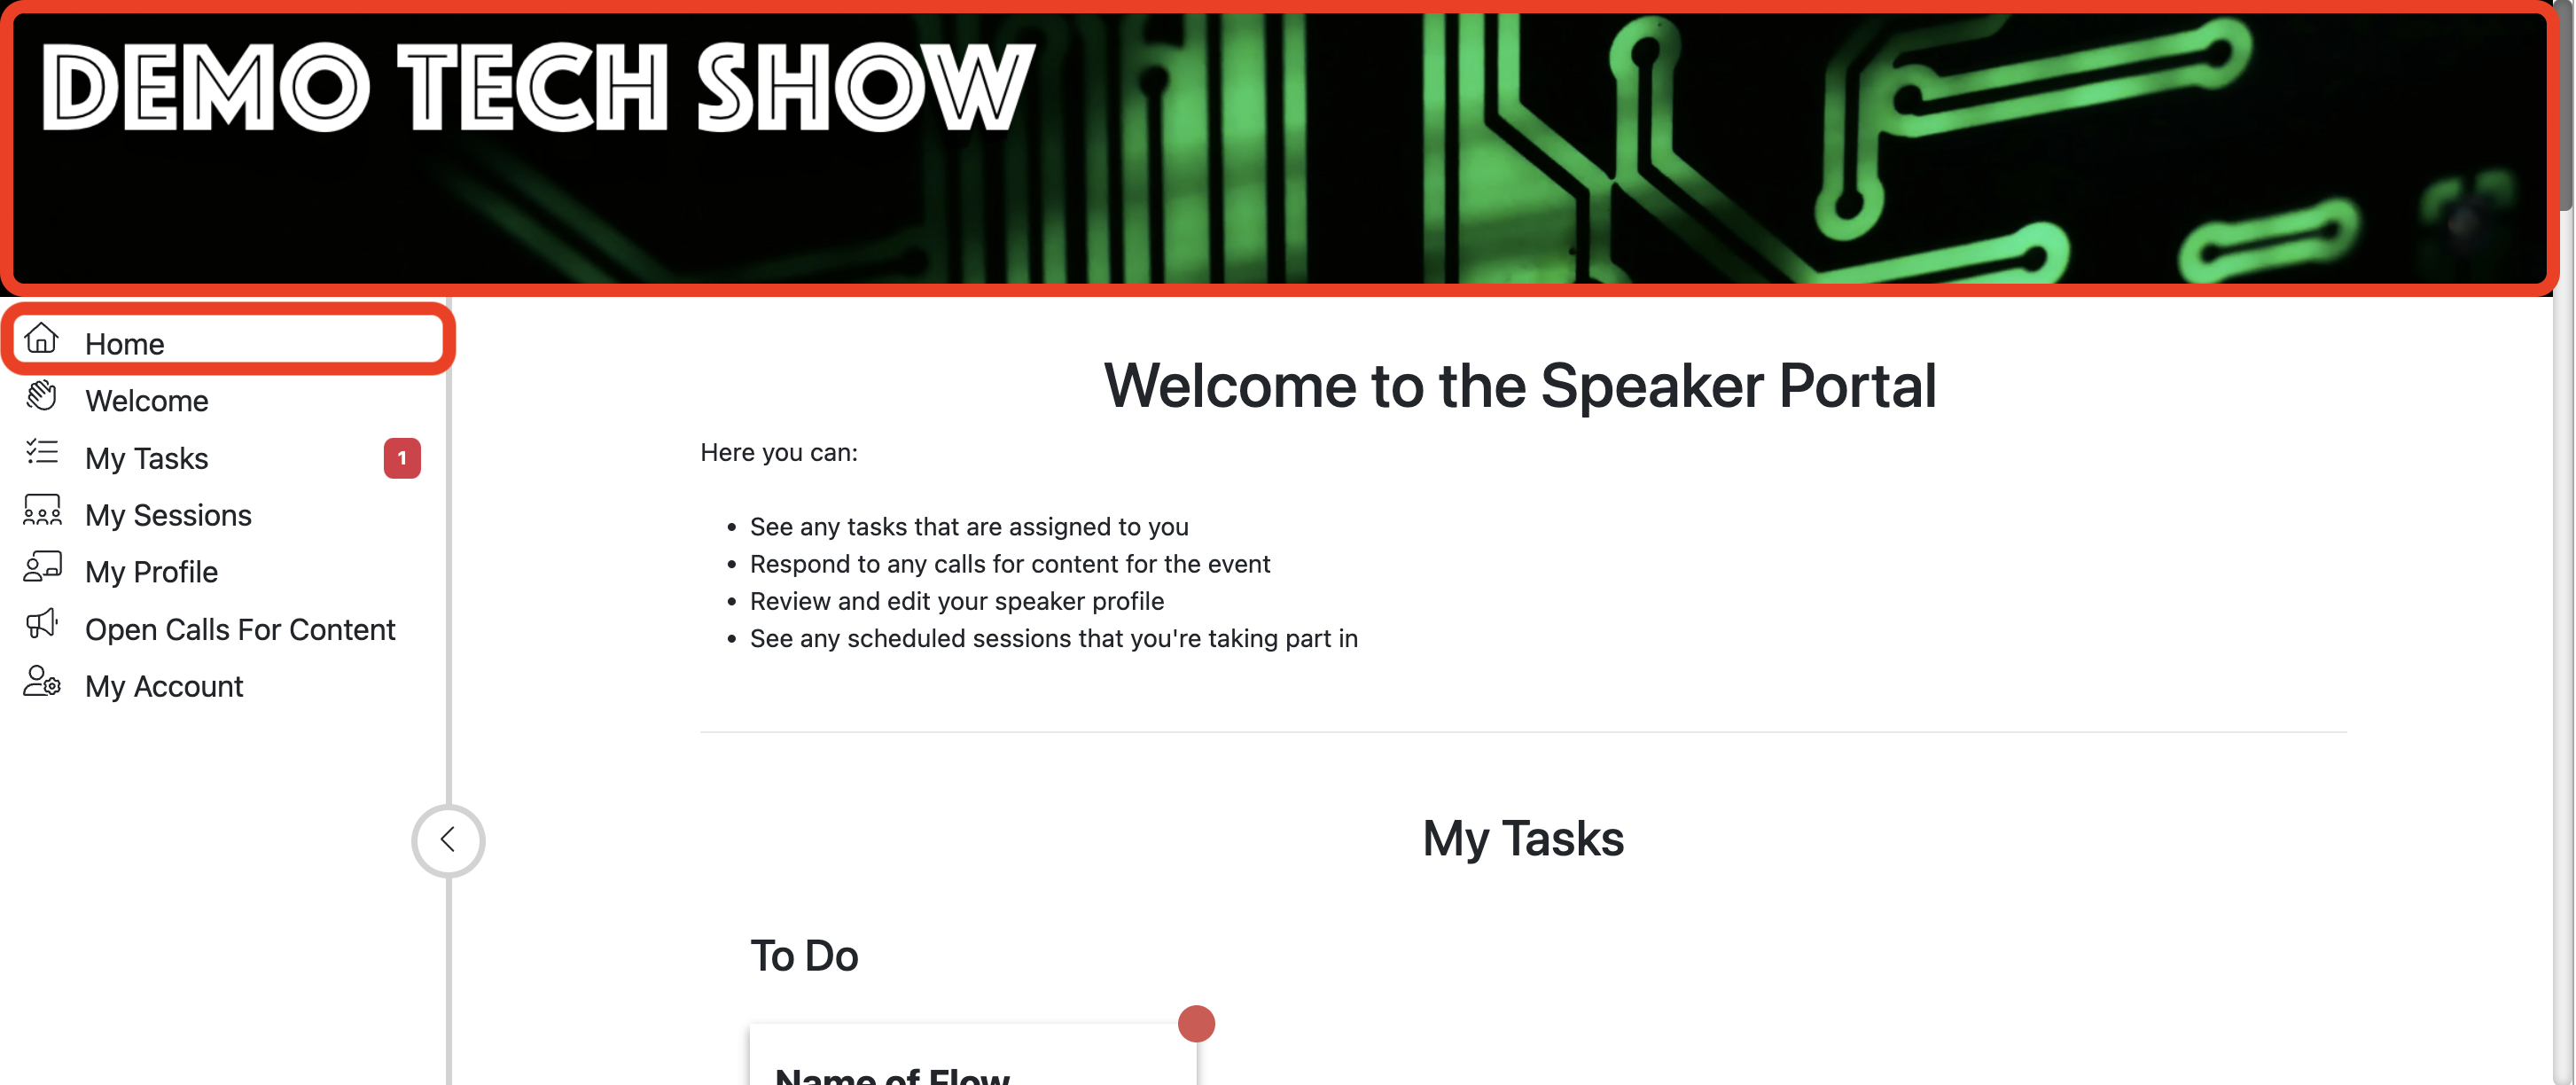
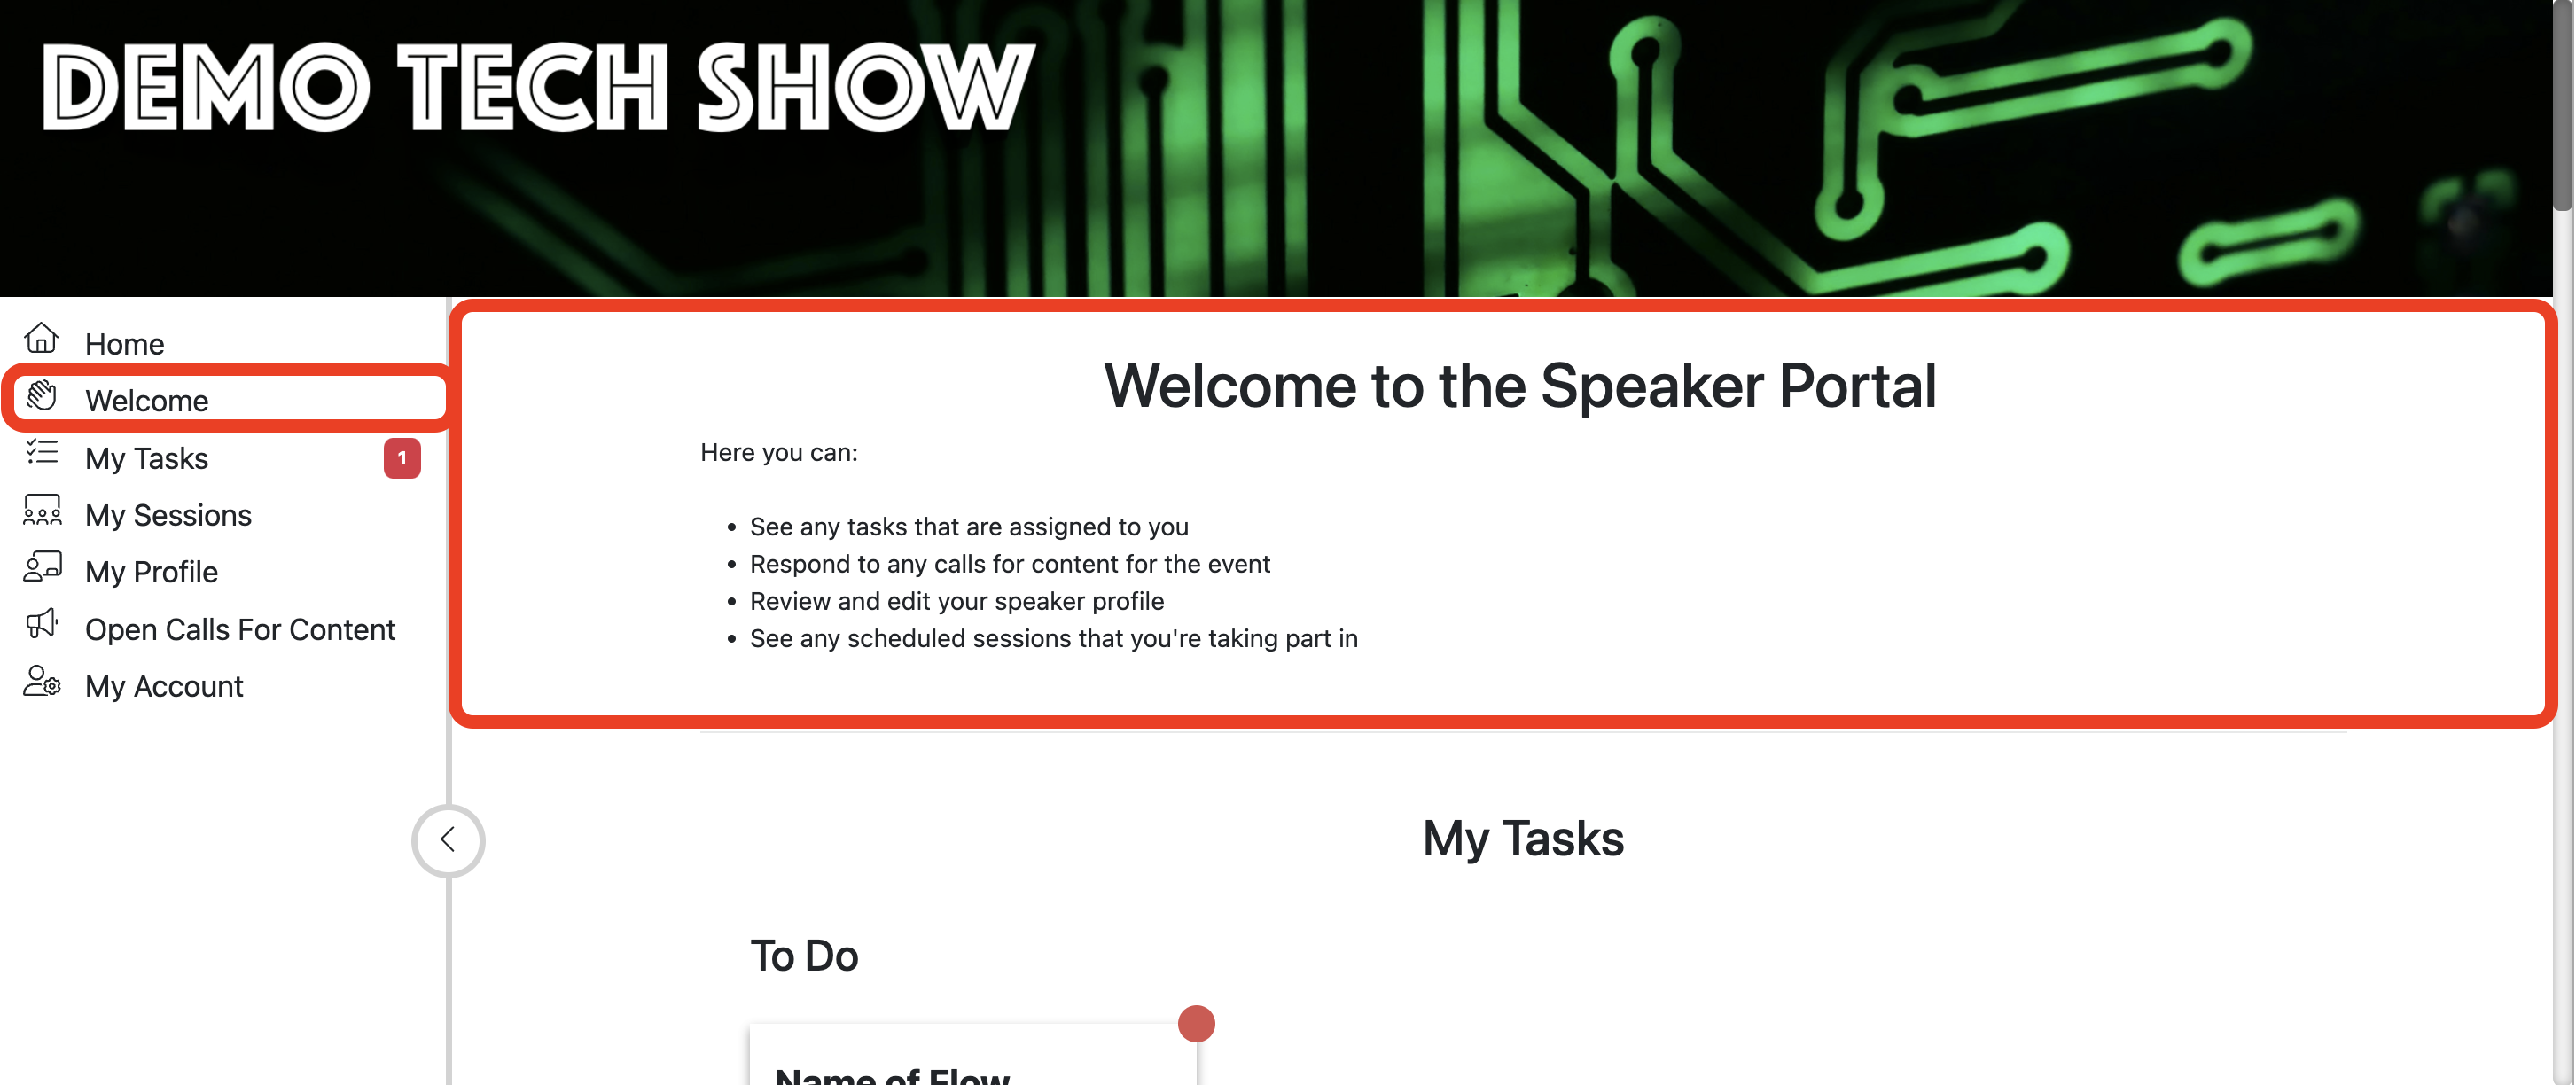
- Home: The top of the page and banner that will be displayed after login
- Welcome: A space for some text to orientate the user
- My Tasks: Open submissions and outstanding tasks
- My Profile: The speaker’s details
- My Sessions: Details of any sessions that the user is taking part in
- Open Calls for Content: Calls for papers, award submissions etc that are currently open.
- My Account: Where the user can edit their account details.
- Additional text type sections: you can add as many text type sections as you like.
There is more detail about each section and some usage tips below…
Note
Several sections will only be shown to users if they have relevant content.
For example, if a portal user is not associated with any sessions, they won’t see the “My Sessions” section.
You have more granular control over which content gets shown to which users, and when. See each section’s documentation for more details.
Info
The preview of each section contains dummy data to help you visualize what portal users will see.
You can edit some of this data (e.g. the text in the ‘welcome’ section), but not some other data (e.g. the Keynote session with John and Jane Doe in the ‘My Sessions’ section).
How do I add branding to the Home Page in the Content Portal?
To add a new banner to the Home Page, navigate to the Content Portal preview, hover your cursor over the Banner Image area and click the blue button:
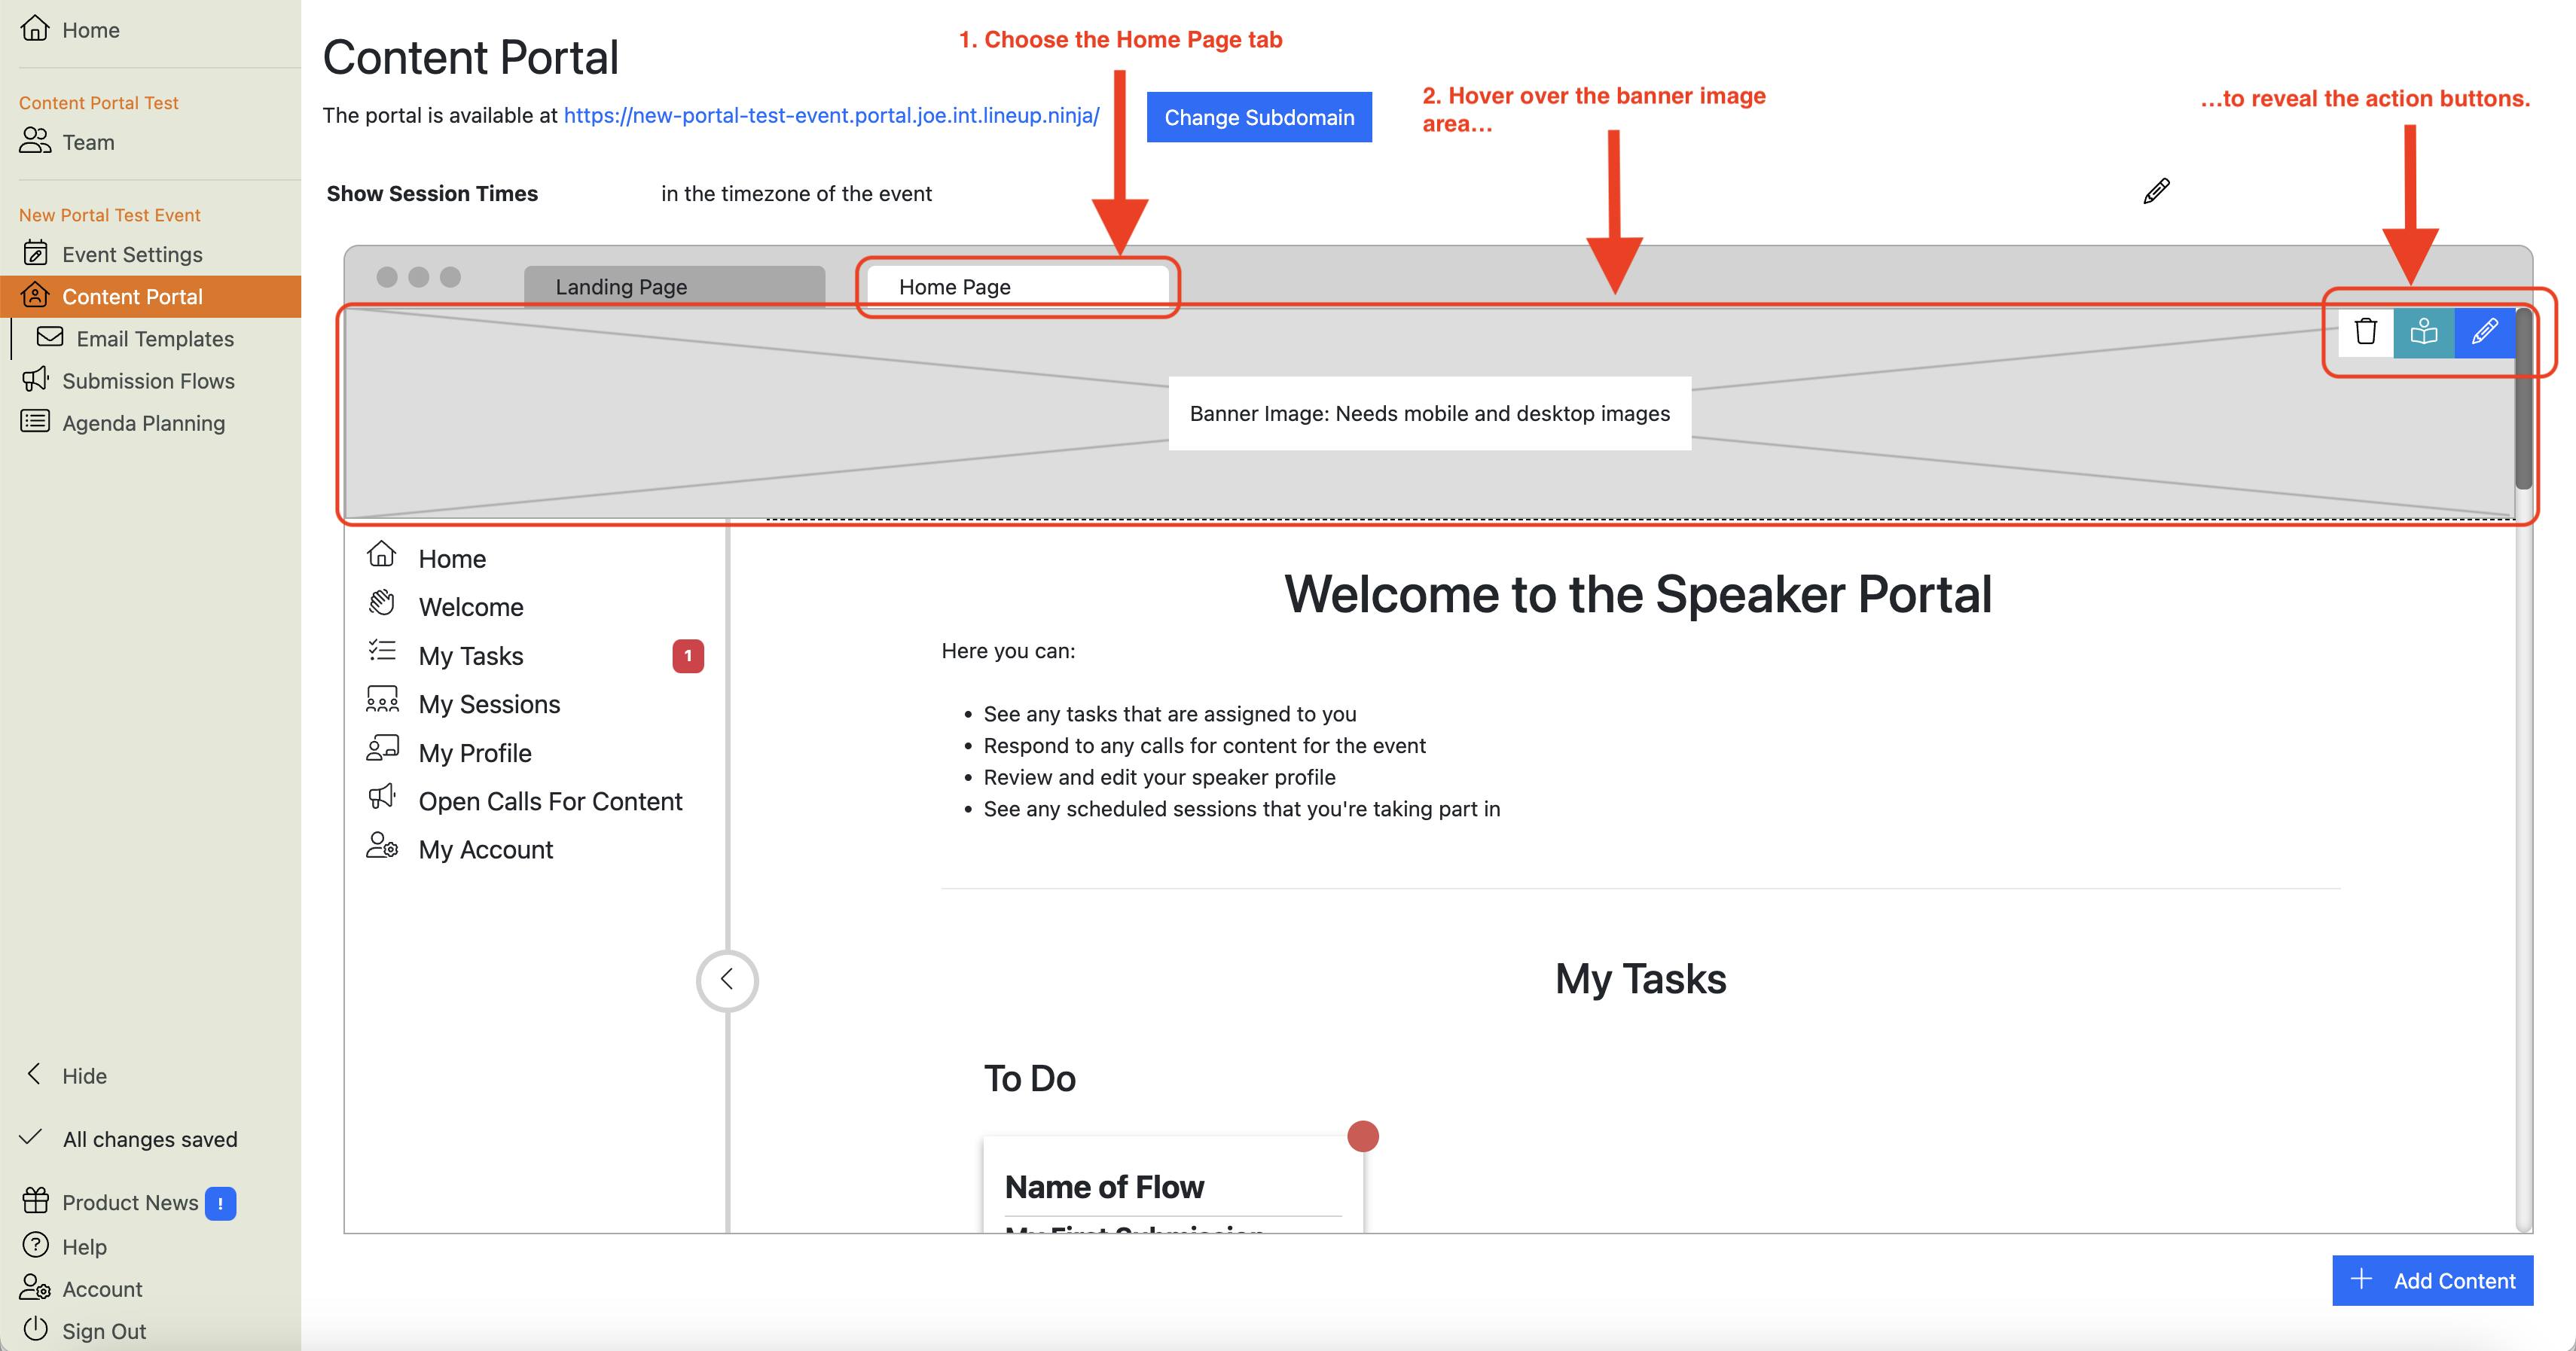
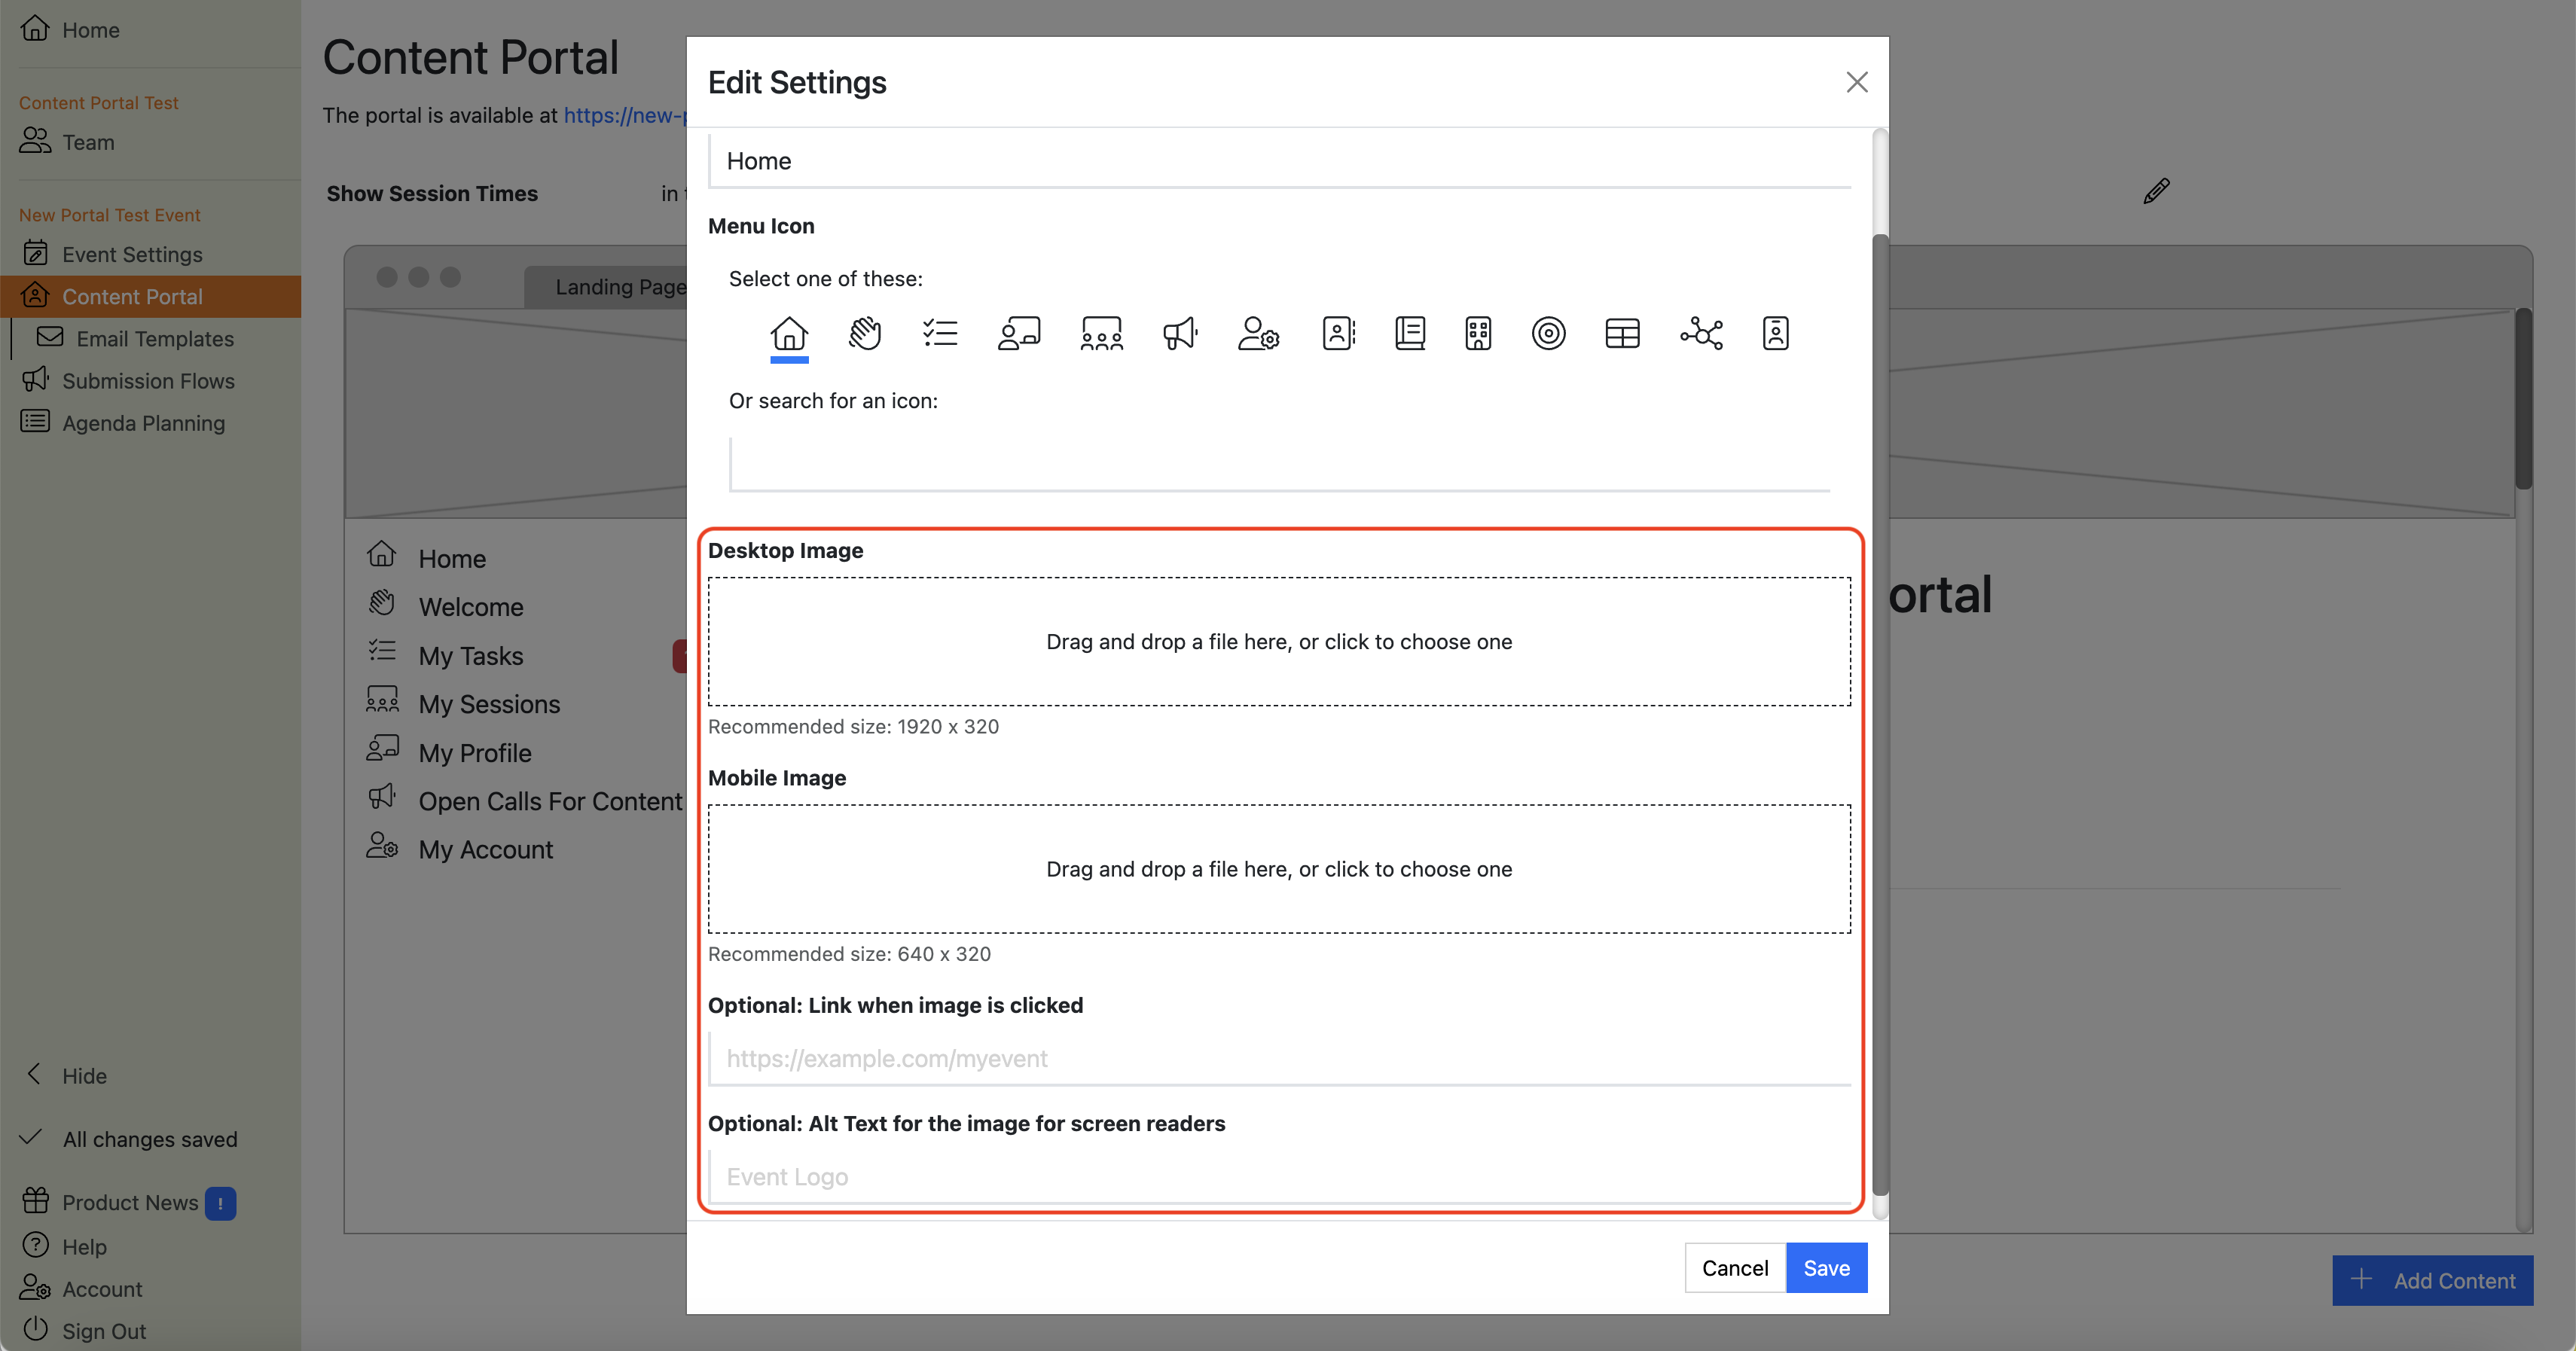
This will launch the “Home” section editor dialogue box. Here you can configure a few things:
- The name for the section as it appears in the left-hand menu.
- The icon for the section as it appears in the left-hand menu.
- Desktop and mobile banner images
- Alt text for the banner images
- A link that will be embedded in the image, so when users tap or click the image, they will be taken to the link.

What does the Home section of the Home Page do?
This section contains the banner images (one for desktop, one for mobile) that will be applied to the top of the Home Page.
Tip
You can reuse the images from the Landing Page, but we suggest using different versions that take up less vertical space to leave more room for the content..
What does the Welcome section of the Home Page do?
This section allows you to add formatted text. You can use it to provide orientation and guidance information for users.
Tip
The Welcome section is a text type section.
You can embed links in the text, so text type sections are useful for sharing links to things like:
- Speaker agreements
- Slide templates
- Registration pages
You can add as many text type sections as you like, so those links don’t have to go in the Welcome section!
What does the My Tasks section of the Home Page do?
This section shows the users’ Tasks and Submissions. It has three sections of its own:
- To Do - Submissions that are open for editing* and Tasks that require attention
- Done - Submitted Submissions** and Completed tasks
- Missed Deadline - Submissions and Tasks for which the user missed the deadline
* technically, this means Submissions that are in a Submission Stage which has the configuration option “Does Submitter need to take action?” set to Yes, AND for which the deadline has not passed. The tip below explains where to find this option.
** technically, this means Submissions that are in a Submission Stage which has the configuration option “Does Submitter need to take action?” set to No. The tip below explains where to find this option.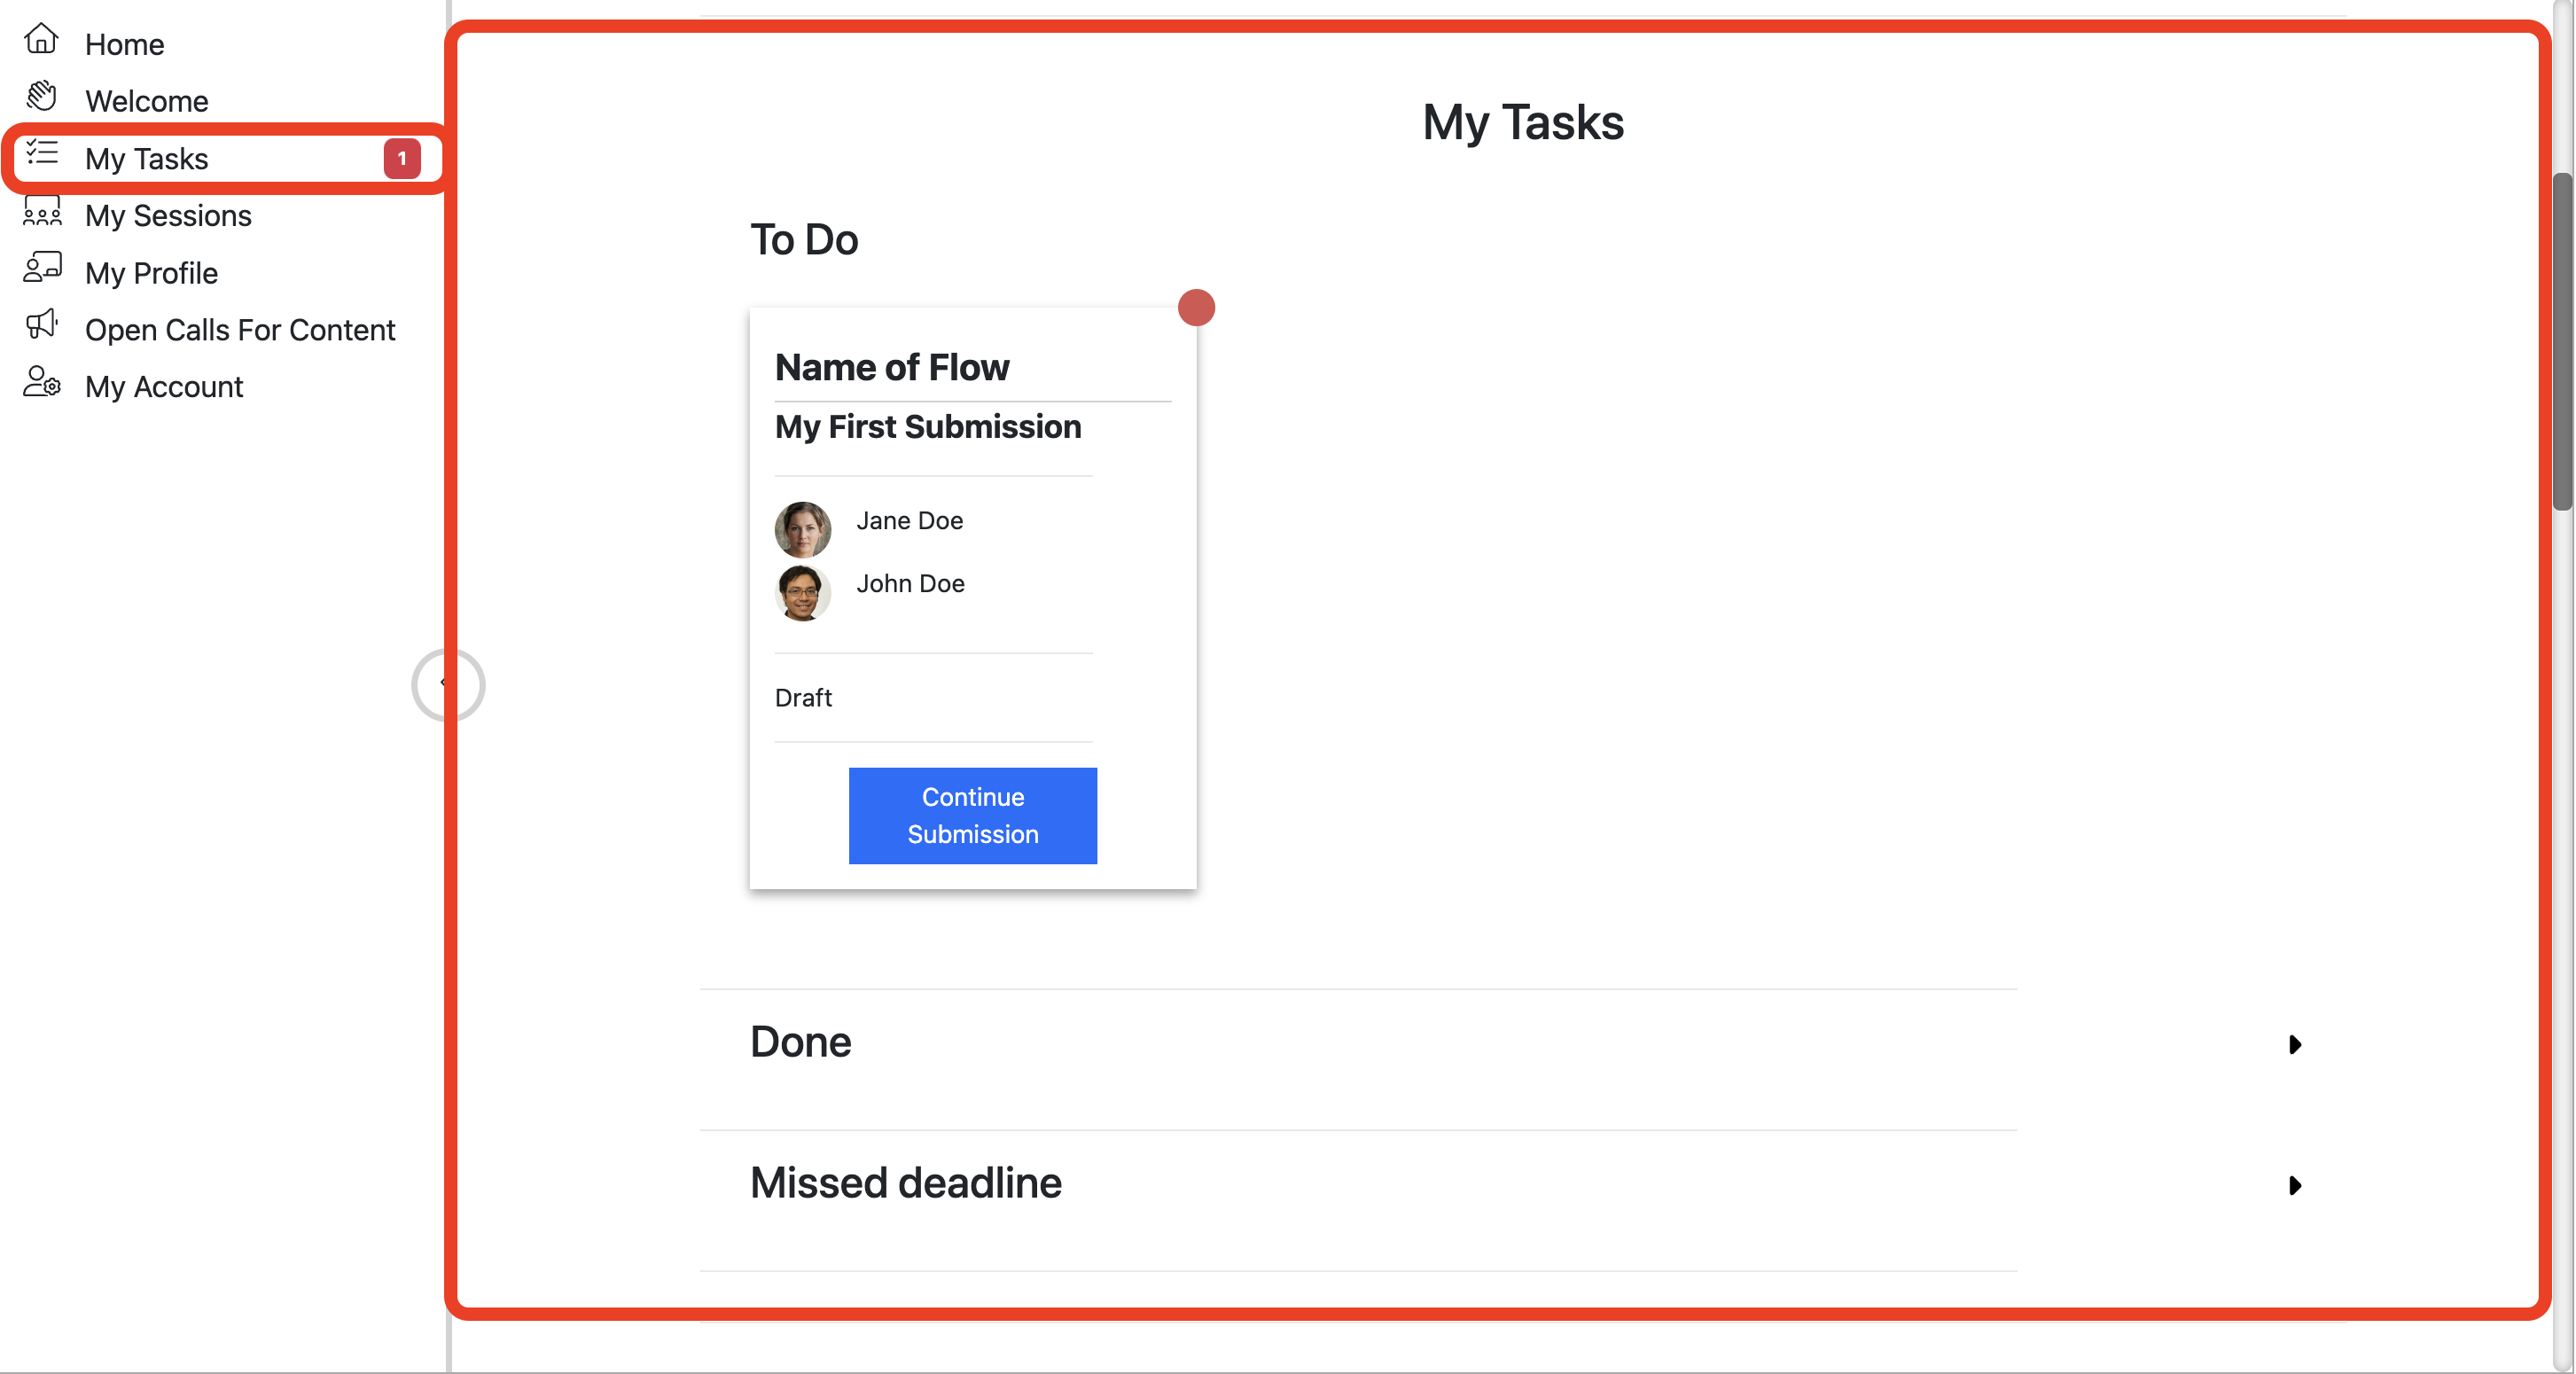
Tip
You can find the “Does Submitter need to take action?” option in the Submission Flow configuration.
Navigate to the Submission Flow, then click the pencil icon in the next to the relevant Submission Stage.
This will bring up the Submission Stage configuration dialogue. You will see a section called “View of a Submission on Portal Home Page”. Expand this section and you will see the configuration option.
Info
The preview of the My Tasks section contains a dummy task with some dummy data:
- Submission title: ‘My First Submission"
- Submission Flow: “Name of Flow”
- Two speaker profiles: “Jane Doe” and “John Doe”
- The Submission stage: “Draft”
- A button: “Continue Submission”
All of these will be replaced by the relevant data for each submission or task belonging to the portal user. They are only shown here to help you visualize what your users will see.
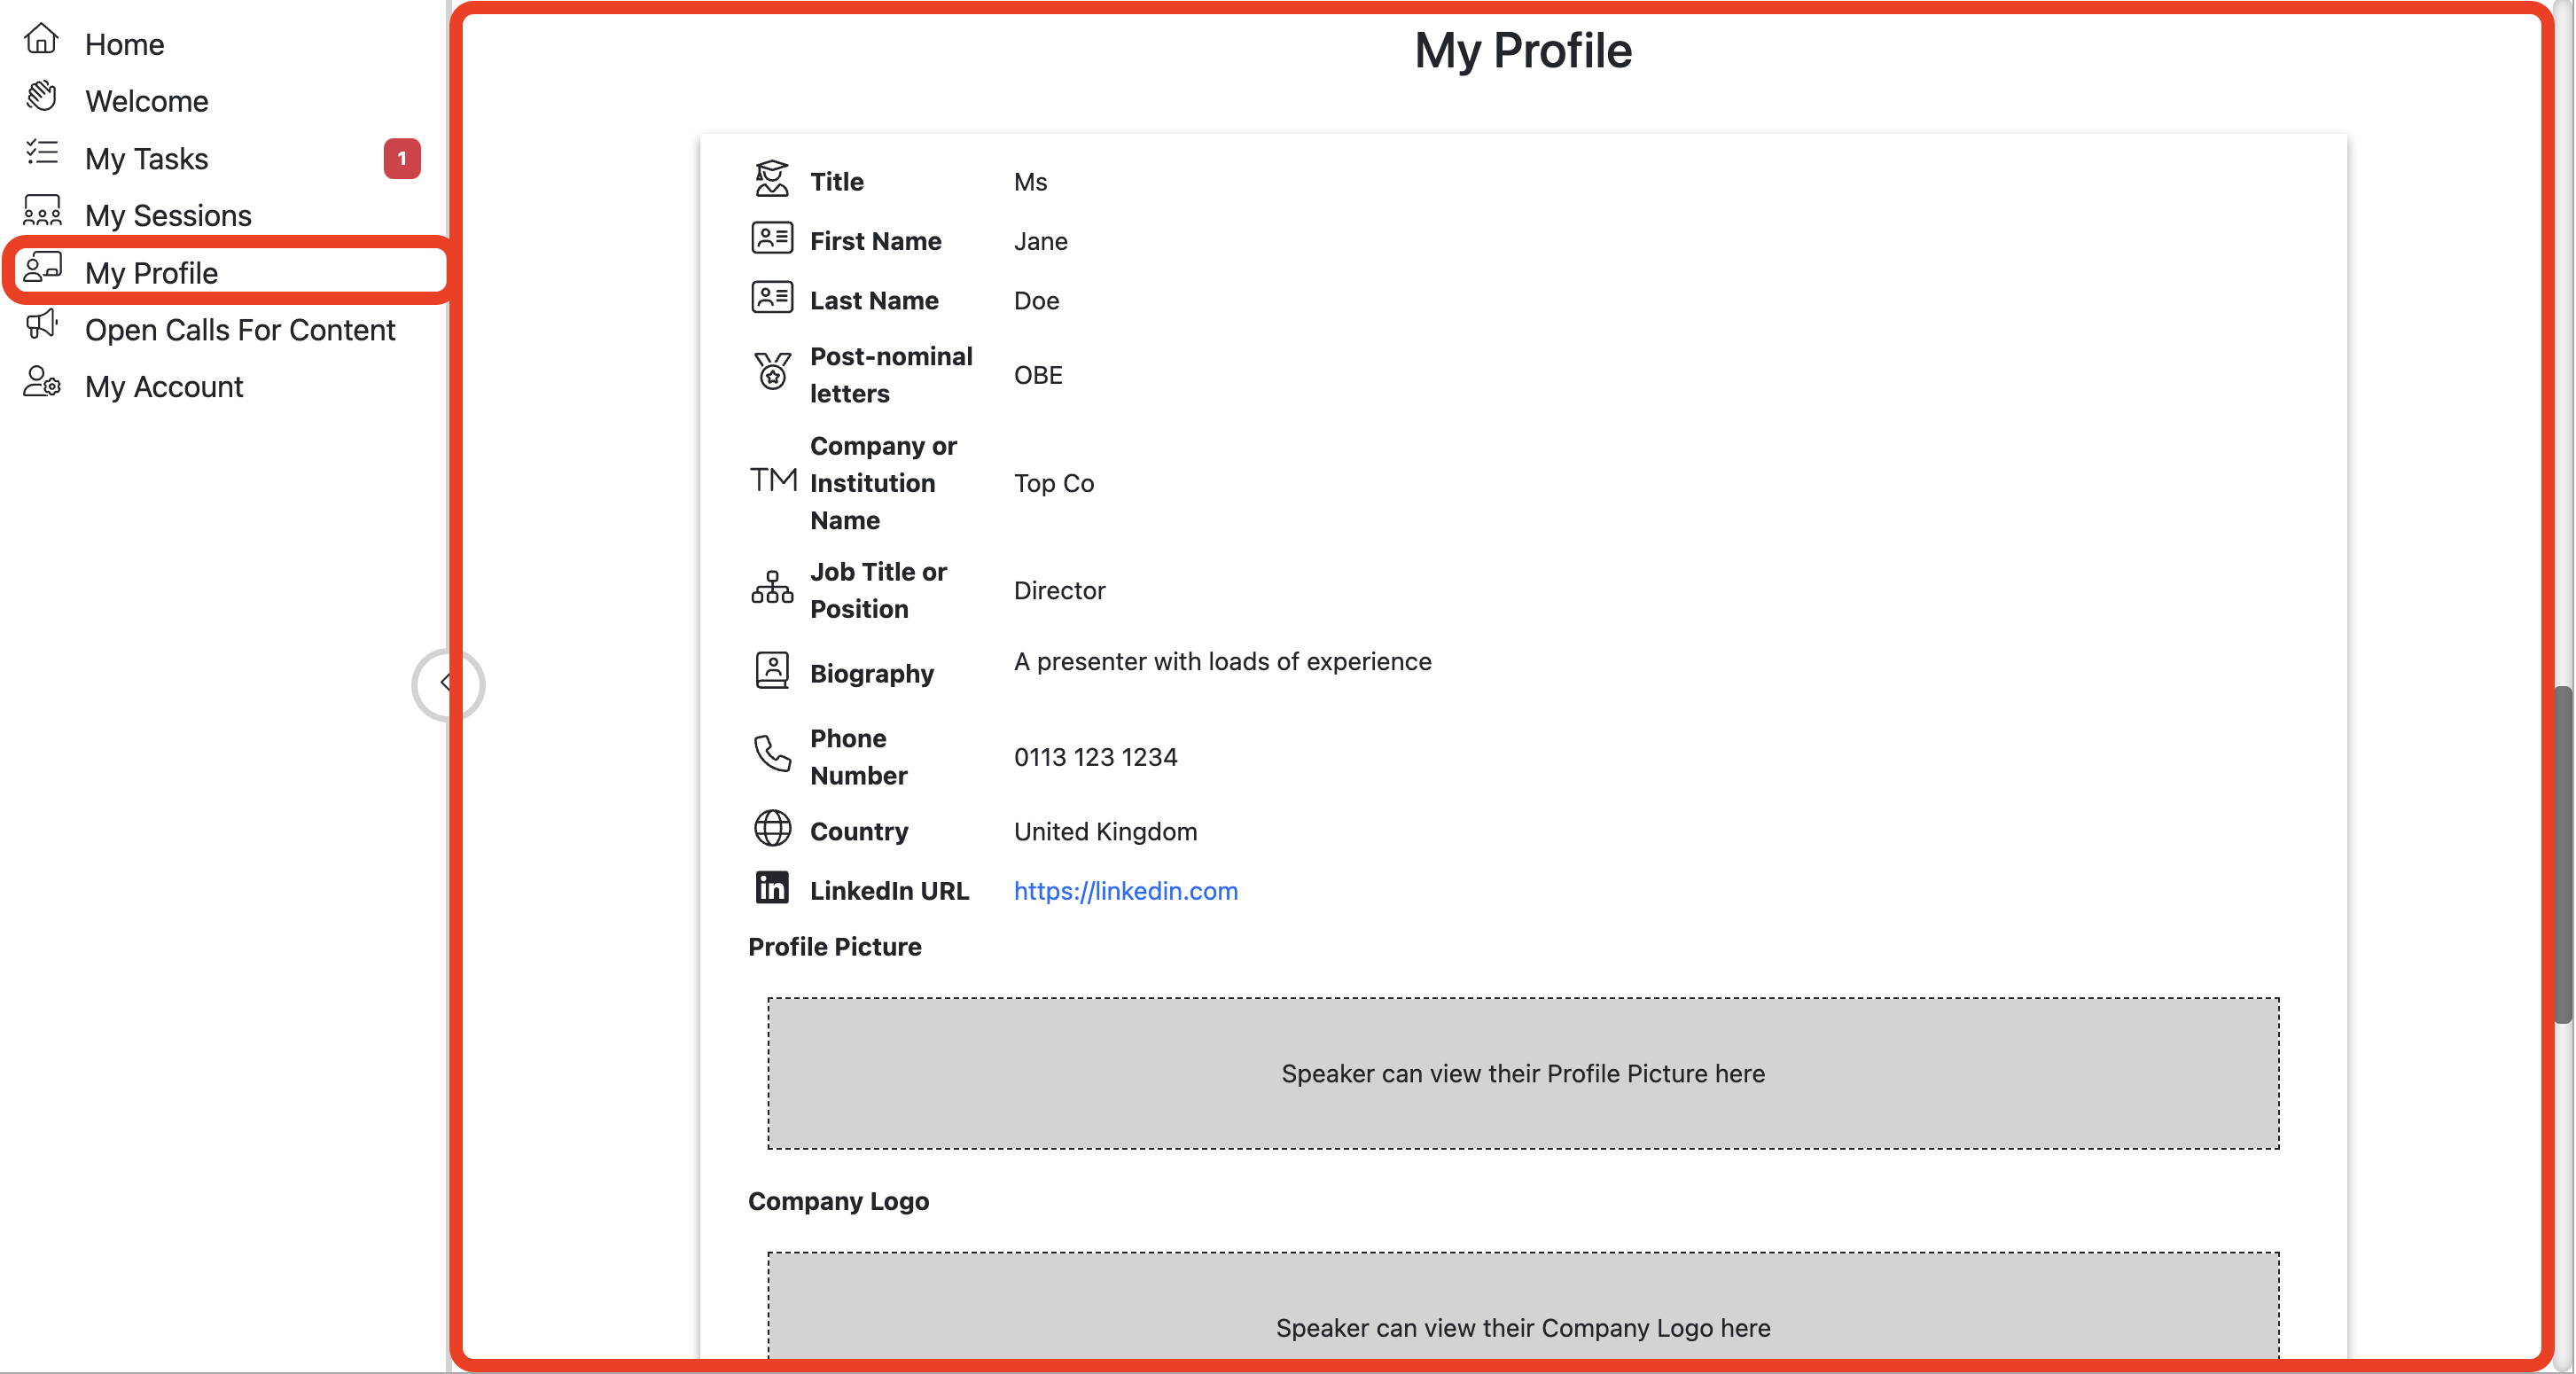
What does the My Profile section of the Home Page do?
This section shows speakers the data that you hold for them in the Agenda Planning part of Lineup Ninja.
Portal users can only see the details of speaker records that have the same email address that they have logged into the portal with.
Most of the time in Lineup Ninja, each speaker has a unique email address, so each portal user will only see one speaker record - their own.
However in some instances, several speaker records will have the same email address (for example, where there is a single contact for several speakers). In this case, the user will be able to see several speaker records.
Warning
This is the speaker profile that will be published to your event’s website, mobile app, signage and other digital assets.
You can allow speakers to make changes here, but be aware that their changes may be published without anyone reviewing them.
Note
If you have gathered speakers’ profiles via a Submission Flow, the data will only appear here after you have created speakers on the agenda.
Also, if speakers are allowed to edit their profiles via the submission flow, any changes will only appear here once you’ve updated their profile on the agenda.
Info
The preview of the My Profile section contains some dummy data for the imaginary speaker, Jane Doe.
This will be replaced with the relevant data for each speaker, and iis only shown here to help you visualize what your users will see.
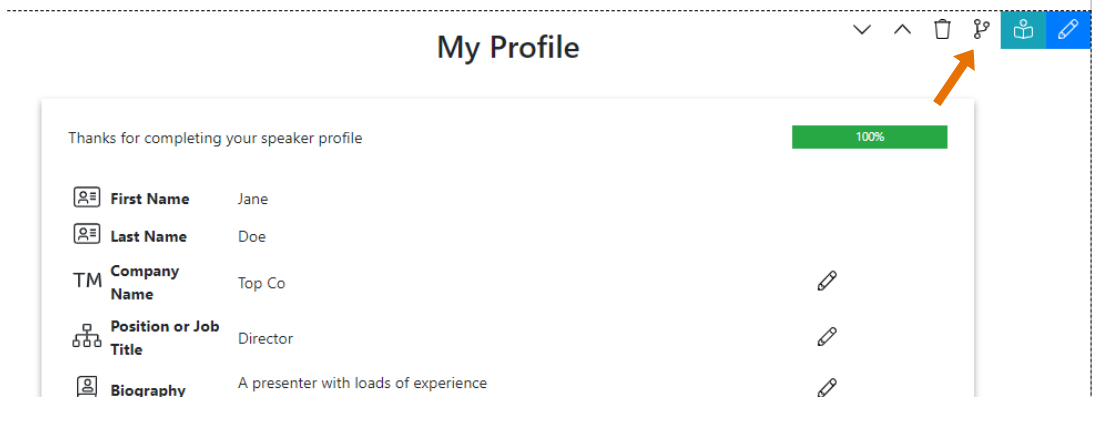
You can configure various parts of the My Profile section: The text at the top of the section; which fields are shown to users, and some guidance text for mandatory fields.
To edit the My Profile section, hover over the section to reveal the action buttons:
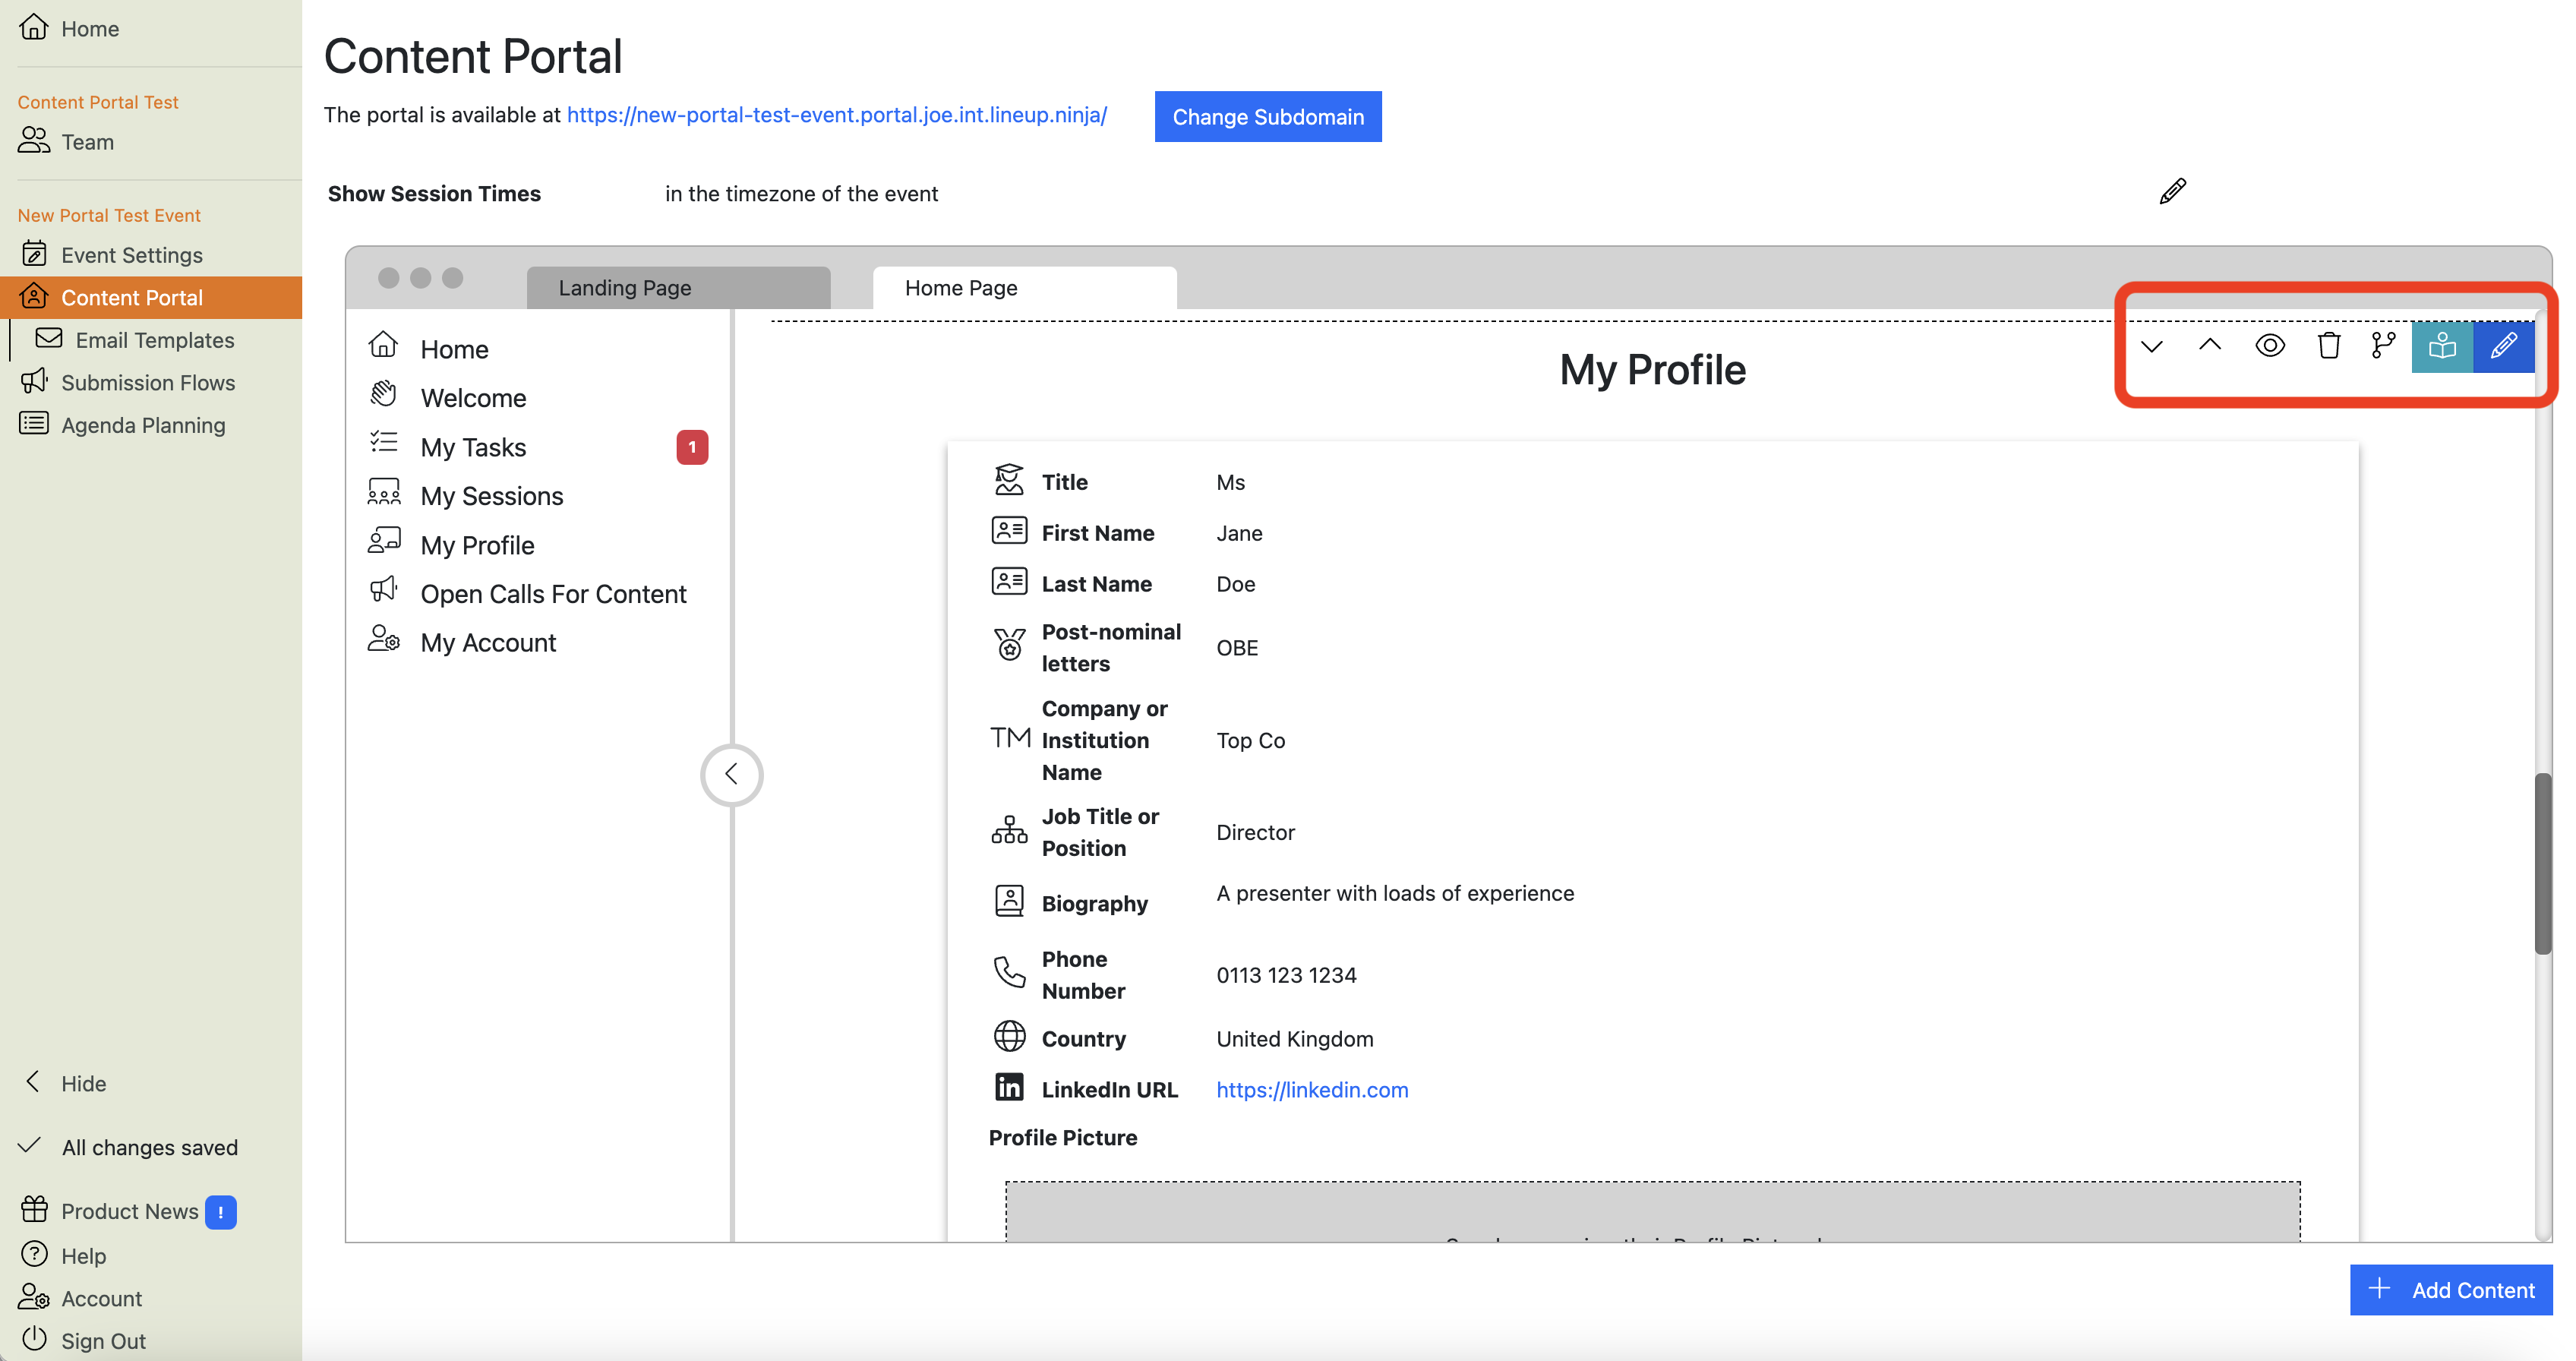
Click the blue edit button to open the section editor:
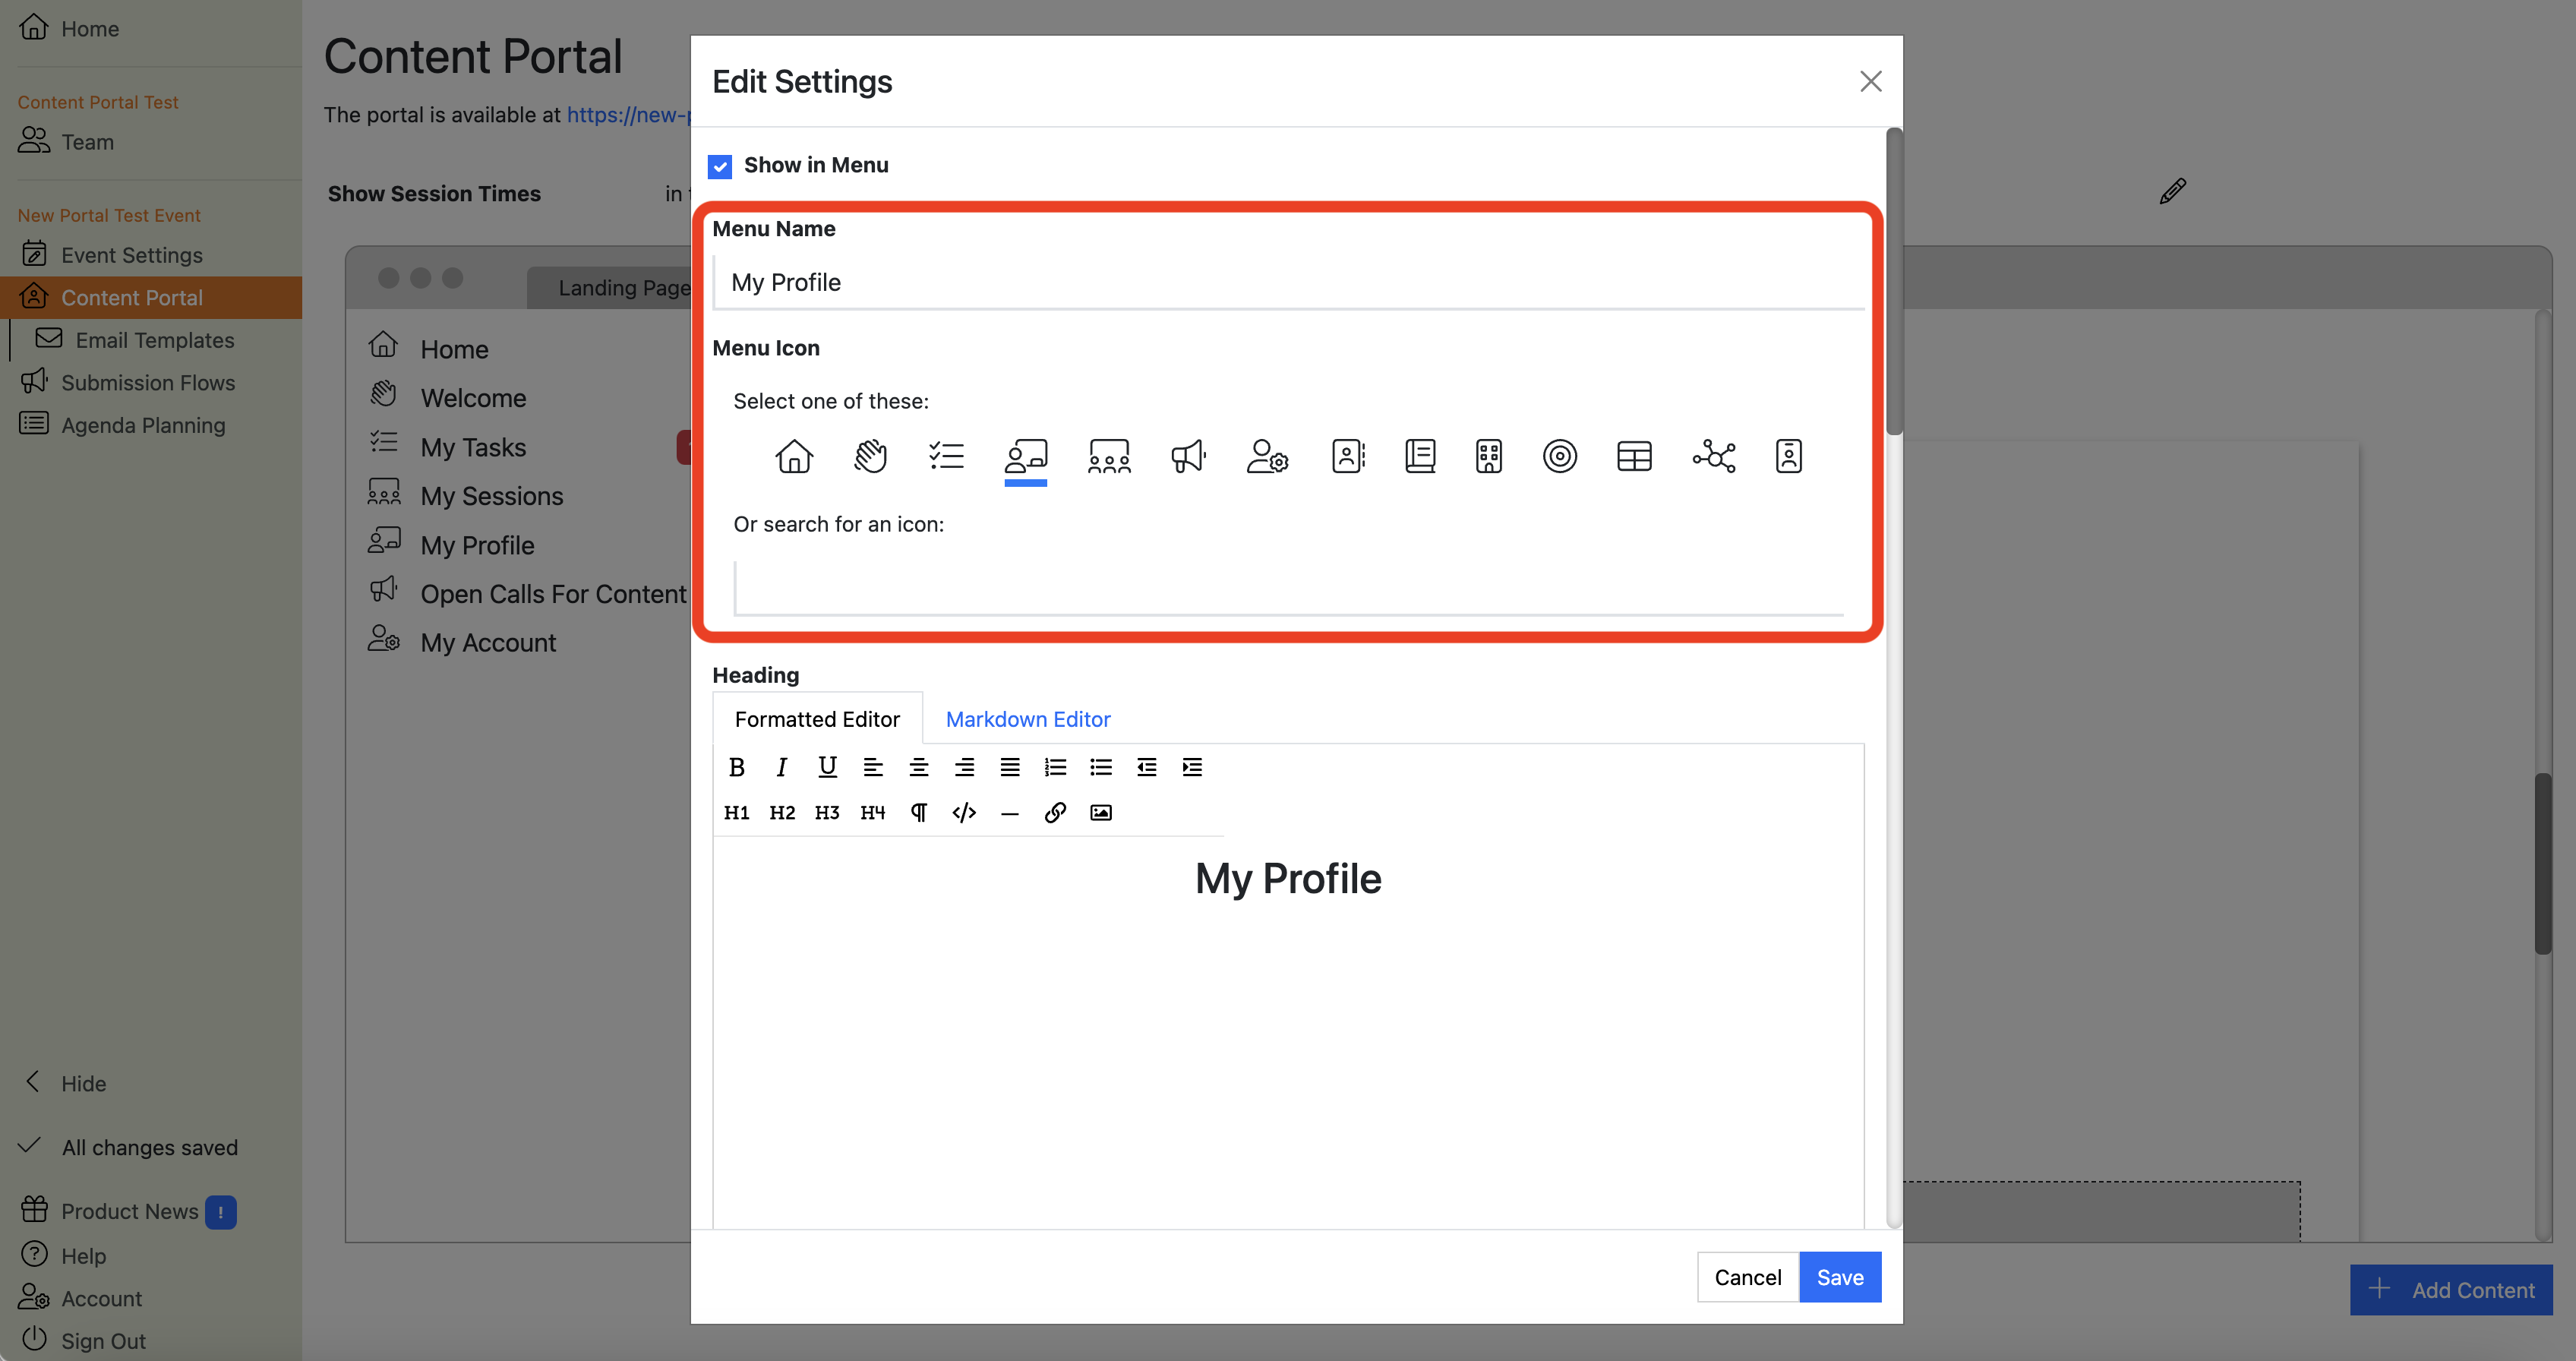
Here you can edit the menu name and icon.
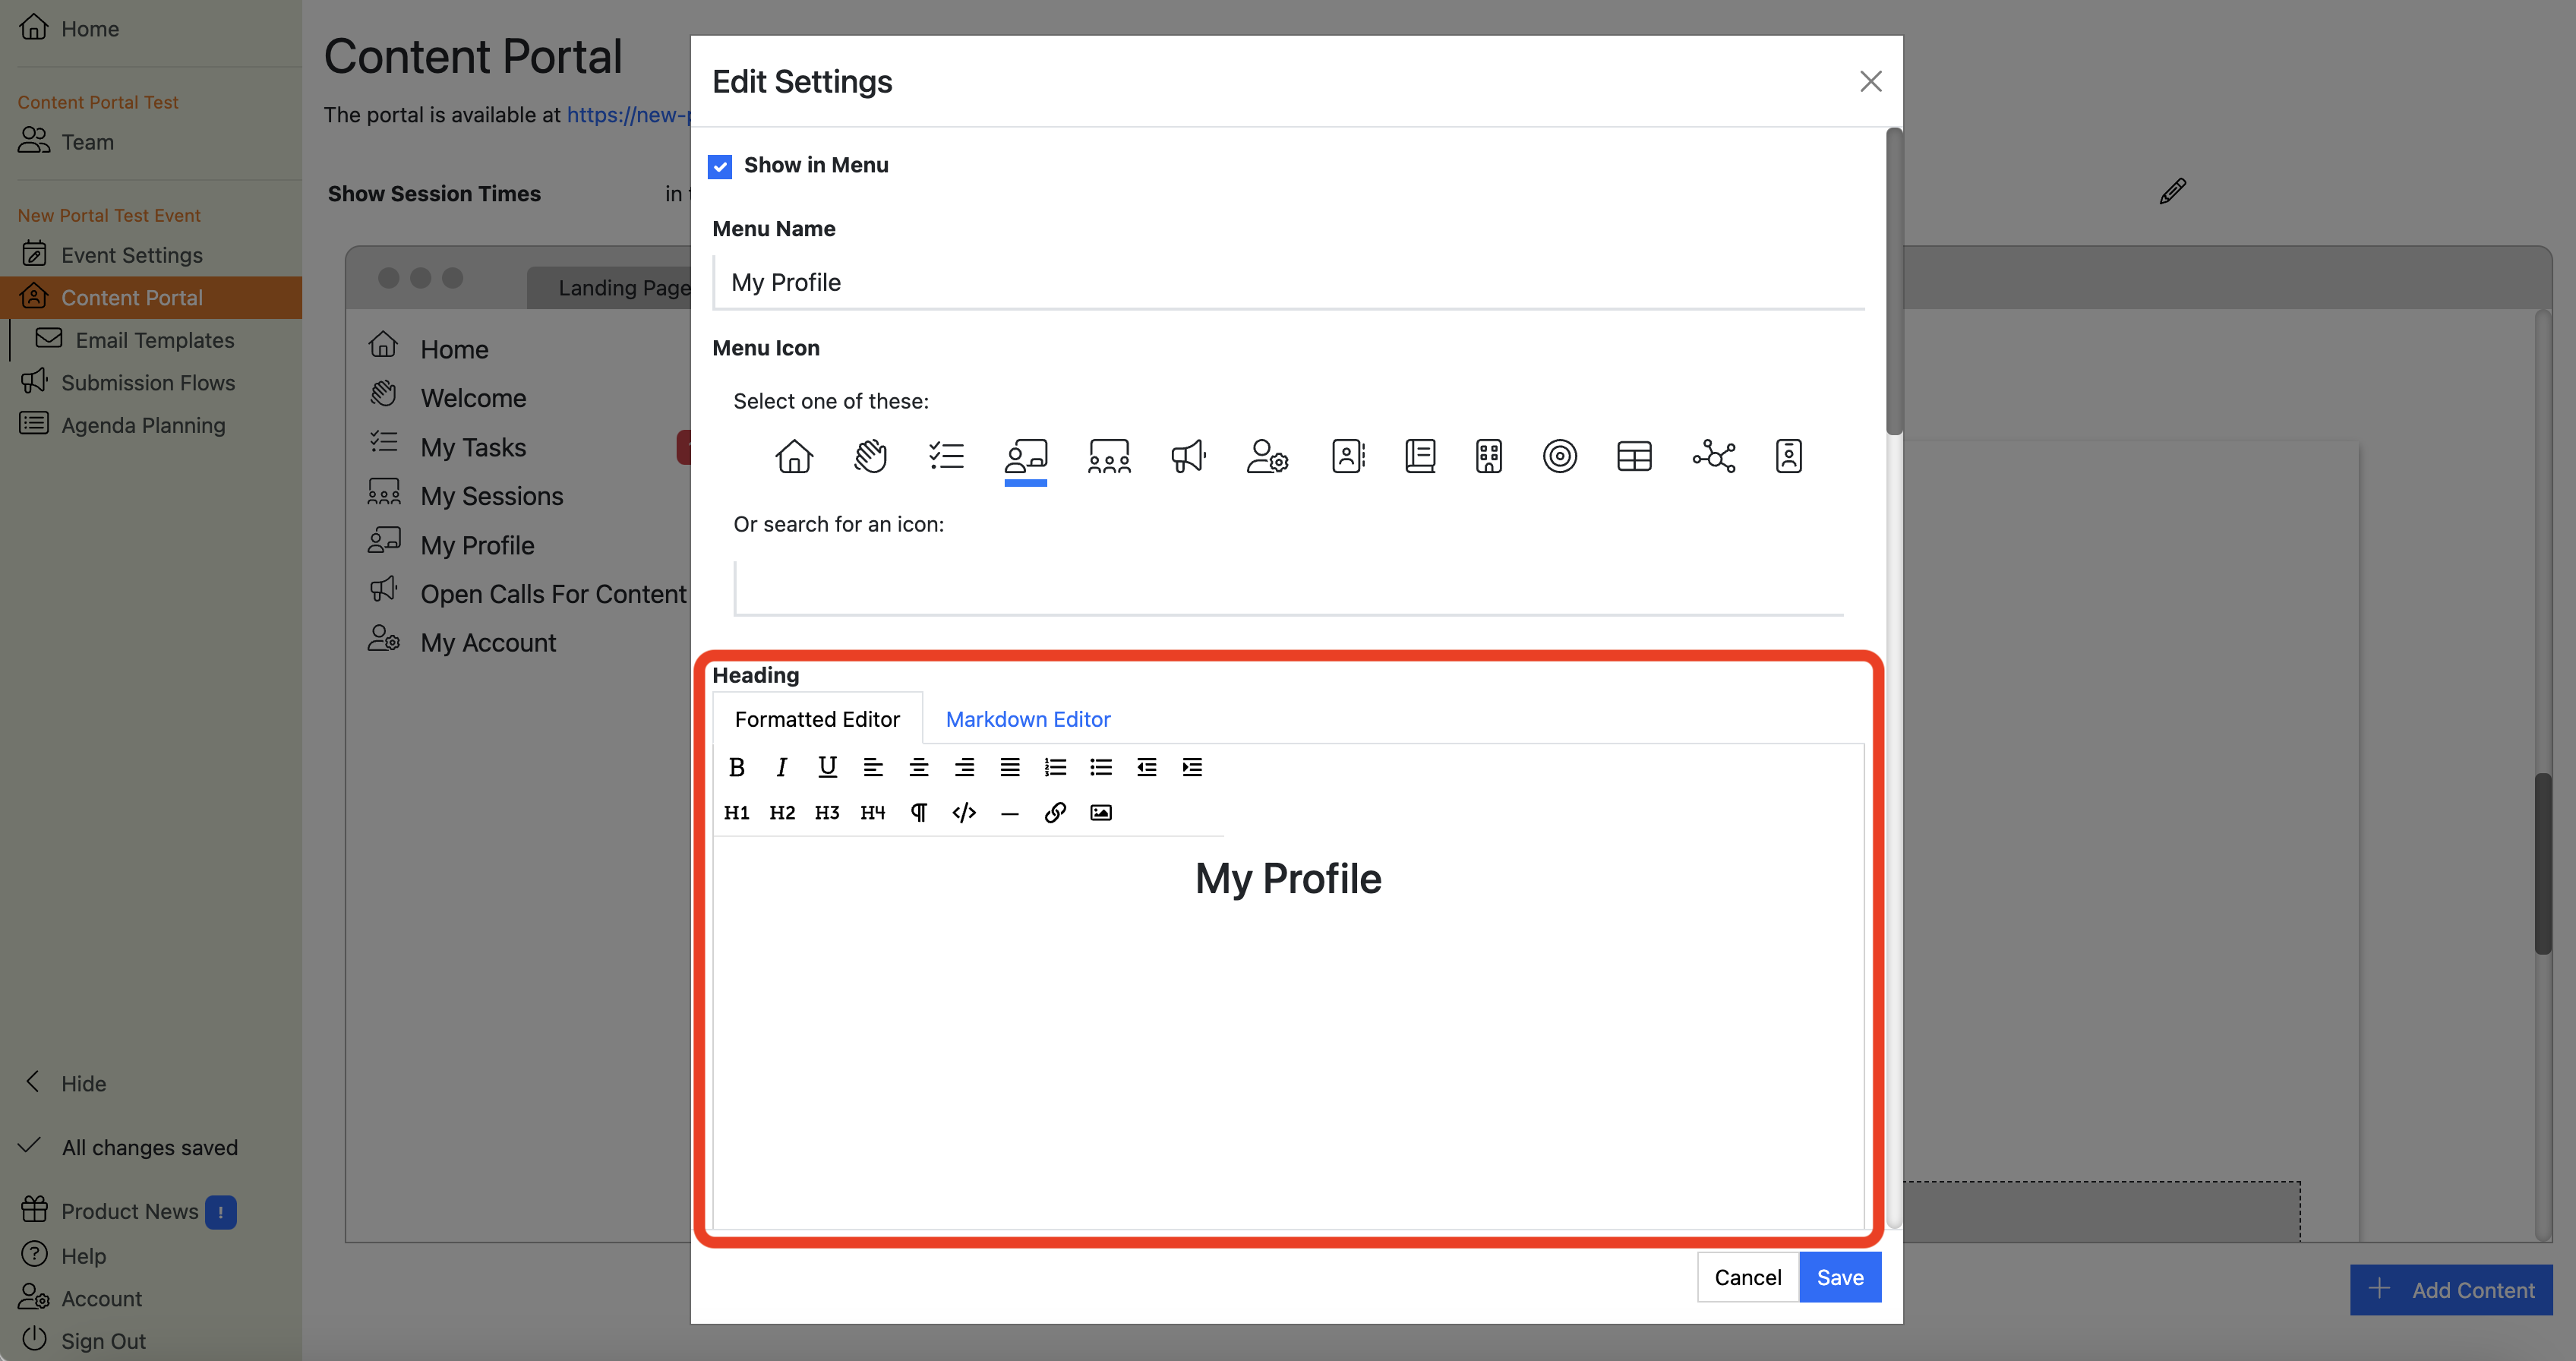
Scroll down to edit the text that appears at the top of the ‘My Profile" section:
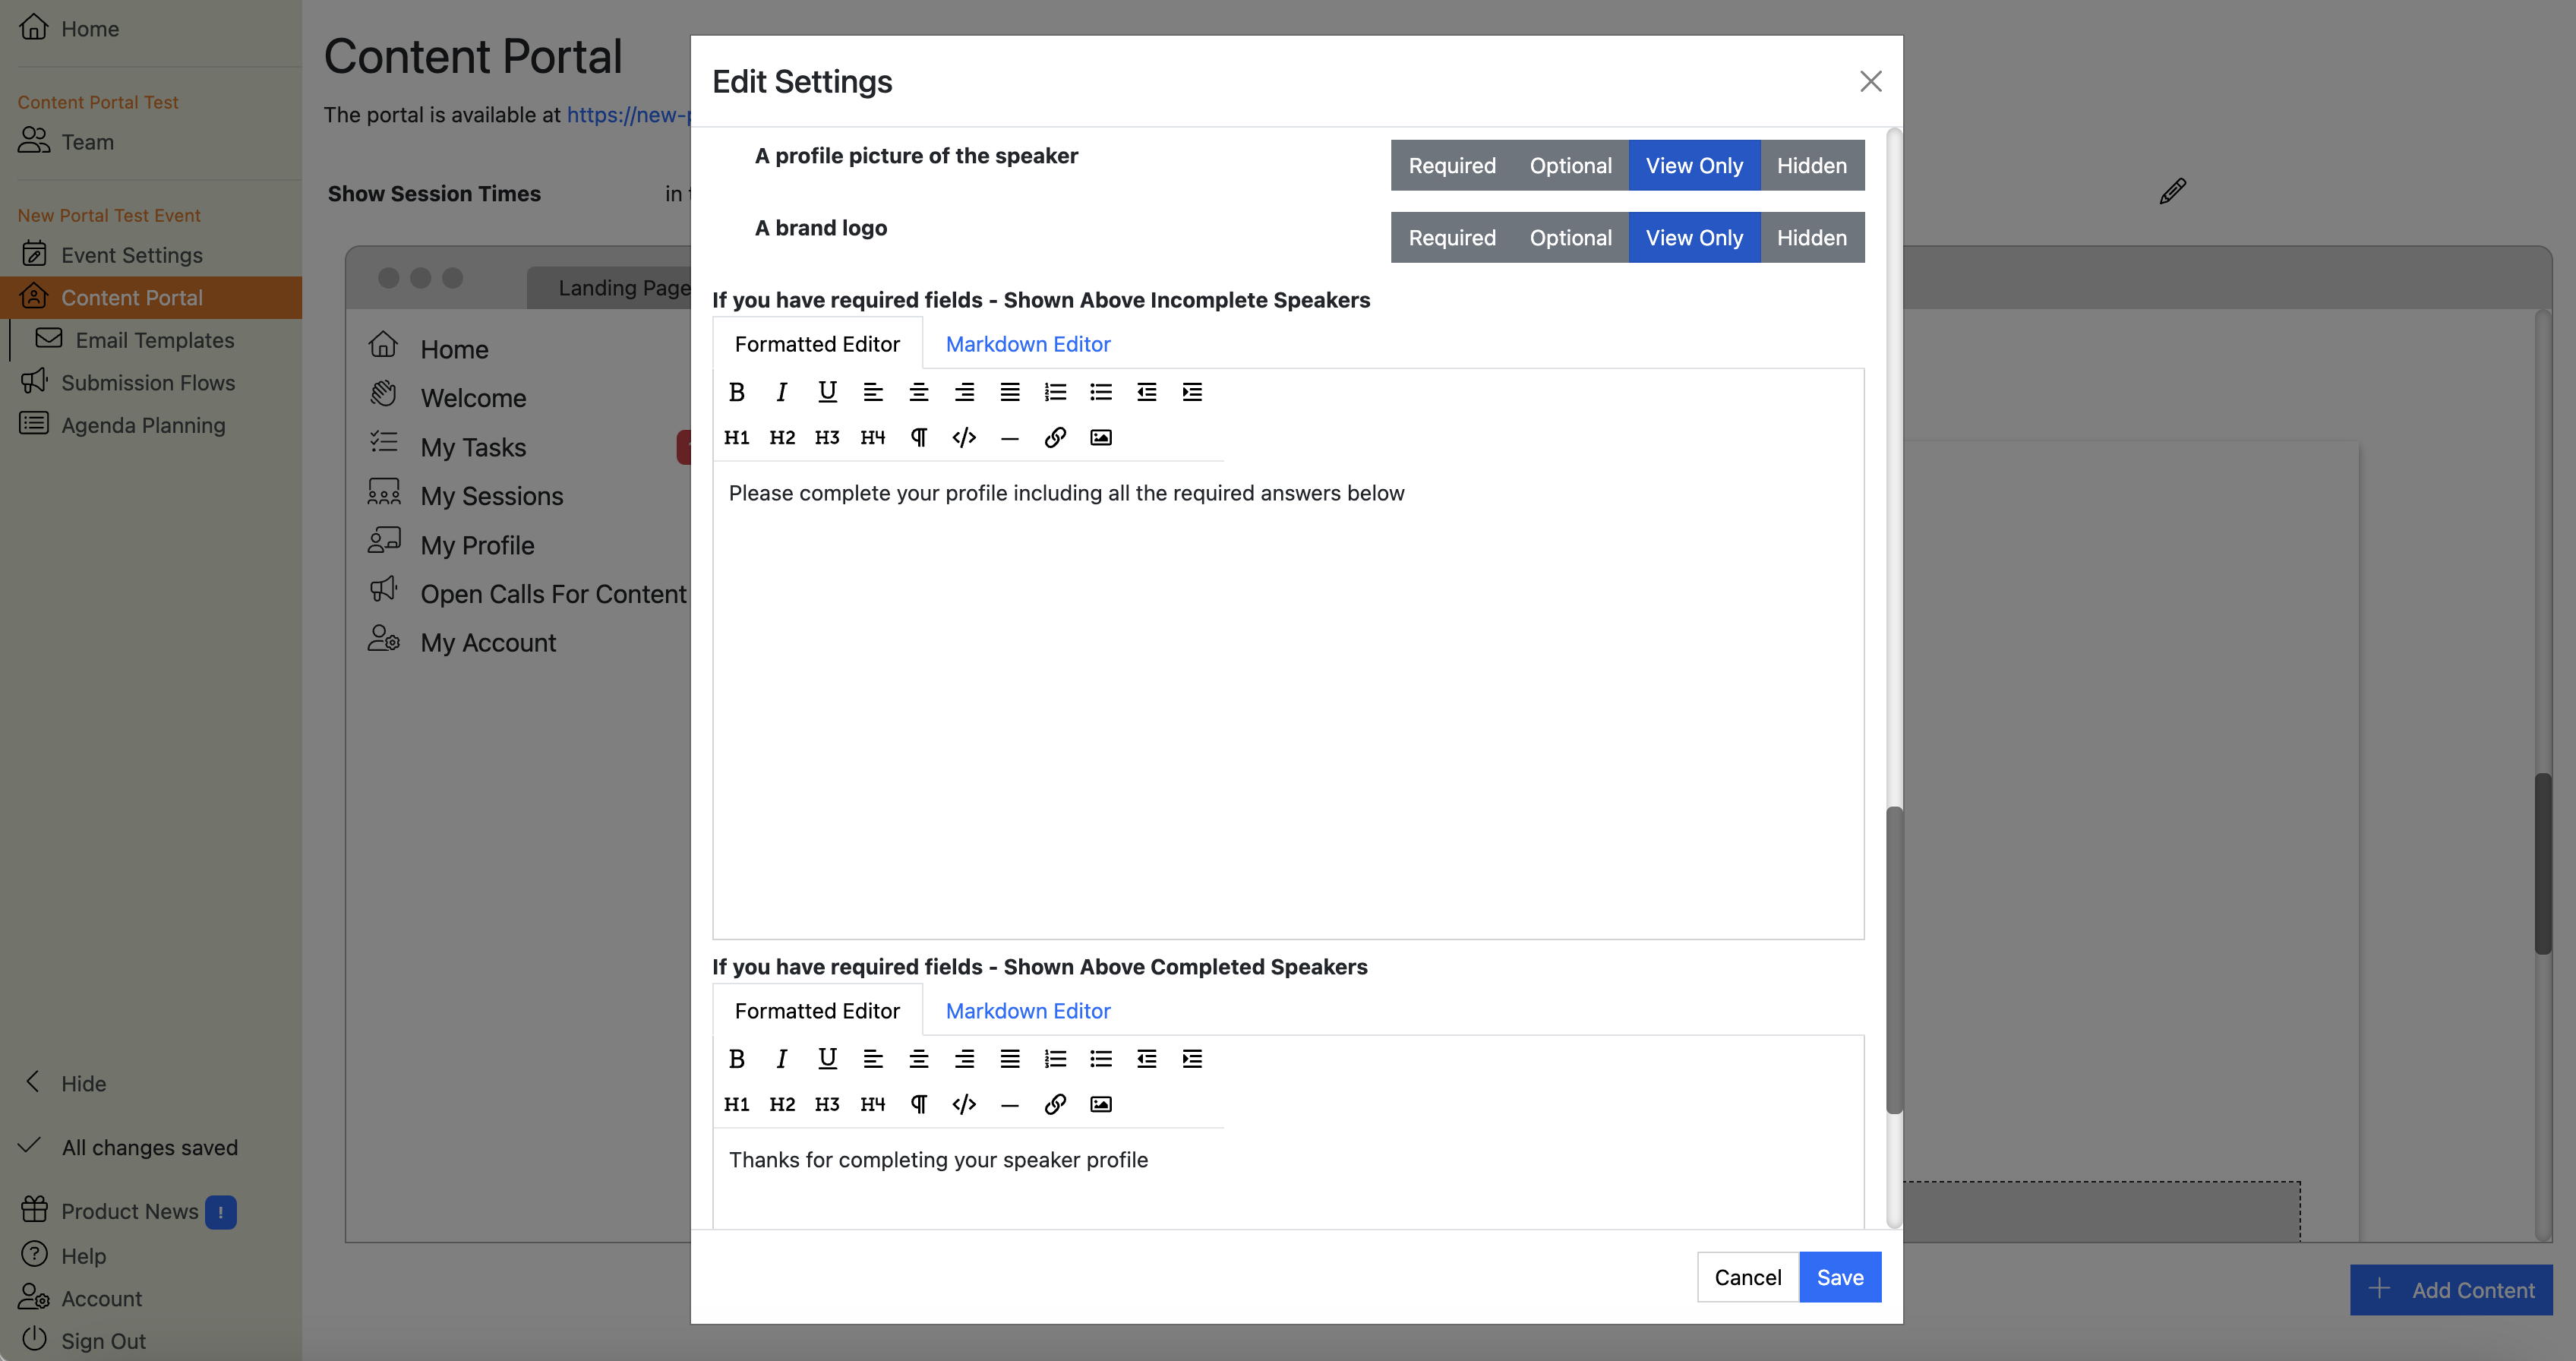
Scroll down to the the next section, and you can choose for every speaker field whether it should be:
- Required (i.e. editable and mandatory)
- Optional (editable and optional)
- View-only (visible but not editable)
- Hidden (not visible to the user)
This list of fields that you can choose from includes all the Speaker fields - including any custom fields you’ve added, and any fields that get added by integrations, such as the link to speakers Gleanin assets.

You can also add text asking users to fill in mandatory fields (when they still have some mandatory fields that haven’t been filled in yet), and if they have filled all the mandatory fields, thanking them for doing so:
How do I add new questions to the ‘My Profile’ section?
To add new questions to the My Profile section of the speaker portal, you must add these as Custom Fields first. They will then automatically appear in the list of fields that you can make Required, Optional, View-only or Hidden (see the My Profile section for more detail).
See Custom Fields for more information on how to add custom fields.
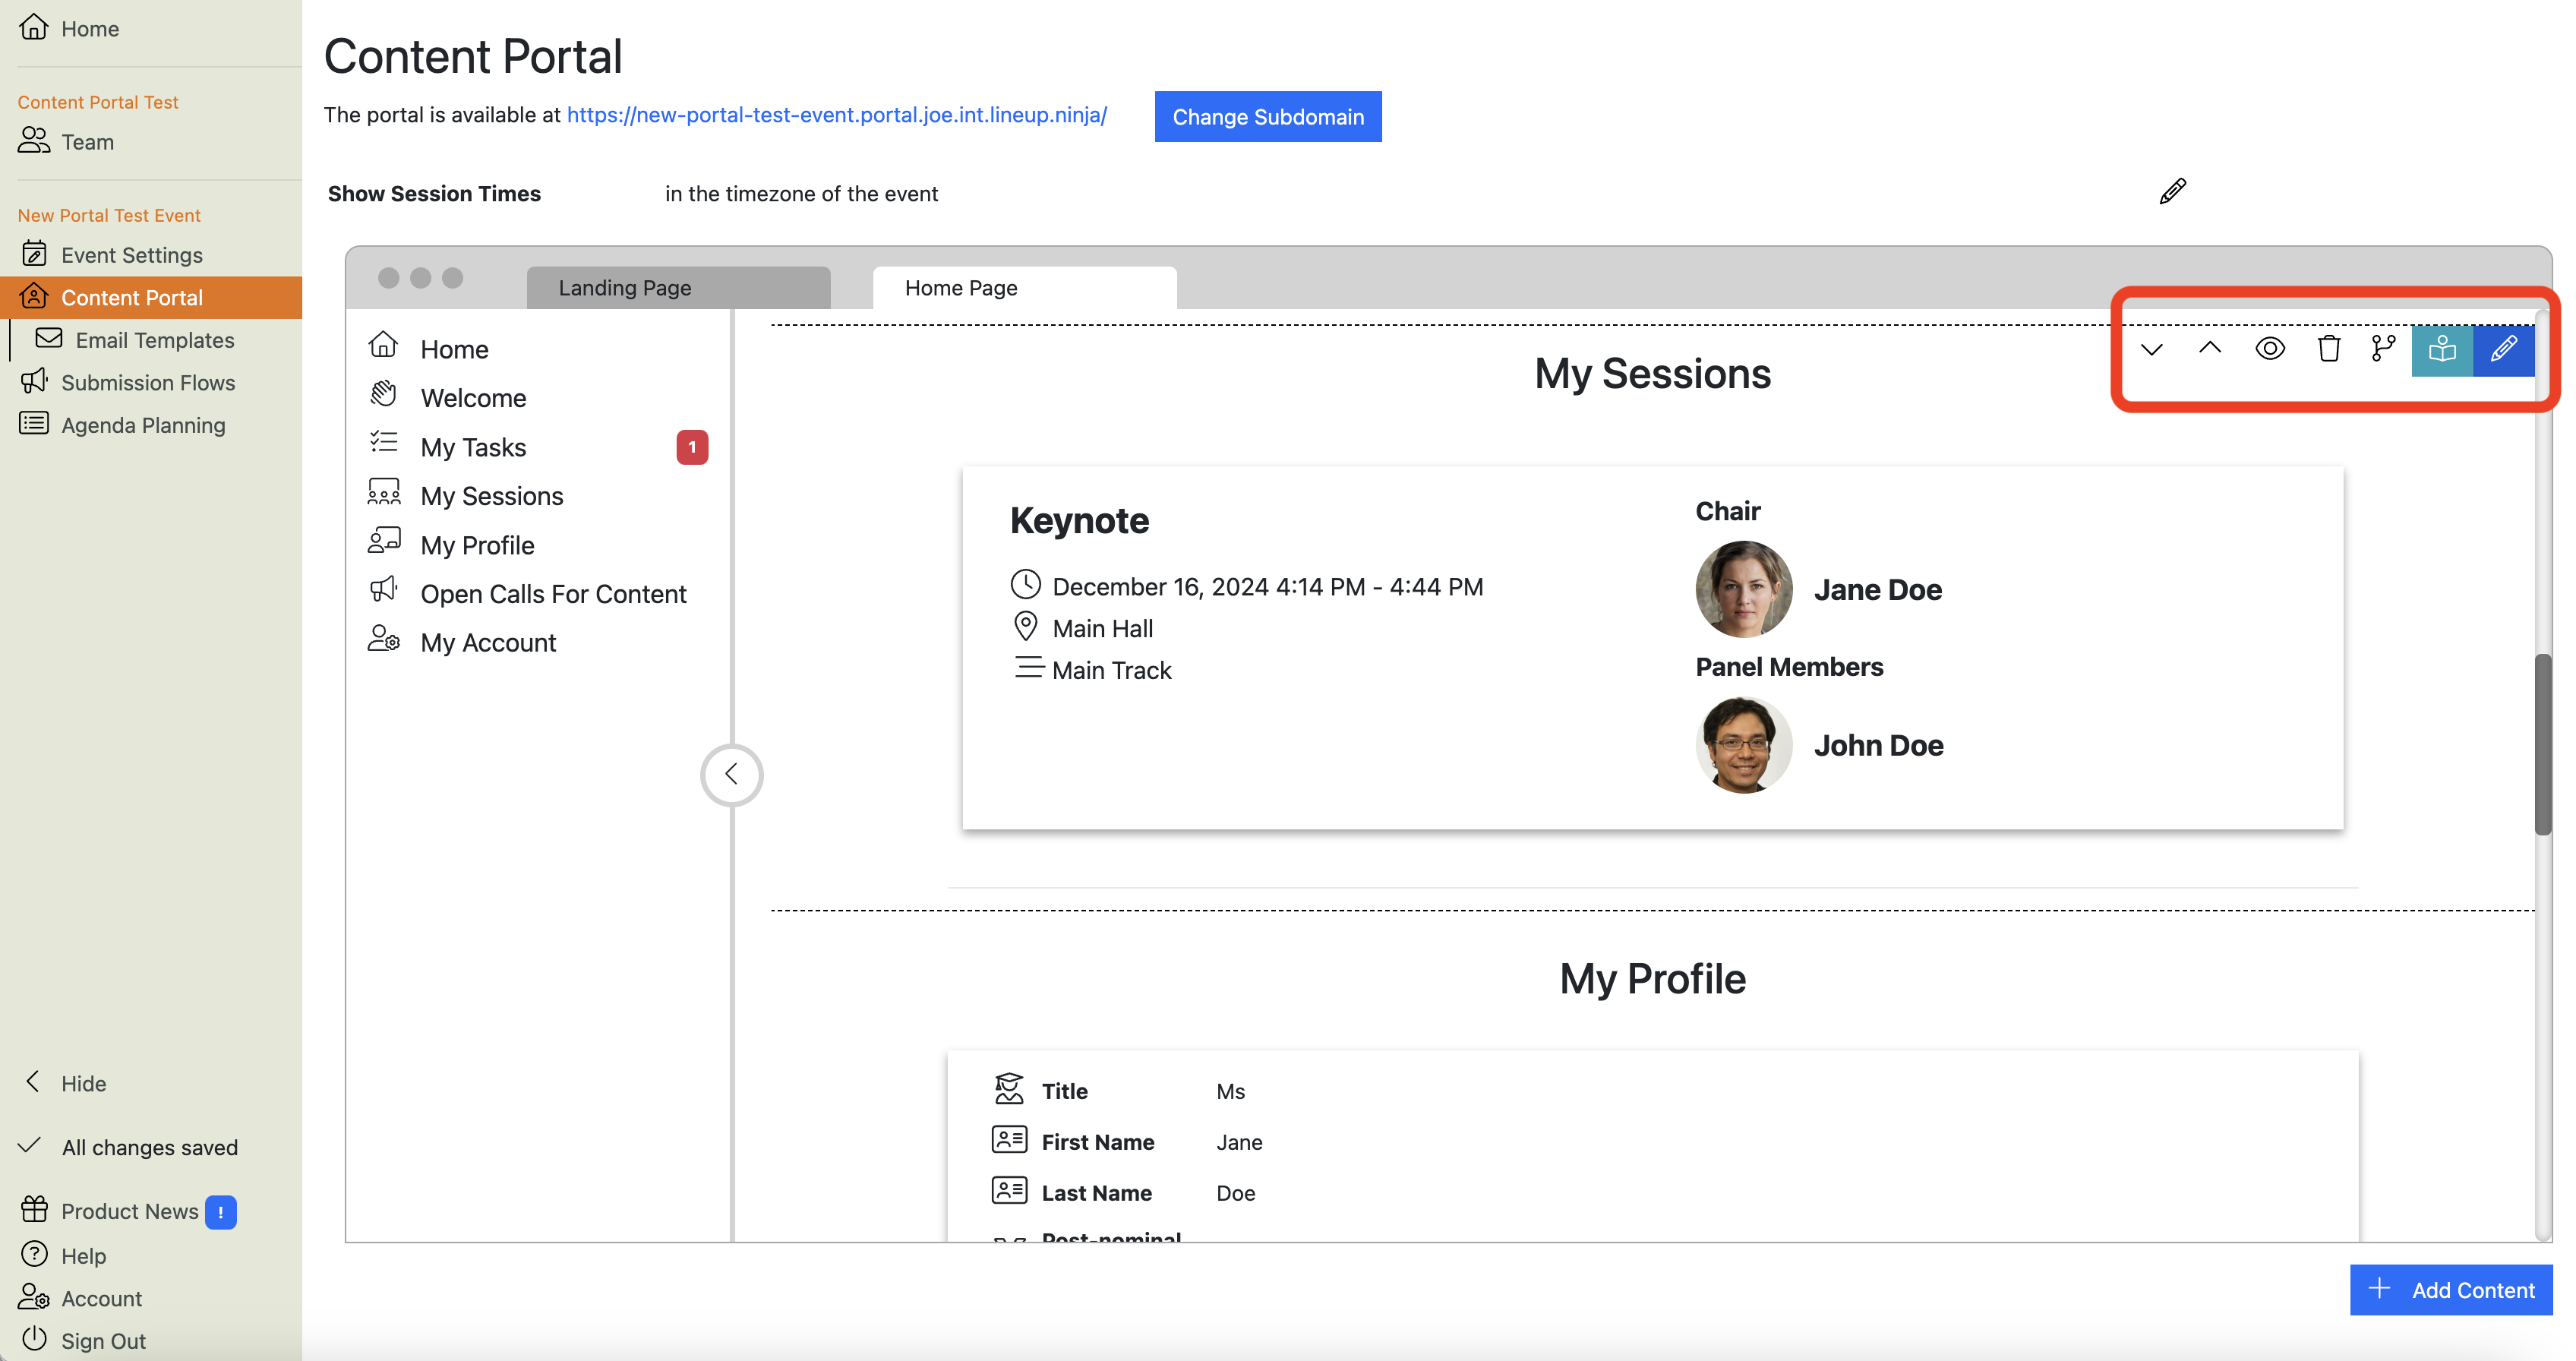
What does the My Sessions section of the Home Page do?
This sections shows the sessions that the speaker is taking part in. Portal users cannot edit the content in this section.
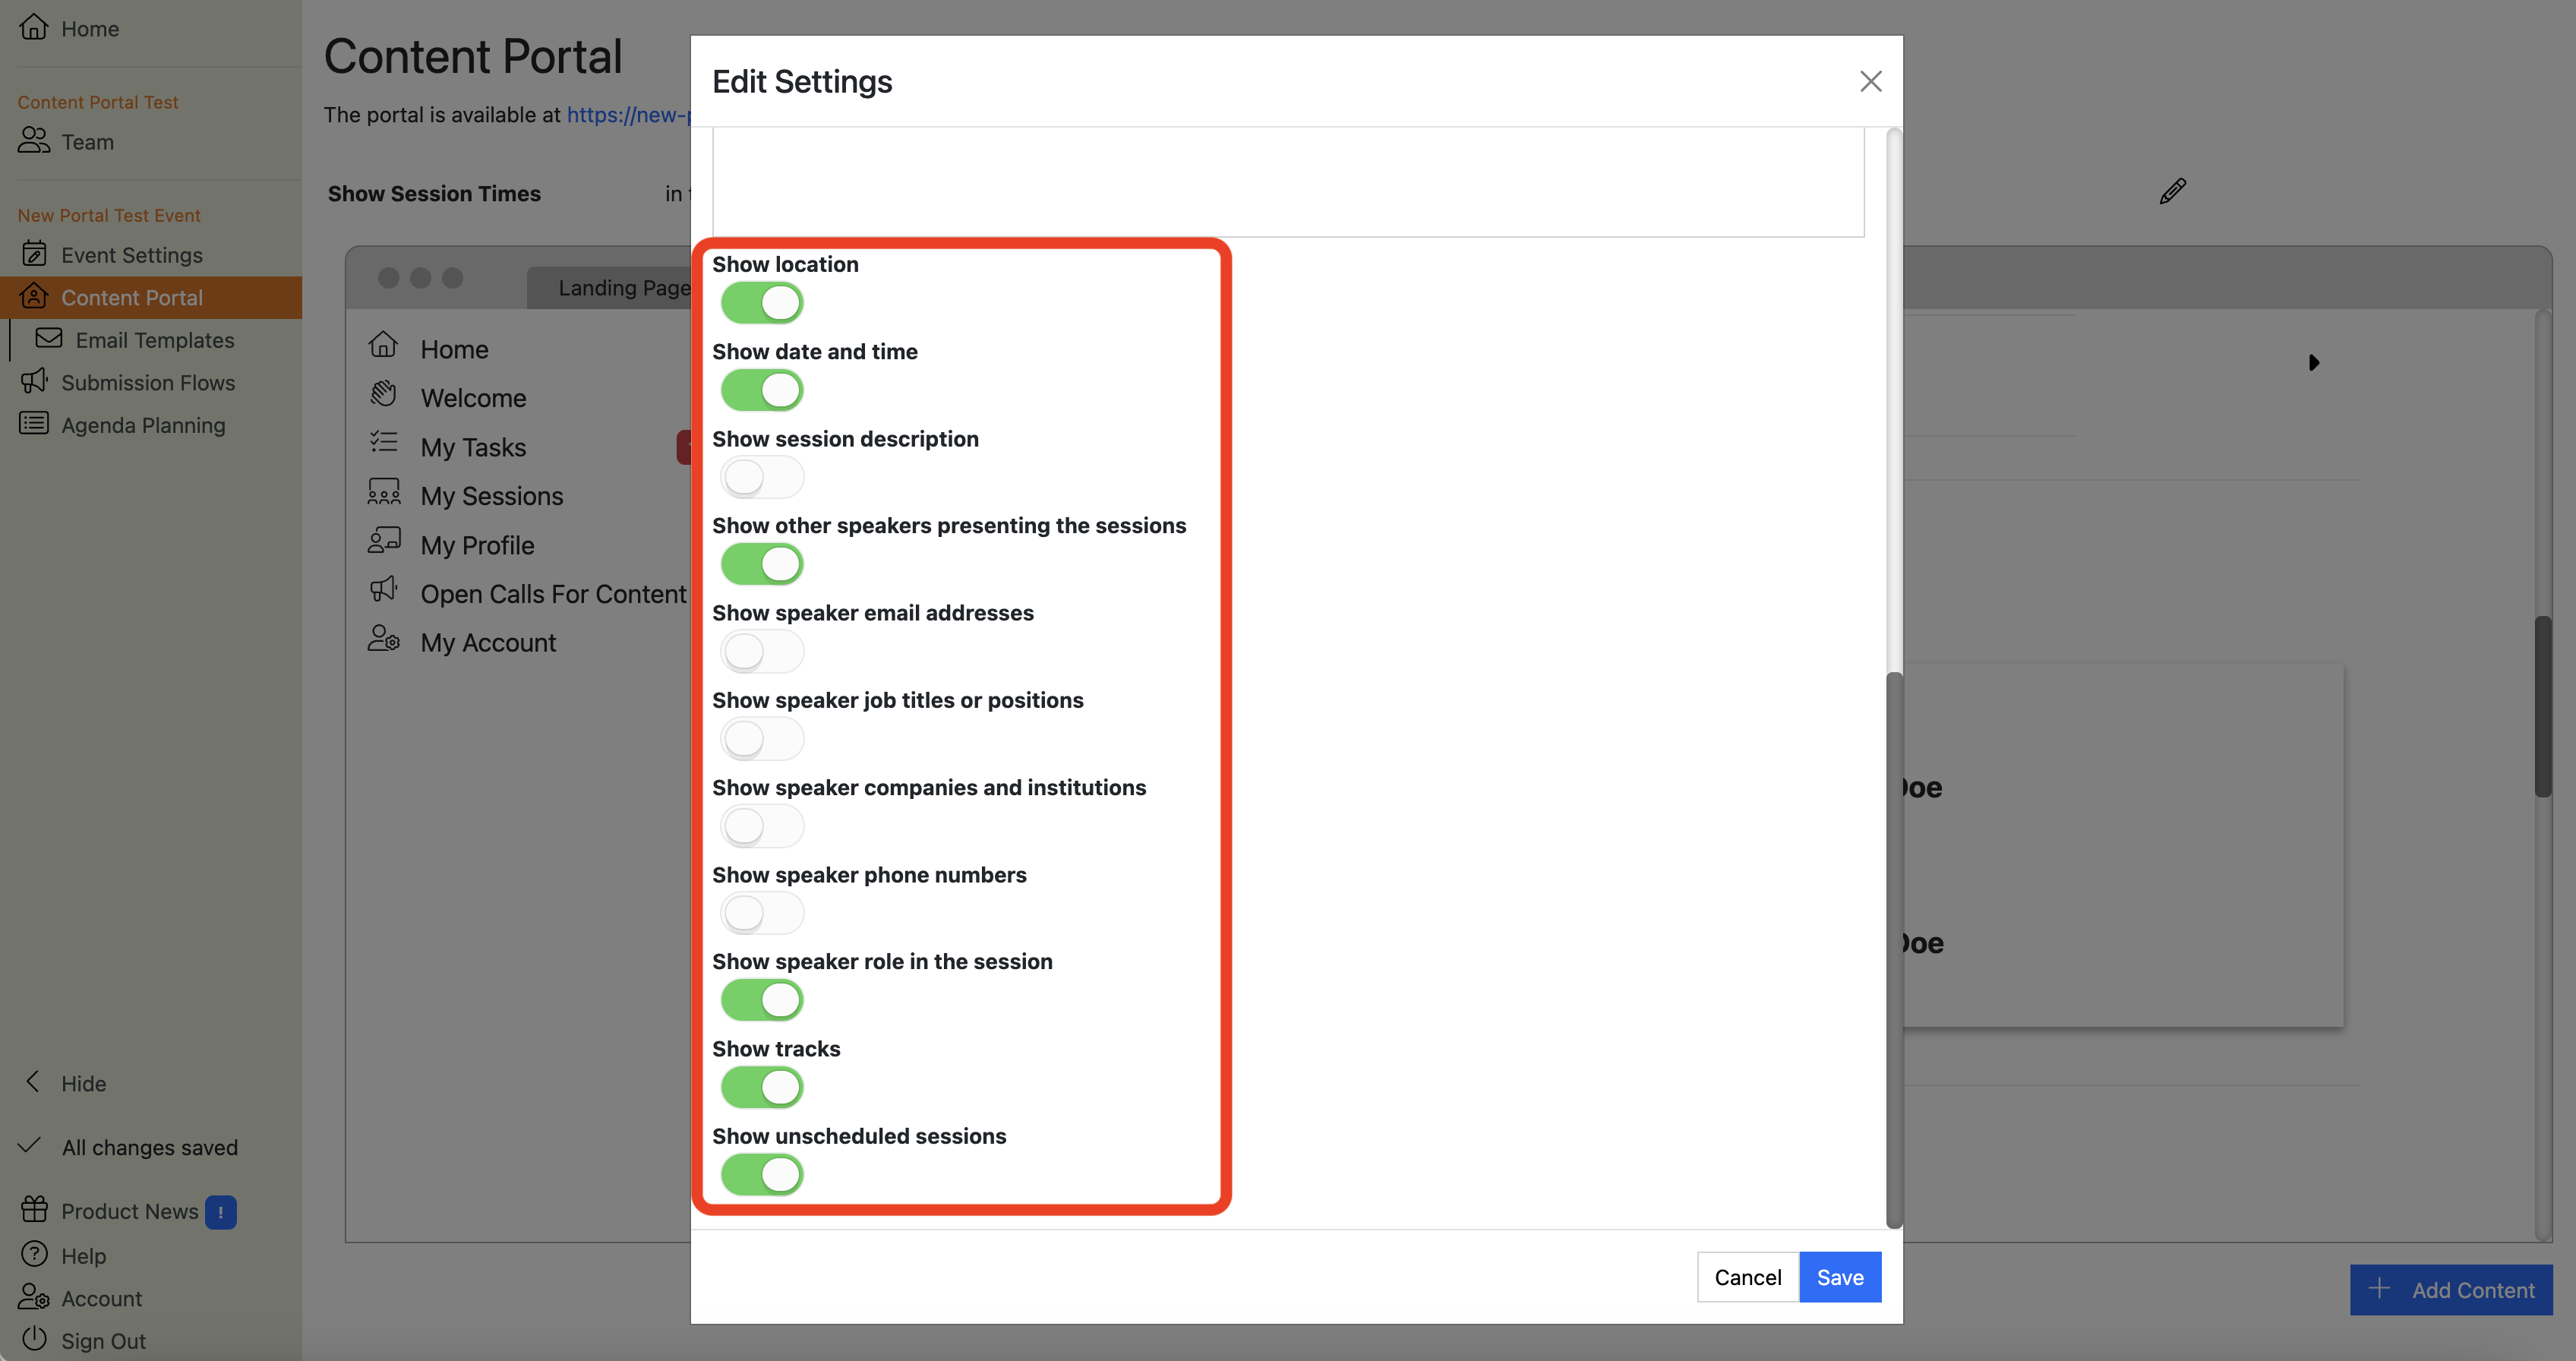
You can configure which fields are shown to users in this section. Hover over the section to reveal the action buttons:
Next, click the blue
edit button to bring up the section editor, and scroll down. Here you will see a set of toggles for various fields related to the sessions and their speakers:
Tip
You might find it useful to show different users different sets of fields in this section.
For example, if you have a panel and you want to share the panelists’ contact details with the chair (so they can convene a meeting before the conference), but not with each other (for data protection / GDPR purposes).
In this case, you can create two “My Sessions” sections: one that shows speakers’ contact details and one that does not. You can then use Display rules on the sections so that users with the Role “Chair” see the version of the section with the contact details, and users with the role “Panelist” see a version of the section without them.
See also Speaker Roles.
Info
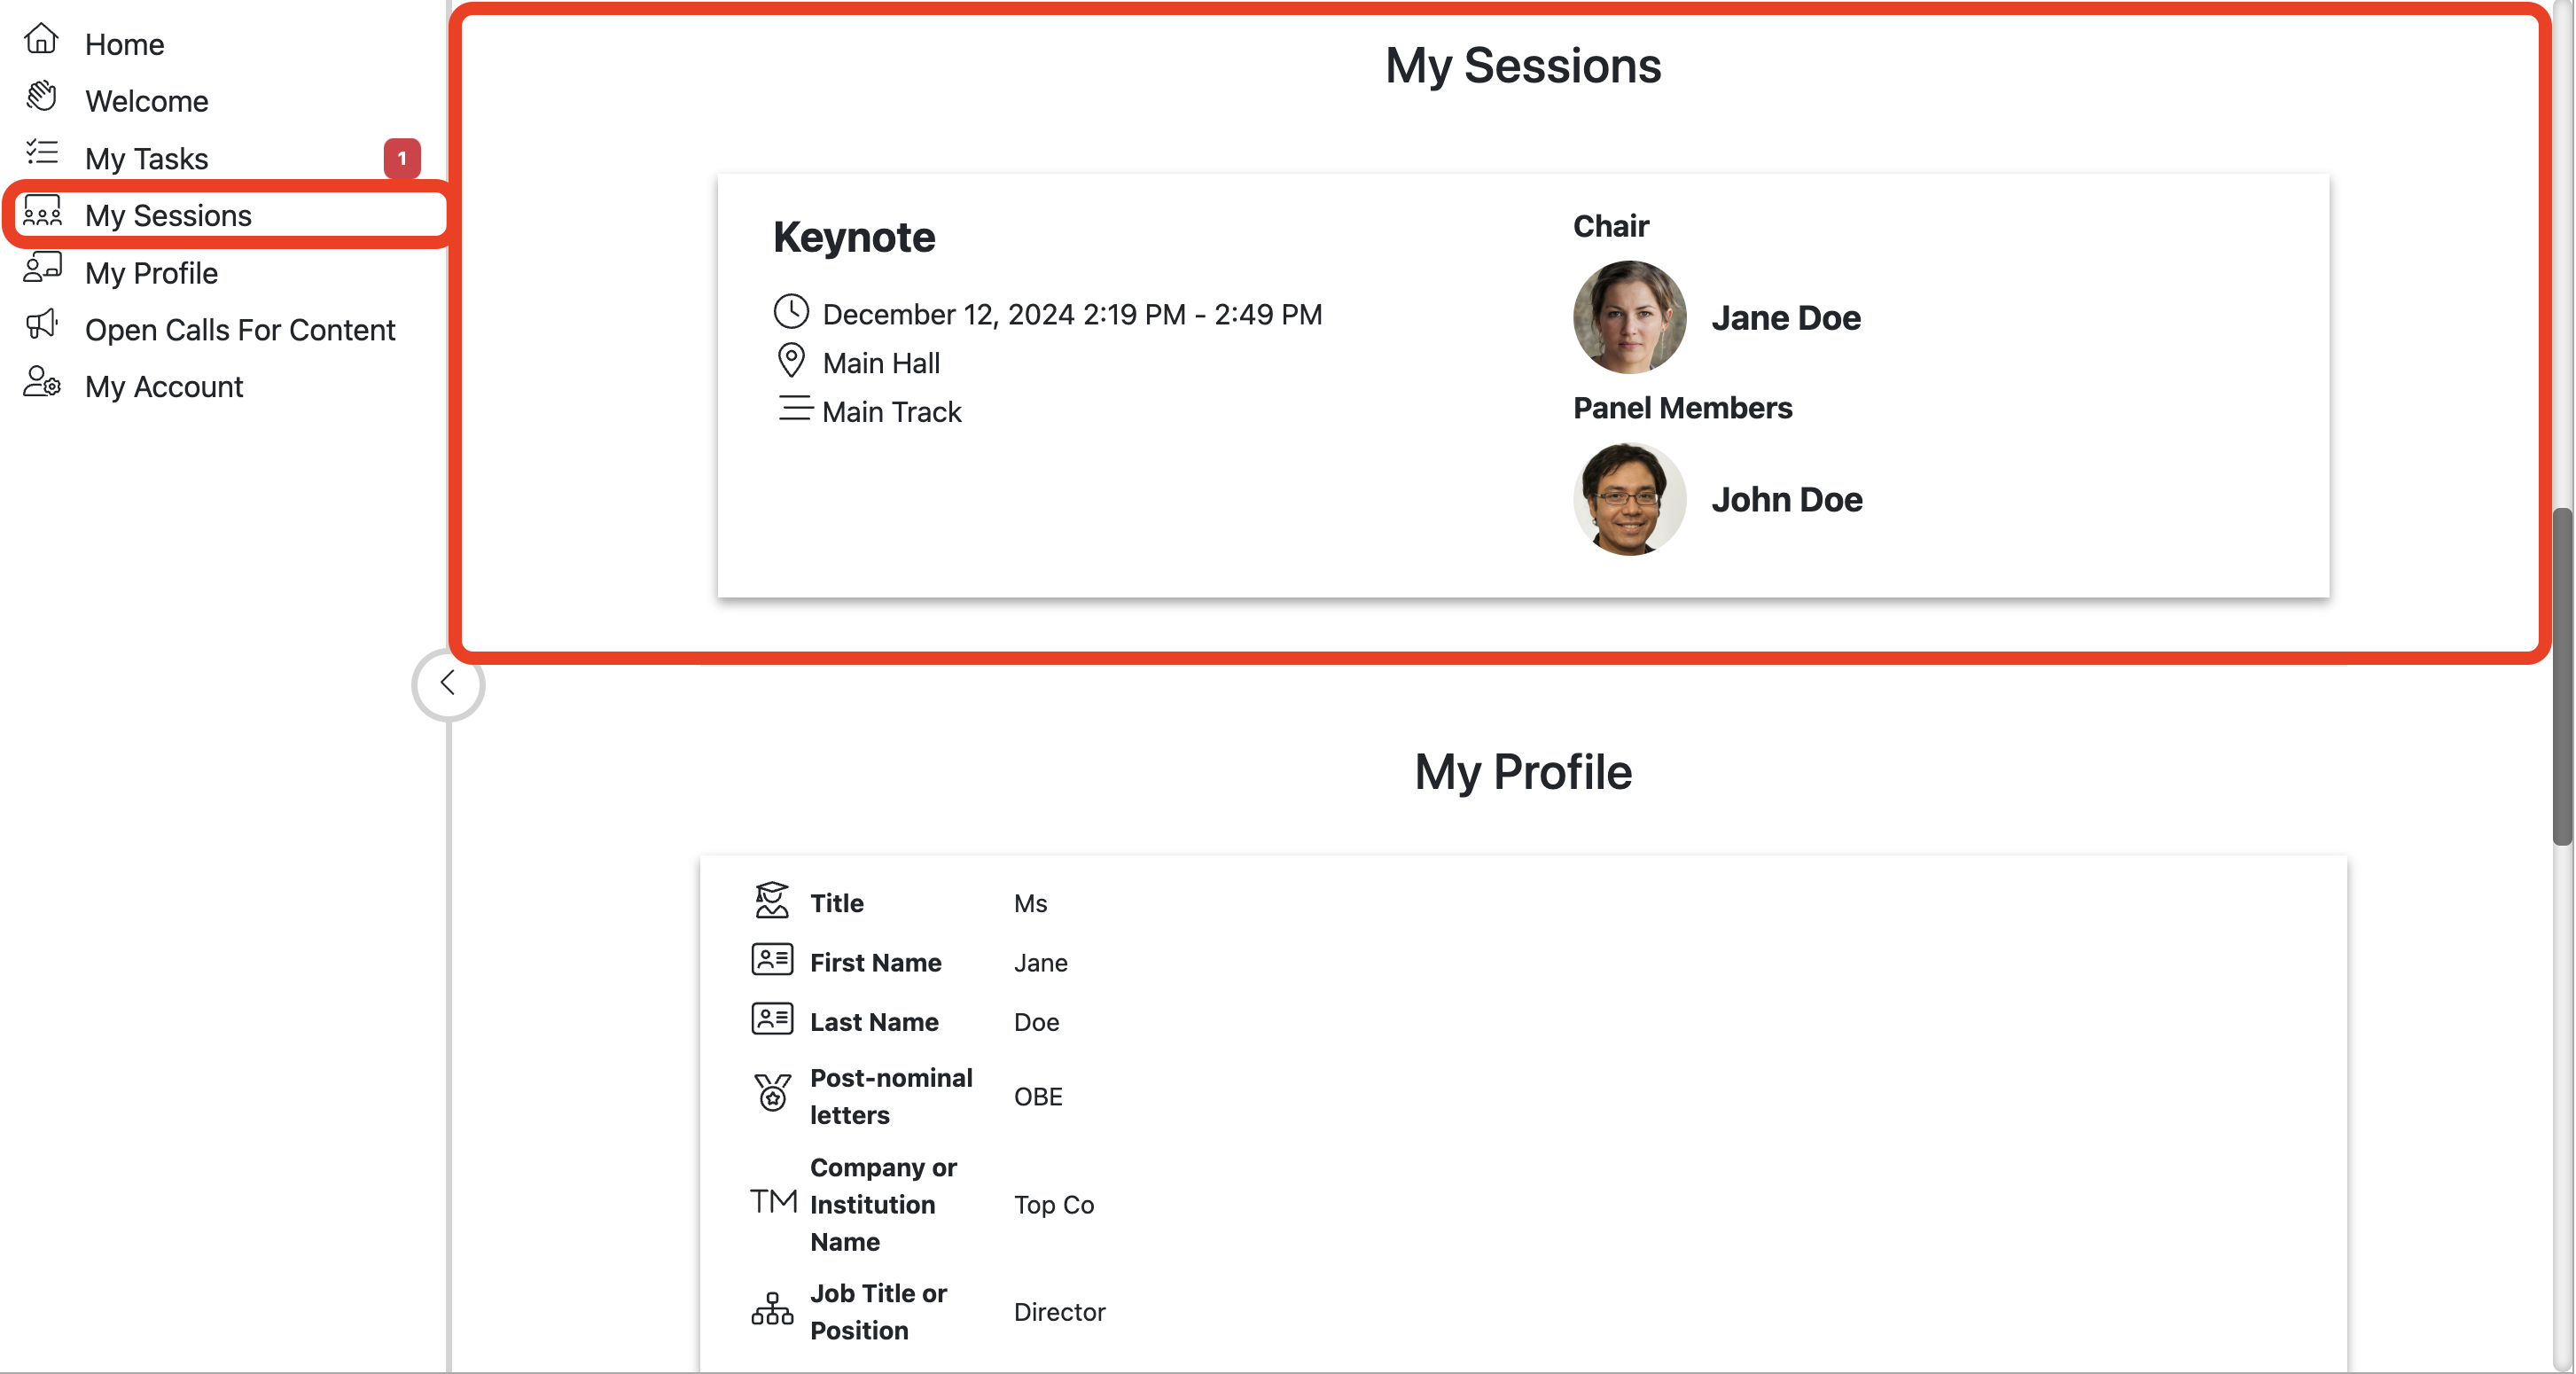
The preview of the My Session section contains some dummy data for an imaginary session:
- Session Title: “Keynote'
- Date and time: Today’s date
- Location: Main Hall
- Track: “Main Track”
- Chair: “Jane Doe”
- Panel member: “John Doe.”
- Headshots of the speakers
This will be replaced with the relevant data for each session and speaker and is only shown here to help you visualize what your users will see.
What does the Open Calls for Content section of the Home Page do?
This section shows any Submission Flows that are currently accepting public submissions. Invite-only flows are not shown in this section. You can choose which flows are included, and their order, by clicking the edit button.

What does the Manage Account section of the Home Page do?
This is where users can access their account to perform actions related to their account:
- Change their display name
- Change their password
- Add / edit their phone number
- Switch on two-step verification (AKA 2 factor authentication)
- Manage cookie consent
- Log out
This section is mandatory and cannot be removed but you can change the menu item text and icon, as well as the text on the button.
-–
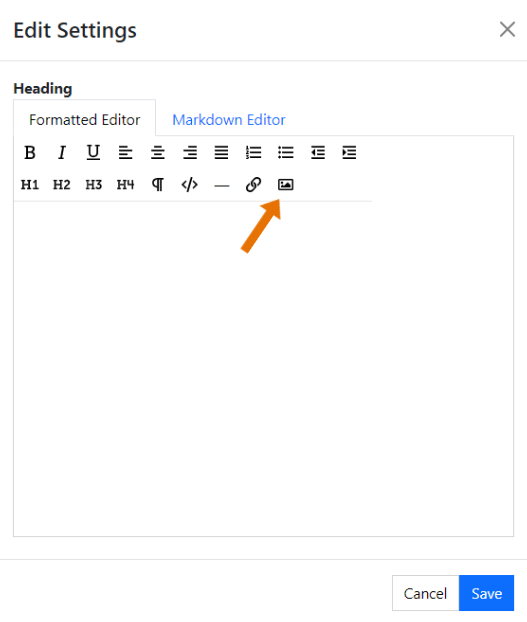
How do I embed an image into the Home Page of the Content Portal?
To embed an image into the Speaker Portal, your image will need to already be hosted online somewhere (e.g. Google Drive). To add the image, add a blank ‘Text’ section and click the blue button to edit. Select the image icon and input the image URL.
Can I share documents for speakers to view/download in the Home Page of the Content Portal?
Yes. Follow these steps:
- Make the document available on a shared drive, such as Sharepoint, Google Drive, Dropbox etc.
- Add a new text section to the portal
- Embed a link to the shared document.
How do I add a new section to the Home Page?
To add a new section, scroll to the bottom of the Speaker Portal page and click the blue ‘Add Content’ button.
This will open a pop up with guidance on how to add new content types.
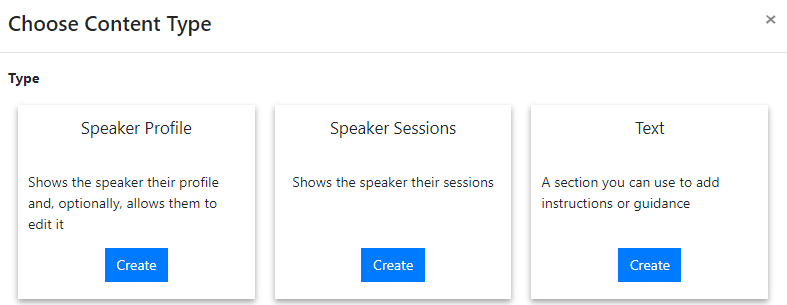
Note
Please note that if you add multiple ‘Speaker Profile’ or ‘Speaker Session’ sections, you must configure Display Rules to avoid showing the speaker duplicated content.
Tip
Whilst there are many ways that you can utilise the ‘Text’ option, we have listed a few ideas to get you started.
- Images - Upload images of the venue/ floor plan/ theatre layout/ directions etc.
- Speaker Brief - Insert a link to a speaker brief or write it directly into the text box
- Contract - Insert a link to a contract for the speaker to sign
- Link to parking permits/ hotel details etc.
- Evaluation - include a form for evaluation questions and schedule an email for after the event to gather evaluation data
How do I edit a section on the Home Page?
To edit a section, hover over the section and click the blue in the top right-hand corner:
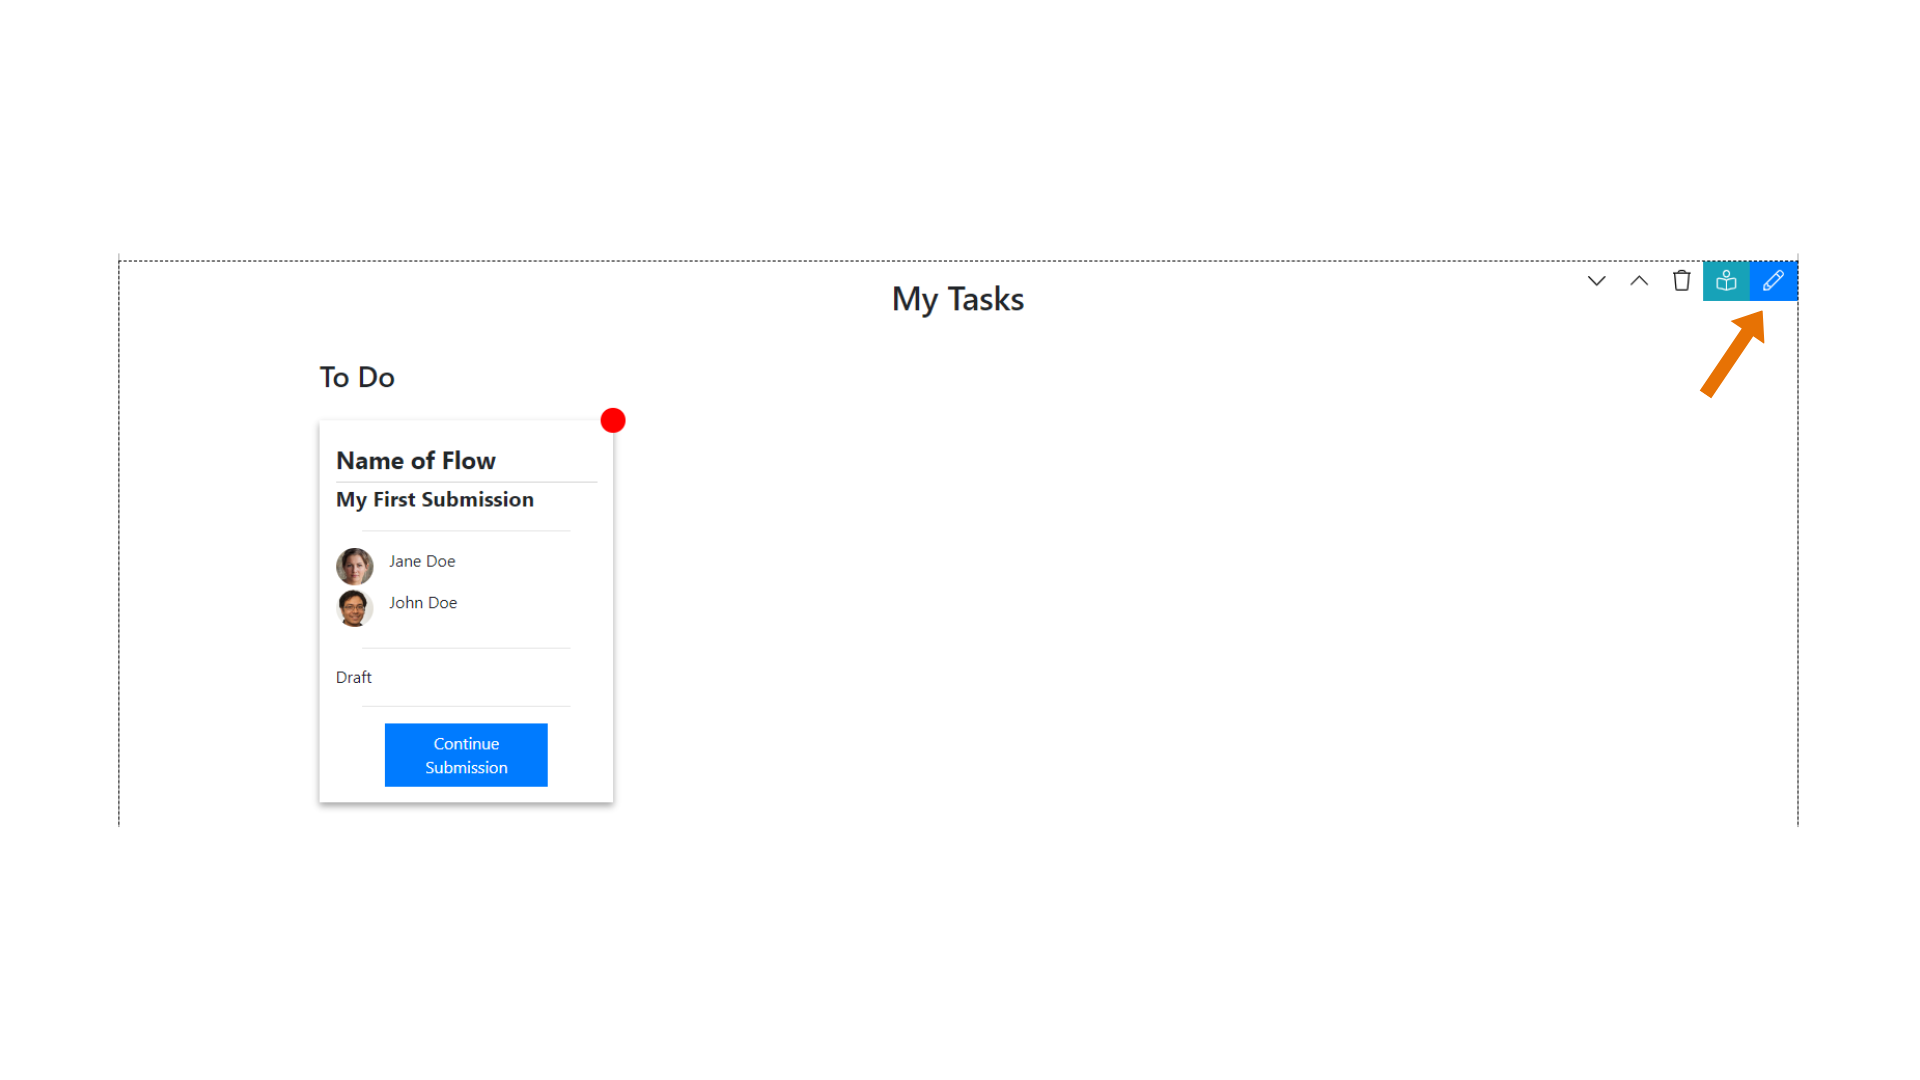
This will launch the relevant editor for that section.
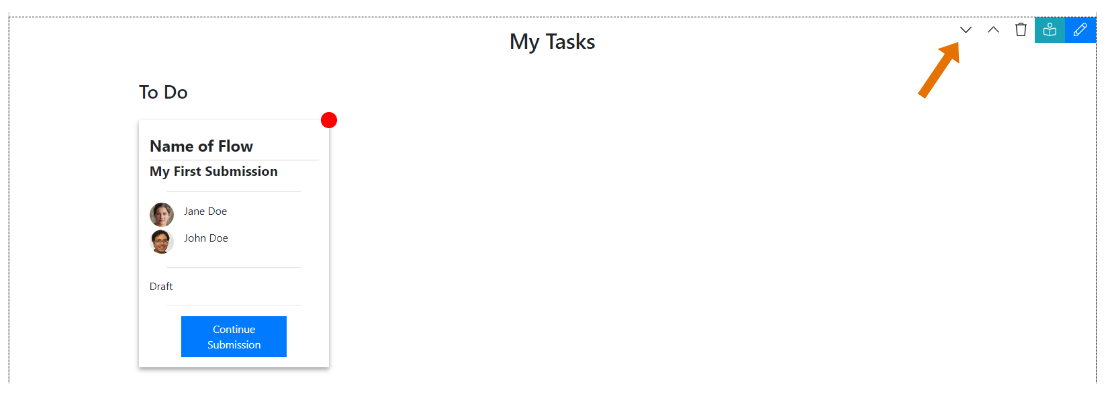
How do I reorder sections on the Home Page?
To reorder sections, hover over a section and click the up or down arrows in the top right-hand corner.
How do I delete a section on the Home Page?
To delete a section, hover over the section and click in the top right-hand corner.

What are Display Rules on Home Page sections?
Display rules allow you to show sections to some users and not others. They can be added to Text, My Sessions and My Profile sections.
The rules can be based on conditions such as which role the speaker has (e.g. “Show the My Session section to speakers with the role Moderator”).
You can configure multiple sections of each type with different rules.
Tip
You might find it useful to show different users different sets of fields in this section.
For example, if you have a panel and you want to share the panelists’ contact details with the chair (so they can convene a meeting before the conference), but not with each other (for data protection / GDPR purposes).
In this case, you can create two “My Sessions” sections: one that shows speakers’ contact details and one that does not.
You can then use Display rules on the sections so that users with the Role “Chair” see the version of the section with the contact details, and users with the role “Panelist” see a version of the section without them.
See also Speaker Roles.
How can I configure Display Rules?
To configure Display Rules, scroll over the section and click the branch icon in the top right corner.