Custom Fields
What are Custom Fields and how can I use them to help plan my event?
Lineup Ninja has a pre-defined set of fields for data like speakers and sessions. For example, a session may have a ‘Title’ and ‘Description’.
Custom Fields allow you to add extra fields to Lineup Ninja that are specific for your event.
Here’s a list of the kinds of things people use Custom Fields for.
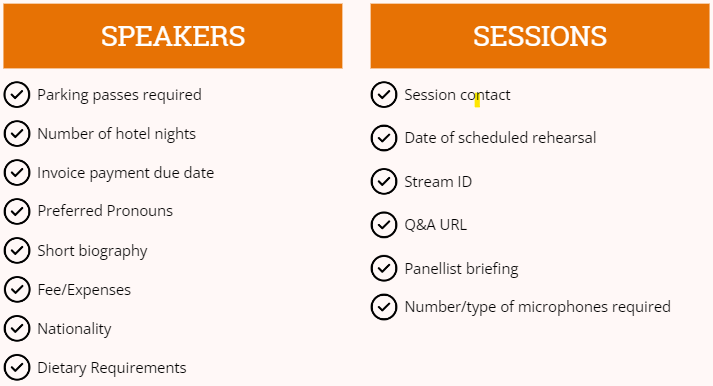
You can also add Custom Fields to Labels, Locations, Tracks and Resources.
Why do I need to create custom fields?
Lineup Ninja comes with a set of standard fields for things like speakers, sessions, locations etc. For example, speakers have fields for ‘first name’, ’last name’, ‘job title’, ‘biography’ etc.
When building forms in Submission Flows, Tasks, and Reviews it is important to use the question that maps to the correct field. Lineup Ninja can then store it in the correct field and copy it to your Agenda.
This means that your speaker’s first name, last name, job title and biography will all be stored in the right place to appear as expected to on your event website, mobile app, digital signage etc.
But sometimes Lineup Ninja doesn’t have a field for some data that you need to capture via a form in a Submission Flow or Task.
In these instances, we strongly advise using a Custom Field (or Label), then adding a question to your form that maps to the new field.
Custom Fields are essential to map data from the Submission Flow side of Lineup Ninja, to the Agenda Planning side and to all subsequent integrations (website, app, digital signage).
Even if you don’t plan to publish that field (e.g. speaker’s emergency mobile phone number), if you want it to be available in the agenda side of Lineup Ninja, you must create a custom field for it.
Tip
If you create a custom question in your form that does NOT map to a Custom Field or Label, the answers can’t be copied to speakers, sessions etc on your Agenda.
This means that they’ll only be visible in the Submission Flows side of the platform.
What types of data can I store in a Custom Field?
The following data types are available:
- Short Answer (One Line)
- Paragraph (Multiple Lines)
- Number
- Choose Many - Allows the selection of one or more values from a list
- Choose One - Allows the selection of a single value from a list
- E-mail Address
- Website Address
- Date
How do I create and manage Custom Fields?
Custom Fields are easy to create:
- Navigate into your event and click on in the left-hand menu
- Scroll down to the type of data you would like to add the field to. For example, ‘Speaker Fields’
- Choose an icon for the field form the selection, or search for one from a selection of over 3,000
- To create the new ‘Custom Field’, click on the right-hand side
- Enter the Field Name and Field Type and click save
Tip
If you choose to toggle on ‘Show this field in tables by default’, this will automatically appear for all team members in their tables. They can choose to customize their view to turn it off.
Can I change a Custom Field after creating it?
After a Custom Field has been created you can:
- Change the name of the field
- Change the icon for the field
- Add, rename and delete the available options for ‘Choose One’ and ‘Choose Many’ fields
- Choose whether the field should show automatically on tables. This setting applies to all team members. If you turn it off and on again then all team members will see the field, even if they have previously disabled it.
You cannot change the type of the field, for example, you cannot change it from number to a text field after it is created.
How do I copy Custom Fields from one event to another?
You can copy Custom Fields as part of the Copy Event process. If you copy Labels, Locations, Tracks, Resources and Custom Fields at the same time, then the values set for those objects will also be copied.
Can I use Custom Field data in email templates?
Depending on the version of Lineup Ninja you are currently using, you may have to activate Speaker Confirmation to use Custom Field data in email templates.
- If you are using the > then custom fields are available in your email templates.
- > > - If your speaker confirmation lives here, you will need to ensure it is activated to use custom fields in email templates
To use Custom Fields in e-mail templates, when editing you will see additional placeholder values you can use in your template. For example, if you have a custom field called Rehearsal Date then you will see a placeholder {{rehearsal_date}}. You can click on the placeholder to copy it to your clipboard and then paste it into the template.
Can I attach files to a Custom Field?
Files cannot be attached directly to a Custom Field. Instead, you should use File Types to add custom types of files.
How do I delete a Custom Field?
Warning
If you delete a Custom Field, all data you have input for that field will be deleted and cannot be recovered.
- Navigate into your event and click on in the left-hand menu
- Scroll down to the type of data you would like to add the field to. For example, ‘Speaker Fields’
- Click on the Field you wish to delete and click ‘Confirm’
How to use Custom Fields
How do I manually input the data for each Custom Field?
To manually input the data for each Custom Field, you have two options:
- Navigate to the item you wish to input the data for (e.g. a specific speaker/ session). Scroll down to view the Custom Fields you have configured and click to edit
- Navigate to the list page of the items you wish to input the date for (e.g. speaker/ session). Click and add the fields to your table. You can then edit the values as you would for any other column.
How do I use a Custom Field in a Submission Flow?
You can use Custom Fields with your Submission Flows to gather additional data from your submitters.
To add a Custom Field question into a Submission Flow, follow these steps:
- Navigate to and create either a ‘Speaker Field’ or ‘Session Field’ depending on the type of data you want to gather
- Now navigate to the in the Submission Flow you want to add the question
- In the section you want to add a question, click next to ‘Add a question to this section’
- Click next to ‘Ask the submitter for data that will map to a Session/Speaker Custom Field’
- Select the Custom Field from the drop-down menu and click Save
- Configure the question as normal and it will now be created and linked to the Custom Field

How do I use a Custom Field in the Speaker Portal?
You can use the Speaker Fields to gather additional data from your speakers in the My Profile section.
All Speaker Field types can be used in the Speaker Portal.
To add a Custom Speaker Field question to the My Profile section of the Speaker Portal, follow these steps:
- Navigate to and create a ‘Speaker Field’
- Now navigate to the My Profile section of the
- Click the blue to edit the My Profile settings
- Scroll to the bottom of the My Profile questions where you will see your Custom Speaker Field questions
- Click either ‘required’, ‘optional’ ‘view only’ or ‘hidden’, depending on how you want to configure the question
- Click save
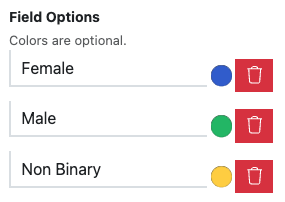
How are the colors for Custom Fields’ options useful?
When using the ‘Choose One’ or ‘Choose Many’ Field Types you can assign a color to each option. These will then appear when the field is shown on the Agenda Planner, or in the list views. This enables you to more quickly get a visual overview of the values associated with each session.
For example you could use a Custom Field to help track gender diversity in your agenda. If you create a Custom Field for Speakers like this:
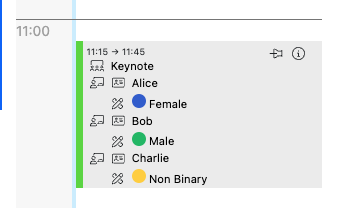
You can then show that data on the Agenda Planner:
How are the icons for the Custom Fields used?
You can choose a icon for your Custom Field. If you do it will be used in the following locations:
- On the Agenda Planning board if you add the field in the settings.
- When editing the corresponding Session, Speaker, Location etc..
- WHen sharing the Custom Field in the Agenda App. (Currently for ‘Short Answer’ fields on Sessions only.)
To change the icon for the field edit the field on the page. Choose one of the selection or search for one from over 3,000 icons.
Still can’t find what you’re looking for? Email support@lineupninja.com and one of the team will get back to you as soon as possible.